Dodge 1500 (Gas) (2006 year). Manual - part 12


  Index      Dodge     Dodge 1500 (Gas) (2006 year) - manual in english


Search            copyright infringement  


Content      ..     10      11      12      13     ..


Dodge 1500 (Gas) (2006 year). Manual - part 12


Manual Compass Calibration

NOTE:

To ensure proper compass calibration, make

sure the compass variance is properly set before manu-
ally calibrating the compass.

If the compass appears erratic and the CAL symbol does
not appear, you must manually put the compass into the
“Calibration” mode.

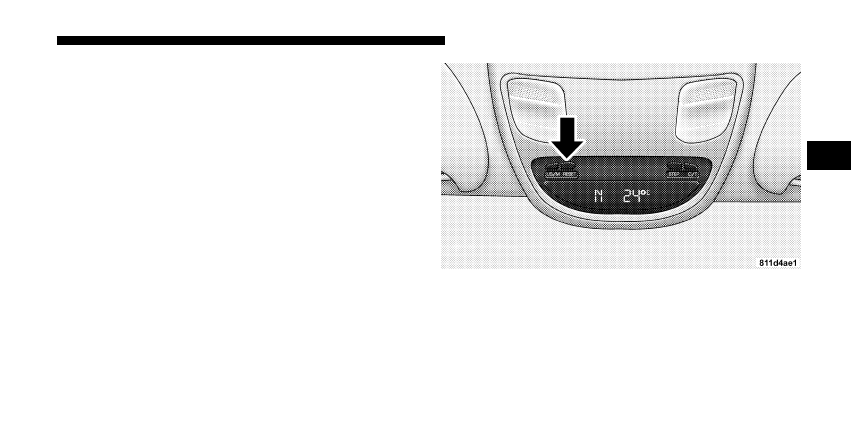
Recalibrating The Compass
Turn on the ignition and set the display to “Compass/
Temperature.” Press and hold the RESET button to
change the display between VAR (compass variance) and
CAL (compass calibration) modes. When the CAL sym-
bol is displayed complete one 360° turn in an area free
from large metal objects or power lines. The CAL symbol
will turn off and the compass will function normally.

UNDERSTANDING THE FEATURES OF YOUR VEHICLE

181

3

-------------------------------------------------------------------------------------------------------------------------------------------------------------

Compass Variance

is the difference between magnetic

north and geographic north. In some areas of the country,
the difference between magnetic and geographic north is
great enough to cause the compass to give false readings.
If this occurs, the compass variance must be set according
to the Compass Variance Map.

182

UNDERSTANDING THE FEATURES OF YOUR VEHICLE

-------------------------------------------------------------------------------------------------------------------------------------------------------------

NOTE:

The default for the compass variance is zone 8.

To set the variance: Turn the ignition ON and set the
display to “Compass/Temperature.” Press and hold the
RESET button approximately five seconds. The last vari-
ance zone number will be displayed. Press the STEP
button to select the new variance zone and press the
RESET button to resume normal operation.

Outside Temperature
Because the ambient temperature sensor is located un-
derhood, engine temperature can influence the displayed
temperature, therefore, temperature readings are slowly
updated when the vehicle speed is below 20 mph (30
km/h) or during stop and go driving.

GARAGE DOOR OPENER — IF EQUIPPED
The HomeLink

威 Universal Transceiver replaces up to three

remote controls (hand held transmitters) that operate de-
vices such as garage door openers, motorized gates, or
home lighting. It triggers these devices at the push of a
button. The Universal Transceiver operates off your vehi-
cle’s battery and charging system; no batteries are needed.

HomeLink

威 Programming Buttons

UNDERSTANDING THE FEATURES OF YOUR VEHICLE

183

3

-------------------------------------------------------------------------------------------------------------------------------------------------------------

For additional information on HomeLink

威, call 1–800–

355–3515, or on the internet at www.homelink.com.

WARNING!

A moving garage door can cause injury to people and
pets in the path of the door. People or pets could be
seriously or fatally injured. Only use this transceiver
with a garage door opener that has a “stop and
reverse” feature as required by federal safety stan-
dards. This includes most garage door opener mod-
els manufactured after 1982. Do not use a garage
door opener without these safety features it could
cause injury or death. Call toll-free 1–800–355–3515
or, on the Internet at www.homelink.com for safety
information or assistance.

WARNING!

Vehicle exhaust contains carbon monoxide, a danger-
ous gas. Do not run the vehicle’s exhaust while
training the transceiver. Exhaust gas can cause seri-
ous injury or death.

WARNING!

Your motorized door or gate will open and close
while you are training the Universal Transceiver. Do
not train the transceiver if people or pets are in the
path of the door or gate. A moving door or gate can
cause serious injury or death to people and pets or
damage to objects.

184

UNDERSTANDING THE FEATURES OF YOUR VEHICLE

-------------------------------------------------------------------------------------------------------------------------------------------------------------

Programming HomeLink

NOTE:

When programming a garage door opener, it is

advised to park outside the garage. It is also recom-
mended that a new battery be placed in the hand-held
transmitter of the device being programmed to
HomeLink for quicker training and accurate transmis-
sion of the radio-frequency signal.

1. Press and hold the two outer HomeLink buttons, and
release only when the indicator light begins to flash (after
20 seconds). Do not hold the buttons for longer than 30
seconds and do not repeat step one to program a second
and/or third hand-held transmitter to the remaining two
HomeLink buttons.

2. Position the end of your hand-held transmitter 1-3
inches (3-8 cm) away from the HomeLink buttons while
keeping the indicator light in view.

Outer HomeLink buttons

UNDERSTANDING THE FEATURES OF YOUR VEHICLE

185

3

-------------------------------------------------------------------------------------------------------------------------------------------------------------

3. Simultaneously press and hold both the HomeLink
button that you want to train and the hand-held trans-
mitter buttons. Do not release the buttons until step 4
has been completed.

NOTE:

Some gate operators and garage door openers

may require you to replace this Programming Step 3 with
procedures noted in the

⬙Gate Operator/Canadian Pro-

gramming

⬙ section.

4. The HomeLink indicator light will flash slowly and
then rapidly after HomeLink successfully receives the
frequency signal from the hand-held transmitter. Release
both buttons after the indicator light changes from the
slow to the rapid flash.

5. Press and hold the just trained HomeLink button and
observe the indicator light. If the indicator light stays on
constantly, programming is complete

and your device

should activate when the HomeLink button is pressed
and released.

NOTE:

To program the remaining two HomeLink but-

tons, begin with

⬙Programming⬙ step two. Do not repeat

step one.

If the indicator light blinks rapidly for two seconds and
then turns to a constant light, continue with

Program-

ming

ⴖ steps 6-8 to complete the programming of a rolling

code equipped device (most commonly a garage door
opener).

6. At the garage door opener receiver (motor-head unit)
in the garage, locate the

⬙learn⬙ or ⬙smart⬙ button. This

can usually be found where the hanging antenna wire is
attached to the motor-head unit.

7. Firmly press and release the

⬙learn⬙ or ⬙smart⬙ button.

(The name and color of the button may vary by manu-
facturer.)

NOTE:

There are 30 seconds in which to initiate step

eight.

186

UNDERSTANDING THE FEATURES OF YOUR VEHICLE

-------------------------------------------------------------------------------------------------------------------------------------------------------------

8. Return to the vehicle and firmly press, hold for two
seconds and release

the programmed HomeLink button.

Repeat the

press/hold/releaseⴖ sequence a second time,

and, depending on the brand of the garage door opener
(or other rolling code equipped device), repeat this
sequence a third time to complete the programming.

HomeLink should now activate your rolling code
equipped device.

NOTE:

To program the remaining two HomeLink but-

tons, begin with

⬙Programming⬙ step two. Do not repeat

step one

. For questions or comments, please contact

HomeLink at www.homelink.com or 1-800-355-3515.

Canadian Programming/Gate Programming
Canadian radio-frequency laws require transmitter sig-
nals to

⬙time-out⬙ (or quit) after several seconds of

transmission which may not be long enough for
HomeLink to pick up the signal during programming.

Similar to this Canadian law, some U.S. gate operators are
designed to

⬙time-out⬙ in the same manner.

If you live in Canada or you are having difficulties
programming a gate operator by using the

⬙Program-

ming

⬙ procedures (regardless of where you live), replace

Programming HomeLinkⴖ step 3 with the following:

NOTE:

If programming a garage door opener or gate

operator, it is advised to unplug the device during the

⬙cycling⬙ process to prevent possible overheating.
3. Continue to press and hold the HomeLink button
while you press and release every two seconds (

⬙cycle⬙)

your hand-held transmitter until the frequency signal has
successfully been accepted by HomeLink. (The indicator
light will flash slowly and then rapidly.) Proceed with

⬙Programming⬙ step four to complete.

UNDERSTANDING THE FEATURES OF YOUR VEHICLE

187

3

-------------------------------------------------------------------------------------------------------------------------------------------------------------

Using HomeLink
To operate, simply press and release the programmed
HomeLink button. Activation will now occur for the
trained device (i.e. garage door opener, gate operator,
security system, entry door lock, home/office lighting,
etc.). For convenience, the hand-held transmitter of the
device may also be used at any time. In the event that
there are still programming difficulties or questions,
contact HomeLink at: www.homelink.com or 1-800-355-
3515

.

Erasing HomeLink Buttons
To erase programming from the three buttons (individual
buttons cannot be erased but can be

⬙reprogrammed⬙ -

note below), follow the step noted:

• Press and hold the two outer HomeLink buttons until

the indicator light begins to flash-after 20 seconds.
Release both buttons. Do not hold for longer that 30

seconds. HomeLink is now in the train (or learning)
mode and can be programmed at any time beginning
with

⬙Programming⬙ - step 2.

Reprogramming a Single HomeLink Button
To program a device to HomeLink using a HomeLink
button previously trained, follow these steps:

1. Press and hold the desired HomeLink button. DO
NOT

release the button.

2. The indicator light will begin to flash after 20 seconds.
Without releasing the HomeLink button, proceed with

⬙Programming⬙ step 2

For questions or comments, contact HomeLink at:
www.homelink.com or 1-800-355-3515

.

188

UNDERSTANDING THE FEATURES OF YOUR VEHICLE

-------------------------------------------------------------------------------------------------------------------------------------------------------------

Security
If you sell your vehicle, be sure to erase the frequencies.

To erase all of the previously trained frequencies, hold
down both outside buttons until the green light begins to
flash.

This device complies with part 15 of FCC rules and with
RSS-210 of Industry Canada. Operation is subject to the
following conditions:

• This device may not cause harmful interference.
• This device must accept any interference that may be

received including interference that may cause undes-
ired operation.

NOTE:

Changes or modifications not expressly ap-

proved by the party responsible for compliance could
void the user’s authority to operate the equipment.

HomeLink

威 is a trademark owned by Johnson Controls,

Inc.

POWER SUNROOF — IF EQUIPPED
The power sunroof switch is located between the sun
visors on the overhead console.

UNDERSTANDING THE FEATURES OF YOUR VEHICLE

189

3

-------------------------------------------------------------------------------------------------------------------------------------------------------------

WARNING!

• Never leave children in a vehicle, with the keys in

the ignition switch. Occupants, particularly unat-
tended children, can become entrapped by the
power sunroof while operating the power sunroof
switch. Such entrapment may result in serious
injury or death.

• In an accident, there is a greater risk of being

thrown from a vehicle with an open sunroof. You
could also be seriously injured or killed. Always
fasten your seat belt properly and make sure all
passengers are properly secured too.

• Do not allow small children to operate the sun-

roof. Never allow fingers or other body parts, or
any object to project through the sunroof opening.
Injury may result.

Open Sunroof - Express Mode
Momentarily pressing the switch rearward will activate
the Express Open Feature, causing the sunroof to open
automatically. During the Express Open operation, any
movement of the switch will stop the sunroof and it will
remain in a partial open position. Again, momentarily
pressing the switch rearward will activate the Express
Open Feature.

Comfort Stop

The sunroof is equipped with an intermediate “Comfort
Stop” position. This is the first stop that express open
reaches. This is designed to reduce wind buffeting at
vehicle speeds between 20 - 40 mph (32 - 64 km/h).
Pressing the switch momentarily rearward again will
open the sunroof to its full open position however wind
buffeting can occur at full open.

190

UNDERSTANDING THE FEATURES OF YOUR VEHICLE

-------------------------------------------------------------------------------------------------------------------------------------------------------------

Closing Sunroof - Express
Press the switch forward and release, and the sunroof
will close automatically from any position. The sunroof
will close fully and stop automatically. This is called
Express Close. During Express Close operation, any
movement of the switch will stop the sunroof.

Pinch Protect Feature
This feature will detect an obstruction in the opening of
the sunroof during Express Close operation. If an ob-
struction in the path of the sunroof is detected, the
sunroof will automatically retract. Remove the obstruc-
tion if this occurs. Next, press the switch forward and
release to Express Close.

Pinch Protect Override
If a known obstruction (ice, debris, etc.) prevents closing,
press the switch forward and hold for two seconds after
the reversal occurs. This allows the sunroof to move
towards the closed position.

NOTE:

Pinch protection is disabled while the switch is

pressed.

Venting Sunroof - Express
Press and release the

⬙V⬙ button, and the sunroof will

open to the vent position. This is called Express Vent, and
will occur regardless of sunroof position. During Express
Vent operation, any movement of the switch will stop the
sunroof.

Sunshade Operation
The sunshade can be opened manually. However, the
sunshade will open automatically as the sunroof opens.

NOTE:

The sunshade cannot be closed if the sunroof is

open.

UNDERSTANDING THE FEATURES OF YOUR VEHICLE

191

3

-------------------------------------------------------------------------------------------------------------------------------------------------------------

Wind Buffeting
Wind buffeting can be described as the perception of
pressure on the ears or a helicopter type sound in the
ears. Your vehicle may exhibit wind buffeting with the
windows down, or the sunroof (if equipped) in certain
open or partially open positions. This is a normal occur-
rence and can be minimized. If the buffeting occurs with
the rear windows open, open the front and rear windows
together to minimize the buffeting. If the buffeting occurs
with the sunroof open, adjust the sunroof opening to
minimize the buffeting or open any window.

Sunroof Maintenance
Use only a non-abrasive cleaner and a soft cloth to clean
the glass panel.

Sunroof Fully Closed
Press the switch forward and release to ensure that the
sunroof is fully closed.

ELECTRICAL POWER OUTLETS
The auxiliary electrical outlet can provide power for in
cab accessories designed for use with the standard “cigar
lighter” plug. The outlet is located in the instrument
panel below and to the right of the Climate Control
Panel. A cap is attached to the outlet base indicating
“Power Outlet” 12V-20A.

There is an additional Power Outlet inside the center
console of vehicles equipped with 40/20/40, or Bucket
front seats. There is also a Power Outlet located on the
rear of the center console for Quad Cab or Mega Cab
vehicles (only) equipped with bucket seats.

192

UNDERSTANDING THE FEATURES OF YOUR VEHICLE

-------------------------------------------------------------------------------------------------------------------------------------------------------------

The outlet(s) has/have a fused direct feed from the
battery so it/they receive power whether the ignition is
ON or OFF.

All accessories connected to this/these outlet(s) should
be removed or turned OFF when the vehicle is not in use
to protect the battery against discharge.

NOTE:

If desired, all of the power outlets can be

converted by your authorized dealer to provide power
with the ignition switch in the ON position only.

CAUTION!

Electrical Outlet Use With Engine Off
• Many accessories that can be plugged in draw

power from the vehicle’s battery, even when not
in use (i.e. cellular phones, etc.). Eventually, if
plugged in long enough, the vehicle’s battery will
discharge sufficiently to degrade battery life
and/or prevent engine starting.

• Accessories that draw higher power (i.e. coolers,

vacuum cleaners, lights, etc.), will discharge the
battery even more quickly. Only use these inter-
mittently and with greater caution.

• After the use of high power draw accessories, or

long periods of the vehicle not being started (with
accessories still plugged in), the vehicle must be
driven a sufficient length of time to allow the
generator to recharge the vehicle’s battery.

UNDERSTANDING THE FEATURES OF YOUR VEHICLE

193

3

-------------------------------------------------------------------------------------------------------------------------------------------------------------

CIGAR LIGHTER AND ASH RECEIVER
The removable ash receiver is located in the instrument
panel cup holder tray.

The cigar lighter is located on the instrument panel,
above and to the left of the ash receiver.

As a child safety precaution, the lighter only operates
with the ignition switch ON. It heats when pushed in and
pops out automatically when ready for use. To preserve
the heating element, do not hold the lighter in the
heating position.

Ash Tray Automatic Transmission

194

UNDERSTANDING THE FEATURES OF YOUR VEHICLE

-------------------------------------------------------------------------------------------------------------------------------------------------------------

CUPHOLDERS

Front Instrument Panel Cupholders (40–20–40
Seats) — Automatic Transmission
Your new Ram truck is equipped with two adjustable
cupholders. The cupholder is opened by pulling on the
cup holder door handle, on the front surface. Each
opening in the cupholder is adjustable and will hold cups
and mugs of various sizes.

Ash Tray Manual Transmission

UNDERSTANDING THE FEATURES OF YOUR VEHICLE

195

3

-------------------------------------------------------------------------------------------------------------------------------------------------------------

To secure the cup, place the cup to be held into one of the
cup wells and then push the cupholder arm toward the
cup until it is held stable.

Cup Holder Door Handle

Cup Holders Automatic Transmission

196

UNDERSTANDING THE FEATURES OF YOUR VEHICLE

-------------------------------------------------------------------------------------------------------------------------------------------------------------


Content      ..     10      11      12      13     ..