Dodge 1500 (Gas) (2006 year). Manual - part 11


  Index      Dodge     Dodge 1500 (Gas) (2006 year) - manual in english


Search            copyright infringement  


Content      ..     9      10      11      12     ..


Dodge 1500 (Gas) (2006 year). Manual - part 11


illuminate at less than 50% of normal intensity. If the
parking brake is applied the Daytime Running Lights
will turn off.

Lights-on Reminder
If the headlights, parking lights, or cargo lights are left
on, after the ignition is turned off, a chime will sound
when the driver’s door is opened.

Fog Lights — If Equipped

The foglights are turned ON by placing the head-
light rotary control in the parking light or head-
light position and pushing in the headlight rotary

control. The fog lights will operate only when the parking
lights are ON or when the vehicle headlights are ON low
beam. An indicator light located in the instrument cluster
will illuminate when the fog lights are on. The fog lights
will turn off when the switch is pushed a second time,
when the headlight switch is rotated to the OFF position,
or the high beam is selected.

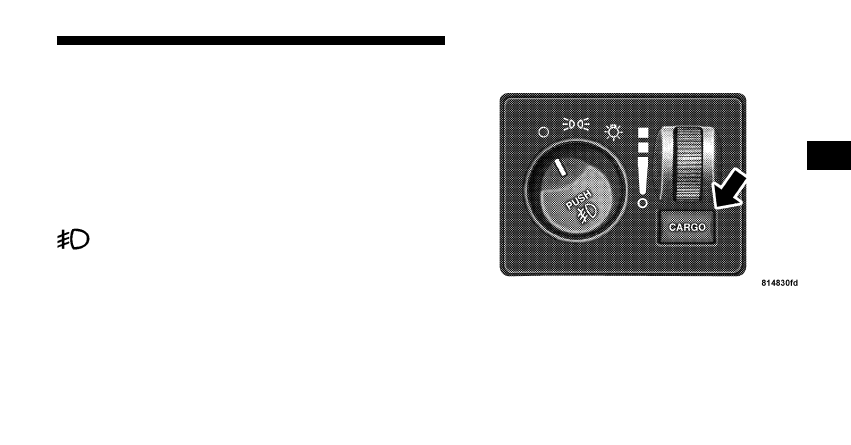
CARGO Light — If Equipped

The cargo lights are turned on by pressing on the
CARGO button. The interior lights will also turn on
when the cargo lights are on. The cargo lights will also
turn on for 30 seconds when a key fob Unlock is pressed,
as part of the illuminated entry feature.

Cargo Light Switch

UNDERSTANDING THE FEATURES OF YOUR VEHICLE

165

3

-------------------------------------------------------------------------------------------------------------------------------------------------------------

MULTIFUNCTION CONTROL LEVER
The multifunction control lever is located on the left side
of the steering column.

Turn Signals
Move the lever up or down to signal a right-hand or
left-hand turn.

The arrow on either side of the instrument cluster flashes
to indicate the direction of the turn, and proper operation
of the front and rear turn signal lights. If a defective bulb
or wiring circuit is detected for the turn signal system, the
arrow indicators will flash at a faster rate. If an indicator
fails to light when the lever is moved, it would suggest
that the switch or indicator lamp is defective.

You can signal a lane change by moving the lever
partially up or down.

Passing Light
You can signal another vehicle with your headlights by
partially pulling the multifunction lever toward the steer-
ing wheel. This will cause the high beam headlights to
turn on until the lever is released.

Turn Signal Lever

166

UNDERSTANDING THE FEATURES OF YOUR VEHICLE

-------------------------------------------------------------------------------------------------------------------------------------------------------------

High Beam / Low Beam Select Switch
Pull the multifunction control lever fully toward the
steering wheel to switch the headlights from HIGH or
LOW beam.

Windshield Wipers

The wipers and washers are operated by a switch in the
multifunction control lever. Turn the end of the handle to
select the desired wiper speed.

High Beam / Low Beam

Windshield Wiper / Washer Switch

UNDERSTANDING THE FEATURES OF YOUR VEHICLE

167

3

-------------------------------------------------------------------------------------------------------------------------------------------------------------

Intermittent Wiper System
The intermittent feature of this system was designed for
use when weather conditions make a single wiping cycle,
with a variable pause between cycles, desirable. For
maximum delay between cycles, rotate the control knob
into the upper end of the delay range.

The delay interval decreases as you rotate the knob until
it enters the LOW continual speed position. The delay
can be regulated from a maximum of about 15 seconds
between cycles, to a cycle every 2 seconds. The delay
intervals will double in duration when the vehicle speed
is 10 mph (16 km) or less.

WARNING!

Sudden loss of visibility through the windshield
could lead to an accident. You might not see other
vehicles or other obstacles. To avoid sudden icing of
the windshield during freezing weather, warm the
windshield with defroster before and during wind-
shield washer use.

Windshield Washers
To use the washer, push in on the washer knob on the end
of the multifunction control lever and hold while spray is
desired. If the washer knob is depressed while in the
delay range, the wiper will operate for several seconds
after the washer knob is released. It will then resume the
intermittent interval previously selected. If the washer
knob is pushed, for a period greater than 1 second, while
in the OFF position, the wiper will wipe approximately
three wipes, after the wash knob is released.

168

UNDERSTANDING THE FEATURES OF YOUR VEHICLE

-------------------------------------------------------------------------------------------------------------------------------------------------------------

To prevent freeze-up of your windshield washer system
in cold weather, select a solution or mixture that meets or
exceeds the temperature range of your climate. This
rating information can be found on most washer fluid
containers.

TILT STEERING COLUMN
To tilt the column, pull rearward on the lever below the
turn signal control and move the wheel up or down, as
desired. Push the lever forward to lock the column firmly
in place.

Tilt Steering Control Lever

UNDERSTANDING THE FEATURES OF YOUR VEHICLE

169

3

-------------------------------------------------------------------------------------------------------------------------------------------------------------

WARNING!

Tilting the steering column while the vehicle is
moving is dangerous. Without a stable steering col-
umn, you could lose control of the vehicle and have
an accident. Adjust the column only while the ve-
hicle is stopped. Be sure it is locked before driving.

DRIVER ADJUSTABLE PEDALS — IF EQUIPPED

The power adjustable accelerator and brake pedals allow
the driver to establish a comfortable position relative to
the steering wheel and pedals.

Adjustable Pedals Switch

170

UNDERSTANDING THE FEATURES OF YOUR VEHICLE

-------------------------------------------------------------------------------------------------------------------------------------------------------------

Adjustment

1. Position the driver seat so that you are at least 10
inches (254 mm) away from the airbag located in the
center of the steering wheel.

2. Fasten and adjust the seatbelts.

3. Move the adjustable pedal switch, located to the left of
the steering column near the parking brake release, in the
direction you desire to move the pedals.

4. The pedals cannot be adjusted when the vehicle is in
R (Reverse) or when the Speed Control is SET.

CAUTION!

Do not place any article under the adjustable pedals
or impede its ability to move as it may cause damage
to the pedal controls. Pedal travel may become
limited if movement is stopped by an obstruction in
the adjustable pedal’s path.

UNDERSTANDING THE FEATURES OF YOUR VEHICLE

171

3

-------------------------------------------------------------------------------------------------------------------------------------------------------------

ELECTRONIC SPEED CONTROL — IF EQUIPPED
When engaged, this device takes over accelerator opera-
tion at speeds greater than (refer to the table below for
the speed for your specific engine). The controls are
mounted on the steering wheel.

To Activate
Push the ON/OFF button to the ON position. In the
instrument cluster, the word “CRUISE” illuminates when
the system is on.

To Set At A Desired Speed
When the vehicle has reached the desired speed, press
and release the SET button. Release the accelerator and
the vehicle will operate at the selected speed.

To Deactivate
A soft tap on the brake pedal, normal braking, clutch
pressure while slowing the vehicle, or pressing the CAN-
CEL button will deactivate speed control without erasing
the memory. Pushing the ON/OFF button to the OFF
position or turning off the ignition erases the memory.

Speed Control Switches

172

UNDERSTANDING THE FEATURES OF YOUR VEHICLE

-------------------------------------------------------------------------------------------------------------------------------------------------------------

WARNING!

Leaving the Speed Control ON when not in use is
dangerous. You could accidentally set the system to
cause it to go faster than you want. You could lose
control and have an accident. Always leave the
system OFF when you aren’t using it.

To Resume Speed
To resume a previously set speed, push and release the
RESUME button. Resume can be used at any speed above
(refer to the table below for the speed for your specific
engine).

To Vary The Speed Setting
When the speed control is on, speed can be increased by
pressing and holding the ACCEL button. When the
button is released, a new set speed will be established.

Tapping the ACCEL button once will result in a speed
increase (refer to the table below for the speed for your
specific engine). Each time the button is tapped, speed
increases so that tapping the button three times will
increase speed by three increments.

Tapping the DECEL button once will result in a speed
decrease (refer to the table below for the speed for your
specific engine). Each time the button is tapped, speed
will decrease. For example, tapping the button 3 times
will decrease the speed by 3 times the speed listed in the
table below (refer to the table below for the speed for
your specific engine).

To decrease speed while the speed control is on, press
and hold the DECEL button. Release the button when the
desired speed is reached, and the new speed will be set.

UNDERSTANDING THE FEATURES OF YOUR VEHICLE

173

3

-------------------------------------------------------------------------------------------------------------------------------------------------------------

Functions

3.7L

4.7L

5.7L

Engage Speed

35 mph (56 km/h)

35 mph (56 km/h)

25 mph (40 km/h)

Minimun RESUME Speed

30 mph (50 km/h)

30 mph (50 km/h)

20 mph (32 km/h)

ACCEL Increase

2 mph (3km/h)

2 mph (3km/h)

1 mph (2 km/h)

DECEL Decrease

1 mph (2 km/h)

1 mph (2 km/h)

1 mph (2 km/h)

Dropout Speed

30 mph (50 km/h)

30 mph (50 km/h)

20 mph (32 km/h)

To Accelerate For Passing
Depress the accelerator as you would normally. When the
pedal is released, the vehicle will return to the set speed.

NOTE:

When driving uphill, at elevations above 2,000

feet (610 meters), or when the vehicle is heavily loaded
(especially when towing) the vehicle may slow below the
SET speed. If the vehicle speed drops below (refer to the
table below for the speed for your specific engine), the
speed control will automatically disengage. If this hap-
pens, you can push down on the accelerator pedal to
maintain the desired speed.

Vehicles equipped with a 5–speed-manual transmission
should be operated in 4th gear or lower under the above
conditions.

Vehicles equipped with a Automatic transmission may
exhibit several downshifts under the above conditions.
To reduce the frequency of the downshifts and to im-
prove vehicle performance, it is advisable to use either
TOW HAUL or O/D OFF modes which can be selected
by pressing the “TOW HAUL O/D OFF” button located
at the end of the gear shifter.

174

UNDERSTANDING THE FEATURES OF YOUR VEHICLE

-------------------------------------------------------------------------------------------------------------------------------------------------------------

WARNING!

Speed Control can be dangerous where the system
can’t maintain a constant speed. Your vehicle could
go too fast for the conditions, and you could lose
control. An accident could be the result. Don’t use
Speed Control in heavy traffic or on roads that are
winding, icy, snow-covered, or slippery.

OVERHEAD CONSOLE— IF EQUIPPED
The two optional overhead consoles may consist of the
following features:

• Courtesy/Reading Lights
• Compass/Temperature Mini-Trip Computer (CMTC)

— If Equipped

• Universal Garage Door Opener — If Equipped

Overhead Console Features

UNDERSTANDING THE FEATURES OF YOUR VEHICLE

175

3

-------------------------------------------------------------------------------------------------------------------------------------------------------------

Courtesy/Reading Lights
In the middle of the console are two courtesy/reading
lights.

Both lights illuminate as courtesy lights when a door is
opened, when the dimmer control is rotated to the
courtesy light position (fully upward position), or when
the UNLOCK button is pressed on the Remote Keyless
Entry transmitter, if so equipped. These lights are also
operated individually as reading lights by pressing the
recessed area of the corresponding lens.

NOTE:

The courtesy/reading lights will remain on until

the switch is pressed a second time, so be sure they have
been turned off before leaving the vehicle. If the interior
lights are left on after the vehicle is turned off, they will
extinguish after 15 minutes.

OVERHEAD CONSOLE WITH
COMPASS/TEMPERATURE MINI-TRIP COMPUTER
— IF EQUIPPED
This optional overhead console consists of the following:

• Courtesy Lights
• Compass/Temperature Mini-Trip Computer (CMTC)

176

UNDERSTANDING THE FEATURES OF YOUR VEHICLE

-------------------------------------------------------------------------------------------------------------------------------------------------------------

This overhead console allows you to choose between a
compass/temperature display and one of four trip con-
ditions being monitored.

US/M Button

Use this button to change the display from U.S. to metric
measurement units.

RESET Button

Use this button to reset the following displays:
Average Fuel Economy (AVG ECO)
Trip Odometer (ODO)
Elapsed time (ET)

UNDERSTANDING THE FEATURES OF YOUR VEHICLE

177

3

-------------------------------------------------------------------------------------------------------------------------------------------------------------

Global Reset
If the RESET button is pressed twice within 2 seconds
while in any of the 3 resettable displays (AVG ECO,
ODO, ET), the Global Reset will reset all 3 displays.

Step Button

Use this button to choose or cycle through the four trip
conditions.

Average Fuel Economy (AVG ECO)
Shows the average fuel economy since the last reset.
Average fuel economy is a running average of the
amount of fuel used and the distance the vehicle has
traveled.

When the fuel economy is reset, the display will momen-
tarily blank. Then, the history information will be erased,
and the averaging will continue from where it was before
the reset. The reset value is based on a minimal amount
of fuel used and the distance traveled from the previous
drive cycle. The display may take several miles for this
value to change dependent upon driving habits.

Distance To Empty (DTE)
Shows the estimated distance that can be traveled with
the fuel remaining in the tank. This estimated distance is
determined by weighted average of the instantaneous
and average fuel economy, according to the current fuel
tank level. This is not resettable

178

UNDERSTANDING THE FEATURES OF YOUR VEHICLE

-------------------------------------------------------------------------------------------------------------------------------------------------------------

NOTE:

Significant changes in driving style or vehicle

loading will greatly affect the actual drivable distance of
the vehicle, regardless of the DTE displayed value.

When the DTE value is less than 30 miles estimated
driving distance, the DTE display will change to an
alternating test display of “LO” and “FUEL”. This dis-
play will continue until the vehicle runs out of fuel.
Adding a significant amount of fuel to the vehicle will
turn off the “LO FUEL” text and a new DTE value will be
displayed, based on the current values in the DTE
calculation and the current fuel tank level.

NOTE:

It is possible for DTE to display “LO FUEL”

before the low fuel warning light turns on in the instru-
ment cluster. This could occur because low fuel warning
is set to a specified fuel tank volume and DTE is an
estimated distance calculation based on fuel economy
and remaining fuel tank volume.

Ram fuel tank volumes are as follows:

• 26 gallons - 1500 short box models
• 34 gallons - 1500 Quad Cab (if equipped)/2500/3500

short box models

• 35 gallons - 1500/2500/3500 long box models

Trip Odometer (ODO)
This display shows the distance traveled since the last
reset. Resetting of this screen will cause the trip odometer
to change to Zero.

Elapsed Time (ET)
This display shows the accumulated ignition ON time
since the last reset. Resetting the Elapsed Time will cause
the display to change to Zero.

UNDERSTANDING THE FEATURES OF YOUR VEHICLE

179

3

-------------------------------------------------------------------------------------------------------------------------------------------------------------

C/T Button

Use this button to select a readout of the outside tem-
perature and one of eight compass headings that indicate
the direction in which the vehicle is facing.

WARNING!

Even if the display still reads a few degrees above
32°F ( 0°C), the road surface may be icy, particularly
in woods or on bridges. Drive carefully under such
conditions to prevent an accident and possible per-
sonal injury or property damage.

Automatic Compass Calibration
This compass is self-calibrating which eliminates the
need to manually set the compass. When the vehicle is
new, the compass may appear erratic and the CAL
symbol will be displayed.

After completing up to three 360° turns, with the vehicle
traveling less than 5 mph (8 km/h), in an area free from
large metal or metallic objects, the CAL symbol will turn
off and the compass will function normally.

180

UNDERSTANDING THE FEATURES OF YOUR VEHICLE

-------------------------------------------------------------------------------------------------------------------------------------------------------------


Content      ..     9      10      11      12     ..