Dodge Neon SRT (2005 year). Manual - part 9


  Index      Dodge     Dodge Neon SRT (2005 year) - manual in english


Search            copyright infringement  


Content      ..     7      8      9      10     ..


Dodge Neon SRT (2005 year). Manual - part 9


1. Wear eye protection and remove any metal jewelry
such as watch bands or bracelets that might make an
inadvertent electrical contact.

2. When boosting from a battery in another vehicle, park
that vehicle within booster cable reach but without
letting the vehicles touch. Set parking brake, place trans-
axle in NEUTRAL and turn ignition to OFF for both
vehicles.

3. Turn off the heater, radio and all unnecessary electrical
loads.

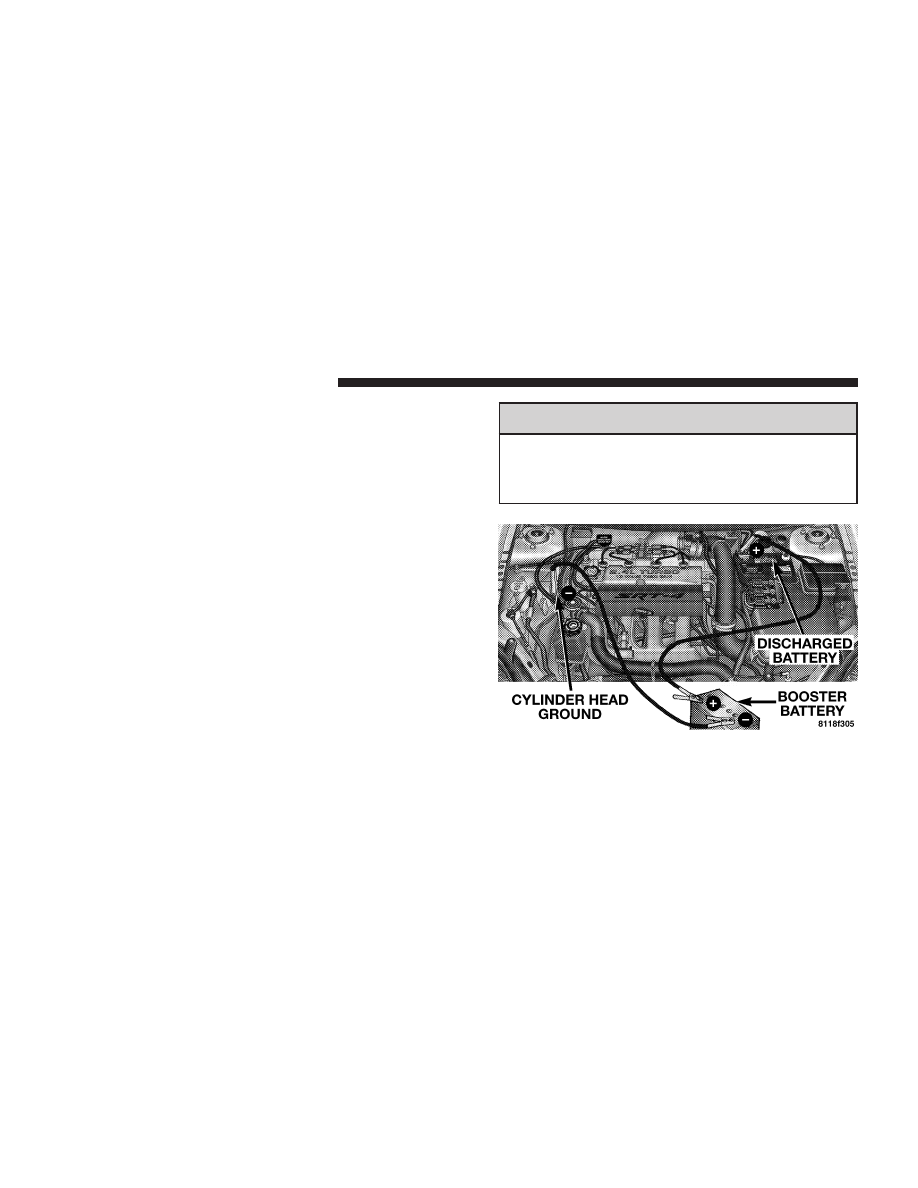
4. Connect one end of a jumper cable to the positive
terminal of the booster battery. Connect the other end to
the positive terminal of the discharged battery.

WARNING!

Do not permit vehicles to touch each other as this
could establish a ground connection and person
injury could result.

134

WHAT TO DO IN EMERGENCIES

WARNING!

Battery fluid is a corrosive acid solution; do not
allow battery fluid to contact eyes, skin or clothing.
Don’t lean over battery when attaching clamps or
allow the clamps to touch each other. If acid splashes
in eyes or on skin, flush the contaminated area
immediately with large quantities of water.

A battery generates hydrogen gas which is flam-
mable and explosive. Keep flame or spark away
from the vent holes. Do not use a booster battery or
any other booster source with an output that exceeds
12 volts.

5. Connect the other cable, first to the negative terminal
of the booster battery and then to the engine of the
vehicle with the discharged battery. Make sure you have
a good contact on the engine.

WARNING!

Do not connect the cable to the negative post of the
discharge battery. The resulting electrical spark
could cause the battery to explode.

During cold weather when temperatures are below
freezing point, electrolyte in a discharged battery
may freeze. Do not attempt jump starting because
the battery could rupture or explode. The battery
temperature must be brought up above freezing
point before attempting to jump start.

6. Since your vehicle is equipped with senrty key immo-
bilizer, turn the ignition switch to the ON/RUN position
for 3 seconds prior to moving the ignition switch to the
crank position and starting the vehicle.

7. Start the engine in the vehicle that has the booster
battery, let the engine idle a few minutes, then start the
engine in the vehicle with the discharged battery.

8. When removing the jumper cables, reverse the above
sequence exactly. Be careful of the moving belts and fan.

WHAT TO DO IN EMERGENCIES

135

6

WARNING!

Any procedure other than above could result in:

1. Personal injury caused by electrolyte squirting
out the battery vent;

2. Personal injury or property damage due to battery
explosion;

3. Damage to charging system of booster vehicle or
of immobilized vehicle.

DRIVING ON SLIPPERY SURFACES

Acceleration
Rapid acceleration on snow covered, wet, or other slip-
pery surfaces may cause the front wheels to pull errati-
cally to the right or left. This phenomenon occurs when
there is a difference in the surface traction under the front
(driving) wheels, particularly with high output engines.

WARNING!

Rapid acceleration on slippery surfaces is danger-
ous. Unequal traction can cause sudden pulling of
the front wheels. You could lose control of the
vehicle and possibly have an accident. Accelerate
slowly and carefully whenever there is likely to be
poor traction (ice, snow, wet, mud, loose sand, etc.).

Traction
When driving on wet or slushy roads, it is possible for a
wedge of water to build up between the tire and road
surface. This is hydroplaning and may cause partial or
complete loss of vehicle control and stopping ability. To
reduce this possibility, the following precautions should
be observed:

1. Slow down during rainstorms or when roads are
slushy.

2. Slow down if road has standing water or puddles.

3. Replace tires when tread wear indicators first become
visible.

136

WHAT TO DO IN EMERGENCIES

4. Keep tires properly inflated.

5. Maintain enough distance between your vehicle and
the vehicle in front of you to avoid a collision in a sudden
stop.

FREEING A STUCK VEHICLE
If your vehicle becomes stuck in mud, sand or snow, it
can often be moved by a rocking motion. Turn your
steering wheel right and left to clear the area around the
front wheels. Then shift back and forth between Reverse
and First gear. Usually the least accelerator pedal pres-
sure to maintain the rocking motion without spinning the
wheels is most effective.

WARNING!

Fast spinning tires can be dangerous. Forces gener-
ated by excessive wheel speeds may cause tire dam-
age or failure. A tire could explode and injure
someone. Do not spin your vehicle’s wheels faster
than 35 mph (55km/h) when you are stuck. And don’t
let anyone near a spinning wheel, no matter what the
speed.

CAUTION!

Racing the engine or spinning the wheels too fast
may lead to transaxle overheating and failure. It can
also damage the tires. Do not spin the wheels above
35 mph (55km/h).

WHAT TO DO IN EMERGENCIES

137

6

TOWING A DISABLED VEHICLE

With Ignition Key
Your vehicle may be towed if the gearshift lever is in
NEUTRAL. If the transaxle is not operative, the vehicle
must be towed with the front wheels off the ground.

CAUTION!

If the vehicle being towed requires steering, the
ignition switch must be in the OFF position, not in
the LOCK or ACCESSORY positions.

If it is necessary to use the accessories while being towed
(wipers, defrosters, etc.), the key must be in the ON
position, not the ACCESSORY position. Make certain the
transaxle remains in NEUTRAL.

Without The Ignition Key
Special care must be taken when the vehicle is towed
with the ignition in the LOCK position. A dolly should be
used under the front wheels if the rear wheels are raised.
Proper towing equipment is necessary to prevent dam-
age to the vehicle.

Towing This Vehicle Behind Another Vehicle (Flat
Towing With All Four Wheels On The Ground)
Your vehicle may be towed at any legal highway speed,
for any distance, if the transaxle is in neutral.

138

WHAT TO DO IN EMERGENCIES

MAINTAINING YOUR VEHICLE

CONTENTS

䡵 2.4L Turbo Charged Engine Compartment . . . . 141
䡵 Onboard Diagnostic System — OBD II . . . . . . 142
䡵 Emissions Inspection And Maintenance

Programs . . . . . . . . . . . . . . . . . . . . . . . . . . . . 143

䡵 Replacement Parts . . . . . . . . . . . . . . . . . . . . . 144
䡵 Dealer Service . . . . . . . . . . . . . . . . . . . . . . . . 144
䡵 Maintenance Procedures . . . . . . . . . . . . . . . . . 145

▫ Engine Oil . . . . . . . . . . . . . . . . . . . . . . . . . . 145
▫ Ignition Wiring System . . . . . . . . . . . . . . . . . 151
▫ Crankcase Emission Control System . . . . . . . . 151
▫ Fuel Filter . . . . . . . . . . . . . . . . . . . . . . . . . . 151
▫ Air Cleaner Element (Filter) . . . . . . . . . . . . . . 151

▫ Maintenance-Free Battery . . . . . . . . . . . . . . . . 152
▫ Air Conditioner Maintenance . . . . . . . . . . . . . 153
▫ Power Steering Fluid Check . . . . . . . . . . . . . . 154
▫ Front Suspension Ball Joints . . . . . . . . . . . . . . 154
▫ Body Lubrication . . . . . . . . . . . . . . . . . . . . . 155
▫ Windshield Wiper Blades . . . . . . . . . . . . . . . . 155
▫ Windshield Wiper Blade Replacement . . . . . . . 156
▫ Windshield Washer Aiming . . . . . . . . . . . . . . 156
▫ Windshield Washer Reservoir . . . . . . . . . . . . . 156
▫ Exhaust System . . . . . . . . . . . . . . . . . . . . . . 156
▫ Cooling System . . . . . . . . . . . . . . . . . . . . . . . 157

7

▫ Hoses And Vacuum/Vapor Harnesses . . . . . . . 161
▫ Brake System . . . . . . . . . . . . . . . . . . . . . . . . 162
▫ Manual Transaxle . . . . . . . . . . . . . . . . . . . . . 164
▫ Appearance Care And Protection From

Corrosion . . . . . . . . . . . . . . . . . . . . . . . . . . . 165

䡵 Fuses . . . . . . . . . . . . . . . . . . . . . . . . . . . . . . . 170

▫ Underhood Fuses

(Power Distribution Center) . . . . . . . . . . . . . . 170

▫ Interior Fuses . . . . . . . . . . . . . . . . . . . . . . . . 171

䡵 Vehicle Storage . . . . . . . . . . . . . . . . . . . . . . . . 173
䡵 Replacement Bulbs . . . . . . . . . . . . . . . . . . . . . 173
䡵 Bulb Replacement . . . . . . . . . . . . . . . . . . . . . . 174

▫ Headlight Bulb Replacement . . . . . . . . . . . . . 174
▫ Front Park/Turn Signal Lights . . . . . . . . . . . . 175
▫ Front Sidemarker Light . . . . . . . . . . . . . . . . . 175
▫ Tail/Stop, Rear Turn Signals And Back-Up

Lights . . . . . . . . . . . . . . . . . . . . . . . . . . . . . 176

▫ Center High Mounted Stop Light . . . . . . . . . . 176

䡵 Fluids And Capacities . . . . . . . . . . . . . . . . . . . 176
䡵 Recommended Fluids, Lubricants And Genuine

Parts . . . . . . . . . . . . . . . . . . . . . . . . . . . . . . . 177

▫ Engine . . . . . . . . . . . . . . . . . . . . . . . . . . . . . 177
▫ Chassis . . . . . . . . . . . . . . . . . . . . . . . . . . . . 177

140

MAINTAINING YOUR VEHICLE

2.4L TURBO CHARGED ENGINE COMPARTMENT

MAINTAINING YOUR VEHICLE

141

7

ONBOARD DIAGNOSTIC SYSTEM — OBD II
Your vehicle is equipped with a sophisticated onboard
diagnostic system called OBD II. This system monitors
the performance of the emissions, and engine control
systems. When these systems are operating properly,
your vehicle will provide excellent performance and fuel
economy, as well as engine emissions well within current
government regulations.

If any of these systems require service, the OBD II system
will turn on the “Malfunction Indicator Light.” It will
also store diagnostic codes and other information to
assist your service technician in making repairs. Al-
though your vehicle will usually be driveable and not
need towing, see your dealer for service as soon as
possible.

CAUTION!

Prolonged driving with the “Malfunction Indicator
Light” on could cause further damage to the emis-
sion control system. It could also affect fuel economy
and driveability. The vehicle must be serviced before
any emissions tests can be performed.

If the “Malfunction Indicator Light” is flashing
while the engine is running, severe catalytic con-
verter damage and power loss will soon occur. Im-
mediate service is required.

142

MAINTAINING YOUR VEHICLE

EMISSIONS INSPECTION AND MAINTENANCE
PROGRAMS
In some localities, it may be a legal requirement to pass
an inspection of your vehicle’s emissions control system.
Failure to pass could prevent vehicle registration.

For states which have an I/M (Inspection and
Maintenance) requirement, this check verifies the
following: the MIL (Malfunction Indicator Lamp)

is functioning and is not on when the engine is running,
and that the OBD (On Board Diagnostic) system is ready
for testing.

Normally, the OBD system will be ready. The OBD
system may not be ready if your vehicle was recently
serviced, if you recently had a dead battery, or a battery
replacement. If the OBD system should be determined
not ready for the I/M test, your vehicle may fail the test.

Your vehicle has a simple ignition key actuated test
which you can use prior to going to the test station. To
check if your vehicle’s OBD system is ready, you must do
the following:

1. Insert your ignition key into the ignition switch.

2. Turn the ignition to the ON position, but do not crank
or start the engine.

3. If you crank or start the engine, you will have to start
this test over.

4. As soon as you turn your key to the ON position, you
will see your MIL symbol come on as part of a normal
bulb check.

5. Approximately 15 seconds later, one of two things will
happen:

a. The MIL will flash for about 10 seconds and then
return to being fully illuminated until you turn off
the ignition key or start the engine. This means that
your vehicle’s OBD system is not ready and you
should not proceed to the I/M station.

b. The MIL will not flash at all and will remain fully
illuminated until you turn off the ignition key or
start the engine. This means that your vehicle’s OBD
system is ready and you can proceed to the I/M
station.

MAINTAINING YOUR VEHICLE

143

7

If your OBD system is not ready, you should see your
authorized dealer or repair facility. If your vehicle was
recently serviced or had a battery failure or replacement,
you may need to do nothing more than drive your
vehicle as you normally would in order for your OBD
system to update. A recheck with the above test routine
may then indicate that the system is now ready.

Regardless of whether your vehicle’s OBD system is
ready or not ready, if the MIL symbol is illuminated
during normal vehicle operation, you should have your
vehicle serviced before going to the I/M station. The I/M
station can fail your vehicle because the MIL symbol is on
with the engine running.

REPLACEMENT PARTS
Use of genuine Mopar parts for normal/scheduled main-
tenance and repairs is highly recommended to insure the
designed performance. Damage or failures caused by the
use of non-Mopar parts for maintenance and repairs will
not be covered by the manufacturer warranty.

DEALER SERVICE
Your dealer has the qualified service personnel, special
tools and equipment to perform all service operations in
an expert manner. Service manuals are available which
include detailed service information for your vehicle.
Refer to these manuals before attempting any procedure
yourself.

NOTE:

Intentional tampering with emissions control

systems can result in civil penalties being assessed
against you.

144

MAINTAINING YOUR VEHICLE

WARNING!

You can be badly injured working on or around a
motor vehicle. Do only that service work for which
you have the knowledge and the proper equipment.
If you have any doubt about your ability to perform
a service job, take your vehicle to a competent
mechanic.

MAINTENANCE PROCEDURES
The pages that follow contain the required maintenance
services determined by the engineers who designed your
vehicle.

Besides the maintenance items for which there are fixed
maintenance intervals, there are other items that should
operate satisfactorily without periodic maintenance.
However, if a malfunction of these items does occur, it
could adversely affect the engine or vehicle performance.
These items should be inspected if a malfunction is
observed or suspected.

Engine Oil

Checking Oil Level
To assure proper engine lubrication, the engine oil must
be maintained at the correct level. Check the oil level at
regular intervals, such as every fuel stop.

The best time to check the engine oil level is about 5
minutes after a fully warmed engine is shut off, or before
starting the engine after it has sat overnight.

Engine Oil Dipstick Location

MAINTAINING YOUR VEHICLE

145

7

Checking the oil while the vehicle is on level ground will
improve the accuracy of the oil level readings. Maintain
the oil level between the MIN and MAX markings on the
dipstick. Adding one quart of oil when the reading is at
the MIN mark will result in a MAX reading on these
engines.

CAUTION!

Overfilling or underfilling will cause aeration or
loss of oil pressure. This could damage your engine.

Change Engine Oil
Road conditions and your kind of driving affects the
interval at which your oil should be changed. Check the
following list to decide if any apply to you.

• Day and night temperatures are below 32°F (0°C)
• Stop and Go driving
• Extensive engine idling

Engine Oil Dipstick

146

MAINTAINING YOUR VEHICLE

• Driving in dusty conditions
• Short trips of less than 10 miles (16.2 km)
• More than 50% of your driving is at sustained high

speeds during hot weather, above 90°F (32°C)

• Trailer towing
• Taxi, Police, or delivery service (commercial service)
• Off-road or desert operation
• If equipped for and operating with E-85 (ethanol) fuel

NOTE:

If ANY of these apply to you then change your

engine oil every 3,000 miles (5 000 km) or 3 months,
whichever comes first and follow schedule “B” of the

⬙Maintenance Schedules⬙ section of this manual.

If none of these apply to you, then change your engine oil
at every interval shown on schedule

⬙A⬙ of the ⬙Mainte-

nance Schedules

⬙ section of this manual.

Engine Oil Selection
For best performance and maximum protection under all
types of operating conditions, the manufacturer only
recommends engine oils that are API certified and meet
the requirements of DaimlerChrysler Material Standard
MS-6395.

If you choose to operate this vehicle in a very spirited
driving style, the manufacturer recommends the use of
a full synthetic engine oil, such as Mobil 1

威 SAE 5W-30.

Oil Filler Cap Location

MAINTAINING YOUR VEHICLE

147

7

American Petroleum Institute (API) Engine Oil
Identification Symbol

This symbol means that the oil has
been certified by the American
Petroleum Institute (API). The
manufacturer only recommends
API Certified engine oils.

Engine Oil Viscosity (SAE Grade)
SAE 5W-30 engine oil is recommended for all operating
temperatures. This engine oil improves low tempera-
ture starting and vehicle fuel economy. Refer to your
engine oil filler cap for the recommended engine oil
viscosity for your vehicle.

For information on engine oil filler cap location, see the
Engine Compartment illustration in this section.

Lubricants which do not have both, the engine oil certi-
fication mark and the correct SAE viscosity grade num-
ber should not be used.

Synthetic Engine Oils
There are a number of engine oils being promoted as
either synthetic or semi-synthetic. If you chose to use
such a product, use only those oils that are American
Petroleum Institute (API) Certified and have the recom-
mended SAE viscosity grade. Follow the maintenance
schedule that describes your driving type.

Materials Added To Engine Oils
The manufacture strongly recommends against the addi-
tion of any additives (other than leak detection dyes) to
the engine oil. Engine oil is an engineered product and
it’s performance may be impaired by supplemental ad-
ditives.

Disposing of Used Engine Oil
Care should be taken in disposing of used engine oil from
your vehicle. Used oil, indiscriminately discarded, can
present a problem to the environment. Contact your
dealer, service station, or governmental agency for advice
on how and where used oil can be safely discarded in
your area.

148

MAINTAINING YOUR VEHICLE

Engine Oil Filter
The engine oil filter should be replaced at every engine
oil change.

Engine Oil Filter Selection
All of this manufacturers engines have a full-flow type
disposable oil filter. Use a filter of this type for replace-
ment. The quality of replacement filters varies consider-
ably. Only high quality filters should be used to assure
most efficient service. Mopar Engine Oil Filters are high
quality oil filters and are recommended.

Drive Belts — Check Condition and Tension
At the mileage shown in the maintenance schedules,
check all drive belts for condition and proper tension.
Improper belt tension can cause belt slippage and failure.

Inspect the drive belts for evidence of cuts, cracks, or
glazing and replace them if there is any sign of damage
which could result in belt failure. If adjustment is re-
quired, adjust the belts according to the specifications
and procedures shown in the Service Manual.

Special tools are required to properly measure tension
and to restore belt tension to factory specifications. Also,

check belt routing to make sure there is no interference
between the belts and other engine components.

Spark Plugs
Spark plugs must fire properly to assure engine perfor-
mance and emission control. New plugs should be in-
stalled at the specified mileage. The entire set should be
replaced if there is any malfunction due to a faulty spark
plug. Refer to the Vehicle Emission Control Information
(VECI) label, for proper type of spark plug for use in your
vehicle.

Catalytic Converter
The catalytic converter requires the use of unleaded fuel
only. Leaded gasoline will destroy the effectiveness of the
catalyst as an emission control device.

Under normal operating conditions, the catalytic con-
verter will not require maintenance. However, it is im-
portant to keep the engine properly tuned to assure
proper catalyst operation and prevent possible catalyst
damage.

MAINTAINING YOUR VEHICLE

149

7


Content      ..     7      8      9      10     ..