Dodge Intrepid (2004 year). Manual - part 13


  Index      Dodge     Dodge Intrepid (2004 year) - manual in english


Search            copyright infringement  


Content      ..     11      12      13      14     ..


Dodge Intrepid (2004 year). Manual - part 13


NOTE:

Often, fluids such as oil, power steering fluid, and

brake fluid are used during assembly plant operations to
ease the assembly of hoses to couplings. Therefore, oil
wetness at the hose-coupling area is not necessarily an
indication of leakage. Actual dripping of hot fluid when
systems are under pressure (during vehicle operation)
should be noted before hose is replaced based on leakage.

NOTE:

Inspection of brake hoses should be done

whenever the brake system is serviced and every engine
oil change.

WARNING!

Worn brake hoses can burst and cause brake failure.
You could have an accident. If you see any signs of
cracking, scuffing, or worn spots, have the brake
hoses replaced immediately.

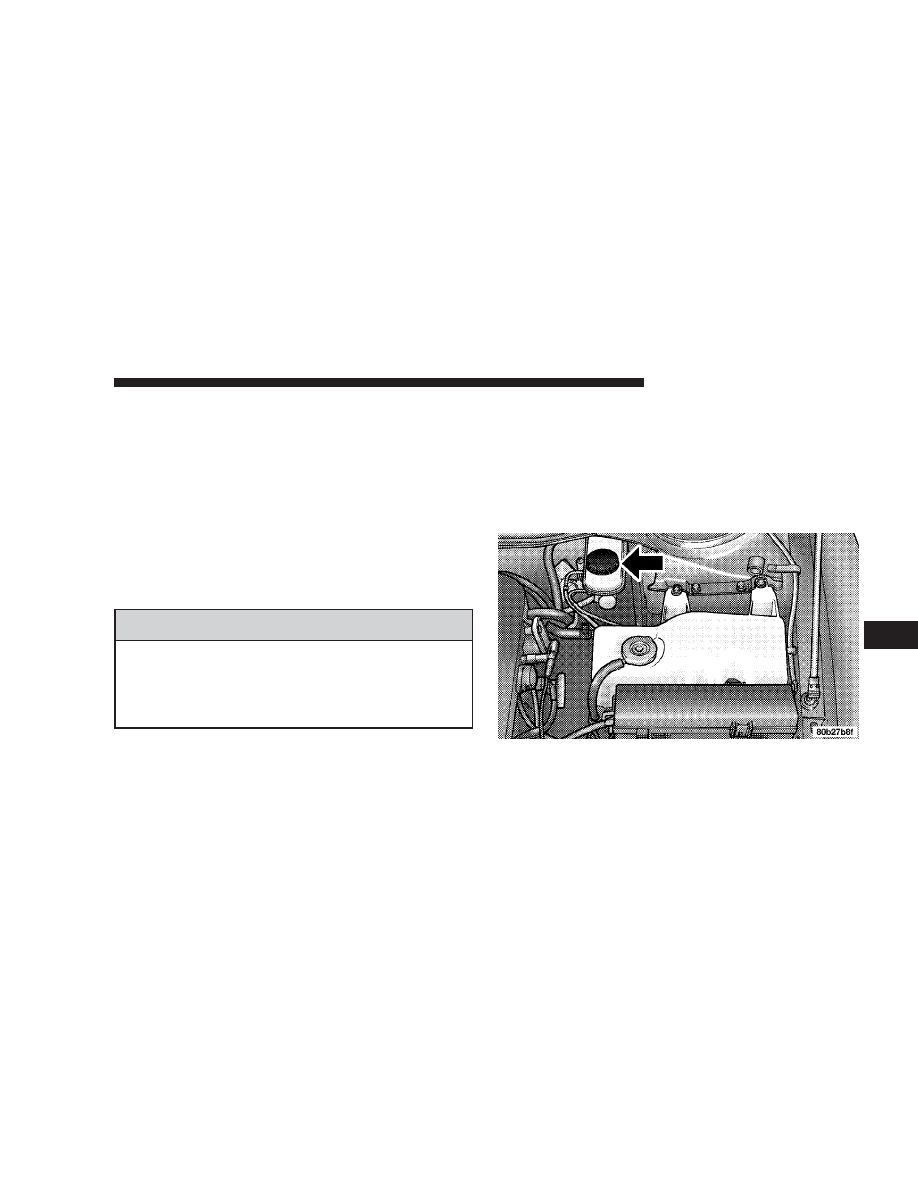
Brake Master Cylinder
The fluid level in the master cylinder should be checked
when performing under hood services, or immediately if
the brake system warning lamp shows system failure.

Be sure to clean the top of the master cylinder area before
removing the cap. If necessary, add fluid to bring the
fluid level up to the requirements described on the brake
fluid reservoir. With disc brakes, fluid level can be
expected to fall as the brake pads wear. However, low
fluid level may be caused by a leak and a checkup may be
needed.

Use only the manufacturer’s recommended brake fluid.
Refer to the Recommended Fluids, Lubricants and Genu-
ine Parts section for correct fluid type.

MAINTAINING YOUR VEHICLE

193

7

WARNING!

Use of a brake fluid that may have a lower initial
boiling point or unidentified as to specification, may
result in sudden brake failure during hard pro-
longed braking. You could have an accident.

Use only brake fluid that has been in a tightly closed
container to avoid contamination from foreign matter.

Do not allow petroleum base fluid to contaminate the
brake fluid as seal damage will result!

Fuel System Hoses

Electronic Fuel Injection high pressure fuel systems are
designed with hoses and clamps which have unique
material characteristics to provide adequate sealing and
resist attack by deteriorated gasoline.

You are urged to use only manufacturer specified hoses
and clamps, or their equivalent in material and specifi-
cation, in any fuel system servicing. It is mandatory to
replace all clamps that have been loosened or removed
during service. Care should be taken in installing new
clamps to insure they are properly torqued.

Automatic Transaxle

All front wheel drive vehicles have a transaxle and
differential assembly contained within a single housing.

Selection of Lubricant
It is important that the proper lubricant is used in the
transaxle to assure optimum transaxle performance. Use
only the manufacturer’s recommended transmission
fluid. Refer to the Recommended Fluids, Lubricants and
Genuine Parts section for correct fluid type. It is impor-
tant that the transmission fluid be maintained at the
prescribed level using the recommended fluid.

194

MAINTAINING YOUR VEHICLE

CAUTION!

Using a transmission fluid other than the manufac-
turer’s recommended fluid may cause deterioration
in transmission shift quality and/or torque converter
shudder. Using a transmission fluid other than that
recommended by the manufacturer will result in
more frequent fluid and filter changes. Refer to the
Recommended Fluids, Lubricants and Genuine Parts
section for the correct fluid type.

Fluid Level Check
The fluid level in the automatic transaxle should be
checked whenever the vehicle is serviced. Operation with
an improper fluid level will greatly reduce the life of the
transaxle and of the fluid.

2.7L Transmission Dipstick

MAINTAINING YOUR VEHICLE

195

7

Procedure For Checking Fluid Level
To properly check the automatic transaxle fluid level, the
following procedure must be used:

• The vehicle must be on level ground.
• The engine should be running at curb idle speed for a

minimum of 60 seconds.

• Fully apply parking brake.

• Place the gear selector momentarily in each gear

position ending with the lever in P (PARK).

• Wipe the dipstick clean and reinsert until seated.

Remove dipstick and note reading.

• If the fluid is hot (180° F / 82° C) , the reading should

be in the cross hatched area marked ”HOT” (between
the upper two holes in the dipstick).

• If the fluid is cold (80° F / 27° C) , the reading should

be in the cross hatched area marked “COLD” (between
the lower two holes in the dipstick).

• If the fluid level shows low, add sufficient transmis-

sion fluid to bring to the proper level.

3.5L Transmission Dipstick

196

MAINTAINING YOUR VEHICLE

CAUTION!

Do not overfill. Dirt and water in the transaxle can
cause serious damage. To prevent dirt and water
from entering the transaxle after checking or replen-
ishing fluid, make certain that the dipstick cap is
seated properly.

Fluid and Filter Changes
Automatic transmission fluid and filter should be
changed as follows:

Maintenance schedule “A”

— No change necessary

Maintenance schedule “B”

— Every 60,000 miles (96 000

km) change fluid and filter under the following condi-
tions:

• Police, taxi, limousine, commercial type operation, or

trailer towing where the vehicle is driven regularly for
more than 45 minutes of continuous operation.

NOTE:

Refer to Section 8 of this manual for mainte-

nance schedules.

If the transaxle is disassembled for any reason, the fluid
and filter should be changed.

Special Additives
The manufacturer recommends against the addition of
any fluid additives to the transaxle. The only exception to
this policy is the use of special dyes to aid in detecting
fluid leaks. The use of transmission sealers should be
avoided as they may adversely affect seals.

Appearance Care And Protection From Corrosion

Protection of Body and Paint from Corrosion
Vehicle body care requirements vary according to geo-
graphic locations and usage. Chemicals that make roads
passable in snow and ice, and those that are sprayed on
trees and road surfaces during other seasons, are highly
corrosive to the metal in your vehicle. Outside parking,
which exposes your vehicle to airborne contaminants,
road surfaces on which the vehicle is operated, extreme
hot or cold weather and other extreme conditions will
have an adverse effect on paint, metal trim, and under-
body protection.

MAINTAINING YOUR VEHICLE

197

7

The following maintenance recommendations will enable
you to obtain maximum benefit from the corrosion
resistance built into your vehicle.

What Causes Corrosion?
Corrosion is the result of deterioration or removal of
paint and protective coatings from your vehicle.

The most common causes are:

• Road salt, dirt and moisture accumulation.
• Stone and gravel impact.
• Insects, tree sap and tar.
• Salt in the air near seacoast localities.
• Atmospheric fallout/industrial pollutants.
• Bird droppings.

Washing

• Wash your vehicle regularly. Always wash your ve-

hicle in the shade using a mild car wash soap, and
rinse the panels completely with clear water.

• If insects, tar or other similar deposits have accumu-

lated on your vehicle, wash it as soon as possible.

• Use Mopar auto polish to remove road film and stains

and to polish your vehicle. Take care never to scratch
the paint.

• Avoid using abrasive compounds and power buffing

that may diminish the gloss or thin out the paint
finish.

CAUTION!

Do not use abrasive or strong cleaning materials
such as steel wool or scouring powder, which will
scratch metal and painted surfaces.

Special Care

• If you drive on salted or dusty roads or if you drive

near the ocean, hose off the undercarriage at least once
a month.

198

MAINTAINING YOUR VEHICLE

• It is important that the drain holes in the lower edges

of the doors, rocker panels and rear deck lid be kept
clear and open.

• If you detect any stone chips or scratches in the paint,

touch them up immediately. The cost of such repairs is
considered the responsibility of the owner.

• Use Mopar touch up paint on scratches or chips as

soon as possible. Your dealer has touch up paint to
match the color of your vehicle.

• If your vehicle is damaged due to an accident or

similar cause which destroys the paint and protective
coating have your vehicle repaired as soon as possible.
The cost of such repairs is considered the responsibil-
ity of the owner.

• Aluminum wheels should be cleaned regularly with

mild soap and water to prevent corrosion. To remove
heavy soil, select a non abrasive, non-acidic cleaner.
Do not use scouring pads or metal polishes. Avoid
automatic car washes that use acidic solutions or harsh
brushes that may damage the wheels’ protective fin-
ish.

• If you carry special cargo such as chemicals, fertilizers,

deicer salt, etc., be sure that such materials are well
packaged and sealed.

• If a lot of driving is done on gravel roads, consider

mud or stone shields behind each wheel.

Interior Care
Use Mopar Fabric Cleaner to clean fabric upholstery and
carpeting.

Use a mild soap and warm water solution to clean vinyl
or leather upholstery. For stubborn stains, use Mopar
Vinyl Cleaner.

Mopar Vinyl Cleaner is specifically recommended for
vinyl trim.

WARNING!

Do not use volatile solvents for cleaning purposes.
Many are potentially flammable, and if used in
closed areas they may cause respiratory harm.

MAINTAINING YOUR VEHICLE

199

7

CAUTION!

The use of vinyl, leather or plastic protectants may
cause excessive gloss and/or discoloration of interior
trim parts.

Leather Seat Care and Cleaning
Leather is best preserved by regular cleaning with a
damp soft cloth. Small particles of dirt can act as an
abrasive and damage the leather surface and should be
removed immediately with a damp cloth. Stubborn soils
can be removed easily with a soft cloth and Mopar Total
Clean. Care should be taken to avoid soaking the leather
with any liquid. Please do not use polishes, oils, cleaning
fluids, solvents, detergents, or ammonia based cleaners
to clean the leather. Application of a leather conditioner is
not required to maintain the original condition.

Cleaning Headlights
Your vehicle has plastic headlights that are lighter and
less susceptible to stone breakage than glass headlights.

Plastic is not as scratch resistant as glass and therefore
different lens cleaning procedures must be followed.

To minimize the possibility of scratching the lenses and
reducing light output, avoid wiping with a dry cloth. To
remove road dirt, wash with a mild soap solution fol-
lowed by rinsing.

Do not use abrasive cleaning components, solvents, steel
wool or other aggressive material to clean the lenses.

Glass Surfaces
All glass surfaces should be cleaned on a regular basis
with any commercial household-type glass cleaner.
Never use an abrasive type cleaner. Use caution when
cleaning inside rear windows equipped with electric
defrosters. Do not use scrapers or other sharp instru-
ments which may scratch the elements.

Instrument Panel Cover
The instrument panel cover has a low glare surface which
minimizes reflections in the windshield. Do not use
protectants or other products which may cause undesir-
able reflections. Use soap and warm water to restore the
low glare surface.

200

MAINTAINING YOUR VEHICLE

Cleaning Plastic Instrument Cluster Lenses
The lenses in front of the instruments in this vehicle are
molded in clear plastic. When cleaning the lenses, care
must be taken to avoid scratching the plastic.

• Clean with a wet soft rag. A mild soap solution may be

used, but do not use high alcohol content or abrasive
cleaners. If soap is used, wipe clean with a clean damp
rag.

• Dry with a soft tissue.

Seat Belt Maintenance
Do not bleach, dye or clean the belts with chemical
solvents or abrasive cleaners. This will weaken the fabric.

If the belts need cleaning, use a mild soap solution or
lukewarm water. Do not remove the belts from the
vehicle to wash them.

Replace the belts if they appear frayed or worn or if the
buckles do not work properly.

FUSES

The fuse block is behind the end cover at the left side of
the instrument panel. Pull the cover straight away from
the instrument panel for access to the fuses.

Fuse Block Relays

The location and identification of fuse block relays can be
found on the inside of the instrument panel end cover.

MAINTAINING YOUR VEHICLE

201

7

Underhood Fuses

A Power Distribution center is located in the engine
compartment. This center contains fuses and relays for
circuits that operate only under the hood. A label which
identifies these components is located on the underside
of the cover.

CAUTION!

When replacing a blown fuse, it is important to use
only a fuse having the correct amperage rating. The
use of a fuse with a rating other than indicated may
result in a dangerous electrical system overload. If a
properly rated fuse continues to blow, it indicates a
problem in the circuit that must be corrected.

Interior Fuses

Cavity Fuse

Circuits

1

10 Amp Red

Transmission Controller,
Gauges, Autostick

2

10 Amp Red

Right High Beam Headlight

3

10 Amp Red

Left High Beam Headlight

4

10 Amp Red

Radio, CD Player

5

10 Amp Red

Washer Motor

6

15 Amp Lt. Blue Power Outlet

7

20 Amp Yellow

Tail, License, Parking, Illu-
mination Lights, Instru-
ment Cluster

202

MAINTAINING YOUR VEHICLE

Cavity Fuse

Circuits

8

10 Amp Red

Airbag

9

10 Amp Red

Turn Signal Lights, Turn
Signal/Hazard Indicator

10

15 Amp Lt. Blue Right Low Beam

11

20 Amp Yellow

High Beam Relay, High
Beam Indicator, High Beam
Switch

12

15 Amp Lt. Blue Left Low Beam Headlight

13

10 Amp Red

Fuel Pump Relay, Power
Train Control Module

14

10 Amp Red

Cluster, Day/Night Mirror,
Sunroof, Overhead Console,
Garage Door Opener, Body
Control Module

15

10 Amp Red

Daytime Running Light
Module (Canada)

16

20 Amp Yellow

Fog Light Indicator

17

10 Amp Red

ABS Control, Back Up
Lights, Daytime Running
Lights, A/C Heater Con-
trol,

Cavity Fuse

Circuits

18

20 Amp Yellow

Power Amplifier, Horn

19

15 Amp Lt. Blue Overhead Console, Garage

Door Opener, Trunk, Over-
head, Rear Reading, and
Visor Vanity Lights, Trunk
Release Solenoid, Power
Mirrors, Power Door Locks,
Body Control Module, As-
pirator Motor

20

20 Amp Yellow

Brake Lights

21

10 Amp Red

Leak Detection Pump, Low
Rad Relay, High Rad Relay,
A/C Clutch Relay

22

10 Amp Red

Airbag

23

30 Amp Green

Blower Motor, ATC Power
Module

24

20 Amp
C/BRKR

Power Window Motors

25

20 Amp
C/BRKR

Power Door Lock Motors,
Power Seats

MAINTAINING YOUR VEHICLE

203

7

REPLACEMENT BULBS

Interior Light Bulbs

Bulb No.

Cluster Illumination. . . . . . . . . . . . . . . . . . . . . PC194
Turn Signal . . . . . . . . . . . . . . . . . . . . . . . . . . . PC194
Climate Control. . . . . . . . . . . . . . . . . . . . . . . . . . 330
Overhead Console, Front Reading, Courtesy, Grab
Handle . . . . . . . . . . . . . . . . . . . . . . . . . . . . . . . . 192
Trunk . . . . . . . . . . . . . . . . . . . . . . . . . . . . . . . . . 906

Exterior Light Bulbs

Bulb No.

Low Beam Headlights . . . . . . . . . . . . . . . . . . . . 9006
High Beam Headlights . . . . . . . . . . . . . . . . . . . . 9005
Park, Turn, & Side Marker . . . . . . . . . . . . . . . . 3157A
Fog Light . . . . . . . . . . . . . . . . . . . . . . . . . . . . . . H-3
Center Stop Light . . . . . . . . . . . . . . . . . . . . . . . . 922
Tail, Stop, & Turn. . . . . . . . . . . . . . . . . . . . . . . . 3157
Rear Side Marker . . . . . . . . . . . . . . . . . . . . . . . . 168
Back-Up . . . . . . . . . . . . . . . . . . . . . . . . . . . . . . 3157
License . . . . . . . . . . . . . . . . . . . . . . . . . . . . . . . . 168

EXTERIOR LIGHT BULB SERVICE

Headlight Replacement

1. Open the hood and remove the headlight assembly
mounting screws.

2. Pull the headlight assembly forward to access the
bulbs.

3. Turn the bulb assembly retaining ring counterclock-
wise and pull the bulb and socket assembly from the
housing.

204

MAINTAINING YOUR VEHICLE

4. Remove the bulb from the socket and replace the bulb.

CAUTION!

Do not touch the new bulb with your fingers. Oil
contamination will severely shorten bulb life.

If the bulb comes into contact with any oily surface,
clean the bulbs with rubbing alcohol.

5. Reinsert the bulb and socket assembly and turn the
retaining ring clockwise to secure the bulb.

6. Reinstall the headlight assembly.

Front Park, Turn Signal and Side Marker Light

1. Open the hood and remove the headlight assembly
mounting screws.

2. Pull the headlight assembly forward to access the
bulbs.

3. Turn the bulb and socket assembly counterclockwise
and remove it from the housing.

4. Pull the bulb from the socket, install the new bulb,
reinstall the bulb and socket assembly. Reinstall the
headlight assembly.

MAINTAINING YOUR VEHICLE

205

7

Fog Light

1. Remove the screw securing the fog light to the fascia
and pull the light away from the vehicle to expose the
bulb.

2. Remove the bulb by turning counter-clockwise. Pull
the bulb out of the light housing.

3. Remove the wiring connector from the bulb.

4. Insert the new bulb and turn clockwise.

5. Connect the wiring connector to the new bulb and
reinstall the assembly.

Center Stop Light

1. Open the trunk and remove the trunk lid cover.

2. Turn the bulb socket counterclockwise and remove it
from the housing.

3. Pull the bulb from the socket and replace the bulb.

4. Reinstall the bulb and socket assembly and reattach
the trunk lid cover.

206

MAINTAINING YOUR VEHICLE

Tail, Stop, Back Up, and Turn Signal Lights

1. Open the trunk and remove the fasteners securing the
light housing to the body.

2. Pull the light housing from the body to expose the
wiring socket.

3. Turn the bulb socket counterclockwise to remove from
the housing. Pull the bulb from the socket.

4. Replace the bulb, reinstall the socket, and reattach the
light housing.

License Plate Light

1. Remove the screws securing the light to the rear fascia.

2. Remove the bulb and socket assembly and pull the
bulb from the socket.

3. Replace the bulb and reinstall the bulb and socket
assembly.

MAINTAINING YOUR VEHICLE

207

7

SPECIFICATIONS

ENGINE

ALL

Oil Filter

Mopar 5281090 or equivalent

Thermostat

180°F (82°C)

Spark Plug

See Underhood Label

Spark Plug Gap

See Underhood Label

Firing Order

1-2-3-4-5-6

FLUID CAPACITIES

U.S.

Metric

Fuel (Approximate)

17 Gallons

64 Liters

Engine Oil with Filter

2.7 & 3.5 Liter Engine

5 Qts

4.7 Liters

Cooling System*

2.7 Liter Engine

10.5 Qts

10 Liters

3.5 Liter Engine

11 Qts

10.5 Liters

* Includes heater and coolant recovery bottle filled to MAX level.

208

MAINTAINING YOUR VEHICLE


Content      ..     11      12      13      14     ..