Content .. 1951 1952 1953 1954 ..
Dodge Ram Truck 1500-2500-3500. Manual - part 1953
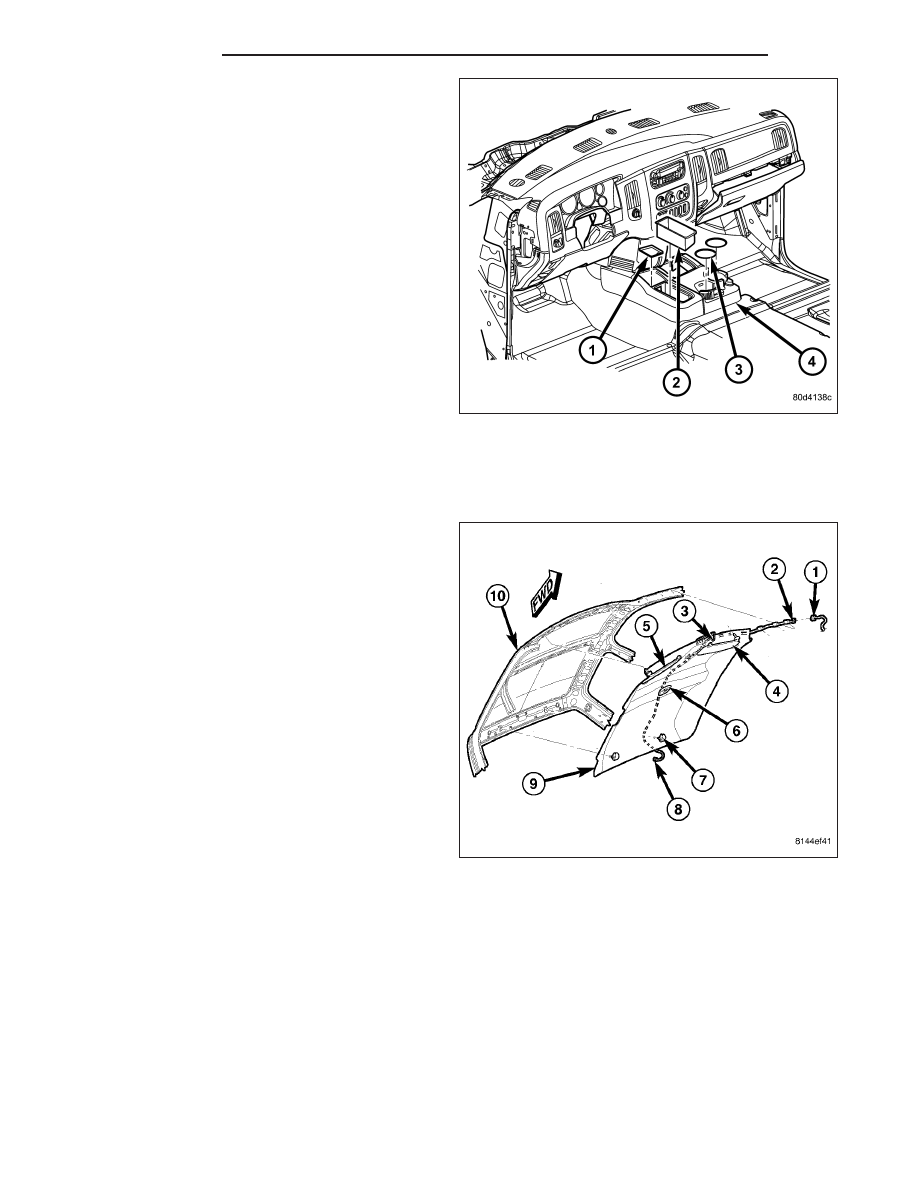
3. Install the three inserts (1 and 3) into the floor con-
sole (4).
4. Position the manual transmission gear shift boot or
storage bin (2) (depending on application) onto the
floor console and engage the retaining tabs.
5. If equipped with a manual transmission, install the
transmission gear shift lever extension.
6. If equipped, install the 4WD gear shift boot (Refer
to 23 - BODY/INTERIOR/4WD FLOOR SHIFT
BOOT - INSTALLATION).
HEADLINER
REMOVAL
NOTE: Headliner for Quad Cab model shown. Reg-
ular cab similar.
1. Remove the A-pillar trim panels (Refer to 23 -
BODY/INTERIOR/A-PILLAR TRIM - REMOVAL).
2. Remove the upper B-pillar trim panels (Refer to 23
-
BODY/INTERIOR/B-PILLAR
UPPER
TRIM
-
REMOVAL).
3. On Quad Cab models, remove the upper C-pillar
trim panels (Refer to 23 - BODY/INTERIOR/C-PIL-
LAR TRIM - REMOVAL).
4. Disconnect the wire harness connector (1) located
at the left A-pillar from the headliner wire harness
(2).
5. Disconnect the headliner wire harness connector
(3) from the inside rear view mirror.
6. Remove the overhead console (Refer to 8 - ELEC-
TRICAL/OVERHEAD CONSOLE - REMOVAL).
7. Remove the sun visors (4) (Refer to 23 - BODY/INTERIOR/SUN VISOR - REMOVAL).
8. Remove the sun visor supports (5) (Refer to 23 - BODY/INTERIOR/SUN VISOR SUPPORT - REMOVAL).
9. Remove the dome lamp (6) (Refer to 8 - ELECTRICAL/LAMPS/LIGHTING - INTERIOR/DOME LAMP -
REMOVAL).
10. Remove the two coat hooks (7) (Refer to 23 - BODY/INTERIOR/COAT HOOK - REMOVAL).
11. Lower the rear of the headliner (9) downward from the roof panel (9) and disconnect the headliner wire harness
connector (8) from the center high mounted stop lamp.
12. Lower the front of the headliner downward and remove the headliner through the passenger door opening.
23 - 166
INTERIOR
DR/DH