Dodge Ram Truck 1500-2500-3500. Manual - part 34
INSTALLATION
NOTE: Discard the nuts and bolts and do not
reuse, New nuts and bolts should be used when
replacing or servicing the suspension arms.
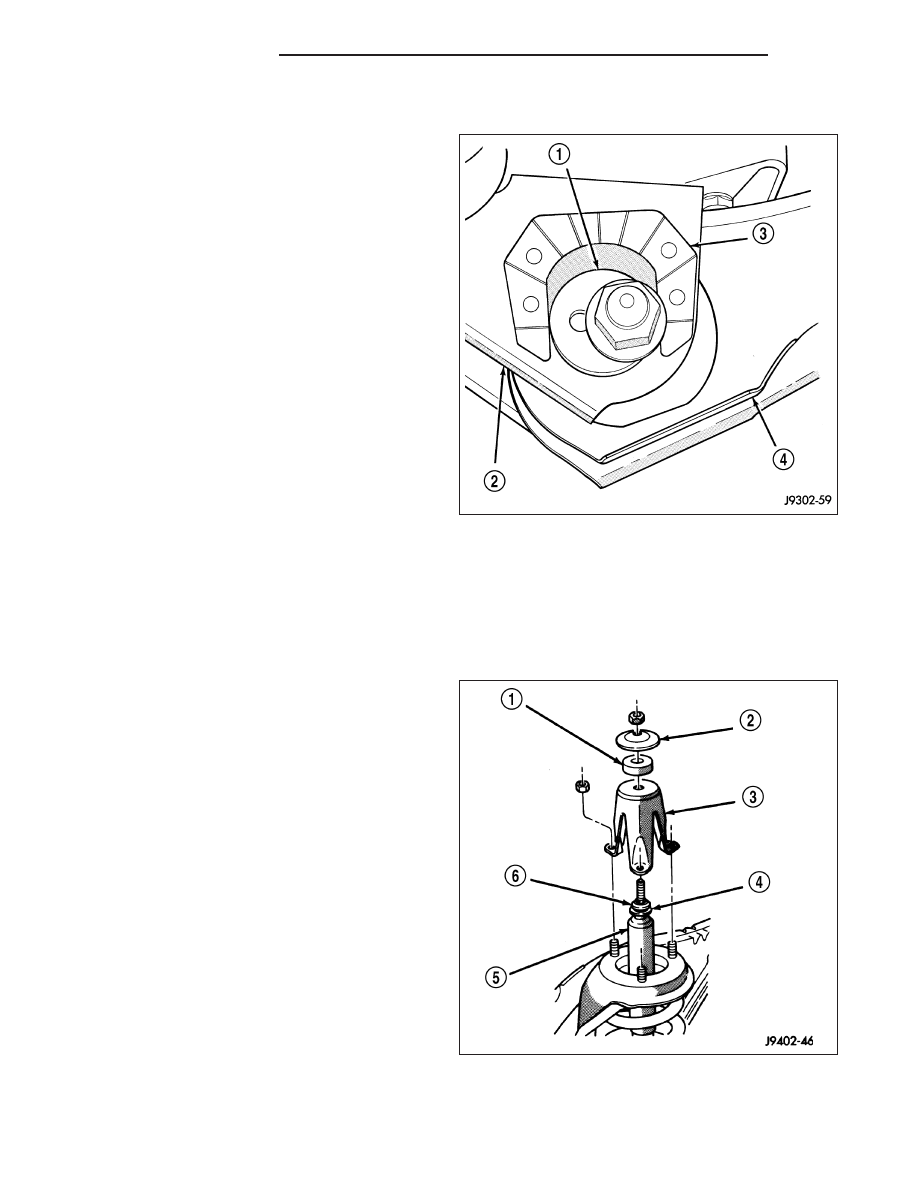
1. Position the lower suspension arm (4) at the axle
bracket (2) and frame rail bracket.
2. Install the rear bolt and finger tighten the nut.
3. Install the cam bolt (1), cam and nut in the axle
and align the reference marks.
4. Remove support and lower the vehicle.
5. Tighten cam nut at the axle bracket to 217 N·m
(160 ft. lbs.). Tighten rear nut at the frame bracket
to 217 N·m (160 ft. lbs.).
SHOCK
DIAGNOSIS AND TESTING
SHOCK
A knocking or rattling noise from a shock absorber (5)
may be caused by movement between mounting
grommets (1&6) and metal brackets (3) or attaching
components. These noises can usually be stopped by
tightening the attaching nuts. If the noise persists,
inspect for damaged and worn bushings, and attach-
ing components. Repair as necessary if any of these
conditions exist.
A squeaking noise from the shock absorber may be
caused by the hydraulic valving and may be intermit-
tent. This condition is not repairable and the shock
absorber must be replaced.
The shock absorbers are not refillable or adjustable. If
a malfunction occurs, the shock absorber must be
replaced. To test a shock absorber, hold it in an
upright position and force the piston in and out of the
cylinder four or five times. The action throughout each
stroke should be smooth and even.
The shock absorber bushings do not require any type
of lubrication. Do not attempt to stop bushing noise by
lubricating them. Grease and mineral oil-base lubri-
cants will deteriorate the bushing.
2 - 82
FRONT - LINK/COIL
DR/DH