Dodge Durango (DN). Manual - part 194
(4) Remove the nine screws that secure the lower
housing cover to the rear overhead A/C unit.
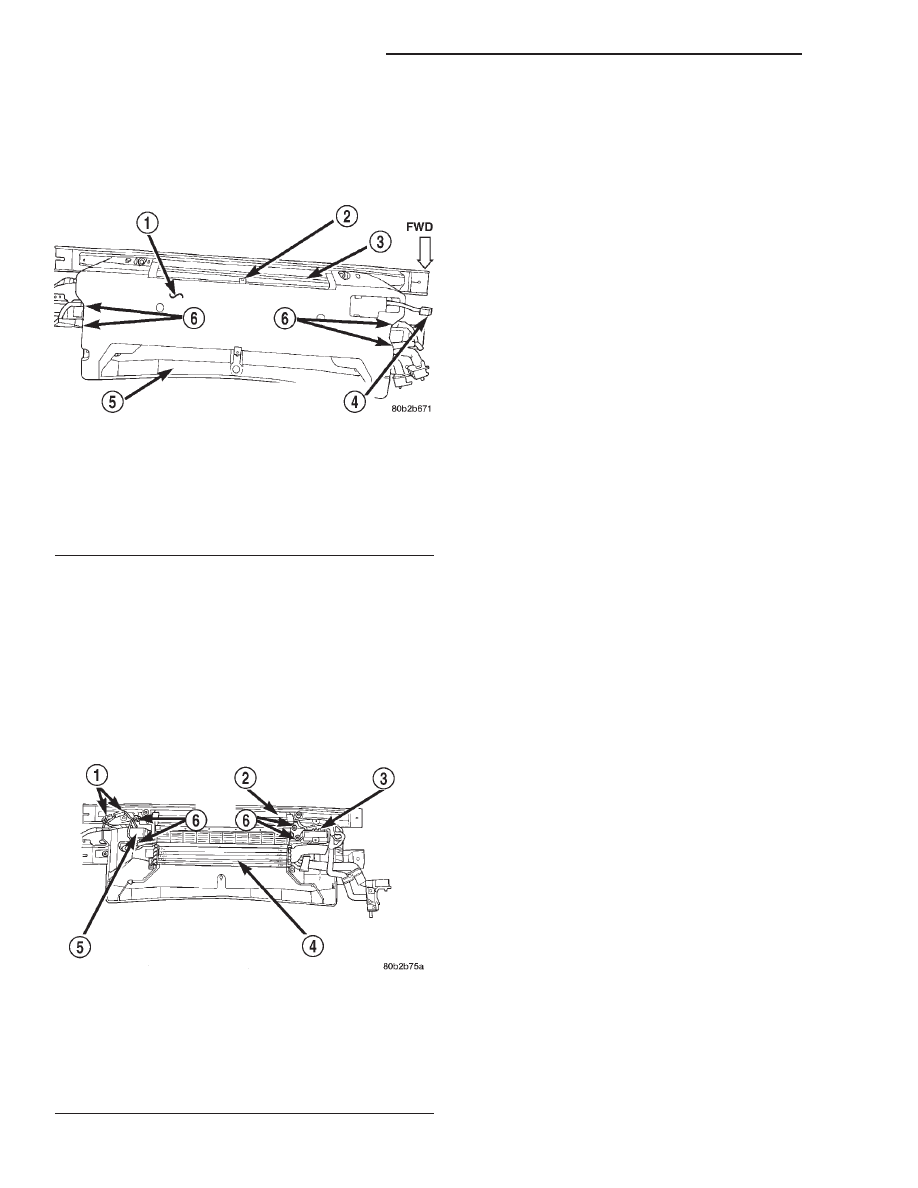
(5) Release the lower housing cover snap retainer
near the center of the outlet side (rear) of the rear
overhead A/C unit (Fig. 18).
(6) Feed the rear blower motor switch wire har-
ness and connector through the hole in the right end
of the rear overhead A/C unit lower housing cover
while removing the cover from the unit.
(7) Disengage the rear blower motor wire harness
connector retainer from the mounting hole in the left
rear corner of the rear overhead A/C unit upper hous-
ing cover.
(8) Unplug the rear blower motor wire harness
connector (Fig. 19).
(9) Remove the four screws that secure the rear
blower motor, wheel and housing unit to the rear
overhead A/C unit upper housing cover.
(10) Lower the rear blower motor, wheel and hous-
ing unit far enough to access and disengage the rear
overhead A/C unit wire harness from each end of the
blower housing.
(11) Remove the rear blower motor, wheel and
housing unit from the rear overhead A/C unit.
INSTALLATION
(1) Position the rear blower motor, wheel and
housing unit to the rear overhead A/C unit, and start
the four mounting screws to hold it in position.
(2) Engage the rear overhead A/C unit wire har-
ness in the routing holes on each end of the blower
housing.
(3) Finish installing the four rear blower motor,
wheel and housing unit mounting screws. Tighten
the mounting screws to 3 N·m (27 in. lbs.).
(4) Plug in the rear blower motor wire harness
connector.
(5) Engage the rear blower motor wire harness
connector retainer in the mounting hole in the left
rear corner of the rear overhead A/C unit upper hous-
ing cover.
(6) Feed the rear blower motor switch wire har-
ness and connector through the hole in the right end
of the rear overhead A/C unit lower housing cover
while positioning the cover to the unit.
(7) Be certain that the lower housing cover snap
retainer near the center of the outlet side (rear) of
the rear overhead A/C unit is engaged.
(8) Install the nine screws that secure the lower
housing cover to the rear overhead A/C unit. Tighten
the mounting screws to 2.2 N·m (20 in. lbs.).
(9) Connect the B-pillar drain hoses to the wye fit-
tings on each side of the rear overhead A/C unit.
(10) Reinstall the headliner to the passenger com-
partment of the vehicle. Refer to Group 23 - Body for
the procedures.
(11) Connect the battery negative cable.
BLOWER MOTOR RELAY
REMOVAL
The blower motor relay (Voltage Reduction Relay
or VRR) is mounted with a single screw directly to
the instrument panel’s structural plastic inside the
glove box opening, next to the left-side energy-ab-
sorbing bracket (Fig. 20).
(1) Disconnect and isolate the battery negative
cable.
(2) Roll down the glove box as described in the
Glove Box section of Instrument Panel Systems.
Fig. 18 Rear Overhead A/C Unit Lower Housing
Cover Remove/Install
1 – REAR OVERHEAD A/C UNIT LOWER HOUSING COVER
2 – SNAP RETAINER
3 – OUTLET SIDE
4 – BLOWER MOTOR SWITCH WIRE HARNESS CONNECTOR
5 – INLET SIDE
6 – DRAIN HOSES
Fig. 19 Rear Blower Motor and Wheel Remove/
Install
1 – WIRE HARNESS CONNECTORS
2 – BLOWER WHEEL AND HOUSING
3 – RESISTOR
4 – EVAPORATOR COIL
5 – BLOWER MOTOR
6 – SCREWS
24 - 34
HEATING AND AIR CONDITIONING
DN
REMOVAL AND INSTALLATION (Continued)