Dodge Durango (DN). Manual - part 165
 

  Index      Dodge     Dodge Durango (DN) - service repair manual 2000 year


Search            


Content   ..  163  164  165  166   ..


Dodge Durango (DN). Manual - part 165


(7) Install window crank, if equipped.

REAR DOOR WATERDAM

REMOVAL

(1) Remove door trim panel.
(2) Peel the waterdam from the door.
(3) Route the latch rods and wire harnesses

through the waterdam.

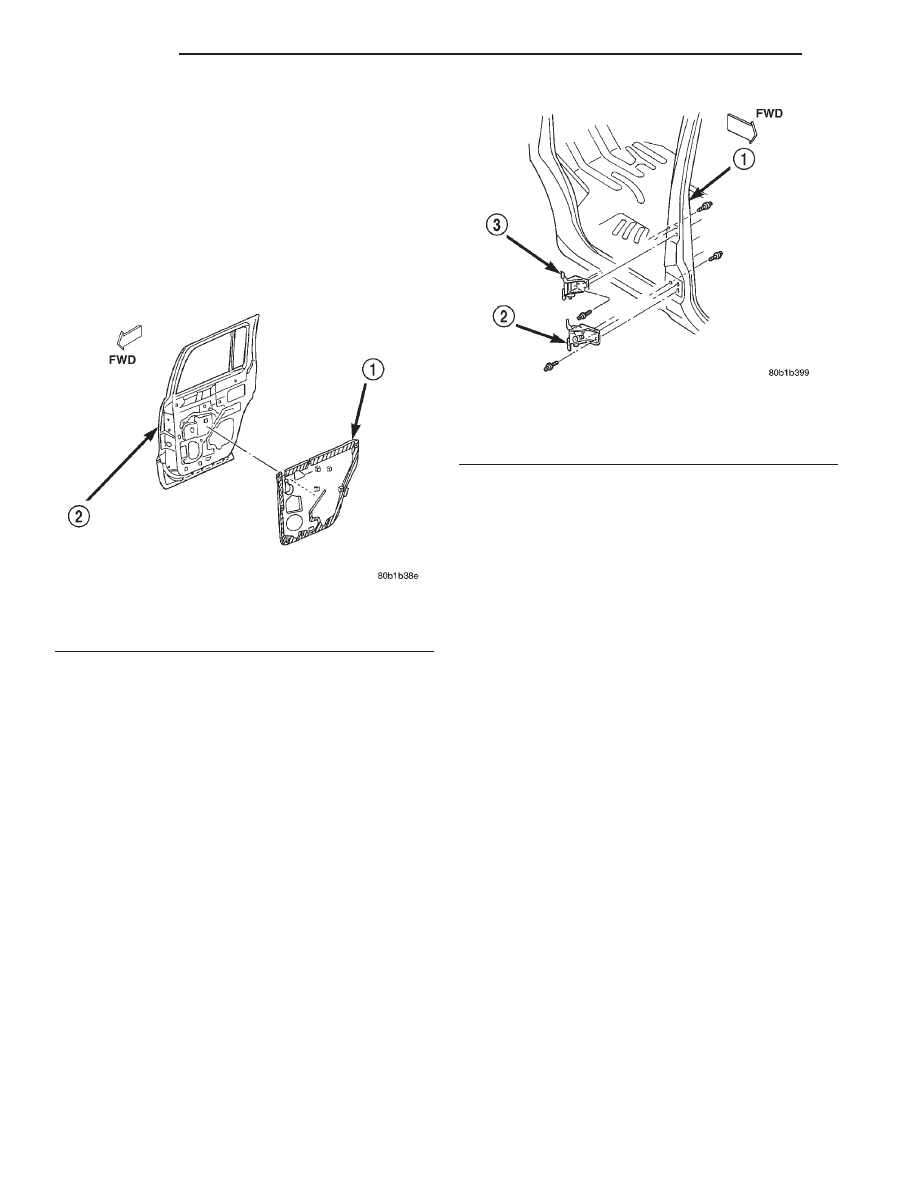
(4) Separate the waterdam from the door inner

panel (Fig. 46).

INSTALLATION

(1) Route the latch rods and wire harnesses

through the waterdam.

(2) Position the waterdam on the door, apply adhe-

sive as necessary and press into place.

(3) Install door trim panel.

REAR DOOR

REMOVAL

(1) Remove B-pillar trim.
(2) Disconnect door wire harness connector.
(3) Support door on suitable stand.
(4) Using a wax crayon or equivalent, mark hinge

position on B-pillar.

(5) Remove bolts attaching hinge to B-pillar (Fig.

47).

INSTALLATION

(1) Align and position door on vehicle.
(2) Install bolts attaching hinge to B-pillar (Fig.

47). Tighten bolts to 28 N·m (20 ft. lbs.) torque.

(3) Connect door wire harness connector.
(4) Install B-pillar trim.

REAR DOOR HINGE

REMOVAL

(1) Remove B-pillar trim.
(2) Disconnect door wire harness connector.
(3) Support door on suitable stand.
(4) Using a wax crayon or equivalent, mark hinge

position on B-pillar.

(5) Remove bolts attaching hinge to B-pillar (Fig.

47).

(6) Separate door from vehicle.
(7) Using a wax crayon or equivalent, mark hinge

position on door.

(8) Remove bolts attaching hinge to door.

INSTALLATION

(1) Align and position hinge on door.
(2) Install bolts attaching hinge to door. Tighten

bolts to 28 N·m (20 ft. lbs.) torque.

(3) Align and position door on vehicle.
(4) Install bolts attaching hinge to B-pillar (Fig.

47). Tighten bolts to 28 N·m (20 ft. lbs.) torque.

(5) Connect door wire harness connector.
(6) Install B-pillar trim.

REAR DOOR OUTSIDE HANDLE

REMOVAL

(1) Remove trim panel.
(2) Peel back waterdam to access outside handle.
(3) Remove glass run channel.
(4) Disconnect latch rod (Fig. 48).
(5) Remove nuts attaching handle to outer door

panel (Fig. 49).

(6) Separate outside handle from rear door.

Fig. 46 Rear Door Waterdam

1 – WATER DAM
2 – REAR DOOR

Fig. 47 Rear Door Hinge

1 – B-PILLAR
2 – LOWER HINGE
3 – UPPER HINGE

23 - 40

BODY

DN

REMOVAL AND INSTALLATION (Continued)

INSTALLATION

(1) Position outside handle in rear door.
(2) Install nuts attaching handle to outer door

panel (Fig. 49).

(3) Connect latch rod (Fig. 48).
(4) Install glass run channel.
(5) Install waterdam.
(6) Install trim panel.

REAR DOOR LATCH

REMOVAL

(1) Remove trim panel.
(2) Peel waterdam back to access latch.
(3) Disconnect latch rods from latch (Fig. 50).

(4) Disconnect the latch harness connector.
(5) Remove screws attaching latch to rear door

(Fig. 51).

INSTALLATION

(1) Connect the latch harness connector.
(2) Install screws attaching latch to rear door.
(3) Connect latch rods to latch.
(4) Install waterdam.
(5) Install trim panel.

REAR DOOR LATCH STRIKER

REMOVAL

(1) Use a wax crayon or equivalent and mark posi-

tion of striker on C-pillar.

Fig. 48 Latch Rod

1 – OUTSIDE HANDLE
2 – LATCH
3 – LATCH ROD

Fig. 49 Rear Door Outside Handle

1 – REAR DOOR
2 – HANDLE

Fig. 50 Rear Door Latch Rods

1 – LATCH
2 – LATCH ROD
3 – LATCH ROD
4 – CONNECTOR

Fig. 51 Rear Door Latch

1 – REAR DOOR
2 – LATCH

DN

BODY

23 - 41

REMOVAL AND INSTALLATION (Continued)

(2) Remove bolts attaching striker and shim to

C-pillar (Fig. 52).

(3) Separate striker from C-pillar.

INSTALLATION

(1) Using alignment marks, position shim and

striker on C-Pillar.

(2) Install bolts. Tighten bolts to 28 N·m (20 ft.

lbs.) torque.

REAR DOOR INSIDE HANDLE ACTUATOR

The rear door inside handle actuator is heat staked

to the trim panel. If the handle needs servicing, refer
to the heat staking procedure located in this section.

REAR DOOR INNER BELT WEATHERSTRIP

REMOVAL

(1) Remove trim panel.
(2) Pull weatherstrip from inner door panel (Fig.

53).

INSTALLATION

(1) Position weatherstrip on inner door panel (Fig.

53).

(2) Press into place.
(3) Install trim panel.

REAR DOOR OUTER BELT WEATHERSTRIP

REMOVAL

(1) Lower glass.
(2) Lift corner of weatherstrip upward and remove

weatherstrip from outer door panel (Fig. 53).

INSTALLATION

(1) Position weatherstrip on outer door panel (Fig.

53).

(2) Press into place.
(3) Raise glass.

REAR DOOR OPENING WEATHERSTRIP

REMOVAL

(1) Remove door sill trim.
(2) Loosen upper and lower B-pillar trim to access

weatherstrip.

(3) Remove C-pillar trim.
(4) Pull quarter panel trim outward to access

weatherstrip.

(5) Pull weatherstrip from pinch flange around

door opening (Fig. 54).

INSTALLATION

(1) Clean pinch flange
(2) Position the weatherstrip on the pinch flange

around door opening and press into place.

(3) Install quarter panel trim.
(4) Install C-pillar trim.
(5) Install B-pillar trim.
(6) Install door sill trim. Ensure the clips attach-

ing the sill trim to the door sill are fully seated.

(7) Install A-pillar trim.

REAR DOOR WINDOW REGULATOR

REMOVAL

(1) Remove upper door trim extension panel.
(2) Remove door trim panel.
(3) Position glass to access the fasteners. Remove

the fasteners.

Fig. 52 Rear Door Latch Striker

1 – C-PILLAR
2 – SHIM
3 – STRIKER
4 – TAPPING PLATE

Fig. 53 Inner/Outer Belt Weatherstrip

1 – OUTER BELT WEATHERSTRIP
2 – INNER BELT WEATHERSTRIP

23 - 42

BODY

DN

REMOVAL AND INSTALLATION (Continued)

(4) Disengage glass from regulator lift channel.
(5) Position glass up into door frame (rest glass on

a block of wood on door reinforcement).

(6) Lower waterdam.
(7) Disconnect regulator wire harness, if equipped.
(8) Remove screws attaching window regulator to

door inner panel (Fig. 55) and (Fig. 56).

(9) Remove window regulator from door.

INSTALLATION

(1) Position window regulator in door.
(2) Loosely install screws attaching window regu-

lator to door inner panel.

(3) Install glass onto regulator lift channel. Secure

fasteners.

(4) Connect regulator wire harness, if equipped.
(5) Cycle the window glass to the full up position.

(6) Tighten bolts attaching the regulator to the

inner door panel.

(7) Install waterdam.
(8) Install door trim panel.
(9) Install upper door trim extension panel.

REAR DOOR GLASS RUN WEATHERSTRIP

REMOVAL

(1) Remove trim panel.
(2) Remove inner beltline weatherstrip.
(3) Remove outer beltline weatherstrip.
(4) Pull weatherstrip from door frame and divider

bar channel (Fig. 57).

Fig. 54 Door Opening Weatherstrip

1 – UPPER BODY SEAL
2 – PRIMARY DOOR SEAL

Fig. 55 Rear Door Window Regulator—Manual

1 – REAR DOOR
2 – MANUAL REGULATOR

Fig. 56 Rear Door Window Regulator—Power

1 – REAR DOOR POWER REGULATOR
2 – NUT

Fig. 57 Glass Run Weatherstrip

1 – REAR DOOR
2 – GLASS RUN WEATHERSTRIP

DN

BODY

23 - 43

REMOVAL AND INSTALLATION (Continued)


Content   ..  163  164  165  166   ..