Dodge Durango (DN). Manual - part 61
(4) Remove spring retainer and clutch spring. Note
position of retainer on spring for assembly reference.
(5) Remove clutch piston from clutch retainer.
Remove piston by rotating it up and out of retainer.
(6) Remove seals from clutch piston and clutch
retainer hub. Discard both seals as they are not reus-
able.
ASSEMBLY
(1) Soak clutch discs in transmission fluid while
assembling other clutch parts.
(2) Install new seals on piston and in hub of
retainer. Be sure lip of each seal faces interior of
clutch retainer.
(3) Lubricate lips of piston and retainer seals with
liberal quantity of Mopar
t Door Ease. Then lubricate
retainer hub, bore and piston with light coat of trans-
mission fluid.
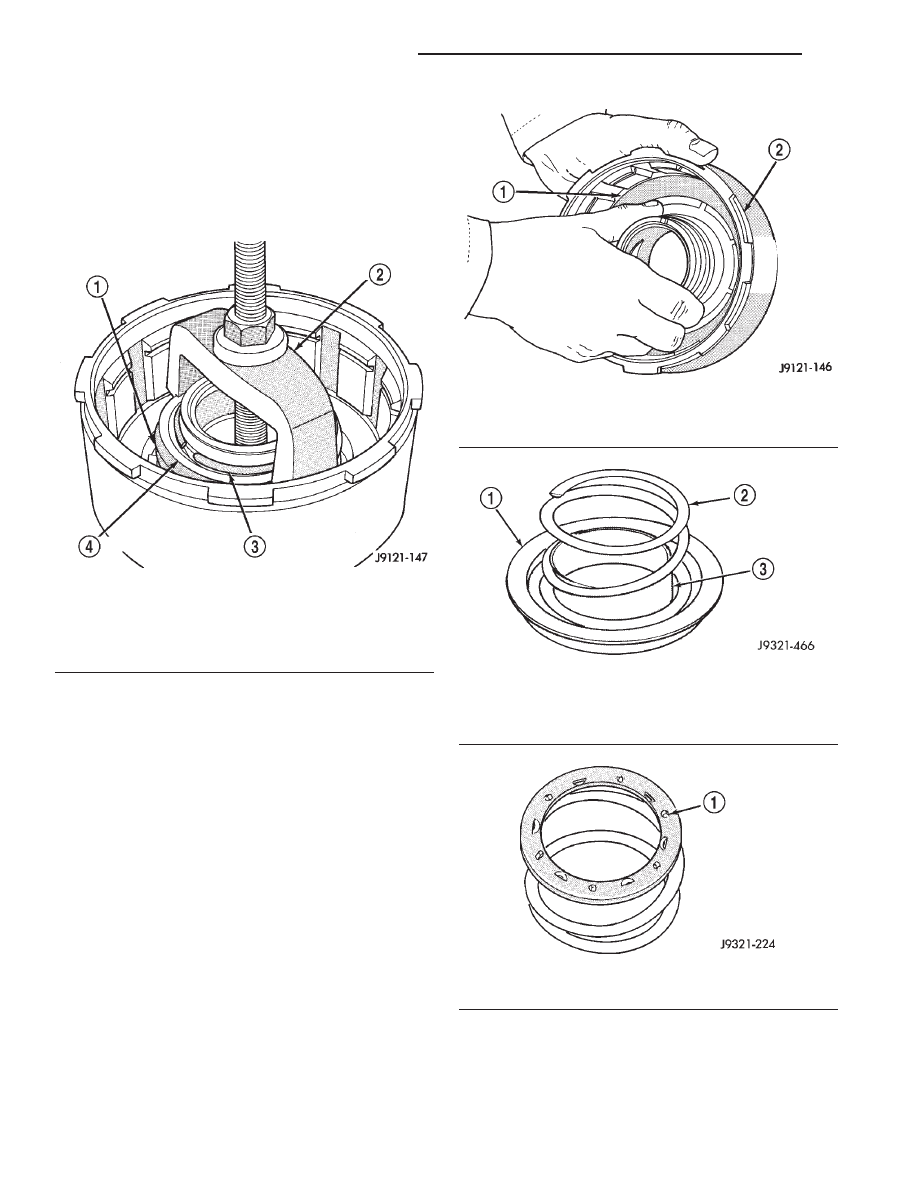
(4) Install clutch piston in retainer (Fig. 211). Use
twisting motion to seat piston in bottom of retainer.
CAUTION: Never push the clutch piston straight in.
This will fold the seals over causing leakage and
clutch slip.
(5) Position spring in clutch piston (Fig. 212).
(6) Position spring retainer on top of piston spring
(Fig.
213).
Make
sure
retainer
is
properly
installed. Small raised tabs should be facing
upward. Semicircular lugs on underside of
retainer are for positioning retainer in spring.
(7) Compress piston spring and retainer with Com-
pressor Tool C-3575-A (Fig. 210). Then install new
snap ring to secure spring retainer and spring.
(8) Install clutch plates and discs (Fig. 209).
Install steel plate then disc until all plates and discs
Fig. 210 Compressing Front Clutch Piston Spring
1 – FRONT CLUTCH SPRING
2 – COMPRESSOR TOOL C-3575–A
3 – RETAINER SNAP RING
4 – SPRING RETAINER
Fig. 211 Front Clutch Piston Installation
1 – CLUTCH PISTON
2 – FRONT CLUTCH RETAINER
Fig. 212 Clutch Piston Spring Installation
1 – RETAINER
2 – CLUTCH SPRING
3 – PISTON
Fig. 213 Correct Spring Retainer Installed Position
1 – SMALL TABS ON RETAINER FACE UPWARD
21 - 110
42/44RE AUTOMATIC TRANSMISSION
DN
DISASSEMBLY AND ASSEMBLY (Continued)