Dodge Dakota (R1). Manual - part 560
INSTALLATION
CAUTION: Whenever fuel pump module is serviced,
the module gasket must be replaced.
(1) Using a new gasket, position fuel pump module
into opening in fuel tank. Be sure rubber gasket
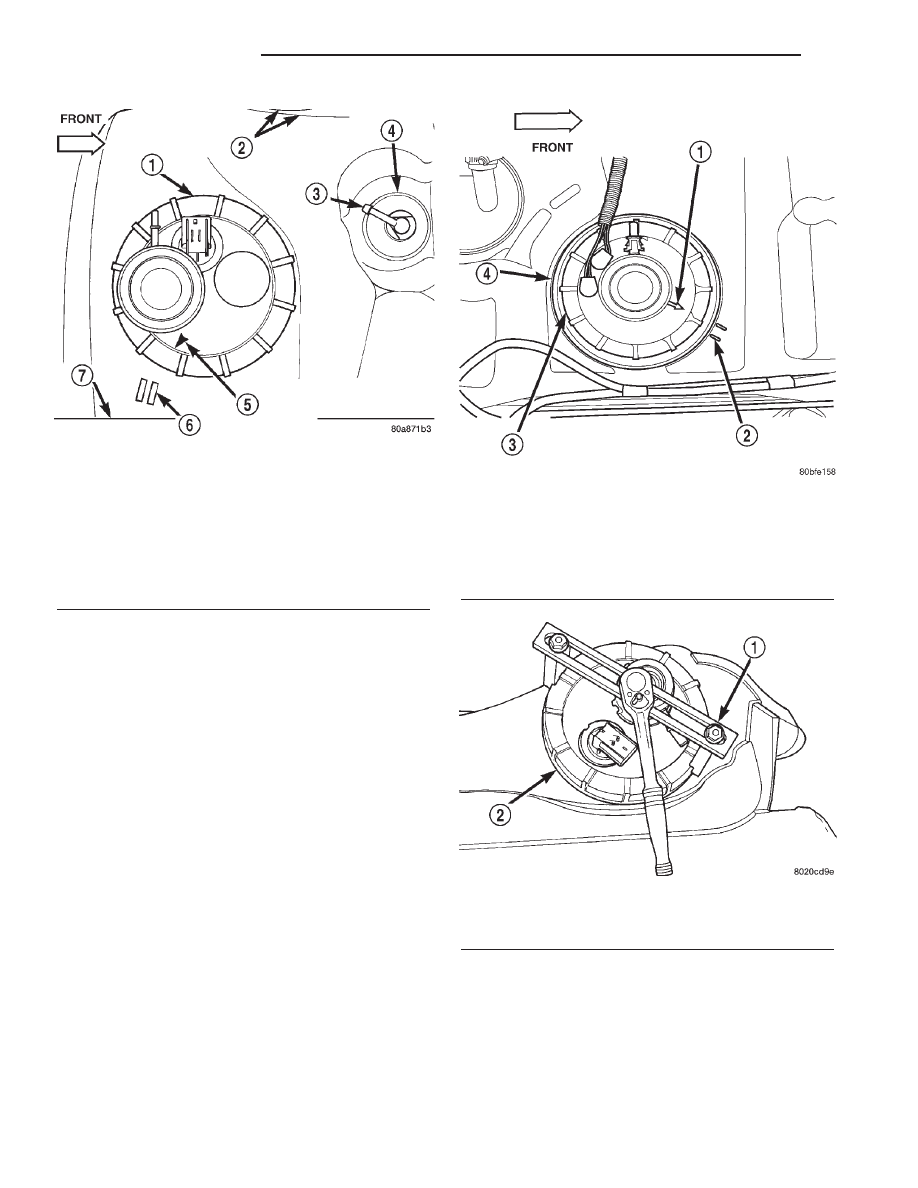
remains in place. 2 Door Models: Rotate module
assembly until module alignment arrow is at 7
o’clock position (Fig. 14). The front of fuel tank is to
the right in (Fig. 14). Arrow should be pointed to fuel
tank markings (Fig. 14). 4 Door Models: Rotate
module assembly until module alignment arrow is at
4 o’clock position (Fig. 15). The front of fuel tank is to
the right in (Fig. 15). Arrow should be pointed to fuel
tank markings (Fig. 15). This step must be followed
to prevent float/float rod from contacting sides of fuel
tank.
(2) Position locknut over top of fuel pump module.
Tighten finger tight.
(3) Carefully rotate fuel filter/fuel pressure regula-
tor until fuel fitting is pointed towards drivers side of
vehicle (Fig. 14) or (Fig. 15). The front of fuel tank is
to the right in (Fig. 14) or (Fig. 15).
(4) Install Special Tool 6856 to locknut.
(5) Tighten locknut to 54 N·m (40 ft. lbs.) torque.
While tightening locknut, be sure module has not
rotated.
(6) Install fuel tank. Refer to Fuel Tank Installa-
tion.
Fig. 14 Top View of Fuel Pump Module—2 Door
Models
1 - LOCKNUT
2 - TANK FITTINGS
3 - EVAP FITTING
4 - ROLLOVER VALVE
5 - MODULE ALIGNMENT ARROW (7 O’CLOCK)
6 - TANK MARKINGS
7 - FUEL TANK
Fig. 15 Top View of Fuel Pump Module—4 Door
Models
1 - MODULE ALIGNMENT ARROW (4 O’CLOCK)
2 - TANK MARKINGS
3 - LOCKNUT
4 - FUEL TANK
Fig. 16 Locknut Removal/Installation—Typical
1 - SPECIAL TOOL 6856
2 - LOCKNUT
14 - 12
FUEL DELIVERY
AN
FUEL PUMP MODULE (Continued)