Chrysler Le Baron, Dodge Dynasty, Plymouth Acclaim. Manual - part 301


  Index      Dodge     Chrysler Le Baron, Dodge Dynasty, Plymouth Acclaim - service repair manual 1993 year


Search            


Content   ..  299  300  301  302   ..


Chrysler Le Baron, Dodge Dynasty, Plymouth Acclaim. Manual - part 301


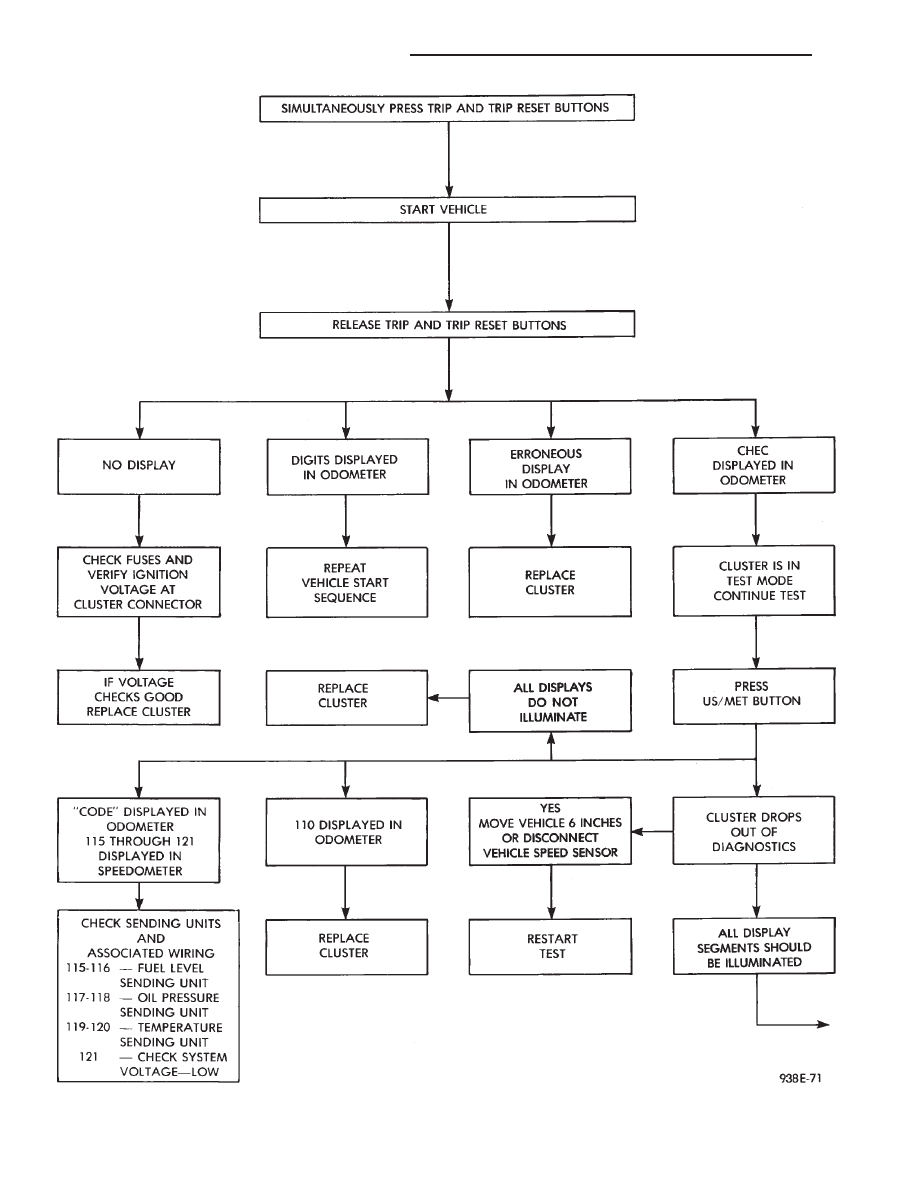
Fig. 37 Self-Diagnostic Test

8E - 16

INSTRUMENT PANEL AND GAUGES

Ä

Fig. 38 Self-Diagnostic Test Continued

Ä

INSTRUMENT PANEL AND GAUGES

8E - 17

(6) For installation reverse above procedures and

check operation of glove box door and adjust latch as
necessary.

GLOVE BOX LAMP AND SWITCH
REPLACEMENT

(1) Disconnect battery negative cable and isolate

or remove fuse #2 prior to removing switch or wires
may short to ground.

(2) Open glove box door. The lamp can be removed

without removing switch

(3) Remove switch by squeezing retaining tabs

from behind switch mount and slide rearward. Dis-
connect wiring connectors.

(4) Remove lamp and switch.
(5) For installation reverse above procedures.

FOG LAMP RELAY REPLACEMENT

(1) Disconnect battery negative cable and isolate

or remove fuse #2 prior to removing switch or wires
may short to ground.

ART: 938e-92 ; SIZE (6) = 4-1/2h x 7-1/4w

Fig. 39 Cluster Connectors

Fig. 40 Cluster Bezel

Fig. 41 Headlamp Switch Mounting Screws

8E - 18

INSTRUMENT PANEL AND GAUGES

Ä

(2) Remove glove box assembly (Fig. 49). Refer to

Glove Box Assembly Replacement.

(3) Remove screw from relay.
(4) Disconnect wiring.
(5) Remove relay.

(6) For installation reverse above procedures.

REAR WINDOW DEFOGGER SWITCH
REPLACEMENT

(1) Remove left bezel by pulling straight back.
(2) Press tabs and pull switch rearward.
(3) Disconnect wiring and remove switch.
(4) For installation reverse above procedures.

INSTRUMENT PANEL CENTER BEZEL
REPLACEMENT

(1) Pull bezel straight back disengaging five clips.
(2) Disconnect ash receiver lamp and wiring from

bezel.

(3) For installation reverse above procedures.

ASH RECEIVER/CUP HOLDER REPLACEMENT

(1) Remove center bezel. Disconnect ash receiver

lamp socket.

(2) Remove four screws from center module and re-

move module.

Fig. 42 Headlamp Switch Wiring Connectors

Fig. 43 Headlamp Switch Knob and Stem

Fig. 44 Headlamp Switch Mounting Nut

Fig. 45 Fog Lamp Switch Test

Fig. 46 Lower Steering Column Cover

Ä

INSTRUMENT PANEL AND GAUGES

8E - 19


Content   ..  299  300  301  302   ..