Daewoo Matiz (2003 year). Manual - part 157
 

  Index      Daewoo     Daewoo Matiz - service repair manual 2003 year


Search            


Content   ..  155  156  157  158   ..


Daewoo Matiz (2003 year). Manual - part 157


FIVE-SPEED MANUAL TRANSAXLE  5B – 11

D13B5031

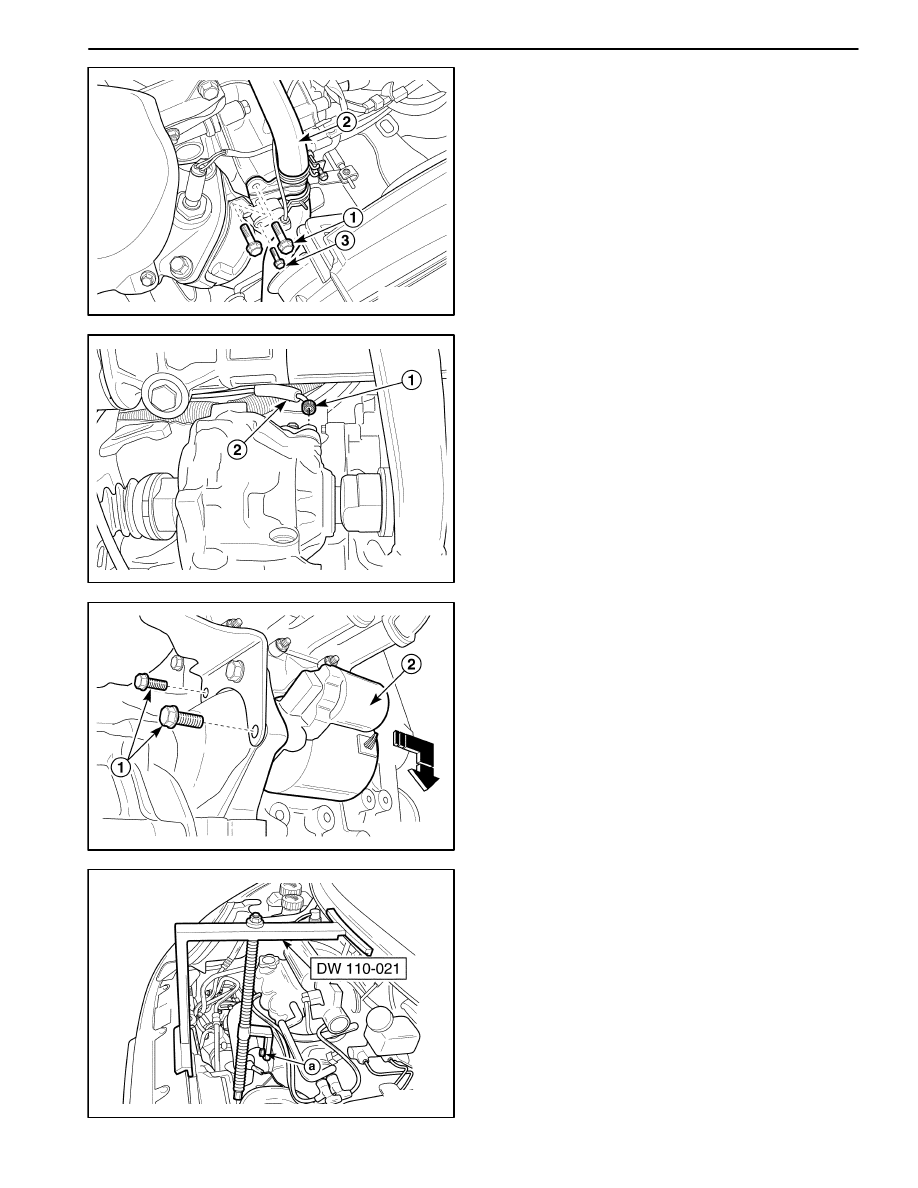
6.

Disconnect the radiator lower hose.

D

Remove the bolts (1).

D

Disconnect the radiator lower hose (2).

7.

Remove crankshaft position (CKP) sensor.

D

Remove the bolt (3).

D

Disconnect the CKP sensor connector

D

Remove the CKP sensor.

D103B507

8.

Disconnect the speedometer cable.

D

Loosen the nut (1).

D

Disconnect the cable (2).

9.

Remove the vehicle speed sensor (VSS) if
equipped.

D

Disconnect VSS connector.

D

Remove the VSS.

D102E502

10. Remove the starter motor.

D

Remove upper two bolts that securing starter mo-
tor to transaxle.

D13B5041

11. Fix the engine assembly.

D

Remove the cowl panel weatherstrip.

D

Position the engine support fixture DW110–021
on the cowl panel and the front upper panel.

D

Tighten the engine fixture joint with a bolt after re-
moving exhaust manifold bolt (No.4).

5B – 12  FIVE-SPEED MANUAL TRANSAXLE

D103B510

12. Remove the transaxle upper bolts.

a. Exhaust manifold side bolt.

b. Thermostat housing side bolt.

D103B505

13. Remove the transaxle under cover.

D

Remove the bolts (1).

D

Remove the transaxle under cover (2).

14. Remove the front tires and wheels.

D103B506

15. Drain the transaxle fluid.

D

Remove the drain plug and drain the fluid.

16. Disconnect the clutch cable.

D

Remove the cable adjust nut (1).

D

Disconnect the cable from the wire clip (2).

D

Disconnect the cable from the transaxle mount
hole (3).

D103B509

17. Remove the front under longitudinal frames and sta-

bilizer. Refer to Section 2C, Front Suspension.

18. Remove the drive axle (only transaxle side). Refer

to Section 3B, Manual Transaxle Drive Axle.

19. Remove the clutch housing lower plate.

D

Remove the bolts (1).

D

Remove the lower plate (2).

FIVE-SPEED MANUAL TRANSAXLE  5B – 13

D12B5731

20. Remove the front exhaust pipe.

D

Remove the front exhaust pipe nuts (exhaust
manifold side) (1).

D

Remove the gasket and separate exhaust man-
ifold pipe (2).

D

Make free the front exhaust pipe.

D13B5111

21. Support the transaxle with the transaxle remove/

install support DW220–030N.

D

Position the support on the jack (a).

D

Support the transaxle case and mount using a
jack and the transaxle remove/install support.

D103B512

22. Remove the transaxle lower bolt and nut.

a. Lower bolt.

b. Lower nut.

D13B5131

23. Remove the transaxle mount bolts.

5B – 14  FIVE-SPEED MANUAL TRANSAXLE

D13B5141

24. Position the manual transaxle assembly in tilting.

D

To remove the manual transaxle side cover with-
out the interference with the front under longitudi-
nal panel (Left), tilt the engine/manual transaxle by
loosening the engine support fixture DW110– 021
joint with the wrench.

D13B5151

25. Remove the manual transaxle assembly.

D

Lower the transaxle assembly slowly by adjusting
jack.

a. Jack.

b. Transaxle assembly.

D

Tilt the transaxle assembly by adjusting jack.

D

Remove the transaxle assembly by pulling and
lowering it slowly.

D103B516

26. Support the engine to normal position using the en-

gine support fixture DW110–021.

Notice: The abnormal position of the engine may dam-
age to the related parts or interfere with them. You have
to support the engine to normal position when removing
the transaxle.

Important: If it is impossible to use the special tool, sup-
port the engine to normal position with the auto jack.

D13B5171

Installation Procedure

1. Install in the reverse order of removal.

2. Install the transaxle mounting bolts.

Tighten

Tighten the transaxle mounting bolts (body side) to
45–55 N

S

m (33–41 lb-ft).


Content   ..  155  156  157  158   ..