Citroën Berlingo (2022 year). Manual in english - page 13
 

  Index      Manuals     Citroën Berlingo (2022 year). Manual in english


Search            copyright infringement  


Content      ..     11      12      13      14     ..


Citroën Berlingo (2022 year). Manual in english - page 13


194

Practical information

ignition is switched on (for vehicles equipped 

with an electric gauge), or using the dipstick.

It is normal to top up the oil level between two 

services (or oil changes). It is recommended 

that you check the level, and top up if necessary, 

every 3,000 miles (5,000 km).

In order to maintain the reliability of the 

engine and emissions control system, 

never use additives in the engine oil.

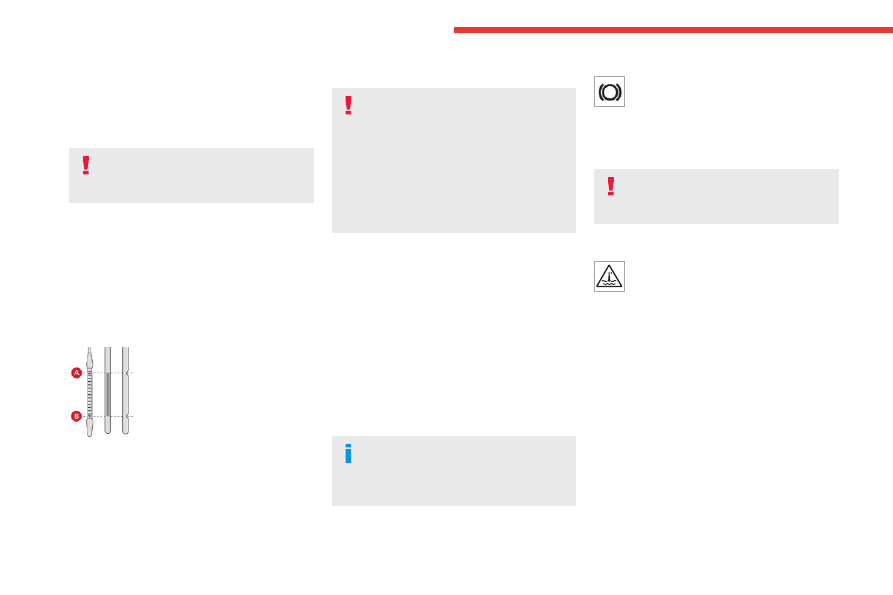
Checking using the dipstick

For the location of the dipstick, please refer 

to the illustration of the corresponding engine 

compartment.

►  Grasp the dipstick by its coloured grip and 

pull it out completely.

►  Wipe the end of the dipstick using a clean, 

lint-free cloth.


►  Reinsert the dipstick and push fully down, 

then pull it out again to visually check the oil 

level: the correct level is between marks 

A (max)


and 

B (min).

Do not start the engine if the level is:

–  above mark 

A

: contact a CITROËN dealer or a 

qualified workshop.

–  below mark 

B

: top up the engine oil 

immediately.

Oil grade

Before topping up or changing the 

engine oil, check that the oil is suitable 

for your engine and complies with the 

recommendations in the service schedule 

supplied with the vehicle (or available from 

your CITROËN dealer or qualified workshop).

Use of non-recommended oil may invalidate 

your warranty in the event of engine failure.

Topping up the engine oil level

For the location of the engine oil filler cap, please 

refer to the corresponding engine compartment 

illustration.

►  Add oil in small quantities, avoiding any spills 

on engine components (risk of fire).

►  Wait a few minutes before checking the level 

again using the dipstick.

►  Top up the level if necessary.

►  After checking the level, carefully screw the 

oil filler cap back on and replace the dipstick in 

its tube.

The oil level indication displayed on the 

instrument panel when the ignition is 

switched on is not valid for 30 minutes 

following an addition of oil. 

Brake fluid

The level of this fluid should be 

close to 

the "

MAX

" mark. If not, check the brake 

pads for wear.

To know how often the brake fluid should be 

replaced, refer to the manufacturer's servicing 

schedule.

Clean the cap before removing it to refill. 

Use only DOT4 brake fluid from a sealed 

container.

Engine coolant

It is normal to top up this 

fluid between 

two services.

The check and top-up must only be done with 

the engine cold.

A level of coolant that is too low risks causing 

major damage to the engine; the coolant level 

must be close to the "

MAX

" mark without ever 

going above it.

If the level is close to or below the "

MIN

" mark, it 

is essential to top it up.

When the engine is hot, the temperature of the 

coolant is regulated by the fan.

As the cooling system is pressurised, wait at 

least one hour after switching off the engine 

before carrying out any work.

In order to avoid the risk of scalding if you need 

to top up in an emergency, wrap a cloth around 

the cap and unscrew the cap by two turns to 

allow the pressure to drop.

-------------------------------------------------------------------------------------------------------------------------------------------------------------

195

Practical information

7

Once the pressure has dropped, remove the cap 

and top up to the required level.

Vehicle with electric motor

Do not top up the coolant. 

If the level is close to or below 

the "

MIN

" mark, it is essential to contact a 

CITROËN dealer or a qualified workshop.

Screenwash fluid

Top up to the required level when 

necessary.

Capacity of the tank:

–  5.3 litres for "very cold climate" versions.

–  2.2 litres for other versions.

Fluid specification

The fluid must be topped up with a pre-mixed 

product.

In winter (temperatures below zero), a fluid 

containing an anti-freeze agent which is 

appropriate for the temperature conditions 

must be used in order to protect the system's 

components (pump, tank, ducts, jets).

Filling with pure water is prohibited in all 

circumstances (risk of freezing, 

limescale, etc.).

Diesel fuel additive (Diesel 

with particle filter)

On reaching the minimum level in 

the particle filter additive tank, one 

of these warning lamps comes on fixed, 

accompanied by an audible signal and a warning 

message.

Topping up

The topping up of this additive must be carried 

out quickly.

Visit a CITROËN dealer or a qualified workshop.

AdBlue

®

 (BlueHDi)

An alert is triggered when the reserve level is 

reached.

For more information on the 

Indicators

 and in 

particular the AdBlue range indicators, refer to 

the corresponding section.

To avoid the vehicle being immobilised in 

accordance with regulations, you must top up the 

AdBlue tank.

For more information on 

AdBlue

®

 (BlueHDi)

and in particular the supply of AdBlue, refer to 

the corresponding section.

Checks

Unless otherwise indicated, check these 

components in accordance with the 

manufacturer's service schedule and according 

to your engine.

Otherwise, have them checked by a CITROËN 

dealer or a qualified workshop.

Only use products recommended by 

CITROËN or products of equivalent 

quality and specification.

In order to optimise the operation of 

components as important as those in the 

braking system, CITROËN selects and offers 

very specific products.

12 V battery

The battery does not require any 

maintenance.

Check regularly that the terminals are correctly 

tightened (versions without quick-release 

terminals) and that the connections are clean.

For more information on the precautions 

to take before any work on the 

12 V 

battery

, refer to the corresponding section.

Versions equipped with Stop & Start are 

fitted 

with a 12 V lead-acid battery with 

special technology and specifications.

Its replacement should be carried out only by 

a CITROËN dealer or a qualified workshop.

-------------------------------------------------------------------------------------------------------------------------------------------------------------

196

Practical information

Passenger compartment 

filter

Depending on the environment and the 

use of the vehicle (e.g. dusty atmosphere, 

city driving), 

change it twice as often, if 

necessary

.

A clogged passenger compartment filter 

can adversely affect air conditioning 

system performance and generate 

undesirable odours.

Air filter

Depending on the environment and the 

use of the vehicle (e.g. dusty atmosphere, 

city driving), 

change it twice as often, if 

necessary

.

Oil filter

Change the oil filter each time the 

engine 

oil is changed.

Particle filter (Diesel)

 / 

The start of clogging of the 

particle filter is indicated by the 

temporary lighting of this warning lamp, 

accompanied by an alert message.

As soon as traffic conditions allow, regenerate 

the filter by driving at a speed of at least 37 mph 

(60 km/h), with an engine speed above 2,500 

rpm, for about 15 minutes (until the warning lamp 

goes out).

If it is not possible to reach 37 mph (60 km/h), 

leave the engine running at idle for about 15 

minutes, then drive with an engine speed above 

2,500 rpm for 15 minutes.

Do not switch off the engine until the filter 

is fully regenerated; repeated intervals 

can degrade the engine oil prematurely.

Regenerating the filter while the vehicle is 

stationary is not recommended.

If the warning lamp stays on, this 

indicates a low Diesel additive level.

For more information on 

Checking levels

refer to the corresponding section.

Following prolonged operation of the 

vehicle at very low speed or at idle, you 

may, in exceptional circumstances, notice 

water vapour coming from the exhaust while 

accelerating. These emissions have no 

impact on the vehicle’s behaviour and the 

environment.

New vehicle

During the first few particle filter 

regeneration operations, you may notice a 

"burning" smell. This is perfectly normal.

Manual gearbox

The gearbox does not require any 

maintenance (no oil change).

Automatic gearbox

The gearbox does not require any 

maintenance (no oil change).

Drive selector

The drive selector does not require any 

maintenance.

Brake pads

Brake wear depends on the style of 

driving, particularly in the case of vehicles 

used in town, over short distances. It may be 

necessary to have the condition of the brakes 

checked, even between vehicle services.

Unless there is a leak in the circuit, a drop in the 

brake fluid level indicates that the brake pads 

are worn.

After washing the vehicle, moisture, or in 

wintry conditions, ice can form on the 

brake discs and pads: braking efficiency may 

be reduced. Gently dab the brakes to dry and 

defrost them.

Brake disc wear

For information on checking brake disc 

wear, contact a CITROËN dealer or a 

qualified workshop.

Manual parking brake

If you notice excessive brake lever travel 

or decreased effectiveness, the parking 

-------------------------------------------------------------------------------------------------------------------------------------------------------------

197

Practical information

7

brake must be adjusted, even between two 

services.

This system must be checked by a CITROËN 

dealer or a qualified workshop.

Electric parking brake

This system does not require any routine 

servicing. However, in the event of a 

problem, do not hesitate to have the system 

checked by a CITROËN dealer or a qualified 

workshop.

For more information on the 

Electric 

parking brake

, refer to the 

corresponding section.

Wheels and tyres

The inflation pressure of all 

tyres, 

including the spare wheel, must be 

checked on "cold” tyres.

The pressures indicated on the tyre pressure 

label are valid for "cold" tyres. If you have driven 

for more than 10 minutes or more than 6 miles 

(10 kilometres) at over 31 mph (50 km/h), add 

0.3 bar (30 kPa) to the values indicated on the 

label.

Under-inflation increases energy 

consumption. Non-compliant tyre 

pressures cause tyres to wear prematurely 

and have an adverse effect on the vehicle's 

road holding - risk of accident!

Driving with worn or damaged tyres reduces the 

braking and road holding performance of the 

vehicle. Regularly check the condition of the 

tyres (tread and sidewalls) and rims as well as 

the presence of the valve caps.

When the wear indicators no longer appear set 

back from the tread, the depth of the grooves is 

less than 1.6 mm; replace the tyres as soon as 

possible.

Using different size wheels and tyres from those 

specified can affect the lifetime of tyres, wheel 

rotation, ground clearance, the speedometer 

reading and have an adverse effect on road 

holding.

Fitting different tyres on the front and rear axles 

can cause the ESC to mistime.

Always mark the direction of rotation on the tyres 

that will be stored when fitting winter or summer 

tyres. Store them in a cool, dry place and away 

from direct exposure to the sun's rays.

Winter or 4-seasons tyres can be 

identified by this symbol on their 

sidewalls.

AdBlue

®

 (BlueHDi)

To respect the environment and ensure 

compliance with the Euro 6 standard, without 

adversely affecting the performance or fuel 

consumption of its Diesel engines, CITROËN 

has taken the decision to equip its vehicles with 

a system that combines SCR (Selective Catalytic 

Reduction) with a Diesel Particle Filter (DPF) for 

the treatment of exhaust gases.

SCR system

Using a liquid called AdBlue

®

 that contains 

urea, a catalytic converter turns up to 85% of 

the nitrogen oxides (NOx) into nitrogen and 

water, which are harmless to health and the 

environment.

The AdBlue

®

 is contained in 

a special 

tank

 holding about 17 litres.

Its capacity allows a driving range of 

approximately 3,000 miles (5,000 km) (

which 

may vary considerably

 depending on your 

driving style and the vehicle). An alert system 

is automatically triggered when the remaining 

range reaches 1,500 miles (2,400 km), i.e. once 

the reserve level has been reached.

Several alerts are triggered successively during 

the remaining 1,500 miles (2,400 km) until the 

tank is empty and the vehicle is immobilised.

For more information on the 

Warning 

and indicator lamps

 and the associated 

alerts, or the 

Indicators

, please refer to the 

corresponding sections.

Once the AdBlue

®

 tank is empty, a device 

required by law prevents the engine from 

being restarted.

If the SCR system is faulty, the level of 

emissions from the vehicle will no longer meet 

-------------------------------------------------------------------------------------------------------------------------------------------------------------

198

Practical information

the Euro 6 standard and the vehicle starts 

polluting the environment.

In the event of a confirmed SCR system 

malfunction, it is essential to visit a CITROËN 

dealer or a qualified workshop as soon as 

possible. After 685 miles (1,100 km), a device 

is automatically activated to prevent the 

engine from starting.

In both cases, a range indicator indicates 

the distance that can be travelled before the 

vehicle is immobilised.

Freezing of the AdBlue

®

AdBlue

®

 freezes at temperatures below 

around -11°C.

The SCR system includes a heater for the 

AdBlue

®

 tank, allowing you to continue driving 

in very cold conditions.

Supply of AdBlue

®

It is recommended that the AdBlue

®

 be topped 

up as soon as the first alert is issued indicating 

that the reserve level has been reached.

For the correct operation of the SCR 

system:

–  Use only AdBlue

®

 fluid that meets the ISO 

22241 standard.

–  Never transfer AdBlue

®

 to another container 

as it would lose its purity.

–  Never dilute AdBlue

®

 with water.

You can obtain AdBlue

®

 from a CITROËN dealer 

or a qualified workshop, as well as service 

stations equipped with AdBlue

®

 pumps specially 

designed for passenger vehicles.

Never top up from an AdBlue

®

 dispenser 

reserved for heavy goods vehicles.

Recommendations on storage

AdBlue

®

 freezes at about -11°C and deteriorates 

above +25°C. Containers should be stored in a 

cool area and protected from direct sunlight.

Under these conditions, the fluid can be kept for 

at least a year.

If the fluid has frozen, it can be used once it has 

completely thawed out at room temperature.

Never store AdBlue

®

 containers in your 

vehicle.

Precautions for use

AdBlue

®

 is a urea-based 

solution. This fluid is 

non-flammable, colourless and odourless (when 

kept in a cool place).

In the event of contact with the skin, wash the 

affected area with soap and running water. In the 

event of contact with the eyes, immediately rinse 

the eyes with large amounts of water or with an 

eye wash solution for at least 15 minutes. Seek 

medical attention if you feel a persistent burning 

sensation or irritation.

If swallowed, immediately wash out the mouth 

with clean water and then drink plenty of water.

In certain conditions (high temperature, for 

example), the risk of release of ammonia cannot 

be excluded: do not inhale the fluid. Ammonia 

vapours have an irritant effect on mucous 

membranes (eyes, nose and throat).

Store AdBlue

®

 out of the reach of 

children, in its original container.

Procedure

Before starting the top-up procedure, ensure that 

the vehicle is parked on a flat and level surface.

In wintry conditions, ensure that the temperature 

of the vehicle is above -11°C. Otherwise the 

AdBlue

®

 may be frozen and so cannot be poured 

into the tank. Park the vehicle in a warmer area 

for a few hours to allow the top-up to be carried 

out.

Never pour the AdBlue

®

 into the Diesel 

fuel tank.

If any AdBlue

®

 is splashed, or if there are 

any spillages on the bodywork, rinse 

immediately with cold water or wipe with a 

damp cloth.

If the fluid has crystallised, clean it off using a 

sponge and hot water.

Important: 

in the event of a top-up after 

a breakdown because of a lack of 

-------------------------------------------------------------------------------------------------------------------------------------------------------------

199

Practical information

7

AdBlue,

 it is essential to wait around 5 

minutes before switching on the ignition, 

without opening the driver’s door, 

unlocking the vehicle, inserting the key 

into the ignition switch, or bringing the 

key for the "Keyless Entry and Start" 

system into the passenger compartment

.

Switch on the ignition, then wait for 10 

seconds before starting the engine.

►  Switch off the ignition and remove the key 

from the switch to switch off the engine.

or

►  With Keyless Entry and Start, press the 

"

START/STOP

" button to switch off the engine.


►  With the vehicle unlocked and the fuel filler 

flap open, turn the blue cap of the AdBlue

®

 tank 

anti-clockwise and remove it.

►  With a container of AdBlue

®

: after checking 

the expiry date, read the instructions on the 

label carefully before pouring the contents of the 

container into the vehicle's AdBlue tank.

►  With an AdBlue

®

 pump: insert the nozzle and 

fill the tank until the nozzle automatically cuts 

out.

In order not to overfill the AdBlue

®

 tank:

–  Add between 10 and 13 litres using 

AdBlue

®

 containers.

–  Stop after the nozzle’s first automatic cut-

out, if you are refilling at a service station.

The system only registers AdBlue

®

 top-ups of 

5 litres or more.

If the AdBlue

®

 tank is completely empty 

– which is confirmed by the message 

Top up AdBlue: Starting impossible

” – it is 

essential to add at least 5 litres.

After refilling

►  Refit the blue cap to the tank filler and turn it 

clockwise, as far as it will go.

►  Close the fuel filler flap.

Do not dispose of AdBlue

®

 bottles or 

containers in the household waste.

Place them in a container reserved for this 

purpose or take them back to where you 

purchased them.

Free-wheeling

In certain situations, it is necessary to put the 

vehicle into free-wheeling mode (e.g. towing, on 

a rolling road, automatic car wash (Wash mode), 

rail or sea transport).

The procedure varies according to the type of 

gearbox and parking brake.

Do not leave the vehicle unattended 

while coasting.

Keyless Entry and Start

You must not depress the brake pedal 

while switching the ignition on again, then 

switching it off. If you do, the engine will start, 

requiring you to restart the procedure.

With a manual gearbox and 

electric parking brake


/


To release them

►  With the engine running and while depressing 

the brake pedal, move the gear selector to the 

neutral position.

►  While depressing the brake pedal, switch off 

the engine.

►  Release the brake pedal, then switch on the 

ignition.

►  While depressing the brake pedal, press the 

control to release the parking brake.

►  Release the brake pedal, then switch off the 

ignition.

Reverting to normal operation

►  While depressing the brake pedal, restart the 

engine and apply the parking brake.

-------------------------------------------------------------------------------------------------------------------------------------------------------------

200

Practical information

With an automatic gearbox 

and electric parking brake


/


To release them

►  With the engine running and while depressing 

the brake pedal, set the gear selector to 

N

.

►  While depressing the brake pedal, switch off 

the engine.

►  Release the brake pedal, then switch on the 

ignition again.

►  While depressing the brake pedal, press the 

control lever to release the parking brake.

►  Release the brake pedal, then switch off the 

ignition.

Reverting to normal operation

►  While depressing the brake pedal, restart the 

engine and select mode 

P

.

With drive selector and 

electric parking brake


/


Release procedure

►  With the vehicle stationary and the engine 

running, depress the brake pedal and select 

mode 

N

.

Within 5 seconds:

►  Depress and hold the brake pedal, then 

observe this order: switch off the engine and 

move the push selector forwards or backwards.

►  Release the brake pedal, then switch on the 

ignition.

►  Place your foot on the brake and press the 

electric parking brake control to release it.

►  Release the brake pedal, then switch off the 

ignition.

A message is displayed on the 

instrument panel to confirm the unlocking 

of the wheels for 15 minutes.

When the vehicle is free-wheeling, the 

audio system cannot be updated (message 

displayed on the instrument panel).

After 15 minutes or reverting to normal 

operation

►  While depressing the brake pedal, restart the 

engine and select mode 

P

.

Advice on care and 

maintenance

General recommendations

Observe the following recommendations to avoid 

damaging the vehicle.

Exterior

Never use a high-pressure jet wash in 

the engine compartment - risk of 

damaging the electrical components!

Do not wash the vehicle in bright sunshine or 

extremely cold conditions.

When washing the vehicle in an 

automatic roller-brush car wash, be sure 

to lock the doors and, depending on version, 

move the electronic key away.

When using a pressure washer, keep the jet 

nozzle at a minimum distance of 30 cm from 

the vehicle (particularly when cleaning areas 

containing chipped paint, sensors or seals).

Promptly clean up any stains containing 

chemicals liable to damage the vehicle's 

paintwork (including tree resin, bird 

droppings, insect secretions, pollen and tar).

Depending on the environment, clean the 

vehicle frequently to remove salty deposits 

(in coastal areas), soot (in industrial areas) 

and mud/salts (in wet or cold areas). These 

substances can be highly corrosive.

Contact a CITROËN dealer or a qualified 

workshop for advice on removing stubborn 

stains requiring special products (such as tar 

or insect removers).

Preferably, have paint touch-ups performed 

by a CITROËN dealer or a qualified 

workshop.

-------------------------------------------------------------------------------------------------------------------------------------------------------------

201

Practical information

7

Interior

When washing the vehicle, never use a 

water hose or high-pressure jet to clean 

the interior.

Liquids carried in cups or other open 

containers can spill, presenting a risk of 

damage to the instruments and controls and 

the controls located on the centre console. Be 

vigilant!

To clean instrument panels, touch screens 

or other displays, wipe gently with a soft, 

dry cloth. Do not use products (e.g. alcohol, 

disinfectant) or soapy water directly on these 

surfaces - risk of damage!

Bodywork

High-gloss paint

Do not use abrasive products, solvents, 

petrol or oil to clean the bodywork.

Never use an abrasive sponge to clean 

stubborn stains - risk of scratching the 

paintwork!

Do not apply polish in strong sunshine, or to 

plastic or rubber parts.

Use a soft cloth and soapy water or a pH 

neutral product.

Gently wipe the bodywork with a clean 

microfibre cloth.

Apply polish with the vehicle clean and dry.

Comply with the instructions for use stated on 

the product.

Decals

(Depending on version)

Do not use a high-pressure washer to 

clean the vehicle - risk of damaging or 

detaching the decals!

Use a high-flow hose (temperature 

between 25°C and 40°C).

Place the jet of water perpendicular to the 

surface to be cleaned.

Rinse the vehicle with demineralised water.

-------------------------------------------------------------------------------------------------------------------------------------------------------------

202

In the event of a breakdown

Running out of fuel 

(Diesel)

With Diesel engines, the fuel system must be 

primed if you run out of fuel.

Before starting to prime the system

, it is 

essential to put at least 5 litres of Diesel into the 

fuel tank.

For more information on 

Refuelling

 and 

on 

Misfuel prevention (Diesel)

, refer to 

the corresponding section.

For non-BlueHDi versions, the fuel system 

components are located in the engine 

compartment; this may be under a removable 

cover.

For more information on the 

Engine 

compartment

, in particular the location 

of these components under the bonnet, refer 

to the corresponding section.

With 1.6 BlueHDi (Euro 6.1)

►  Switch on the ignition (without starting the 

engine).

►  Wait around 6 seconds and switch off the 

ignition.

►  Repeat the operation 10 times.

►  Operate the starter motor to start the engine.

If the engine does not start at the first attempt, 

do not keep trying, but restart the procedure.

With 1.5 BlueHDi (Euro 6.2/6.3)

►  Switch on the ignition (without starting the 

engine).

►  Wait around 1 minute and switch off the 

ignition.

►  Operate the starter motor to start the engine.

If the engine does not start at the first attempt, 

do not keep trying, but restart the procedure.

Non-BlueHDi engines

►  Open the bonnet and then, if necessary, 

unclip the cover to access the priming pump.

►  Operate the priming pump repeatedly 

until resistance is felt (resistance may be 

felt at the first press).

►  Operate the starter motor to start the engine 

(if the engine does not start at the first attempt, 

wait around 15 seconds before trying again).

►  If the engine does not start after a few 

attempts, operate the priming pump again, then 

the starter motor.

►  Put the cover back in place and clip it in, then 

close the bonnet.

Tool kit

►  For easier access, move the seat(s) forward.

Accessing the tools

Vehicle with electric motor

With temporary puncture repair kit

The tools are located in the passenger footwell.

With spare wheel

The tools are located under the right-hand front 

seat.

To access the tools:

–  With non-adjustable front seat, lift the seat 

cushion by placing your hand between the 

cushion and the backrest.

–  With adjustable front seat, move the seat 

forward as far as possible.

The jack is located in the passenger footwell.

Vehicle with Petrol or Diesel engine

With temporary puncture repair kit

The kit is located under the right-hand front seat.

With spare wheel

The jack is located under the right-hand front 

seat.

The tools are located under the left-hand front 

seat.

List of tools

1.

Chock to immobilise the vehicle

2.

Removable towing eye

-------------------------------------------------------------------------------------------------------------------------------------------------------------

203

In the event of a breakdown

8

3.

Torx key

Allows the removal of the rear lamps in order 

to change a bulb.

With temporary puncture repair kit


4.

12 V compressor with cartridge of sealant 

and speed limit sticker

For temporary repair of a tyre and to adjust 

the tyre pressure.

Storing the tools (vehicle with electric 

motor)

Store the 12 V compressor and sealant 

cartridge 

4

 inside the pouch as shown.

The space inside the passenger footwell is 

narrow. In order to be able to close the hatch, 

store the tools in their initial locations: chock 

1

 outside the bag, removable eye 

2

 on top of 

the bag with the buckle facing outwards, Torx 

key 

3

 on top of the bag, 12 V compressor with 

sealant cartridge 

4

 inside the bag.

For more information about the 

Temporary 

puncture repair kit

, refer to the corresponding 

section.

With spare wheel

5.

Wheelbrace.

For removing the wheel bolts and raising/

lowering the jack.

6.

Jack.

Used to raise the vehicle.

7.

Wheel bolt cover/wheel trim removal tool 

(depending on equipment).

If present on the vehicle, used to remove 

the wheel bolt covers on alloy wheels or the 

wheel trim on steel wheels.

8.

Socket for "anti-theft" wheel bolts.

Used to adapt the wheelbrace to the special 

"anti-theft" bolts.

For more information on the 

Spare 

wheel

, please refer to the corresponding 

section.

-------------------------------------------------------------------------------------------------------------------------------------------------------------

204

In the event of a breakdown

All of these tools are specific to your 

vehicle and may vary depending on 

equipment.

Do not use them for any other purposes.

The jack must only be used to change a 

wheel with a damaged or punctured tyre.

The jack does not require any maintenance.

The jack meets European standards, as 

defined in the Machinery Directive 2006/42/

EC.

Some parts of the jack such as the 

screws and hinges could cause injury: 

avoid touching them.

Carefully remove any traces of grease.

Temporary puncture 

repair kit

Scan the QR Code on page 3 to view 

explanatory videos.

Made up of a compressor and a sealant 

cartridge, it allows you to carry out a 

temporary 

repair

 of the tyre so that you can drive to the 

nearest garage.

It is designed to repair most punctures located 

on the tyre tread.

The vehicle's electric system allows the 

connection of the compressor to the 12 V 

power supply for long enough to repair a tyre 

after a puncture.

Only the 12 V socket located 

at the front


of the vehicle can be used to power the 

compressor.

For more information on the 

Tool kit

refer to the corresponding section.

Repair procedure

Do not remove any foreign body 

(e.g. nail, screw) which has penetrated 

the tyre.

►  Park the vehicle without obstructing traffic 

and apply the parking brake.

►  Follow the safety instructions (hazard 

warning lamps, warning triangle, high visibility 

jacket, etc.) according to the legislation in force 

in the country in which you are driving.

►  Switch the ignition off.

►  Remove the valve cap from the tyre to be 

repaired, and place it in a clean place.


►  Connect the pipe from the bottle of sealant to 

the valve of the tyre to be repaired and tighten 

firmly.

►  Connect the pipe from the compressor to the 

bottle of sealant.

►  Check that the compressor switch is in 

position "

O

".

►  Fully uncoil the electric cable stowed under 

the compressor.

►  Connect the compressor's electric plug to the 

vehicle's 12 V socket.

►  Affix the speed limit sticker.

The speed limit sticker must be affixed 

inside the vehicle in the area close to the 

driver, to remind them that a wheel is in 

temporary use.

►  Switch the ignition on.


-------------------------------------------------------------------------------------------------------------------------------------------------------------

205

In the event of a breakdown

8


►  Switch on the compressor by moving the 

switch to position "

I

" until the tyre pressure 

reaches 2 bar. The sealant product is injected 

under pressure into the tyre; do not disconnect 

the pipe from the valve during this operation (risk 

of blowback).

If after approximately 7 minutes, the 

pressure of 2 bar is not reached, this 

indicates that the tyre is not repairable; 

contact a CITROËN dealer or a qualified 

workshop for assistance.

►  Move the switch to position "

O

".

►  Disconnect the compressor's electric plug 

from the vehicle's 12 V socket.

►  Remove the kit.

►  Refit the cap on the valve.

►  Remove and store the bottle of sealant.

The sealant product is harmful if 

swallowed and causes irritation to the 

eyes.

Keep this product out of the reach of children.

The use-by date of the fluid is marked on the 

bottle.

After use, do not discard the bottle into the 

environment; take it to a CITROËN dealer or 

an authorised waste disposal site.

Do not forget to obtain a new bottle of 

sealant, available from a CITROËN dealer or 

a qualified workshop.


►  Drive immediately for approximately 3 miles 

(5 kilometres) at reduced speed (between 

12 and 37 mph (20 and 60 km/h)) to plug the 

puncture.

►  Stop to check the repair 

and the tyre 

pressure

 using the kit.

With a tyre repaired using this type of kit, 

do not exceed a speed of 50 mph 

(80 km/h) and do not drive more than 

50 miles (80 km).

You must contact a CITROËN dealer or a 

qualified workshop to have the repair checked 

and the tyre changed.

Checking/adjusting tyre 

pressures

The compressor can be used, 

without injecting 

sealant

, to check and, if necessary, adjust the 

tyre pressures.

►  Remove the valve cap from the tyre and keep 

it in a clean place.

►  Uncoil the pipe stowed under the compressor.

►  Screw the pipe onto the valve and tighten 

firmly.

►  Check that the compressor switch is in 

position "

O

".

►  Fully uncoil the electric cable stowed under 

the compressor.

►  Connect the compressor's electric plug to the 

vehicle's 12 V socket.

►  Switch the ignition on.

►  Start the compressor by placing the switch at 

position "

I

" and adjust the pressure to the value 

shown on the vehicle's tyre pressure label. To 

deflate: press the black button located on the 

compressor pipe, near the valve connection.

If after 7 minutes the pressure of 2 bar is 

not reached, the tyre is damaged; 

contact a CITROËN dealer or a qualified 

workshop for assistance.

►  Once the correct pressure is reached, put the 

switch in position "

O

".

►  Remove the kit and stow it.

►  Refit the cap on the valve.

-------------------------------------------------------------------------------------------------------------------------------------------------------------

206

In the event of a breakdown

Should the pressure of one or more tyres 

be adjusted, it is necessary to reinitialise 

the under-inflation detection system.

For more information on 

Tyre under-inflation 

detection

, refer to the corresponding section.

Spare wheel

Scan the QR Code on page 3 to view 

explanatory videos.

For more information on the 

Tool kit

refer to the corresponding section.

►  Park the vehicle without obstructing traffic 

and apply the parking brake.

►  Follow the safety instructions (hazard 

warning lamps, warning triangle, wearing high 

visibility jacket, etc.) according to the legislation 

in force in the country in which you are driving.

►  Switch the ignition off.

Accessing the spare wheel

►  Access to the spare wheel is from the rear. 


►  If the vehicle is fitted with a towbar, raise 

the rear of the vehicle using the jack (must be 

at jacking point 

B

) to allow sufficient space to 

remove the spare wheel.

Removing the spare wheel from the 

carrier

►  Depending on version, open the tailgate or 

side-hinged doors.


►  Access the carrier bolt, located on the rear 

door sill.


►  Slacken the bolt using the wheelbrace until 

the carrier is low enough to allow the carrier 

hook to be disengaged.


►  Release the carrier from the hook and 

place the spare wheel next to the wheel to be 

changed.

-------------------------------------------------------------------------------------------------------------------------------------------------------------

207

In the event of a breakdown

8

Putting the spare wheel back in the 

carrier


►  Position the wheel facing the carrier.

►  Progressively return the wheel to the carrier 

by pushing alternately at left and right until it is 

clear of the hook fixing area.

►  Engage the carrier on the hook, then tighten 

the bolt using the wheelbrace handle until the 

bolt is tight.

Removing a wheel

Parking the vehicle

Immobilise the vehicle where it does 

not obstruct traffic: the ground must be level, 

stable and non-slippery.

With a manual gearbox, engage first gear 

to lock the wheels, apply the parking brake, 

unless it is set to automatic mode, and switch 

off the ignition.

With an automatic gearbox, select mode 

P


to lock the wheels, apply the parking brake, 

unless it is set to automatic mode, and switch 

off the ignition.

Check that the parking brake indicator lamps 

on the instrument panel are on fixed.

The occupants must get out of the vehicle 

and wait where they are safe.

If necessary, place a chock under the wheel 

diagonally opposite the wheel to be changed.

Never go underneath a vehicle raised using a 

jack; use an axle stand.

Wheel with wheel trim

When removing the wheel

, first remove 

the wheel trim by pulling at the valve aperture 

using the wheelbrace.

When refitting the wheel

, refit the wheel 

trim, starting by placing its aperture in line 

with the valve and then pushing it into place 

all round its edge with the palm of your hand.


►  With a steel wheel, remove the wheel trim 

using tool 

7

.

►  With an alloy wheel, remove the cap from 

each of the bolts using tool 

7

.

►  If the vehicle is so equipped, fit security bolt 

socket 

8

 to wheelbrace 

5

 to slacken the security 

bolt.

► 

Slacken

 (without removing) the other wheel 

bolts using just wheelbrace 

5

.

Wheel with wheel trim

When removing the wheel,

 first remove 

the wheel trim by pulling at the valve aperture 

using the wheelbrace.


►  Place the foot of the jack on the ground and 

ensure that it is directly below the 

A

 or 

B

 jacking 

point provided on the underbody, whichever is 

closest to the wheel to be changed.


-------------------------------------------------------------------------------------------------------------------------------------------------------------

208

In the event of a breakdown


►  Extend jack 

6

 until its head comes into 

contact with jacking point 

A

 or 

B

, whichever is 

used; the contact surface 

A

 or 

B

 of the vehicle 

must be correctly engaged with the central part 

of the head of the jack.

►  Raise the vehicle until there is sufficient 

space between the wheel and the ground, to 

then easily fit the spare (not punctured) wheel.

Risk of injury!

Ensure that the jack is stable. If the 

ground is slippery or loose, the jack may slip 

or collapse.

Ensure that the jack is positioned strictly at 

one of the jacking points 

A

 or 

B

 under the 

vehicle, making sure that the vehicle's contact 

surface is correctly centred on the head of the 

jack. Otherwise, there is a risk of damage to 

the vehicle and/or of the jack collapsing.


►  Remove the bolts and store them in a clean 

place.

►  Remove the wheel.

Fitting a wheel


►  Fit the wheel on the hub.

►  Screw in the bolts by hand as far as possible.

►  Pre-tighten the security bolt using the 

wheelbrace 

5

 equipped with a security socket 

8

.

►  Pre-tighten the other bolts using the 

wheelbrace 

5

 only.

►  Lower the vehicle again fully.

►  Fold jack 

6

 and remove it.


-------------------------------------------------------------------------------------------------------------------------------------------------------------

209

In the event of a breakdown

8

►  If your vehicle is so equipped, tighten the 

security bolt using the wheelbrace 

5

 equipped 

with a security socket 

8

.

►  Tighten the other bolts using the 

wheelbrace 

5

 only.

►  Store the tools.

Fitting a steel spare wheel

If the vehicle is fitted with alloy wheels, the 

washers 

A

 do not make contact with the steel 

spare wheel. The wheel is held in place by 

the conical contact surface 

B

 of each bolt.

After changing a wheel

Stow the punctured wheel in the carrier.

With a non-standard spare wheel

Deactivate certain driving aid functions 

(Active Safety Brake, Adaptive cruise control, 

etc.).

Do not exceed the maximum authorised 

speed of 50 mph (80 km/h) or the maximum 

distance of 50 miles (80 km).

Driving with more than one spare wheel of 

this type is prohibited.

The wheel trim from the replaced wheel must 

not be refitted.

Visit a CITROËN dealer or a qualified 

workshop.

Have the tightening of the spare wheel's bolts 

and its tyre pressure checked.

Have the punctured tyre examined. After 

inspection, the technician will advise you on 

whether the tyre can be repaired or if it must 

be replaced.

Wheel with wheel trim

When refitting the wheel

, refit the wheel 

trim, starting by aligning the cutout with the 

valve and then pushing the trim into place all 

round its edge with the palm of your hand.

Tyre inflation pressures are indicated on 

this label.

For more information on 

Identification 

markings

, particularly this label, refer to the 

corresponding section.

Changing a bulb

In some weather conditions (e.g. low 

temperature or humidity), misting on the 

internal surface of the glass of the headlamps 

and rear lamps is normal, and will disappear 

after the lamps have been on for a few 

minutes.

The headlamps have polycarbonate 

lenses with a protective coating:

– 

Do not clean them with a dry or abrasive 

cloth, nor with detergent or solvent 

products.

–  Use a sponge and soapy water or a pH 

neutral product.

–  When using a high-pressure washer on 

persistent marks, do not keep the lance 

directed towards the headlamps, lamps or 

their edges for too long, so as not to damage 

their protective coating and seals.

Changing a bulb must only be done with 

the ignition off and after the headlamp / 

lamp has been switched off for several 

minutes - risk of serious burns!

Do not touch the bulb directly with your 

fingers; use a lint-free cloth.

It is essential only to use anti-ultraviolet 

(UV) type bulbs, so as not to damage the 

headlamp.

-------------------------------------------------------------------------------------------------------------------------------------------------------------


Content      ..     11      12      13      14     ..