Citroën Berlingo (2022 year). Manual in english - page 12
 

  Index      Manuals     Citroën Berlingo (2022 year). Manual in english


Search            copyright infringement  


Content      ..     10      11      12      13     ..


Citroën Berlingo (2022 year). Manual in english - page 12


178

Practical information

In the event of damage to the traction 

battery

It is strictly prohibited to work on the vehicle 

yourself.

Do not touch liquids coming from the battery, 

and in the event of skin contact with these 

products, wash abundantly with water and 

contact a doctor as soon as possible.

Contact a CITROËN dealer or a qualified 

workshop to have the system checked.

Disposal of the traction battery

The traction battery is designed for the life of the 

vehicle if the recommendations of CITROËN are 

followed.

If it becomes necessary to replace the battery, 

contact the CITROËN dealer for instructions on 

its disposal. Improper disposal carries the risk of 

severe burns, electric shock, and damage to the 

environment.

In accordance with regulations, CITROËN 

ensures a second life or recycling of this 

component in collaboration with qualified 

operators.

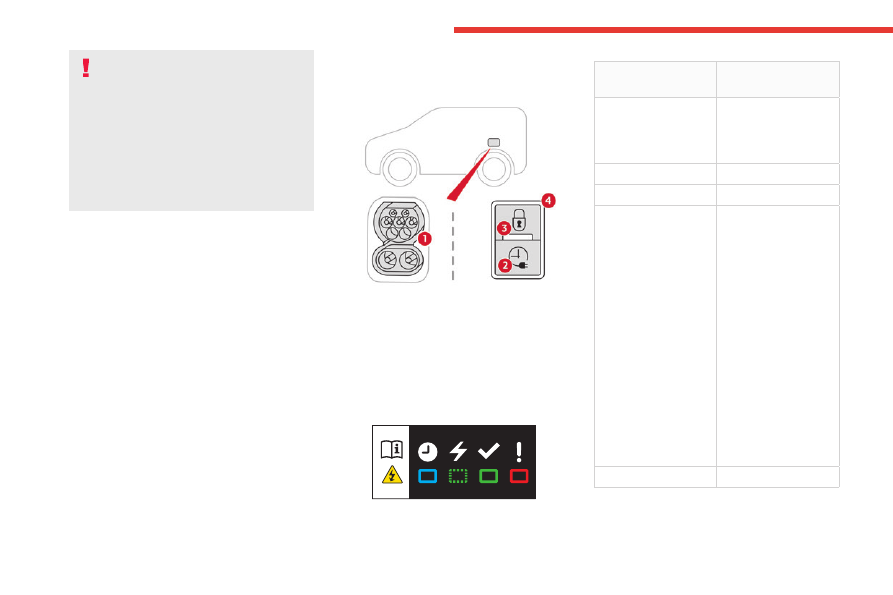
Charging connectors and 

indicator lamps


1.

Charging connectors

2.

Deferred charging activation button

3.

Nozzle locking indicator lamp

Fixed red: nozzle positioned correctly and 

locked in the connector.

Flashing red: nozzle incorrectly positioned or 

locking not possible.

4.

Charging indicator lamp


State of charging 

indicator lamp

Meaning

Fixed white

Welcome lighting on 

opening the flap and 

disconnecting the 

charging cable.

Fixed blue

Deferred charging.

Flashing green

Charging.

Fixed green

Charging complete.

The charging 

indicator lamp goes 

off after about 2 

minutes as the 

vehicle's functions go 

into standby.

The indicator lamp 

comes on again 

when the vehicle is 

unlocked with the 

Keyless Entry and 

Start system or when 

a door is opened 

to indicate that 

the battery is fully 

charged.

Fixed red

Malfunction.

-------------------------------------------------------------------------------------------------------------------------------------------------------------

179

Practical information

7

In case of impact, even light, against the 

charging flap, do not use it.

Do not dismantle or modify the charging 

connector - risk of electrocution and/or fire!

Contact a CITROËN dealer or a qualified 

workshop.

Charging cables, sockets 

and chargers

The charging cable supplied with the vehicle 

(depending on version) is compatible with the 

electrical systems in the country of sale. When 

travelling abroad, check the compatibility of local 

electrical systems with the charging cable.

A full range of charging cables is available from 

your dealer.

Contact a CITROËN dealer or a qualified 

workshop for more information and to obtain 

suitable charging cables.

Identification labels on charging 

sockets/connectors

Identification labels are affixed to the vehicle, 

charging cable and charger to inform the user 

about which device needs to be used.


The meaning of each identification label is as 

follows:

Identification label

Location

Configuration

Power type/Voltage range


C


Charging connector (vehicle side)

TYPE 2

AC

< 480 Vrms


C


Charging socket (charger side)

TYPE 2

AC

< 480 Vrms


K


Charging connector (vehicle side)

COMBO 2 (FF)

DC

50 V – 500 V

-------------------------------------------------------------------------------------------------------------------------------------------------------------

180

Practical information

Standard charging, mode 2

Domestic socket

(standard charging - alternating current (AC))


Mode 2 with a standard socket: 8 A maximum 

charging current.


Mode 2 with a Green'Up socket: 16 A 

maximum charging current.

To have this type of socket installed, call a 

professional installer.

Specific domestic charging cable - mode 

2 (AC)


Identification label 

C

 on the charging 

connector (vehicle side).

Specific domestic charging cable 

(mode 2)

You must not damage the cable.

In the event of damage, do not use it and 

contact a CITROËN dealer or a qualified 

workshop to replace it.

Control unit (mode 2)


POWER

Green: electrical connection established; 

charging can begin. 

CHARGE

Flashing green: charging in progress or 

temperature pre-conditioning activated.

Fixed green: charging complete.

FAULT

Red: fault; charging not permitted or must 

be stopped immediately. Check that everything 

is connected correctly and that the electrical 

system is not faulty.

If the indicator lamp does not go off, contact a 

CITROËN dealer or a qualified workshop.

Upon plugging the charging cable into a 

domestic socket, all of the indicator lamps come 

on briefly.

If no indicator lamps come on, check the 

domestic socket's circuit-breaker:

–  If the circuit-breaker has tripped, contact a 

professional to check that the electrical system 

is compatible and/or carry out any necessary 

repairs.

–  If the circuit-breaker has not tripped, stop 

using the charging cable and contact a 

CITROËN dealer or a qualified workshop.

Control unit label - Recommendations

Refer to the handbook before use. 

1.

Incorrect use of this charging cable may 

result in fire, property damage and serious 

injury or death by electrocution!

2.

Always use a correctly earthed power 

socket, protected by a 30 mA residual 

current device.

3.

Always use an electrical socket protected 

by a circuit-breaker appropriate for the 

electrical circuit’s current rating.

-------------------------------------------------------------------------------------------------------------------------------------------------------------

181

Practical information

7

4.

The weight of the control unit must not be 

borne by the electrical socket, plug and 

cables.

5.

Never use this charging cable if it is 

defective or in any way damaged.

6.

Never attempt to repair or open this 

charging cable. It contains no repairable 

parts - replace the charging cable if it is 

damaged.

7.

Never immerse this charging cable in water.

8.

Never use this charging cable with an 

extension cable, a multi-plug socket, a 

conversion adaptor or on a damaged 

electrical socket.

9.

Do not unplug the plug from the wall as a 

means of stopping charging.

10.

Immediately stop charging, by locking and 

then unlocking the vehicle using the remote 

control key, if the charging cable or wall 

socket feel burning hot to the touch.

11.

This charging cable includes components 

liable to cause electrical arcing or sparks. 

Do not expose to flammable vapours.

12.

Only use this charging cable with CITROËN 

vehicles.

13.

Never plug the cable into the wall socket (or 

unplug it) with wet hands.

14.

Do not force the connector if it is locked into 

the vehicle.

Control unit label - State of indicator 

lamps

State of the 

indicator lamp

Off


On


Flashing


POWER

CHARGE

FAULT

Symbol

Description


Not connected to the power supply or power is not 

available from the infrastructure.


(green)


(green)


(red)


The control unit is currently performing a self-test.


(green)


Connected only to the infrastructure or to the 

infrastructure and to the Electric Vehicle (EV) but 

no charging in progress.

-------------------------------------------------------------------------------------------------------------------------------------------------------------

182

Practical information

POWER

CHARGE

FAULT

Symbol

Description


(green)


(green)


Connected to the power supply and to the Electric 

Vehicle (EV).

The EV is on charge or in a temperature pre-

conditioning sequence.


(green)


(green)


Connected to the power supply and to the Electric 

Vehicle (EV).

The EV is waiting for charging or the charging of 

the EV is completed.


(red)


Control unit malfunction. No charging allowed.

If an error indicator reappears after a manual reset, 

the control unit must be checked by a CITROËN 

dealer before the next charge.


(green)


(green)


(red)


The control unit is in diagnostic mode.

Manual reset procedure

The control unit can be reset by simultaneously disconnecting the charging connector and the wall socket.

Then, reconnect the wall socket first. For more information, refer to the handbook.

-------------------------------------------------------------------------------------------------------------------------------------------------------------

183

Practical information

7

Accelerated charging, mode 3

Accelerated charging unit (depending on 

version)

(accelerated charging - single-phase or three-

phase alternating current (AC))


In mode 3 with an accelerated charging unit: 

32 A maximum charging current.


In mode 3 with an accelerated charging unit 

(Wallbox): 32 A maximum charging current.

Charging cable, mode 3 (AC)


Identification labels 

C

 on the charging 

connector (vehicle side) and on the socket 

(charger side).

Accelerated charging unit

Do not disassemble or modify the 

charging unit - risk of electrocution and/or fire!

Refer to the charging unit manufacturer's user 

manual for the operating instructions.

Superfast charging, mode 4

Fast public charger

(superfast charging - direct current (DC))


Charging cable, mode 4 (DC)

(integrated into the fast public charger)


Identification label 

K

 on the charging 

connector (vehicle side).

Only use fast public chargers where the cable 

length does not exceed 30 metres.

Charging the traction 

battery (Electric)

To recharge, connect the vehicle to a domestic 

electricity supply (domestic or accelerated 

charging) or to a fast public charger (superfast 

charging).

-------------------------------------------------------------------------------------------------------------------------------------------------------------

184

Practical information

For a full charge, follow the desired charging 

procedure without pausing it, until it ends 

automatically. Charging can be either immediate 

or deferred (except fast public charger, mode 4).

You can stop domestic or accelerated charging 

at any time by unlocking the vehicle and 

removing the nozzle. For superfast charging, 

refer to the fast public charger.

For more information on the charging displays 

on the 

Instrument panel

 and the 

Touch screen

refer to the corresponding section.

It is also possible to monitor the charging 

progress using the 

MyCitroën App


application.

For more information on 

Remote functions

refer to the corresponding section.

As a safety measure, the engine will not 

start if the charging cable is plugged into 

the connector on the vehicle. A warning is 

displayed on the instrument panel.

Cooling the traction battery

The cooling fan in the engine 

compartment comes on during charging to 

cool the on-board charger and the traction 

battery.

Low load / Driving

Driving when the charge level of the 

traction battery is too low can lead to the 

vehicle breaking down and can lead to 

accidents or serious injuries. ALWAYS make 

sure the traction battery has a sufficient 

charge level.

Low load / Parking

If the outside temperature is negative, 

it is recommended not to park your vehicle 

outside for several hours at a low load (less 

than 20%).

Vehicle in storage for more than 

1 month

In the event of a long period of non-use of 

the vehicle (beyond 4 weeks) without the 

possibility of charging when restarting, the 

self-discharge may make it impossible to 

restart if the traction battery charge level 

is a low or very low, especially at negative 

ambient temperatures. ALWAYS make sure 

that the traction battery has a charge between 

20% and 40% if you do not plan to use your 

vehicle for several weeks.

Do not connect the charging cable.

Always park the vehicle in a place with 

temperatures between -10°C and 30°C 

(parking in a place with extreme temperatures 

can damage the traction battery).

Disconnect the cable from the (+) terminal 

of the accessory battery in the engine 

compartment.

Connect a 12 V battery charger to the (+) 

and (-) terminals of the accessory battery 

about every 3 months in order to recharge the 

accessory battery and maintain an operating 

voltage.

Precautions

Our electric vehicles have been developed in 

accordance with the recommendations on the 

maximum limits for electromagnetic fields, as 

issued by the International Commission on Non-

Ionizing Radiation Protection (ICNIRP - 1998 

Guidelines).

Wearers of pacemakers or equivalent 

devices

Ask your doctor about what precautions 

you should take, or ask the manufacturer 

of your implanted electro-medical device about 

whether its operation is guaranteed in an 

environment which complies with the ICNIRP 

recommendations.

If in doubt

Domestic or accelerated charging

: do 

not remain inside or near the vehicle, or near 

the charging cable or charging unit, even for 

a short time.

Superfast charging

: do not use the system 

yourself and avoid approaching public fast 

charging points. Leave the area and ask a 

third party to recharge the vehicle.

-------------------------------------------------------------------------------------------------------------------------------------------------------------

185

Practical information

7

For domestic or accelerated charging

Before charging

Depending on the context:

►  Have a professional check that the 

electrical system to be used complies with 

applicable standards and is compatible with 

the vehicle.

►  Have a professional electrician install 

a dedicated domestic power socket or 

accelerated charging unit (Wallbox) 

compatible with the vehicle.

You should preferably use the charging cable 

available as an accessory.

For more information, contact a CITROËN 

dealer or a qualified workshop.

During charging

While charging is in progress, unlocking 

the vehicle will cause the charging to stop.

If no action is taken on one of the openings 

(door or boot) or on the charging nozzle, the 

vehicle will lock again after 30 seconds and 

charging will resume automatically.

Never work under the bonnet:

–  Some areas remain very hot, even an hour 

after charging ends - risk of burns!

–  The fan may start at any time - risk of cuts 

or strangulation!

After charging

Check that the charging flap is closed.

Do not leave the cable connected to the 

domestic power socket - risk of short-circuit 

or electrocution in the event of contact with or 

immersion in water!

For superfast charging

Before charging

Check that the fast public charging 

station and its charging cable are compatible 

with the vehicle.

If the exterior temperature is below:

–  0°C, charging times may be extended.

–  -20°C, charging is still possible, but 

charging times may be extended even further 

(the battery has to be heated first).

After charging

Check that the charging flap is closed.

Connection

►  Before 

charging, check that the drive selector 

is in mode 

P

, otherwise charging is not possible.

►  Open the charging flap by pressing the 

push-button, and check that there are no foreign 

bodies on the charging connector.

Domestic charging, mode 2


►  Connect the charging cable from the control 

unit to the domestic socket.

When the connection is made, all of the indicator 

lamps on the control unit light up, then only the 

POWER

 indicator lamp remains on in green.

►  Remove the protective cover from the 

charging nozzle.

►  Insert the nozzle into the charging connector.

The start of charging is confirmed by the flashing 

green 

CHARGE

 indicator lamps in the flap, then 

those on the control unit.

If this is not the case, charging has not 

started; restart the procedure, ensuring that all 

connections are properly established.

The red indicator lamp in the flap comes on to 

indicate that the nozzle is locked.

When charging is complete and while the 

charging cable is still connected, opening 

-------------------------------------------------------------------------------------------------------------------------------------------------------------

186

Practical information

the driver's door will display the charge level 

on the instrument panel for about 20 seconds.

Accelerated charging, mode 3


►  Follow the accelerated charging unit 

(Wallbox) user instructions.

►  Remove the protective cover from the 

charging nozzle.

►  Insert the nozzle into the charging connector.

The start of charging is confirmed when the 

charging indicator lamp in the flap flashes green.

If this is not the case, charging has not started; 

restart the procedure, ensuring that the 

connection has been properly established.

The red indicator lamp in the flap comes on to 

indicate that the nozzle is locked.

Superfast charging, mode 4


►  Depending on version, remove the protective 

cover from the lower part of the connector.

►  Follow the instructions for use of the fast 

public charger and connect the cable from the 

fast public charger to the vehicle's connector.

The start of charging is confirmed by the flashing 

green charging indicator lamp in the flap.

If this is not the case, charging has not started; 

restart the procedure, ensuring that the 

connection is properly established.

The red indicator lamp in the flap comes on to 

indicate that the nozzle is locked.

Deferred charging

Settings

At a CITROËN dealer or qualified 

workshop, with touch screen BLUETOOTH 

audio system

By default, the deferred charging start time is set 

to midnight (vehicle time).

You can have the deferred charging start time 

modified.

Visit a CITROËN dealer or a qualified workshop.

On a smartphone or tablet

You can programme the deferred 

charging function at any time via the 

MyCitroën App

 application.

For more information on 

Remote functions

refer to the corresponding section.

In the vehicle, with CITROËN Connect Nav

►  In the 

Energy

 touch screen menu, 

select the 

Charge

 page.

►  Set the charging start time.

►  Press 

OK

.

The setting is saved in the system.

Activation

Deferred charging is only possible with 

modes 2 and 3.

►  After programming the deferred charging, 

connect your vehicle to the desired charging 

equipment.


►  Press this button in the flap within one 

minute to activate the system (confirmed by the 

charging indicator lamp coming on in blue).

►  Lock the vehicle.

Disconnection


Before disconnecting the nozzle from the 

charging connector:

►  If the vehicle is unlocked, 

lock it and then 

unlock it

.

-------------------------------------------------------------------------------------------------------------------------------------------------------------

187

Practical information

7

►  If the vehicle is locked, unlock it.

The red indicator lamp in the flap goes out to 

confirm that the charging nozzle is unlocked.

►  In modes 2 and 3, remove the charging 

nozzle within 

30 seconds

.


The locking of the nozzle is linked to the 

locking of the loading area. For more 

information on 

Complete or selective 

unlocking

, refer to the corresponding 

section.

The charging indicator lamp comes on in white.

With selective door unlocking activated, 

press the unlocking button twice to 

disconnect the charging nozzle.

When charging is complete, the green 

charging indicator lamp in the flap goes 

out after about 2 minutes.

Domestic charging, mode 2

The end of charging is confirmed when the green 

CHARGE

 indicator lamp on the control unit and 

the green charging indicator lamp in the flap 

come on fixed.

►  Replace the protective cover on the charging 

nozzle and close the charging flap.

►  Disconnect the control unit end of the 

charging cable from the domestic socket.

Accelerated charging, mode 3

The end of charging is indicated by the charging 

control unit and by the fixed lighting of the green 

indicator lamp in the flap.

►  Hang up the nozzle on the charging unit and 

close the charging flap.

Superfast charging, mode 4

The end of charging is indicated by the charger 

and by the fixed lighting of the green indicator 

lamp in the flap.

►  You can also pause charging by 

pressing this button in the flap (in mode 4 

only).

►  Hang up the nozzle on the charger.

►  Depending on version, replace the protective 

cover on the lower section and close the 

charging flap.

When the charging nozzle is 

disconnected, a message on the 

instrument panel indicates that charging is 

complete, even if the charging nozzle was 

disconnected before full charging was 

completed.

Energy economy mode

This system manages the duration of use of 

certain functions, in order to conserve a sufficient 

level of charge in the battery with the ignition off.

After switching off the engine and for a maximum 

cumulative period of around 30 minutes, you can 

continue to use functions such as the audio and 

telematics system, dipped beam headlamps or 

courtesy lamps.

Selecting the mode

A confirmation message is displayed when 

energy economy mode is entered, and the active 

functions are placed on standby.

If a telephone call is in progress at the 

time, it will be maintained for around 10 

minutes via the audio system’s hands-free 

system.

Exiting the mode

These functions are automatically reactivated the 

next time the vehicle is used.

To restore the use of these functions 

immediately, start the engine and let it run:

–  For less than 10 minutes, to use the 

equipment for approximately 5 minutes.

–  For more than 10 minutes, to use the 

equipment for approximately 30 minutes.

Let the engine run for the specified duration to 

ensure that the battery charge is sufficient.

To recharge the battery, avoid repeatedly or 

continuously restarting the engine.

A flat battery prevents the engine from 

starting.

For more information on the 

12 V battery

refer to the corresponding section.

-------------------------------------------------------------------------------------------------------------------------------------------------------------

188

Practical information

Load reduction mode

This system manages the use of certain 

functions according to the level of charge 

remaining in the battery.

When the vehicle is being driven, the load 

reduction function temporarily deactivates certain 

functions, such as the air conditioning and the 

heated rear screen.

The deactivated functions are reactivated 

automatically as soon as conditions permit.

Snow chains

In wintry conditions, snow chains improve 

traction as well as the behaviour of the vehicle 

when braking.

Snow chains must be fitted only to the 

front wheels. They must never be fitted to 

"space-saver" type spare wheels.

Observe the legislation in force in your 

country relating to the use of snow 

chains and maximum authorised speeds.

Use only the chains designed to be fitted to the 

type of wheel fitted to your vehicle:

Original tyre size

Link size: (mm)

195/65 R15

9

205/60 R16
205/55 R17
215/65 R16
215/60 R17

Cannot be fitted with 

chains

You can also use snow socks.

For more information, contact a CITROËN dealer 

or a qualified workshop.

Installation tips 

►  To fit the

 snow chains during a journey, stop 

the vehicle on a flat surface at the side of the 

road.

►  Apply the parking brake and position any 

wheel chocks under the wheels to prevent 

movement of the vehicle.

►  Fit the snow chains following the instructions 

provided by the manufacturer.

►  Move off gently and drive for a few moments, 

without exceeding 31 mph (50 km/h).

►  Stop the vehicle and check that the snow 

chains are correctly tightened.

It is strongly recommended that you 

practise fitting the snow chains on a level 

and dry surface before setting off.

Avoid driving with snow chains on roads 

that have been cleared of snow to avoid 

damaging the vehicle's tyres and the road 

surface. If the vehicle is fitted with alloy 

wheels, check that no part of the chain or its 

fixings is in contact with the wheel rim.

Very cold climate screen

(Depending on country of sale)

This removable device prevents the 

accumulation of snow around the radiator 

cooling fan.


-------------------------------------------------------------------------------------------------------------------------------------------------------------

189

Practical information

7

In case of difficulty with installation/

removal

Contact a CITROËN dealer or a qualified 

workshop.

Before any operation, ensure that the 

engine is off and the cooling fan has 

stopped.

It is essential to remove them when:

–  the outside temperature exceeds 

10°C.

–  recovery is in progress.

–  the speed is above 75 mph (120 km/h).

Fitting


►  Hold the screen in front of the lower grille of 

the bumper.

►  First insert the upper and side fixing brackets 

into the bumper.

►  Tilt the screen downwards to engage the 

lower part of the screen into the bumper.

►  Check that the unit is firmly held by pressing 

around the edges.

Removing


►  Insert a finger into the notch in the upper part 

of the screen.

►  Pull towards you to unclip the unit.

Towing device

Depending on version, the vehicle is 

fitted with the necessary equipment to 

allow a towing device to be installed.

To install a towing device, contact a 

CITROËN dealer or a qualified workshop.

Load distribution

►  Distribute the load in the trailer so that the 

heaviest items are as close as possible to the 

axle, and the nose weight approaches the 

maximum permitted without exceeding it.

Air density decreases with altitude, thus reducing 

engine performance. The maximum towable load 

must be reduced by 10% per 1,000 metres of 

altitude.

Use genuine towing devices and wiring 

harnesses approved by CITROËN. We 

recommend having them fitted by a CITROËN 

dealer or a qualified workshop.

If not fitted by a CITROËN dealer, they must 

still be fitted in accordance with the vehicle 

manufacturer's instructions.

Certain driving or manoeuvring aid functions 

are automatically deactivated while an 

approved towing system is in use.

For more information about driving with a 

towing device fitted to a trailer and associated 

with the 

Trailer stability assist

, refer to the 

corresponding section.

-------------------------------------------------------------------------------------------------------------------------------------------------------------

190

Practical information

Comply with the maximum authorised 

towable weight, as indicated on your 

vehicle's registration certificate, on the 

manufacturer's label and in the 

Technical 

data

 section of this guide.

If using accessories attached to the 

towing device (e.g. bicycle carriers, tow 

boxes):

–  Comply with the maximum authorised nose 

weight.

–  Do not transport more than 4 conventional 

bicycles or 2 electric bicycles.

When loading bicycles onto a bicycle carrier 

on a towball, be sure to place the heaviest 

bicycles as close as possible to the vehicle.

Observe the legislation in force in the 

country where you are driving.

Electric motor

An electric 

vehicle may be fitted with a 

towing device.

It is therefore possible to tow a trailer or 

caravan.

Contact a CITROËN dealer or qualified 

workshop for more information and to obtain a 

suitable towing device.

Overload indicator


The overload indicator is a driving aid and 

informs you that the 

maximum authorised 

weight

 has been exceeded; this may be either 

the gross vehicle weight (GVW) or the maximum 

authorised weight on either axle (front and rear) 

(GAWR).

The indicator does not relieve the user 

from their responsibility.

Even if you correctly measure the weight 

of the vehicle's load, any factor that may 

vary this weight (driver/additional passengers 

seated or taking on additional fuel) after the 

measurement may put the vehicle into the 

overload condition.


The load includes the weight of the items 

stored in the loading area (including any 

fittings such as shelves), but also the weight 

of all persons on board the vehicle, the 

amount of fuel (depending on version) and 

various equipment fitted on the vehicle.

For optimal performance, the vehicle must 

be parked and loaded on level ground (avoid 

the following conditions: parking on a slope or 

straddling a pavement).

Attaching a trailer to your vehicle may 

affect the operation of the system.

Operation

The weight on board your vehicle is measured:

►  When the engine starts, automatically.


ON

►  When stationary, by pressing this 

button in the loading area. The system is 

then active for 5 minutes.

Display of the measurement in the loading 

area


ON


-------------------------------------------------------------------------------------------------------------------------------------------------------------

191

Practical information

7

If the weight on board the vehicle 

is nearly up to 

the maximum authorised value

, the indicator 

lamps of these buttons come on.


ON


If the weight on board the vehicle 

exceeds 

the maximum authorised value

, the indicator 

lamps of these buttons come on.

Display of the measurement on the 

instrument panel

If the weight on board the vehicle 

exceeds the maximum authorised 

value

, this indicator lamp comes on.

Malfunction

Display of the malfunction in the loading 

area

After the measurement is triggered from the 

loading area, the LEDs of the 3 buttons flash 

simultaneously for about 3 seconds and then go 

out.

Contact a CITROËN dealer or a qualified 

workshop.

Information displayed on the instrument 

panel


These warning lamps come on, together with a 

message.

Contact a CITROËN dealer or a qualified 

workshop.

Roof bars / Roof rack

Recommendations

Distribute the load uniformly, taking care 

to avoid overloading one of the sides.

Arrange the heaviest part of the load as close 

as possible to the roof.

Secure the load firmly.

Drive gently: the vehicle will be more 

susceptible to the effects of side winds and its 

stability may be affected.

Regularly check the security and tight 

fastening of the roof bars and racks, at least 

before each trip.

Remove the roof bars once they are no longer 

needed.

In the event of loading (

not exceeding


40 cm in height) on the roof, 

do not 

exceed

 the following loads:

–  Transverse bars on longitudinal bars: 

80 kg

.

–  Two transverse bars bolted to the roof: 

100 kg

.

–  Three transverse bars bolted to the roof: 

150 kg

.

–  An aluminium rack: 

120 kg

.

–  A steel rack: 

115 kg

.

If the height exceeds 40 cm, adapt the speed 

of the vehicle to the profile of the road to 

avoid damaging the roof bars or the roof rack 

and the fixings on the vehicle.

Refer to national legislation in order to comply 

with the regulations for transporting objects 

that are longer than the vehicle.


In the event of loading a 7-seat model 

(

not exceeding

 40 cm in height) on the 

roof, 

do not exceed

 the following loads:

–  Three transverse bars bolted to the roof: 

100 kg

.

–  An aluminium rack: 

70 kg

.

–  A steel rack: 

65 kg

.

As a safety measure and to avoid 

damaging the roof, it is essential to use 

the roof bars and racks approved for your 

vehicle.

Observe the instructions on fitting and use 

contained in the guide supplied with the roof 

bars and racks.


-------------------------------------------------------------------------------------------------------------------------------------------------------------

192

Practical information

To fit the transverse roof bars or a roof rack, use 

the fixing points provided for this purpose:

►  Remove the fixing covers installed on the 

vehicle.

►  Put each fixing in place and lock them on the 

roof one by one.

►  Ensure that the roof bars or the roof rack are 

correctly fitted (by shaking them).

The bars are adaptable for each fixing point.

Bonnet

Stop & Start

Before doing anything under the bonnet, 

you must switch off the ignition to avoid any 

risk of the engine restarting automatically.

Take care with objects or clothing that could 

be caught in the blades of the cooling fan 

or in certain moving components - risk of 

strangulation and serious injury!

The location of the interior bonnet 

release lever prevents the bonnet being 

opened when the left-hand front door is 

closed.

When the engine is hot, handle the 

exterior safety catch and the bonnet stay 

with care (risk of burns), using the protected 

area.

When the bonnet is open, take care not to 

damage the safety catch.

Do not open the bonnet under very windy 

conditions.

Cooling of the engine when stopped

The engine cooling fan may start after 

the engine has been switched off.

Take care with objects or clothing that 

could be caught in the blades of the fan!

Opening

►  Open the left-hand front door.


►  Pull the interior release lever, located at the 

bottom of the door frame, towards you.

►  Lift the exterior safety catch and raise the 

bonnet.


►  Unclip the stay from its housing and place it 

in the support slot to hold the bonnet open.

Closing

►  Hold the bonnet and 

pull out the stay from the 

support slot.

►  Clip the stay in its housing.

►  Lower the bonnet and release it near the end 

of its travel.

►  Pull on the bonnet to check that it is locked 

correctly.

Because of the presence of electrical 

equipment under the bonnet, it is 

recommended that exposure to water (rain, 

washing, etc.) be limited.

Engine compartment

The engine shown here is an example for 

illustrative purposes only.

-------------------------------------------------------------------------------------------------------------------------------------------------------------

193

Practical information

7

The locations of the following components may 

vary:

–  Air filter.

–  Engine oil dipstick.

–  Engine oil filler cap.

Petrol engine


Diesel engine


1.

Screenwash fluid reservoir

2.

Engine coolant reservoir

3.

Brake fluid reservoir

4.

Battery/Fuses

5.

Remote earth point (-)

6.

Fusebox

7.

Air filter

8.

Engine oil filler cap

9.

Engine oil dipstick

Diesel fuel system

This system is under very high pressure.

All work must be carried out only by a 

CITROËN dealer or a qualified workshop

Electric motor


1.

Screenwash fluid reservoir

2.

Engine coolant reservoir (level only)

3.

Brake fluid reservoir

4.

Battery/Fuses

5.

Remote earth point (-)

6.

Fusebox

7.

400 V electrical circuit

8.

Emergency circuit-breaker for emergency 

services and maintenance technicians

For more information on the 

Charging system 

(Electric)

, refer to the corresponding section.

Checking levels

Check all of the following levels regularly in 

accordance with the manufacturer's service 

schedule. Top them up if required, unless 

otherwise indicated.

If a level drops significantly, have the 

corresponding system checked by a CITROËN 

dealer or a qualified workshop.

The fluids must comply with the 

manufacturer's requirements and with 

the vehicle's engine.

Take care when working under the 

bonnet, as certain areas of the engine 

may be extremely hot (risk of burns) and the 

cooling fan could start at any time (even with 

the ignition off).

Used products

Avoid prolonged contact of used oil or 

fluids with the skin.

Most of these fluids are harmful to health and 

very corrosive.

Do not discard used oil or fluids into 

sewers or onto the ground.

Empty used oil into the containers reserved 

for this purpose at a CITROËN dealer or a 

qualified workshop.

Engine oil

The level is checked, with the engine 

having been switched off for at least 30 

minutes and on level ground, either using the oil 

level indicator in the instrument panel when the 

-------------------------------------------------------------------------------------------------------------------------------------------------------------


Content      ..     10      11      12      13     ..