Citroën Berlingo Van (2022 year). Manual in english - page 9
 

  Index      Manuals     Citroën Berlingo Van (2022 year). Manual in english


Search            copyright infringement  


Content      ..     7      8      9      10     ..


Citroën Berlingo Van (2022 year). Manual in english - page 9


130

Driving

an audible signal sounds and a message 

appears.

►  Return the drive selector to position 

P

the audible signal stops and the message 

disappears.

When positioned on a steep slope with a 

loaded vehicle, 

depress the brake 

pedal

, select position 

P

, apply the parking 

brake, unless it is set to automatic mode (with 

electric parking brake), then release the brake 

pedal.

In all circumstances, ensure that the 

selector is in position 

P

 before leaving 

your vehicle.

Malfunction

In the event of a malfunction, this warning 

lamp comes on and a message is 

displayed, when the ignition is switched on.

In this case, the gearbox goes into back-up 

mode and is locked in 3

rd

 gear. You may feel a 

significant jolt (without risk to the gearbox) when 

changing from 

P

 to 

R

 and from 

N

 to 

R

.

Do not exceed 62 mph (100 km/h), local speed 

restrictions permitting.

Have the system checked by a CITROËN dealer 

or a qualified workshop.

There is a risk of damaging the gearbox:

–  If the accelerator and brake pedals are 

depressed simultaneously.

–  In the event of a battery failure, forcing the 

selector from position 

P

 to another position.

Automatic gearbox

Never try to start the engine by pushing 

the vehicle.

Automatic gearbox (Type 

2)

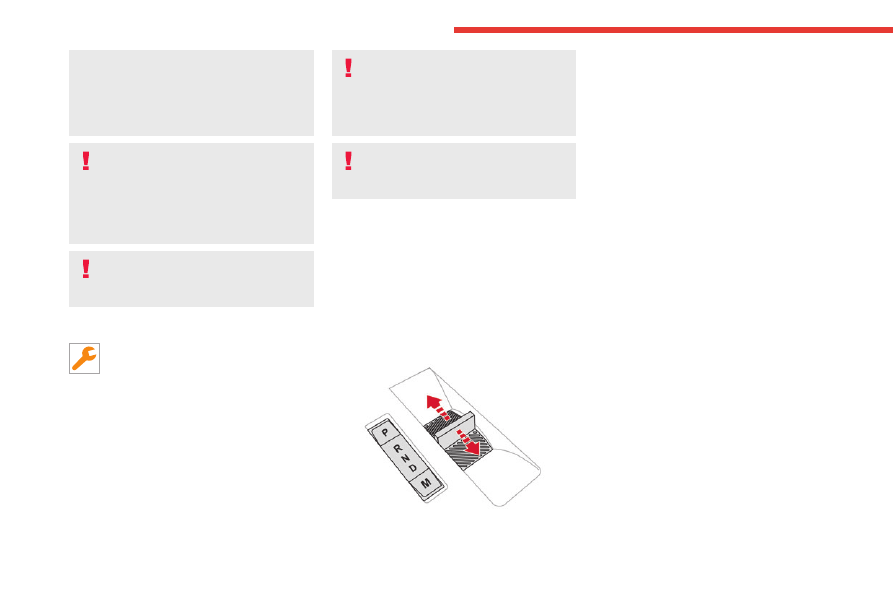
Automatic 8-speed gearbox with push selector. 

It also offers a manual mode with gear changes 

via control paddles located behind the steering 

wheel.

Push selector


P.

Auto Park

Press this button to switch to Parking mode.

For parking the vehicle: the front wheels are 

blocked.

R.

Reverse

N.

Neutral

To free-wheel and move the vehicle, with the 

ignition off.

For more information on 

Free-wheeling

, refer 

to the corresponding section.

D.

Driving in automatic mode

The gearbox manages gear changes 

according to the style of driving, the road 

profile and the vehicle load.

M.

Driving in manual mode (Petrol/Diesel)

Press this button to switch to manual mode.

The driver changes gear using the steering-

mounted controls.

►  In mode 

N

, with your foot on the brake pedal, 

push without passing the point of resistance:

•  Forwards, mode 

R

 is selected.

•  Backwards, mode 

D

 is selected.

Release the selector fully after each push; it 

will then return to its initial position.

Special cases

To avoid mode 

N

 (quick change from 

D

 to 

R

 and 

back again):

►  In mode 

R

, push backwards past the point of 

resistance, mode 

D

 is selected.

►  In mode 

D

, push forwards past the point of 

resistance, mode 

R

 is selected.

-------------------------------------------------------------------------------------------------------------------------------------------------------------

131

Driving

6

►  To return to mode 

N

, push without passing 

the point of resistance.

Steering-mounted controls

(Depending on equipment)

In mode 

M

 or 

D

, the steering-mounted control 

paddles can be used to change gear manually.

They cannot be used to select neutral or to 

engage or disengage reverse gear.


►  Pull the "

+

" or "

-

" paddle towards you and 

release to shift up or down a gear, respectively.

Information displayed on 

the instrument panel

When the ignition is switched on, the gearbox 

status is displayed on the instrument panel:

P

Parking

R

Reverse

N

Neutral

D1...8

Automatic forward gear

M1...8

Manual forward gear

The state of the gearbox remains displayed on 

the instrument panel for a few seconds after 

switching off the ignition.

Operation

Only appropriate mode change instructions are 

validated.

With the engine running, if it is necessary to 

depress the brake pedal to change modes, 

an alert message will be displayed on the 

instrument panel.

With the engine running and the brakes 

released, if 

R

D

 or 

M

 is selected, the 

vehicle moves off, even without pressing the 

accelerator pedal.

Never depress the accelerator and brake 

pedals at the same time - risk of damage to 

the gearbox!

If you open the driver's door while mode 

N

 is engaged, an audible signal will 

sound and mode 

P

 will be engaged. The 

audible signal stops when the driver's door is 

closed.

At speeds below 3 mph (5 km/h), 

opening the driver’s door will engage 

mode 

P

 - risk of sudden braking!

In the event of battery failure, it is 

essential to place the chock(s) supplied 

with the tool kit against one of the wheels to 

immobilise the vehicle.

Special aspects of automatic mode

The gearbox selects the gear that provides 

optimal performance based on ambient 

temperature, road profile, vehicle loading and 

driving style.

For maximum acceleration, press the accelerator 

fully down (kick-down). The gearbox changes 

down automatically or holds the selected gear 

until the maximum engine speed is reached.

Steering mounted controls allow the driver to 

temporarily select a gear, if the vehicle speed 

and engine speed conditions permit.

Special aspects of manual mode

The gearbox only changes from one gear to 

another if the vehicle speed and engine speed 

conditions permit.

Starting the vehicle

►  Fully depress the brake pedal.

►  Start the engine.

►  With your foot on the brake pedal, push once 

or twice backwards to select automatic mode 

D

or forwards to shift into reverse gear 

R

.

►  Release the brake pedal.

►  Accelerate gradually to automatically release 

the electric parking brake.

The vehicle moves off immediately.

Automatic gearbox

Never try to start the engine by pushing 

the vehicle.

-------------------------------------------------------------------------------------------------------------------------------------------------------------

132

Driving

Switching the vehicle off

Regardless of the current gearbox mode, mode 

P

 is immediately engaged automatically when 

the ignition is switched off.

However, in mode 

N

, mode 

P

 will be engaged 

after a delay of 5 seconds (time to enable free-

wheeling mode).

Check that mode 

P

 has been engaged and 

that the electric parking brake was applied 

automatically; if not, apply it manually.

The corresponding indicator lamps on the 

gear selector and the electric parking 

brake control must be on, as well as the 

indicator lamps on the instrument panel.

Gearbox malfunction

This warning lamp comes on, 

accompanied by an audible signal and 

the display of a message.

Visit a CITROËN dealer or a qualified workshop.

Do not drive faster than 62 mph (100 km/h), 

keeping to the speed limit.

Switching of the gearbox to back-up mode

Mode 

D

 locks in third gear.

The paddles on the steering wheel do not work 

and mode 

M

 is no longer accessible.

You may feel a significant jolt on engaging 

reverse gear. This will not damage the gearbox.

Selector malfunction

Minor malfunction

This warning lamp comes on, 

accompanied by the display of a message 

and an audible signal.

Drive carefully.

Visit a CITROËN dealer or a qualified workshop.

In some cases, the selector indicator lamps may 

no longer come on, but the gearbox state is still 

displayed on the instrument panel.

Major malfunction

This warning lamp comes on, 

accompanied by the display of a 

message.

You must stop the vehicle.

Stop as soon as it is safe to do so and 

switch off the ignition.

Contact a CITROËN dealer or a qualified 

workshop.

Drive selector (Electric)


The drive selector is a pulse selector with a 

regenerative braking function.

The drive selector provides traction control 

based on the driving style, the road profile and 

the vehicle load.

With regenerative braking activated, it also 

manages engine braking when the accelerator 

pedal is released.

P.

Park

Button for parking the vehicle: the front 

wheels are locked (the button lights up to 

indicate that it is activated).

R.

Reverse

To engage reverse gear, with your foot on the 

brake pedal.

-------------------------------------------------------------------------------------------------------------------------------------------------------------

133

Driving

6

N.

Neutral

To move the vehicle with the ignition off and 

so allow it to free-wheel.

For more information on 

Free-wheeling

, refer 

to the corresponding section.

D.

Drive (automatic forward gear)

B.

Brake (regenerative braking)

Regenerative braking (the button lights up to 

indicate its activation).

Information displayed on 

the instrument panel

When the ignition is switched on, the drive 

selector status is displayed on the instrument 

panel:

P

 : Park.

R

 : Reverse.

N

 : Neutral.

D

 : Drive (automatic forward gear).

B

 : Brake (regenerative braking activated).

Operation

►  Move the selector by pressing it forwards 

(

N

 or 

R

) or rearwards (

N

 or 

D

) once or twice, 

passing the point of resistance if necessary.

For example, to change from 

P

 to 

R

 (with your 

foot on the brake pedal), either push forwards 

twice without passing the point of resistance or 

push just once, passing the point of resistance.

Regenerative braking

With the Brake function and when 

decelerating

The Brake function emulates engine braking, 

slowing the vehicle with no need to depress the 

brake pedal. The vehicle slows more quickly 

when the driver releases the accelerator pedal.

The energy recovered when the accelerator 

pedal is released is then used to partially 

recharge the traction battery, thereby increasing 

the vehicle's driving range.

The resulting deceleration of the vehicle 

does not cause the brake lamps to come 

on.

►  From mode 

D/R

, press button 

B

 to activate/

deactivate the function (the button lights up when 

the function is activated).

D/R

 on the instrument panel is replaced with 

B

.

The system status is not saved when the ignition 

is switched off.

In some situations (e.g. battery full, 

extreme temperatures), the amount of 

regenerative braking may be temporarily 

limited, resulting in less deceleration.

The driver must remain alert to traffic 

conditions and must always be ready to use 

the brake pedal.

With the brake pedal

When the brake pedal is depressed, the 

intelligent braking system automatically recovers 

some of the energy and uses it to recharge the 

traction battery.

This energy recovery also reduces use of the 

brake pads, thereby limiting their wear.

The driver may experience a different 

sensation when depressing the brake 

pedal compared to a vehicle without 

regenerative braking.

Driving modes

Driving modes are selected using the following 

control:


1.

Pressing the control activates 

Eco

 mode. The 

indicator lamp comes on. (Petrol or Diesel)

-------------------------------------------------------------------------------------------------------------------------------------------------------------

134

Driving

2.

Pressing the control displays the modes on the 

instrument panel.

With an electric motor, when starting the vehicle, 

no mode can be selected until the 

READY


indicator lamp is displayed.

When the message disappears, the selected 

mode is activated and remains indicated on the 

instrument panel (except 

Normal mode).

Whenever the ignition is switched on, 

Normal

 driving mode is selected by default.

Normal

To restore the default settings.

Eco

To reduce energy consumption by reducing the 

performance of the heating and air conditioning, 

without deactivating them.

To reduce consumption of the traction battery's 

electrical energy by limiting engine torque.

Power (Electric)

Allows a fully laden vehicle (GVW) to obtain 

equivalent performance to that of an unladen 

vehicle in Normal mode.

All modes are displayed on the 

instrument panel, except for 

Normal


mode.

Coasting mode

Depending on version or engine, with an 

EAT8 gearbox and the gear selector in mode 

D

, gradually releasing the accelerator pedal 

fully allows free-wheeling which can save fuel.

A drop in engine speed is normal (rev counter 

at idle, drop in engine noise).

Gear shift indicator

(Depending on engine)

This system is designed to reduce fuel 

consumption by recommending the most suitable 

gear.

Operation

Depending on the driving situation and 

the vehicle's equipment, the system may 

recommend skipping one or more gears.

Gear engagement recommendations are 

not to be considered mandatory. Indeed, the 

configuration of the road, the traffic density and 

safety remain determining factors when choosing 

the best gear. Therefore, the driver remains 

responsible for deciding whether or not to follow 

the system’s advice.

The system cannot be deactivated.

With an automatic gearbox, the system is 

only active in manual operation.

The information appears on the 

instrument panel, in the form of an “up” or 

“down” arrow and the recommended gear.

The system adapts the gear change 

instructions according to the driving 

conditions (e.g. slope, load) and driving style 

(e.g. power demand, acceleration, braking).

The system never suggests:

–  engaging first gear;

–  engaging reverse gear.

Stop & Start (Petrol or 

Diesel)

The Stop & Start function puts the engine 

temporarily into standby - STOP mode - during 

phases when the vehicle is stationary (e.g. red 

lights, traffic jams). The engine automatically 

restarts - START mode - as soon as the driver 

indicates the intention of moving off again.

Primarily designed for urban use, the function 

is intended to reduce fuel consumption and 

exhaust emissions as well as the noise level 

when stationary.

The function does not affect the functionalities of 

the vehicle, in particular the braking.

Opening the bonnet

Before doing anything under the bonnet, 

deactivate the Stop & Start system to avoid 

any risk of injury caused by the engine 

restarting automatically.

-------------------------------------------------------------------------------------------------------------------------------------------------------------

135

Driving

6

Driving on flooded roads

Before entering into a flooded area, it is 

strongly recommended that you deactivate 

the Stop & Start system.

For more information on 

Driving 

recommendations

, particularly on flooded 

roads, refer to the corresponding section.

Deactivation/Activation

With button


►  To deactivate or reactivate the system, press 

this button.

The indicator lamp is 

on

 when the system is 

deactivated

.

With touch screen

The system is activated/

deactivated via the 

Vehicle/

Driving

 touch screen menu.

If the system has been deactivated in 

STOP mode, the engine restarts 

immediately.

The system is reactivated automatically 

whenever the engine is started by the 

driver.

Operation

Main conditions for operation

–  The driver’s door must be closed.

–  The sliding side door must be closed.

–  The driver's seat belt must be fastened.

–  The level of charge in the battery must be 

sufficient.

–  The temperature of the engine must be within 

its nominal operating range.

–  The outside temperature must be between 

0°C and 35°C.

Putting the engine into standby 

(STOP mode)

The engine automatically enters standby mode 

as soon as the driver indicates their intention to 

stop:

–  With a 

manual gearbox

: at a speed below 

2 mph (3 km/h) or with the vehicle stationary 

(depending on engine), with the gear lever in 

neutral and the clutch pedal released.

–  With an 

automatic gearbox

: at a speed below 

2 mph (3 km/h) or with the vehicle stationary 

(depending on engine), with the brake pedal 

depressed or the gear selector in position 

N

.

Time counter

A time counter adds up the time spent in standby 

during the journey. It is reset to zero every time 

the ignition is switched on.

Special cases:

The engine will not go into standby if the 

conditions for operation are not met and in the 

following cases:

–  Steep slope (ascending or descending).

–  Vehicle has not exceeded 6 mph (10 km/h) 

since the last engine start (with the key or the 

START/STOP

 button).

–  Electric parking brake applied or being 

applied.

–  Needed to maintain a comfortable temperature 

in the passenger compartment.

–  Demisting active.

In these cases, this indicator lamp flashes 

for a few seconds, then goes off.

After the engine has restarted, STOP 

mode is not available until the vehicle 

has reached a speed of 5 mph (8 km/h).

During parking manoeuvres, STOP mode 

is not available for a few seconds after 

coming out of reverse gear or turning the 

steering wheel.

-------------------------------------------------------------------------------------------------------------------------------------------------------------

136

Driving

Restarting the engine (START mode)

The engine automatically restarts as soon as the 

driver indicates the intention of moving off again:

With a manual gearbox

: with the clutch pedal 

fully depressed.

With an automatic gearbox

:

–  With the selector in position 

D

 or 

M

: with the 

brake pedal released.

–  With the selector in position 

N

 and the brake 

pedal released: with the selector at 

D

 or 

M

.

–  With the selector in position 

P

 and the brake 

pedal depressed: with the selector at 

R

N

D


or 

M

.

–  Reverse gear engaged.

Special cases

The engine will restart automatically if the 

conditions for operation are met again and in the 

following case:

–  Vehicle speed exceeds 2 mph (3 km/h) 

(depending on engine).

In this case, this indicator lamp flashes for 

a few seconds, then goes off.

Malfunctions

Depending on the vehicle’s equipment:

In the event of a system malfunction, this 

warning lamp flashes on the instrument 

panel.

The warning lamp in this button flashes 

and a message appears, accompanied by 

an audible signal.

Have it checked by a CITROËN dealer or a 

qualified workshop.

The vehicle stalls in STOP mode

All of the instrument panel warning lamps come 

on if there is a fault.

Depending on version, a warning message 

may also be displayed, prompting you to place 

the gear selector in position 

N

 and depress the 

brake pedal.

►  Switch off the ignition then start the engine 

again with the key or the "

START/STOP

" button.

12 V battery

The Stop & Start system requires a 

12 V battery of specific technology and 

specification.

All work must be carried out only by a 

CITROËN dealer or a qualified workshop

Tyre under-inflation 

detection

This system alerts the driver if one or more tyres 

suffer a drop in pressure.

The alert is raised when the vehicle is moving, 

not when stationary.

It compares the information given by the wheel 

speed sensors with 

reference values, which 

must be reinitialised every time the tyre 

pressures are adjusted or a wheel changed

.

It takes into account the last values stored 

during the reinitialisation request. It is therefore 

essential that the tyre pressure is correct during 

the operation. This operation is the driver’s 

responsibility.

The tyre under-inflation detection cannot, 

in any circumstances, replace the need 

for vigilance on the part of the driver.

This system does not avoid the need to 

regularly check the tyre pressures (including 

the spare wheel), especially before a long 

journey.

Driving with under-inflated tyres, particularly 

in adverse conditions (heavy load, high 

speed, long journey):

–  worsens road-holding.

–  lengthens braking distances.

–  causes premature wear of the tyres.

–  increases energy consumption.

The inflation pressures defined for the 

vehicle can be found on the tyre pressure 

label.

For more information on the 

Identification 

markings

, refer to the corresponding section.

Checking tyre pressures

This check should be done monthly 

when the tyres are "cold" (vehicle stopped for 

1 hour or after a journey of less than 6 miles 

(10 km) at moderate speeds).

Otherwise, add 0.3 bar to the pressures 

shown on the label.

-------------------------------------------------------------------------------------------------------------------------------------------------------------

137

Driving

6

Snow chains

The system does not have to be 

reinitialised after fitting or removing snow 

chains.

Spare wheel

The steel spare wheel does not have an 

under-inflation detection sensor.

Under-inflation alert

This is signalled by the fixed illumination 

of this warning lamp, accompanied by an 

audible signal and, depending on equipment, the 

display of a message.

►  Reduce speed immediately, avoid excessive 

steering movements and avoid sudden braking.

►  Stop the vehicle as soon as it is safe to do 

so.

The loss of pressure detected may not 

always cause visible deformation of the 

tyre.

Do not rely on just a visual check.

►  Using a compressor, such as the one in 

the temporary puncture repair kit, check the 

pressures of all four tyres when cold.

►  If it is not possible to carry out this check 

immediately, drive carefully at reduced speed.

►  In the event of a puncture, use the 

temporary puncture repair kit or the spare wheel 

(depending on equipment).

Driving too slowly may not ensure 

optimum monitoring.

The alert is not immediately triggered in the 

event of a sudden loss of pressure or tyre 

blow-out. This is because analysis of the 

values read by the wheel's speed sensors 

can take several minutes.

The alert may be delayed at speeds below 

25 mph (40 km/h), or when adopting a sporty 

driving mode.

The alert is kept active until the system is 

reinitialised.

Reinitialisation

►  The system must be reinitialised after any 

adjustment to the pressure of one or more tyres, 

and after changing one or more wheels.

Before reinitialising the system, make 

sure that the pressures of the four tyres 

are correct for the conditions of use of the 

vehicle and conform to the values written on 

the tyre pressure label.

Check the pressures of the four tyres before 

performing the reinitialisation.

The system does not advise if a pressure is 

incorrect at the time of reinitialisation.

Without touch screen


►  With the vehicle stationary, press this 

button for about 3 seconds then release it. 

Reinitialisation is confirmed by an audible signal.

With touch screen

With the vehicle stationary, the 

system is reinitialised via the 

Driving/Vehicle

 touch screen menu.

Malfunction

In the event of a malfunction, 

these warning lamps light up on 

the instrument panel.

In this case, the tyre under-inflation monitoring 

function is no longer performed.

Have it checked by a CITROËN dealer or a 

qualified workshop.

Non-standard spare wheel

The use of this type of spare wheel may 

suspend tyre pressure monitoring.

In this case, the malfunction warning lamp 

comes on and disappears once the wheel 

has been replaced by one of uniform size (the 

-------------------------------------------------------------------------------------------------------------------------------------------------------------

138

Driving

same as the others), the pressure readjusted 

and the reinitialisation carried out.

Head-up display

System which projects various information onto a 

smoked blade placed in the driver's field of vision 

to avoid the driver having to take their eyes off 

the road.

Information displayed 

during operation


Once the system has been activated, the 

following information is grouped together in the 

head-up display:

A.

The speed of your vehicle.

B.

Cruise control/speed limiter information.

C.

If your vehicle is suitably equipped, distances 

between vehicles, automatic emergency 

braking alerts and navigation instructions.

D.

If your vehicle is suitably equipped, speed 

limit information.

For more information on 

Navigation

refer to the section 

Audio equipment 

and telematics

.

Selector


1.

Switching on

2.

Switching off (long press)

3.

Brightness adjustment

4.

Display height adjustment

Activation/Deactivation

►  With the engine running, press button 

1

 to 

activate the system and deploy the projection 

blade.


►  Press and hold button 

2

 to deactivate the 

system and retract the projection blade.

The state of the system is saved when the 

engine is switched off and restored on restarting.

Adjusting the height

►  With the engine running, adjust the display to 

the desired height using the buttons 

4

:

•  up to move the display up,

•  down to move the display down.

Brightness adjustment

►  With the engine running, adjust the 

brightness of the information display using the 

buttons 

3

:

•  on the "sun" to increase the brightness,

•  on the "moon" to decrease the brightness.

When stationary or while driving, no 

objects should be placed around the 

projection blade (or in its recess) so as not to 

impede its movement and correct operation.

-------------------------------------------------------------------------------------------------------------------------------------------------------------

139

Driving

6

In certain extreme weather conditions 

(rain and/or snow, bright sunshine, etc.), 

the head-up display may not be legible or 

may suffer temporary interference.

Some sunglasses may hamper reading of the 

information.

To clean the projection blade, use a clean, 

soft cloth (such as a spectacles cloth or 

microfibre cloth). Do not use a dry or abrasive 

cloth, or detergent or solvent products, due to 

the risk of scratching the projection blade or 

damaging the non-reflective coating.

This system operates when the engine is 

running, and the settings are saved when 

the ignition is switched off.

Driving and manoeuvring 

aids - General 

recommendations

Driving and manoeuvring aids cannot, in 

any circumstances, replace the need for 

vigilance on the part of the driver.

The driver must comply with the Highway 

Code, must remain in control of the vehicle in 

all circumstances and must be able to retake 

control of it at all times. The driver must adapt 

the speed to climatic conditions, traffic and 

the state of the road.

It is the driver's responsibility to constantly 

monitor traffic conditions, assess the distance 

and relative speed of other vehicles, and 

anticipate their manoeuvres before using the 

direction indicator and changing lanes.

These systems do not make it possible to 

exceed the laws of physics.

Driving aids

You should hold the steering wheel with 

both hands, always use the door and interior 

mirrors, always leave your feet close to the 

pedals and take a break every 2 hours.

Manoeuvring aids

The driver must always check the 

surroundings of the vehicle before and during 

the whole manoeuvre, in particular using the 

mirrors.

Radar(s)

The operation of the radar(s), along with 

any associated functions, may be affected 

by the accumulation of dirt (e.g. mud, ice), 

in poor weather conditions (e.g. heavy rain, 

snow), or if the bumpers are damaged.

If the front bumper is to be repainted, contact 

a CITROËN dealer or a qualified workshop; 

certain types of paint could interfere with the 

operation of the radar(s).


Driving aids camera

This camera and its associated functions 

may be impaired or not work if the windscreen 

area in front of the camera is dirty, misty, 

frosty, covered with snow, damaged or 

masked by a sticker.

In humid and cold weather, demist the 

windscreen regularly.

Poor visibility (inadequate street lighting, 

heavy rain, thick fog, snowfall), dazzle 

(headlamps of an oncoming vehicle, low sun, 

reflections on a damp road, leaving a tunnel, 

alternating shade and light) can also impair 

detection performance.

In the event of a windscreen replacement, 

contact a CITROËN dealer or a qualified 

workshop to recalibrate the camera; 

otherwise, the operation of the associated 

driving aids may be disrupted.

Other cameras

The images from the camera(s) 

displayed on the touch screen or on the 

instrument panel may be distorted by the 

terrain.

-------------------------------------------------------------------------------------------------------------------------------------------------------------

140

Driving

In the presence of areas in shade, or in 

conditions of bright sunlight or inadequate 

lighting, the image may be darkened and with 

lower contrast.

Obstacles may appear further away than they 

actually are.

Sensors

The operation of the sensors, as well as 

any associated functions, may be disrupted 

by noise pollution such as that emitted by 

noisy vehicles and machinery (e.g. lorries, 

pneumatic drills), by the accumulation of 

snow or dead leaves on the road or in the 

event of damaged bumpers and mirrors.

When reverse gear is engaged, an audible 

signal (long beep) indicates that the sensors 

may be dirty.

A front or rear impact to the vehicle can 

upset the sensors’ settings, which is not 

always detected by the system: distance 

measurements may be distorted.

The sensors do not systematically detect 

obstacles that are too low (pavements, studs) 

or too thin (trees, posts, wire fences).

Certain obstacles located in the sensors’ blind 

spots may not be detected or may no longer 

be detected during the manoeuvre.

Certain materials (fabrics) absorb sound 

waves: pedestrians may not be detected.

Maintenance

Clean the bumpers and door mirrors and 

the field of vision of the cameras regularly.

When washing your vehicle at high pressure, 

direct the spray from at least 30 cm away 

from the sensors and cameras.

Mats/Pedal trims

The use of mats or pedal trims not 

approved by CITROËN may interfere with 

the operation of the speed limiter or cruise 

control.

To avoid any risk of jamming the pedals:

–  Ensure that the mat is secured correctly.

–  Never fit one mat on top of another.

Units of speed

Ensure that the units of speed displayed 

on the instrument panel (mph or km/h) are 

those for the country you are driving in.

If this is not the case, when the vehicle is 

stationary, set the display to the required 

units of speed so that it complies with what is 

authorised locally.

In case of doubt, contact a CITROËN dealer 

or a qualified workshop.

Road signs recognition

For more information, refer to the 

General recommendations on the use 

of driving and manoeuvring aids

.


This system displays the maximum speed 

authorised locally on the instrument panel, using:

–  Speed limit signs detected by the camera.

–  Speed limit information from the navigation 

system’s mapping.

–  Signs indicating a shared traffic zone detected 

by the camera.

-------------------------------------------------------------------------------------------------------------------------------------------------------------

141

Driving

6

Sign detected

Suggested speed 

(calculated)

Entry into a shared 

traffic zone

Example:


Without CITROËN 

Connect Nav

10 mph or 20 km/h 

(depending on 

the units on the 

instrument panel)

With CITROËN 

Connect Nav

Display of the speed 

in force in the country 

you are driving in.

–  Some supplementary traffic signs detected by 

the camera.

Supplementary 

traffic sign detected

Display of 

the speed 

associated with 

the supplementary 

traffic sign

Speed limit when 

raining

Examples:


If the wiper control 

stalk is in the 

"intermittent wipe" 

or "automatic wipe" 

position (in order 

to activate the rain 

sensor):

68 mph (110 km/h) 

(for example)

Supplementary 

traffic sign detected

Display of 

the speed 

associated with 

the supplementary 

traffic sign

Speed limit when 

towing


If an approved towing 

device is fixed to the 

vehicle:

56 mph (90 km/h) 

(for example)

Speed limit 

applicable over a 

certain distance

Example:


43 mph (70 km/h) 

(for example)

Speed limit for 

vehicles with a 

gross vehicle 

weight or gross 

train weight less 

than 3.5 tonnes


56 mph (90 km/h) 

(for example)

Supplementary 

traffic sign detected

Display of 

the speed 

associated with 

the supplementary 

traffic sign

Speed limit in case 

of snow

Example:


If the outside 

temperature is below 

3°C:

19 mph (30 km/h) 

(for example)

with a "snowflake" 

symbol

Speed limit at 

certain times of the 

day

Example:


19 mph (30 km/h) 

(for example)

with a "clock" symbol

Navigation mapping should be regularly 

updated in order to receive accurate 

speed limit information from the system.

The units for the speed limit (mph or 

km/h) depend on the country you are 

driving in.

This should be taken into account to ensure 

you observe the speed limit.

For the system to work properly when 

changing countries, the speed unit of the 

-------------------------------------------------------------------------------------------------------------------------------------------------------------

142

Driving

instrument panel must match that of the 

country you are driving in.

Automatic sign reading is a driving aid 

system and does not always display the 

correct speed limits.

The speed limit signs present on the road 

always take priority over those displayed by 

the system. 

The system is designed to detect signs that 

conform to the Vienna Convention on road 

signs.

Specific speed limits, such as those for 

heavy goods vehicles, are not displayed.

The display of the speed limit on the 

instrument panel is updated when passing 

a speed limit sign intended for cars (light 

vehicles).

Activation/Deactivation

By default, the system is automatically activated 

at every engine start.

The settings are changed via 

the 

Driving

/

Vehicle

 touch screen 

menu.

Information displayed on 

the instrument panel


1.

Detected speed limit indication

or

2.

End of speed limit indication


The system is active but is not detecting speed 

limit information.


On detecting speed limit information, the system 

displays the value.


For a suggested maximum speed, the first time 

that the vehicle exceeds it 

by more than 3 mph 

(5 km/h)

 (e.g. 59 mph (95 km/h)), the speed is 

displayed and flashes for 10 seconds (depending 

on version).

Operating limits

The system does not take account of reduced 

speed limits, especially those imposed in the 

following cases:

–  Atmospheric pollution.

– Towing.

–  Driving with a space-saver type spare wheel 

or snow chains fitted.

–  Tyre repaired using the temporary puncture 

repair kit.

–  Young drivers.

The system may not display the speed limit if it 

does not detect a speed limit sign within a preset 

period and in the following situations:

–  Road signs that are obstructed, non-standard, 

damaged or bent.

–  Obsolete or incorrect maps.

Recommendation


In addition to 

Road signs recognition

, the 

driver can select the speed displayed as a speed 

setting for the speed limiter or cruise control 

using the speed limiter or cruise control 'store' 

button.

For more information on the 

Speed 

limiter

Cruise control

 or 

Adaptive 

-------------------------------------------------------------------------------------------------------------------------------------------------------------

143

Driving

6

cruise control

, refer to the corresponding 

sections.

Steering-mounted controls

1.

Speed limiter/cruise control mode selection

2.

Memorise the speed setting

Information displayed on the 

instrument panel


3.

Speed limit indication

4.

Speed memorisation prompt

5.

Current speed setting

Storing the speed setting


►  Switch on the speed limiter/cruise control.

The speed limiter/cruise control information is 

displayed. 

Upon detecting a sign suggesting a new speed 

setting, the system displays the value and 

"

MEM

" flashes for a few seconds, prompting you 

to save it as a new speed setting.

If there is a difference of less than 6 mph 

(9 km/h) between the speed setting and 

the speed displayed by the Road signs 

recognition, the "

MEM

" symbol is not 

displayed.

Depending on the road conditions, several 

speeds may be displayed.

►  Press button 

2 once

 to save the suggested 

speed value.

A message is displayed, confirming the request.

►  Press button 

2 again

 to confirm and save the 

new speed setting.

The display then reverts to its previous state.

Extended Traffic Sign 

Recognition

For more information, refer to the 

General recommendations on the use 

of driving and manoeuvring aids

.


This additional system recognises these road 

signs and displays them on the instrument panel 

if the appropriate display mode is selected:

– 

No entry:

 when entering a lane in the wrong 

direction, an alert message, including the symbol 

of this sign, is displayed on the instrument panel 

(request to check the direction of traffic).

– 

Other signs:

 as you approach it, the symbol 

of the corresponding sign is displayed on the 

instrument panel.

The actual road signs always take priority 

over those displayed by the system.

The signs must comply with the Vienna 

Convention on road signs.

Activation/Deactivation

The settings are changed via 

the 

Driving

/

Vehicle

 touch screen 

menu.

Speed limiter

For more information, refer to the 

General recommendations on the use 

of driving and manoeuvring aids

.

This system prevents the vehicle from 

exceeding the speed programmed by the 

driver (speed setting).

The speed limiter is switched on manually.

The minimum speed setting is 19 mph (30 km/h).

-------------------------------------------------------------------------------------------------------------------------------------------------------------

144

Driving

The speed setting remains in the system 

memory when the ignition is switched off.

Steering-mounted control


1.

ON (

LIMIT

 position)/OFF (position 

0

)

2.

Reduce the speed setting

3.

Increase the speed setting

4.

Pause/resume speed limiter with the speed 

setting previously stored

5.

Depending on version:

Display the speed thresholds saved using the 

Memorising speeds function

or

Use the speed suggested by the Road signs 

recognition (

MEM

 display)

6.

Display and adjustment of the programmed 

inter-vehicle distance

For more information on 

Memorising speeds


or the 

Road signs recognition

, refer to the 

corresponding sections.

Information displayed on 

the instrument panel


Head-up display


7.

Speed limiter mode selection indication

8.

Speed limiter on/pause status indication

9.

Programmed speed setting value

10.

Speed limiter recommendation with Road 

signs recognition (depending on version)

Switching on/Pausing

►  Turn thumbwheel 

1

 to the "

LIMIT

" position 

to select speed limiter mode; the function is 

paused.

►  If the speed limit setting is suitable (most 

recent speed setting programmed in the system), 

press button 

4-II

 to switch the speed limiter on.

►  Pressing 

4-II

 again temporarily pauses the 

function (pause).

When the speed setting remains below 

the vehicle's speed for a prolonged 

period of time, an audible warning is emitted.

Adjusting the limit speed 

setting

You do not have to switch the speed limiter on in 

order to set the speed.

To modify the limit speed setting based on the 

vehicle’s current speed:

►  Briefly press button 

2

 or 

3

 to change the 

value in steps of + or - 1 mph (1.6 km/h).

►  Press and hold button 

2

 or 

3

 to change the 

value in steps of + or - 5 mph (8 km/h).

To change the limit speed setting using 

memorised speeds, via the touch screen:

-------------------------------------------------------------------------------------------------------------------------------------------------------------

145

Driving

6

►  Press button 

5

 to display the memorised 

speed settings.

►  Press the touch screen button for the desired 

speed setting.

The selection screen closes after a few 

moments.

This setting becomes the new limit speed.

To modify the cruise speed setting based on the 

speed suggested by the Road signs recognition, 

as shown on the instrument panel:

►  Press button 

5

 once; a message is displayed 

to confirm the memorisation request.

►  Press button 

5

 again to save the suggested 

speed.

The speed is immediately shown on the 

instrument panel as the new speed setting.

Temporarily exceeding the 

speed setting

►  Fully depress the accelerator pedal.

The speed limiter is temporarily deactivated and 

the displayed speed setting flashes.

►  Release the accelerator pedal to return to 

below the speed setting.

When exceeding the speed is not due to the 

driver's action (e.g. in case of a steep slope), an 

audible signal is triggered immediately.

On a steep descent or in the event of 

sharp acceleration, the speed limiter will 

not be able to prevent the vehicle from 

exceeding the speed setting.

If necessary, apply the brakes to control your 

vehicle’s speed.

When the vehicle speed returns to the speed 

setting level, the speed limiter operates again: 

the speed setting display becomes fixed again.

Switching off

►  Turn the thumbwheel 

1

 to the "

0

" position: 

the display of information on the speed limiter 

disappears.

Malfunction


In the event of a malfunction, dashes are 

displayed flashing and then fixed instead of the 

speed setting.

Have it checked by a CITROËN dealer or a 

qualified workshop.

Fixed speed limiter


If fitted to your vehicle, its speed can be limited 

to a fixed setting.

A label located in the passenger compartment 

indicates this maximum speed.

The fixed speed limiter is not a cruise control 

type function. It cannot be activated or 

deactivated by the driver during the trip.

The maximum speed is originally set 

according to the regulations in force in 

the country of sale.

This maximum speed cannot be changed by 

the driver.

If you wish to modify this maximum speed, 

contact a CITROËN dealer.

-------------------------------------------------------------------------------------------------------------------------------------------------------------


Content      ..     7      8      9      10     ..