Citroen SpaceTourer (2016 year). Instruction - part 20
 

  Index      Citroen     Citroen SpaceTourer - instruction 2016 year in english


Search            


Content   ..  18  19  20  21   ..


Citroen SpaceTourer (2016 year). Instruction - part 20


303

8

In the event of a breakdown

Spacetourer-VP_en_Chap08_En-cas-de-panne_ed01-2016

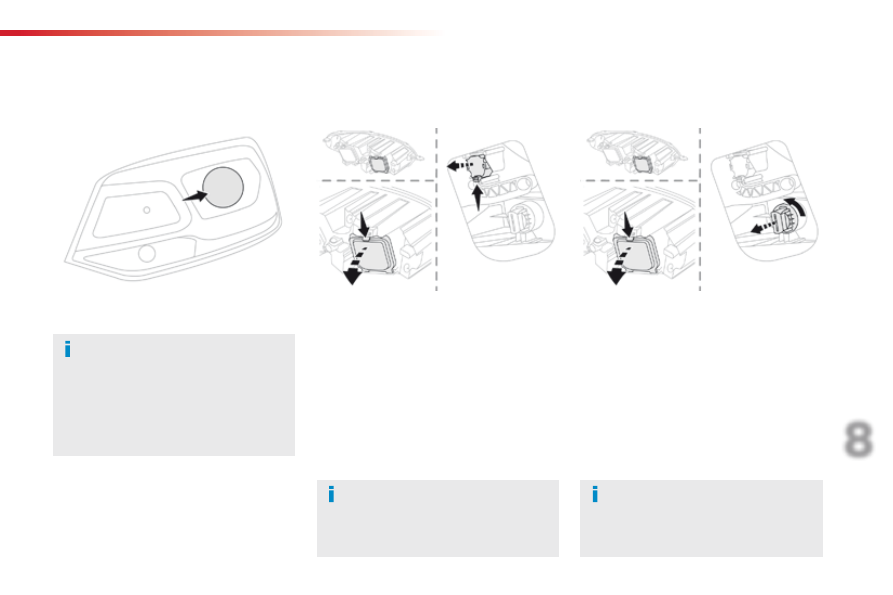
Dipped beam headlamps
(xenon headlamps)

Type E

, D8S 25W

F  Press the upper clip on the cover then tip it 

rearwards to remove it.

F  Turn the bulb holder a quarter turn anti-

clockwise.

F

  Change the failed bulb.

To refit, carry out these operations in reverse 
order.

Replacement of D8S xenon bulbs must 
be done by a CITROËN dealer or a 
qualified workshop as there is a risk of 
electrocution.
It is recommended that both D8S bulbs 
be replaced at the same time, in the 
event of the failure of one of them.

Main beam headlamps
(xenon headlamps)

Type C

, H1-55W

When refitting the connector and bulb 
in the lamp, push the assembly into its 
housing until it clicks into place.

Faster flashing of a direction indicator 
warning lamp (left or right) indicates a 
failed bulb on that side.

Direction indicators
(xenon headlamps)

Type B, PY21W-21W (amber)

F  Press the upper clip on the cover then tip it 

rearwards to remove it.

F  Press the lower clip on the electrical 

connector and remove the assembly of 
connector and bulb.

F

  Pull the bulb out and change it.

To refit, carry out these operations in reverse 
order.

304

In the event of a breakdown

Spacetourer-VP_en_Chap08_En-cas-de-panne_ed01-2016

Front foglamps

Type C

, H11-55W

F

  Press the locking clip and disconnect the 

connector.

F  Turn the bulb holder a quarter turn anti-

clockwise.

F

  Remove the bulb holder.

F

  Change the failed bulb.

To refit, carry out these operations in reverse 
order.

You can also go to a CITROËN 
dealer or a qualified workshop for the 
replacement of these bulbs.

F

  Below the front bumper, unscrew the fixing 

screws for the deflector A

.

F  Remove the deflector A

.

305

8

In the event of a breakdown

Spacetourer-VP_en_Chap08_En-cas-de-panne_ed01-2016

Rear lamps
(side-hinged rear doors)

For more information on Changing a bulb and 
in particular, the types of bulbs, refer to the 
corresponding section.

F

  While holding the lamp in place, press the 

clip on the inside then carefully remove the 
lamp.

F

  Disconnect the electrical connector.

For vehicles with interior trim, contact 
a CITROËN dealer or a qualified 
workshop to have the work done.

1.

  Brake lamps / sidelamps.


Type B

, P21/5W-21/5W

2.

  Direction indicators.


Type B, PY21W-21W (amber)

3.

  Reversing lamps.


Type B

, P21W-21W.

4.

  Foglamps / sidelamps.


Type B

, 21/4W-21/4W.

F  Identify the failed bulb then open the rear 

doors.

F

  Spread the three lugs slightly, then extract 

the bulb holder.

F

  Remove the failed bulb by pressing 

lightly on it, then turning it a quarter turn 
clockwise.

F

  Change the bulb.

To reassemble, carry out these operations in 
reverse order.

F

  From inside, remove the ventilation grille, if 

your vehicle has one.

F

  From outside, unscrew the two lamp fixing 

screws.

306

In the event of a breakdown

Spacetourer-VP_en_Chap08_En-cas-de-panne_ed01-2016

Number plate lamps
(side-hinged doors)

Type A

, W5W-5W

F

  Remove the plastic cover using a small 

screwdriver.

F

  Using a screwdriver through the aperture, 

push the lamp towards the outside.

F

  Disconnect the electrical connector.

F

  Remove the lamp.

F  Turn the bulb holder a quarter turn anti-

clockwise.

F

  Change the failed bulb.

To refit, press on the lamp to clip it in place.

Third brake lamp
(side-hinged doors)

Type A

, W5W-5W

To refit, press on the lens to clip it in place.

F

  Open the left hand rear door.

F  Insert a thin screwdriver into one of the  

cut-outs in the lens.

F

  Push it outwards to unclip it.

F

  Remove the lens.

F

  Change the failed bulb.

307

8

In the event of a breakdown

Spacetourer-VP_en_Chap08_En-cas-de-panne_ed01-2016

Courtesy lamps
(front and rear)

Type A

, W5W-5W

F

  Unclip the lens by inserting a thin 

screwdriver into the cut-outs at each side 
of the lamp.

F

  Pull the bulb out and change it.

F  Clip the lens in place and ensure that it is 

secure.

308

In the event of a breakdown

Spacetourer-VP_en_Chap08_En-cas-de-panne_ed01-2016

Rear lamps
(tailgate)

For more information on Changing a bulb and 
in particular, the types of bulbs, refer to the 
corresponding section.

F

  While holding the lamp in place, press the 

clip on the inside then carefully remove the 
lamp.

F

  Disconnect the electrical connector.

F

  Identify the failed bulb then open the boot.

For vehicles with interior trim, contact 
a CITROËN dealer or a qualified 
workshop to have the work done.

1.

  Brake lamps / sidelamps.


Type B

, P21/5W-21/5W.

2.

  Direction indicators.


Type B, PY21W-21W (amber)

3.

  Reversing lamps.


Type B, P21W-21W

4.

  Foglamps / sidelamps.


Type B

, P21/4W-21/4W.

F  From inside, remove the cover, if your 

vehicle has one.

F  From the outside, press on the inner clips 

on the plastic finisher then tip it towards the 
outside to remove it.

F

  Unscrew the two lamp fixing screws.

F

  Spread the three lugs slightly, then extract 

the bulb holder.

F

  Remove the failed bulb by pressing 

lightly on it, then turning it a quarter turn 
clockwise.

F

  Change the bulb.

To reassemble, carry out these operations in 
reverse order.

309

8

In the event of a breakdown

Spacetourer-VP_en_Chap08_En-cas-de-panne_ed01-2016

To refit, press on the lens to clip it in place.

F

  Unclip the trim at each end by turning it 

upwards.

F

  Pull on the trim to disengage the central 

clips, then remove it.

F

  Using a screwdriver through the aperture, 

push the lamp towards the outside.

F

  Disconnect the electrical connector.

F

  Remove the lamp.

F  Turn the bulb holder a quarter turn anti-

clockwise.

F

  Change the failed bulb.

To refit, carry out these operations in reverse 
order.
To refit the lamp and trim, press on them to clip 
them in place.

Third brake lamp
(tailgate)

Type A

, W5W-5W

Number plate lamps
(tailgate)

Type A

, W5W-5W

F

  Open the tailgate.

F  Insert a thin screwdriver into one of the cut-

outs in the lens.

F

  Push it outwards to unclip it.

F

  Remove the lens.

F

  Change the failed bulb.

310

In the event of a breakdown

Spacetourer-VP_en_Chap08_En-cas-de-panne_ed01-2016

Courtesy lamps
(front and rear)

For the replacement of this type of LED lamp 
and light guide, contact a CITROËN dealer or a 
qualified workshop.
A replacement kit for the LEDs is available from 
CITROËN dealers.

311

8

In the event of a breakdown

Spacetourer-VP_en_Chap08_En-cas-de-panne_ed01-2016

F

  Unclip the cover by pulling at the top left, 

then right.

Disengage the cover completely and turn it over.

Good

Failed

Tweezer

Access to the tools

F

  Take the tweezer from its housing.

The extraction tweezer is located behind the 
fusebox cover, on the dashboard pillar.

Before changing a fuse:
F  the cause of the failure must be identified 

and rectified,

F  all electrical consumers must be 

switched off,

F  the vehicle must be immobilised with the 

ignition off,

F

  identify the failed fuse using the tables and 

layout drawings in the following pages.

Changing a fuse

To replace a fuse, you must:
F  use the special tweezer to extract the fuse 

from its housing and check the condition of 
its filament.

F  always replace the failed fuse with a fuse 

of the same rating (same colour); using a 
different rating could cause faults (risk of 
fire).

If the fuse fails again soon after replacement, 
have the vehicle's electrical system checked by 
a CITROËN dealer or a qualified workshop.

The replacement of a fuse not shown in 
the tables below may cause a serious 
malfunction of your vehicle. Contact 
a CITROËN dealer or a qualified 
workshop.

Changing a fuse

312

In the event of a breakdown

Spacetourer-VP_en_Chap08_En-cas-de-panne_ed01-2016

CITROËN will not accept responsibility 
for the cost incurred in repairing your 
vehicle or for rectifying malfunctions 
resulting from the installation of 
accessories not supplied and not 
recommended by CITROËN and 
not installed in accordance with its 
instructions, in particular when the 
combined consumption of all of the 
additional equipment connected 
exceeds 10 milliamperes.

Installing electrical 
accessories

Your vehicle's electrical system is 
designed to operate with standard or 
optional equipment.
Before installing other electrical 
equipment or accessories on your 
vehicle, contact a CITROËN dealer or a 
qualified workshop.

For more information on installing a 
towbar or equipment of the TAXI type, 
contact a CITROËN dealer.

Dashboard fuses

The fusebox is placed in the lower dashboard 
(left-hand side).

Access to the fuses

F

  Unclip the cover by pulling at top left, then 

right.

313

8

In the event of a breakdown

Spacetourer-VP_en_Chap08_En-cas-de-panne_ed01-2016

Fuse

Rating

(A)

Functions

F1

10

Electric power steering, clutch switch

F4

15

Horn.

F5

20

Front/rear screenwash pump.

F6

20

Front/rear screenwash pump.

F7

10

Rear 12 V accessory socket.

F8

20

Single or double rear wipers.

F10/F11

30

Front and rear, exterior, interior locks.

F13

10

Front air conditioning controls, radio controls, gear lever,  
head-up display.

F14

5

Alarm, emergency and assistance calls.

F17

5

Instrument panel.

F19

3

Steering mounted controls.

F21

3

"Keyless Entry and Starting" system or ignition switch.

F22

3

Rain and sunshine sensor, multifunction detection camera.

F23

5

Seat belt unfastened or not fastened display screen.

F24

5

Touch screen, reversing camera and parking sensors.

F25

5

Airbags.

F29

20

Audio system, touch screen, CD player, navigation.

F31

15

Audio system (battery +).

F32

15

Front 12 V accessory socket.

F34

5

Blind spot monitoring system, door mirror electric controls.

F35

5

Heated washer jets, headlamp beam height control.

F36

5

Torch charger, rear courtesy lamp.

Version 1 (Eco)

The fuses described hereafter vary according 
to the equipment in your vehicle.

314

In the event of a breakdown

Spacetourer-VP_en_Chap08_En-cas-de-panne_ed01-2016

Fuse

Rating

(A)

Functions

F1

3

"Keyless Entry and Starting" system or ignition switch.

F5

5

Touch screen, reversing camera and parking sensors.

F7

10

Rear air conditioning controls, Hi-Fi amplifier.

F8

20

Single or double rear wiper.

F10/F11

30

Front and rear, exterior, interior locks.

F12

3

Alarm.

F17

10

Rear 12 V accessory socket.

F18

5

Emergency and assistance calls.

F21

3

Torch charger, rear courtesy lamp.

F22

3

Glove box lamp, rear courtesy lamps.

F23

5

Blind spot monitoring system, door mirror electric controls.

F24

5

Steering mounted controls.

F25

5

Headlamp beam height control.

F26

3

Seat belt unfastened or not fastened display screen.

F27

3

Rain and sunshine sensor, multifunction detection camera.

F28

10

Front air conditioning controls, radio controls, gear lever, head-
up display.

F30A or B

15

Audio system (battery +).

F31

5

Airbags.

F33

15

Front 12 V accessory socket.

F35

5

Instrument panel.

F36

20

Audio system, touch screen, CD player, navigation.

Version 2 (Full)

The fuses described hereafter vary according 
to the equipment in your vehicle.

315

8

In the event of a breakdown

Spacetourer-VP_en_Chap08_En-cas-de-panne_ed01-2016

Engine compartment fuses

F  Release the two latches A

.

F

  Remove the cover.

F

  Change the fuse.

F  When you have finished, close the cover 

carefully then engage the two latches A, to 
ensure correct sealing of the fusebox.

Fuse

Rating

(A)

Functions

F12

5

Heated washer jets.

F14

25

Front and rear screenwash pump.

F15

5

Front radar and emergency braking, electric power steering.

F17

10

Built-in systems interface.

F19

30

Front wiper motor.

F20

15

Front and rear screenwash pump.

F21

20

Headlamp wash pump.

F22

15

Horn.

F23

15

Right hand main beam headlamp.

F24

15

Left hand main beam headlamp.

The fusebox is located in the engine 
compartment near the battery.

The fuses described hereafter vary according to the equipment in your vehicle.

Access to the fuses

316

In the event of a breakdown

Spacetourer-VP_en_Chap08_En-cas-de-panne_ed01-2016

12 V battery

The battery is located under the bonnet.
F

  Open the bonnet using the interior release 

lever, then the exterior safety catch.

F

  Secure the bonnet stay.

Access to the battery

Procedure for starting the engine using another 
battery or charging a discharged battery.

General points

Lead-acid starter batteries

Protect your eyes and face before 
handling the battery.
All operations on the battery must be 
carried out in a well ventilated area and 
away from naked flames and sources 
of sparks, so as to avoid the risk of 
explosion or fire.
Wash your hands afterwards.

Versions equipped with Stop & Start are 
fitted with a 12 V lead-acid battery of 
specific technology and specification.
Its replacement should be carried out 
only by a CITROËN dealer or a qualified 
workshop.

If your vehicle has an automatic 
gearbox, do not try to start the engine 
by pushing the vehicle.

Batteries contain harmful substances 
such as sulphuric acid and lead.
They must be disposed of in 
accordance with regulations and must 
not, in any circumstances, be discarded 
with household waste.
Take used remote control batteries and 
vehicle batteries to a special collection 
point.

For more information on the 
Bonnet and the Engine, refer to the 
corresponding section(s).

F

  Remove the plastic cover on the (+) terminal.

The battery (-) terminal is not accessible.
A remote earth point is provided at the front of 
the vehicle.

317

8

In the event of a breakdown

Spacetourer-VP_en_Chap08_En-cas-de-panne_ed01-2016

Starting using another 
battery

Never try to start the engine by 
connecting a battery charger.
Never use a 24 V or higher battery 
booster.
First check that the slave battery has a 
nominal voltage of 12 V and a capacity 
at least equal to that of the discharged 
battery.
The two vehicles must not be in contact 
with each other.
Switch off the electrical consumers on 
both vehicles (audio system, wipers, 
lighting, ...).
Ensure that the jump lead cables do 
not pass close to moving parts of the 
engine (cooling fan, belts, ...).
Do not disconnect the (+) terminal when 
the engine is running.

F  Raise the plastic cover on the (+) terminal, 

if your vehicle has one.

F  Connect the red cable to the positive 

terminal (+) of the flat battery A (at 
the metal elbow) then to the positive 
terminal (+) of the slave battery B or the 
booster.

F

  Connect one end of the green or black 

cable to the negative terminal (-) of the 
slave battery B or the booster (or earth 
point on the other vehicle).

F

  Connect the other end of the green or black 

cable to the earth point C

 on the broken 

down vehicle.

F

  Start the engine of the vehicle with the 

good battery and leave it running for a 
few minutes.

F

  Operate the starter on the broken down 

vehicle and let the engine run.

If the engine does not start straight away, 
switch off the ignition and wait a few moments 
before trying again.

When your vehicle's battery is discharged, the 
engine can be started using a slave battery 
(external or on another vehicle) and jump lead 
cables or a battery booster.

Some functions, including Stop & Start, 
are not available if the battery is not 
sufficiently charged.

F

  Wait until the engine returns to idle then 

disconnect the jump lead cables in the 
reverse order.

F  Refit the plastic cover to the (+) terminal, if 

your vehicle has one.

F

  Allow the engine to run for at least 

30 minutes, by driving or with the vehicle 
stationary, so that the battery reaches an 
adequate state of charge.

318

In the event of a breakdown

Spacetourer-VP_en_Chap08_En-cas-de-panne_ed01-2016

For optimum service life of the battery, it is 
essential to maintain an adequate state of 
charge.
In some circumstances it may be necessary to 
charge the battery:

if you use your vehicle essentially for short 
journeys,

-  if the vehicle is to be taken off the road for 

several weeks.

Contact a CITROËN dealer or a qualified 
workshop.

Charging the battery using 
a battery charger

F

  Switch off the ignition.

F  Switch off all electrical consumers (audio 

system, lighting, wipers, ...).

If you envisage charging your vehicle's 
battery yourself, use only a charger 
compatible with lead-acid batteries of a 
nominal voltage of 12 V.

Follow the instructions for use provided 
by the manufacturer of the charger.
Never reverse polarities.

Never try to charge a frozen battery.
If the battery has been frozen, have 
it checked by a CITROËN dealer or a 
qualified workshop, who will check that 
the internal components have not been 
damaged and the casing is not cracked, 
which could cause a leak of toxic and 
corrosive acid.

If this label is present, it is essential 
to use only a 12 V charger, to avoid 
causing irreversible damage to the 
electrical components related to the 
Stop & Start system.

It is not necessary to disconnect the 
battery.

F

  Switch off the charger B before connecting 

the cables to the battery, so as to avoid any 
dangerous sparks.

F

  Ensure that the charger cables are in good 

condition.

F  Raise the plastic cover, if your vehicle has 

one, on the (+) terminal.

F

  Connect the charger B cables as follows:

-  the positive (+) red cable to the 

(+) terminal of the battery A,

-  the negative (-) black cable to the earth 

point C

 on the vehicle.

F

  At the end of the charging operation, switch 

off the charger B before disconnecting the 
cables from the battery A

.


Content   ..  18  19  20  21   ..