Citroen SpaceTourer (2016 year). Instruction - part 17
 

  Index      Citroen     Citroen SpaceTourer - instruction 2016 year in english


Search            


Content   ..  15  16  17  18   ..


Citroen SpaceTourer (2016 year). Instruction - part 17


255

6

Driving

Spacetourer-VP_en_Chap06_conduite_ed01-2016

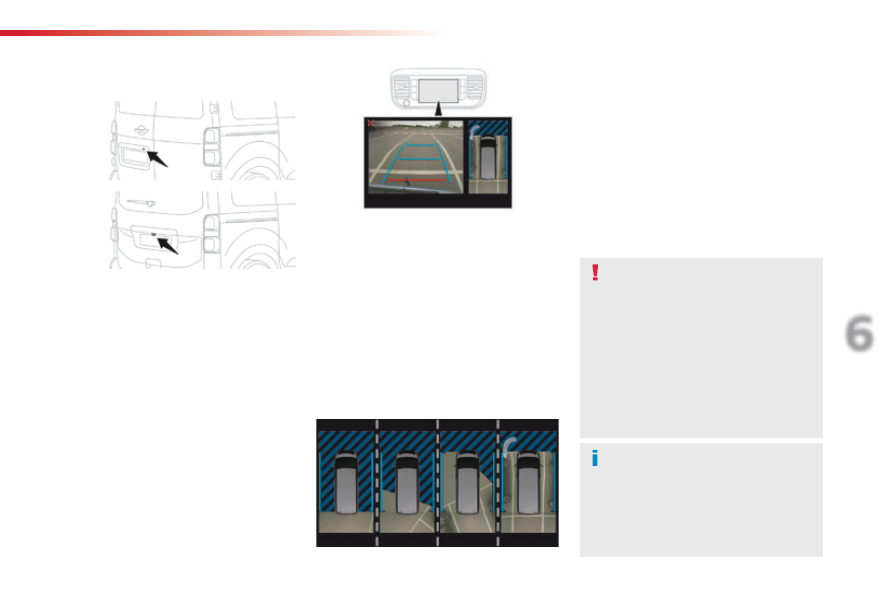
180° rear vision

This system allows the near surroundings of the 
vehicle to be viewed in the display screen using 
cameras located at the rear of the vehicle. The 
parking sensors in the rear and/or front bumper 
complete the information on the view from 
above the vehicle (right-hand part).
In addition to the view from above the vehicle 
(right-hand part) several types of view can be 
displayed (left-hand part):

standard rear view,

180° rear view,

-  reconstructed zoom rear view.

Principle of image 
reconstruction

The system displays the contextual view (left-
hand part) as well as the view from above the 
vehicle in its close surroundings.
By default, automatic mode is activated.
In this mode, the system chooses the best view 
to display (standard or zoom) according to the 
information received from the parking sensors.
The 180° view is only available through the 
menus.

The display disappears above 
approximately 6 mph (10 km/h).
The system is automatically deactivated 
about 7 seconds after coming out of 
reverse or on opening a door or the 
boot.

This system is a visual aid and cannot 
in any circumstances replace the need 
for vigilance on the part of the driver.
The images provided by the cameras 
may appear distorted by the 
surroundings (exterior conditions, 
driving mode, ...).
The presence of areas in shadow, bright 
sunlight, or poor lighting conditions 
may make the image dark and reduce 
contrast.

Using the rear camera, the system records the 
vehicle's surroundings during a manoeuvre. 
An image from above your vehicle in its close 
surroundings is reconstructed (represented 
between the blue brackets) in real time and as 
the manoeuvre progresses.
This representation facilitates the alignment of 
your vehicle when parking and allows you to 
see all of the obstacles close to the vehicle.
This reconstructed view is automatically erased 
if the vehicle remains stationary for too long.

256

Driving

Spacetourer-VP_en_Chap06_conduite_ed01-2016

"Standard view"

"180° view"

"Zoom view" (reconstructed)

The camera records the surroundings during a 
manoeuvre in order to create a reconstruction 
of the view from above the rear of the vehicle in 
its close surroundings, allowing the vehicle to 
be manoeuvred among the obstacles nearby.
This view is available with AUTO view or by 
selecting of the view in the change view menu.

180° view makes it possible to reverse out of 
a parking space while being able to see the 
arrival of vehicles, pedestrians or cyclists.
This view is not recommended for carrying out 
a complete manoeuvre.
It is made up of the following:

The area to the rear of your vehicle is displayed 
in the screen.
The blue outline represents the width of your 
vehicle (with mirrors): its orientation depends 
on the position of the steering wheel.
The red line represents a distance of 30 cm 
from the rear bumper and the two blue lines, 
1 m and 2 m respectively.

Rear views

Engage reverse gear to activate the camera, 
located on the tailgate or rear door.

The rear parking sensors also 
provide information on the vehicle's 
surroundings.
Obstacles may appear further away 
than they are in reality.
It is important to check the side views 
using the mirrors during the manoeuvre.

257

6

Driving

Spacetourer-VP_en_Chap06_conduite_ed01-2016

Activation

Activation is automatic on engaging reverse.
The function is displayed in the touch screen. 
To close the window displayed, press on the 
red cross at the top left of the screen.

On display of the sub-menu, select one of the 
four views:

"Standard view".

"180° view".

"Zoom view".

"AUTO mode".

You can choose the display mode at any time 
by pressing on this area.

Check the cleanliness of the camera 
lenses regularly.
Periodically clean the reversing camera 
with a soft dry cloth.

"AUTO mode"

This mode is activated by default.
Using sensors in the rear bumper, the 
automatic view allows a change from the rear 
view to the view from above as an obstacle is 
approached during a manoeuvre.

The system is automatically deactivated 
when towing a trailer or carrying a 
bicycle on the towbar (vehicle fitted with 
a towbar installed as recommended by 
the manufacturer).

Quick start mode

This mode displays, as quickly as possible, the 
contextual view (left-hand part) and the view 
from above the vehicle.

High pressure jet wash (if muddy, for 
example)
When washing your vehicle, do not 
place the tip of the lance within 30 cm of 
the camera lenses, as otherwise there 
is a risk of damaging them.

A message is displayed advising you to check 
your vehicle's surroundings before starting the 
manoeuvre.

258

Driving

Spacetourer-VP_en_Chap06_conduite_ed01-2016

Under-inflation detection

The system monitors the pressures in the four 
tyres, once the vehicle is moving.
It compares the information given by the four 
wheel speed sensors with reference values, 
which must be reinitialised every time the 
tyre pressures are adjusted or a wheel 
changed

.

The system triggers an alert as soon as it 
detects a drop in the inflation pressure of one 
or more tyres.

The under-inflation detection system 
does not replace the need for vigilance 
on the part of the driver.
This system does not avoid the need to 
check the tyre pressures (including the 
spare wheel) every month as well as 
before a long journey.
Driving with under-inflated tyres impairs 
road holding, extends braking distances 
and causes premature tyre wear, 
particularly under arduous conditions 
(high loading, high speed, long journey).

System which automatically checks the pressures of the tyres while driving.

The inflation pressures defined for 
your vehicle can be found on the tyre 
pressure label.
For more information on the 
Identification markings, refer to the 
corresponding section.
Tyre pressures should be checked 
when the tyres are "cold" (vehicle 
stopped for 1 hour or after a journey of 
less than 6 miles (10 km) at moderate 
speeds).
Otherwise (when hot), add 0.3 bar to 
the pressures shown on the label.

Driving with under-inflated tyres 
increases fuel consumption.

Snow chains

The system does not have to be 
reinitialised after fitting or removing 
snow chains.

Spare wheel

The steel spare wheel does not have an 
under-inflation detection sensor.

259

6

Driving

Spacetourer-VP_en_Chap06_conduite_ed01-2016

Under-inflation alert

Reinitialisation

Before reinitialising the system, ensure 
that the pressures of the four tyres are 
correct for the use of the vehicle and in 
line with the recommendations on the 
tyre pressure label.
The under-inflation alert can only 
be relied on if the reinitialisation of 
the system has been done with the 
pressures in the four tyres correctly 
adjusted.
The under-inflation detection system 
does not give a warning if a pressure is 
incorrect at the time of reinitialisation.

This is given by fixed illumination of 
this warning lamp, accompanied by 
an audible signal and, depending on 
equipment, the display of a message.

It is necessary to reinitialise the system every 
time one or more tyre pressures are adjusted, 
and after changing one or more wheels.

F  Reduce speed immediately, avoid 

excessive steering movements and sudden 
braking.

F  Stop the vehicle as soon as it is safe to do 

so.

F  In the event of a puncture, use the 

temporary puncture repair kit or the spare 
wheel (depending on equipment),

or
F  if you have a compressor, such as the one 

in the temporary puncture repair kit, check 
the pressures of the four tyres when cold,

or
F

  if it is not possible to make this check 

immediately, drive carefully at reduced 
speed.

The loss of pressure detected does not 
always cause visible bulging of the tyre. 
Do not satisfy yourself with just a visual 
check.

The alert is maintained until the system 
is reinitialised.

Initialisation of the system is done with the 
ignition on and the vehicle stationary.

The new pressure settings registered 
are considered to be reference values 
by the system.

260

Driving

Spacetourer-VP_en_Chap06_conduite_ed01-2016

In the Driving menu, select "Under-inflation 
initialisation

".

With the audio system

In the "Personalisation-configuration" menu, 
select "Under-inflation initialisation

".

Operating fault

The flashing and then fixed illumination of the 
under-inflation warning lamp accompanied 
by illumination of the Service warning lamp 
indicates a fault with the system.

In this case, under-inflation monitoring of the 
tyres is no longer assured.
Have the system checked by a CITROËN 
dealer or a qualified workshop.

Before doing anything to the system, 
the pressures of the four tyres must be 
checked and the system reinitialised.

With the touch screen

Press on "Yes" to Confirm the command, 
initialisation is confirmed by an audible signal 
and a message.

261

7

Practical information

Spacetourer-VP_en_Chap07_info-pratiques_ed01-2016

Fuel tank

Opening

If your vehicle is fitted with Stop & Start, 
never refuel with the engine in STOP 
mode; you must switch off the ignition 
using the key, or the START/STOP 
button if your vehicle has Keyless Entry 
and Starting.

You must switch off the engine.

If your vehicle has Keyless Entry and 
Starting, unlock the vehicle.

-  Open the filler flap.

Refuelling

Additions of fuel must be of at least 8 litres to 
be registered by the fuel gauge.
Opening the filler cap may result in an inrush of 
air. This vacuum is entirely normal and results 
from the sealing of the fuel system.

F  Remove the filler cap, then place it on the 

carrier located on the filler flap.

F  Introduce the nozzle and push it in fully 

(pushing on the metal non-return valve A).

F

  Fill the tank. Do not continue past the third 

cut-off of the nozzle, as this may cause 
malfunctions.

F

  Refit the filler cap turning it to the right.

F  Push the filler flap to close it (your vehicle 

must be unlocked).

F

  Take care to select the pump that delivers 

the correct fuel type for your vehicle's 
engine (reminder on a label on the inside of 
the filler flap).

Capacity of the tank: approximately 69 litres.

F

  If your vehicle has a conventional key, 

introduce the key into the filler cap, then 
turn it to the left.

262

Practical information

Spacetourer-VP_en_Chap07_info-pratiques_ed01-2016

Low fuel level

When the low fuel level in the tank is 
reached, this warning lamp comes on 
in the instrument panel, accompanied 
by an audible warning and a message.

Fuel supply cut-off

Your vehicle is equipped with a safety device 
which cuts off the fuel supply in the event of a 
collision.

When it first comes on, less than 8 litres of fuel 
remain in the tank.
You must refuel as soon as possible to avoid 
running out.

If you have put in the wrong fuel for 
your vehicle, you must have have 
the tank drained and refilled with 
the correct fuel before you start the 
engine.

Your vehicle is fitted with a catalytic converter, 
a device which helps to reduce the level of 
harmful emissions in the exhaust gases.

Diesel misfuel 
prevention

Mechanical device which prevents filling the 
tank of a Diesel vehicle with petrol. It avoids 
the risk of engine damage that can result from 
filling with the wrong fuel.
Located in the filler neck, the misfuel 
prevention device appears when the filler cap 
is removed.

When a petrol filler nozzle is introduced into the 
fuel filler neck of your Diesel vehicle, it comes 
into contact with the flap. The system remains 
closed and prevents filling.
Do not persist but introduce a Diesel filler 
nozzle.

If your vehicle has sliding side doors, do 
not open the left hand sliding door as 
there is a risk of damaging the fuel filler 
flap when refuelling.

263

7

Practical information

Spacetourer-VP_en_Chap07_info-pratiques_ed01-2016

Fuel used for Diesel 
engines

The Diesel engines are compatible with 
biofuels available at the pumps which meet 
current and future European standards:
-  Diesel fuel that meets standard EN 590 

mixed with a biofuel that meets standard 
EN 14214,

-  Diesel fuel that meets standard EN16734 

mixed with a biofuel that meets standard 
EN14214 (possibly containing up to 
10 % Fatty Acid Methyl Ester),

Paraffinic Diesel fuel that meets standard 
EN15940 mixed with a biofuel that meets 
standard EN14214 (possibly containing up 
to 7 % Fatty Acid Methyl Ester).

The use of B20 or B30 fuel meeting standard 
EN16709 is possible in your Diesel engines. 
However, this use, even occasional, requires 
strict application of the special servicing 
conditions referred to as "Arduous conditions". 
For more information, contact a CITROËN 
dealer or a qualified workshop.
The use of any other type of (bio)fuel 
(vegetable or animal oils, pure or diluted, 
domestic fuel...) is strictly prohibited (risk of 
damage to the engine and fuel system).
Only the use of Diesel fuel additives that meet 
the standard B715000 is authorised.

It is still possible to use a fuel can to fill 
the tank but this must be done slowly.
In order to ensure a good flow of fuel, 
do not place the nozzle of the fuel can 
in direct contact with the flap of the 
misfuel prevention device.

Travelling abroad

As Diesel fuel pump nozzles may be different 
in other countries, the presence of the misfuel 
prevention device may make refuelling 
impossible.
Before travelling abroad, we recommend that 
you check with the CITROËN dealer network, 
whether your vehicle is suitable for the fuel 
pumps in the country in which you want to 
travel.

264

Practical information

Spacetourer-VP_en_Chap07_info-pratiques_ed01-2016

Snow chains

In wintry conditions, snow chains improve 
traction as well as the behaviour of the vehicle 
when braking.

The snow chains must be fitted only to 
the front wheels.

Take account of the legislation in force 
in your country on the use of snow 
chains and the maximum running speed 
authorised.

Avoid driving with snow chains on roads 
that have been cleared of snow, to 
avoid damaging your vehicle's tyres and 
the road surface. If your vehicle is fitted 
with alloy wheels, check that no part of 
the chain or its fixings is in contact with 
the wheel rim.

Use only the chains designed to be fitted to the 
type of wheel fitted to your vehicle:

You can also use snow socks.
For more information on snow chains, contact a 
CITROËN dealer or a qualified workshop.

Advice on installation

F

  If you have to fit the chains during a 

journey, stop the vehicle on a flat surface 
on the side of the road.

F

  Apply the parking brake and position any 

wheel chocks to prevent movement of your 
vehicle.

F

  Fit the chains following the instructions 

provided by the manufacturer.

F

  Move off gently and drive for a few 

moments, without exceeding 30 mph 
(50 km/h).

F

  Stop your vehicle and check that the snow 

chains are correctly tightened.

Original tyre size

Type of chain.

215/65 R16

12 mm links

215/60 R17

-

225/55 R17

It is strongly recommended that before 
you leave, you practise fitting the snow 
chains on a level and dry surface.

265

7

Practical information

Spacetourer-VP_en_Chap07_info-pratiques_ed01-2016

Towing a trailer

We recommend the use of genuine 
CITROËN towbars and their harnesses 
that have been tested and approved 
from the design stage of your vehicle, 
and that the fitting of the towbar is 
entrusted to a CITROËN dealer or a 
qualified workshop.
If the towbar is not fitted by a 
CITROËN dealer, it must still be 
fitted in accordance with the vehicle 
manufacturer's instructions.

Your vehicle is primarily designed for 
transporting people and luggage, but it may 
also be used for towing a trailer.

Driving with a trailer places greater 
demands on the towing vehicle and the 
driver must take particular care.

For more information on Driving 
advice

, particularly when towing, refer 

to the corresponding section.

266

Practical information

Spacetourer-VP_en_Chap07_info-pratiques_ed01-2016

Energy economy mode

System which manages the duration of use of certain functions to conserve a sufficient level of 
charge in the battery.
After the engine has stopped, you can still use functions such as the audio and telematics 
system, windscreen wipers, dipped beam headlamps, courtesy lamps, etc. for a maximum 
combined duration of about forty minutes.

Switching to economy 
mode

A message appears in the instrument panel 
screen indicating that the vehicle has switched 
to economy mode and the active functions are 
put on standby.
If a telephone call is being made at this time, it 
will be maintained for around 10 minutes with 
the Bluetooth hands-free system of your audio 
system.

Exiting economy mode

These functions are reactivated automatically 
next time the vehicle is driven.
In order to restore the use of these functions 
immediately, start the engine and let it run:

for less than ten minutes, to use the 
equipment for approximately five minutes,

for more than ten minutes, to use the 
equipment for up to approximately 
thirty minutes.

Let the engine run for the duration specified to 
ensure that the battery charge is sufficient.
Do not repeatedly and continuously restart the 
engine in order to charge the battery.
A flat battery prevents the engine from starting.
For more information on the 12 V battery, refer 
to the corresponding section.

Load reduction mode

System which manages the use of certain 
functions according to the level of charge 
remaining in the battery.
When the vehicle is being driven, the load 
reduction function temporarily deactivates 
certain functions, such as the air conditioning, 
the heated rear screen...
The deactivated functions are reactivated 
automatically as soon as conditions permit.

267

7

Practical information

Spacetourer-VP_en_Chap07_info-pratiques_ed01-2016

Accessories

A wide range of accessories and genuine parts is available from the CITROËN dealer network.
These accessories and parts are all suitable for your vehicle and benefit from CITROËN's 
recommendation and warranty.

"Comfort"

Door deflectors, cigarette lighter, boot dividers, 
coat hanger fixed to head restraint, front and 
rear parking sensors, styling mudflaps, boot 
management system, ...

"Transport solutions"

Boot liners, roof bars, bicycle carrier on roof 
bars, ski carrier, roof box, towbar harness, ...
Tow bar, which must be fitted by CITROËN 
dealer or a qualified workshop.

"Styling"

Wheel trims, wheel caps, door sills, gear lever 
knobs, ...

"Security and safety"

Anti-theft alarm, window engraving, wheel 
security bolts, child seats, breathalyzer, first aid 
kit, warning triangle, high visibility jacket, stolen 
vehicle tracking system, fleet management unit, 
snow chains, tyre snow socks, front foglamps 
kit, ...

"Protection"

Mats*, seat covers compatible with lateral 
airbags, mud flaps, side protection rubbing 
strips, bumper protectors, loading area 
protection (on wood or plastic), rear sill 
finishers, rear mat, ...

The fitting of electrical equipment or 
accessories which are not recommended 
by CITROËN may result in a failure of 
your vehicle's electronic system and 
excessive electrical consumption.
Contact a CITROËN dealer 
for information on the range of 
recommended equipment and 
accessories.

Installation of radio 
communication 
transmitters

Before installing any after-market radio 
communication transmitter, you can 
contact a CITROËN dealer for the 
specification of transmitters which can 
be fitted (frequency, maximum power, 
aerial position, specific installation 
requirements), in line with the Vehicle 
Electromagnetic Compatibility 
Directive (2004/104/EC).

Depending on the legislation in force in 
the country, certain safety equipment 
may be compulsory: high visibility 
safety vests, warning triangles, 
breathalyzers, spare bulbs, spare fuses, 
fire extinguisher, first aid kit, mud flaps 
at the rear of the vehicle.

*  To avoid any risk of jamming of the pedals:

-  ensure that the mat is positioned and 

secured correctly,

-  never fit one mat on top of another.

268

Practical information

Spacetourer-VP_en_Chap07_info-pratiques_ed01-2016

By visiting a CITROËN dealer, you can 
also obtain products for cleaning and 
maintenance (exterior and interior) - 
including ecological products in the 
"TECHNATURE" range, topping-up 
products (screenwash...), touch-up pens 
and paint aerosols for the exact colour 
of your vehicle, refills (cartridge for the 
temporary puncture repair kit...), ...

"Multimedia"

Smartphone support, table support or semi-
integral navigation support, range of audio 
systems and portable navigation systems, 
driving recorder, Bluetooth hands-free kit, DVD 
player, multimedia support, driving aids, vehicle 
tracking system, ...

For any work on your vehicle, use 
a qualified workshop that has the 
technical information, skills and 
equipment required, all of which a 
CITROËN dealer is able to provide.

Roof bars / Roof rack

To fit the transverse roof bars, use the fixing 
points provided for this purpose:
F

  open the fixing covers on each bar,

F

  put each fixing in place and lock them on 

the roof one by one,

F  ensure that roof bars are correctly fitted (by 

shaking them),

F

  close the fixing covers on each bar.

The bars can be interchanged and are 
adaptable to each pair of fixing points.

To fit a roof rack, use the fixing points provided 
for this purpose:
F

  place the roof rack on the roof aligned with 

the fixing points and secure each one in 
turn,

F

  ensure that roof rack is correctly fitted (by 

shaking it).

Be sure to refer to national legislation in 
order to comply with the regulations for 
transporting objects that are longer than 
the vehicle.

Maximum authorised weight on each 
fixing point

, for a loading height not 

exceeding 40 cm: 25 kg.
Maximum weight by vehicle size:
-  compact (L1) with 8 fixing points: 

200 kg

-  standard (L2) and long (L3) with 

10 fixing points: 250 kg

If the height exceeds 40 cm, adapt the 
speed of the vehicle to the profile of the 
road to avoid damaging the roof rack 
or roof bars and the fixing points on the 
roof.

269

7

Practical information

Spacetourer-VP_en_Chap07_info-pratiques_ed01-2016

Changing a wiper blade

Before removing a front 
wiper blade

Removing

F

  Raise the corresponding wiper arm.

F

  Unclip the wiper blade and remove it.

Fitting

F

  Put the corresponding new wiper blade in 

place and clip it.

F

  Fold down the wiper arm carefully.

After fitting a front wiper 
blade

F

  Switch on the ignition.

F

  Operate the wiper stalk again to park the 

wiper blades.

F

  Within one minute after switching off 

the ignition, operate the wiper stalk to 
position the wiper blades vertically on the 
windscreen.

270

Practical information

Spacetourer-VP_en_Chap07_info-pratiques_ed01-2016

TOTAL & CITROËN

Partners in performance and 
protecting the environment

Innovation in the search for 
performance

For over 40 years, the TOTAL Research and 
Development departments have developed lubricants 
for CITROËN, to match the latest technical innovations 
on CITROËN vehicles, both for competition and for 
everyday motoring.
For you, this is an assurance that you will obtain the 
best performance from your engine.

Optimum protection for 
your engine

By having your CITROËN vehicle 
serviced with TOTAL lubricants, you are 
contributing towards improving the life 
and performance of your engine, while 
also protecting the environment.


Content   ..  15  16  17  18   ..