Citroen Jumpy (2016 year). Instruction - part 3
 

  Index      Citroen     Citroen Jumpy - instruction 2016 year in english


Search            


Content   ..  1  2  3  4   ..


Citroen Jumpy (2016 year). Instruction - part 3


31

1

Instruments

Jumpy_en_Chap01_instruments-de-bord_ed01-2016

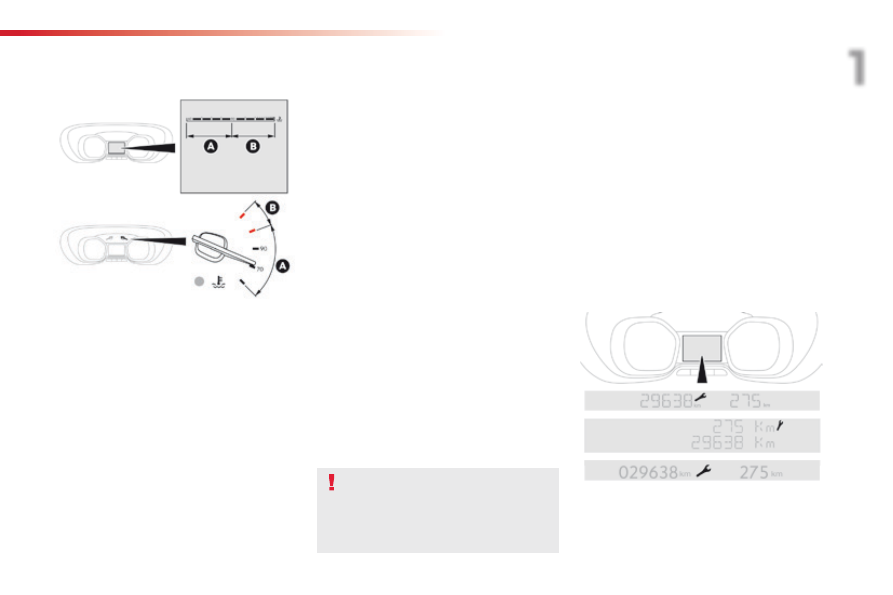
With the engine running, when the needle or 
the bar graph (depending on version) is:

in zone A

, the temperature of the engine 

coolant is correct,

in zone B

, the temperature of the engine 

coolant is too high; the maximum 
temperature and the central STOP

 warning 

lamps come on, accompanied by an 
audible signal and a warning message in 
the touch screen.

You MUST stop as soon as it is safe to 
do so.
Wait a few minutes before switching off the 
engine.
Contact a CITROËN dealer or a qualified 
workshop.

After driving for a few minutes, the temperature 
and pressure in the cooling system increase.
To top up the level:
F

  wait at least one hour for the engine to 

cool,

F  unscrew the cap two turns to allow the 

pressure to drop,

F  when the pressure has dropped, remove 

the cap,

F

  top up the level to the "MAX" mark.

Be aware of the risk of burns when 
topping up the cooling system. Do not 
fill above the maximum level (indicated 
on the header tank).

Engine coolant temperature

Service indicator

System which informs the driver when the 
next service is due, in accordance with the 
manufacturer's servicing schedule.

The point at which the next service is due is 
calculated from the last indicator zero reset, 
depending on the distance travelled and the 
time elapsed since the last service.

For BlueHDi Diesel versions, the degree of 
deterioration of the engine oil is also taken into 
account (depending on the country of sale).

Checking the level

32

Instruments

Between 600 miles (1 000 km) and  
1 800 miles (3 000 km) remain 
before the next service is due

For 5 seconds after the ignition is switched on, the 
spanner symbolising the service operations comes 
on. The distance recorder display line indicates the 
distance remaining before the next service is due.
Example:

 1 700 miles (2 800 km) remain before 

the next service is due.
For 5 seconds after the ignition is switched on, the 
screen indicates:

5 seconds after the ignition is switched on, 
the spanner goes off; the distance recorder 
resumes its normal operation. The screen then 
indicates the total distance.

Service overdue

5 seconds after the ignition is switched on, 
the distance recorder resumes its normal 
operation. The spanner remains on.

For 5 seconds after the ignition is switched on, 
the spanner flashes to indicate that the service 
must be carried out as soon as possible.
Example:

 the service is overdue by 180 miles 

(300 km).
For 5 seconds after the ignition is switched on, 
the screen indicates:

Less than 600 miles (1 000 km) 
remain before the next service is due

5 seconds after the ignition is switched on, 
the distance recorder resumes its normal 
operation. The spanner remains on to 
indicate that a service must be carried out 
soon.

For BlueHDi Diesel versions, this alert may 
also be accompanied by the fixed illumination 
of the service warning lamp when the ignition 
is on.

More than 1 800 miles (3 000 km) 
remain before the next service is due

When the ignition is switched on, no service 
information appears in the screen.

Example:

 560 miles (900 km) remain before 

the next service is due.
For 5 seconds after the ignition is switched on, 
the screen indicates:

33

1

Instruments

Jumpy_en_Chap01_instruments-de-bord_ed01-2016

The distance remaining may be 
weighted by the time factor, depending 
on the driving conditions.
Therefore, the spanner may also come 
on if you have exceeded the period 
since the last service, indicated in the 
manufacturer's service schedule.
For BlueHDi Diesel versions, the 
spanner may also be brought on earlier 
than expected, depending on the 
degree of deterioration of the engine oil 
(depending on the country of sale).
The rate of deterioration of the engine 
oil depends on the driving conditions in 
which the vehicle is used.

Resetting the service  
indicator

If you have to disconnect the battery 
following this operation, lock the vehicle 
and wait at least five minutes for the 
reset to be registered.

You can access the service information at any 
time.

After each service, the service indicator must 
be reset to zero.
If you have carried out the service on your 
vehicle yourself, switch off the ignition:

Retrieving the service 
information

F  Press and hold this button,

F

  Switch on the ignition; the distance 

recorder display begins a countdown,

F  When the display indicates "=0", release 

the button; the spanner disappears.

F

  Press this button.

The service information is displayed for a 
few seconds, then disappears.

34

Instruments

Engine oil level indicator

On versions fitted with an electric oil gauge, 
information on the oil level is displayed in the 
instrument panel for a few seconds when the 
ignition is switched on, at the same time as the 
service information.

The level read will only be correct if 
the vehicle is on level ground and the 
engine has been off for more than 
30 minutes.

Oil level correct

Oil level incorrect

Oil level indicator fault

Dipstick

There are 2 marks on the 
dipstick:

A = max; never exceed this 
level,

B = min; top-up the level via 
the oil filler, using the grade 
of oil suited to your engine.

To locate the dipstick and the oil filler 
cap for the Diesel engine, refer to the 
corresponding section.

This is indicated by a message in the 
instrument panel.
If the low oil level is confirmed by a check using 
the dipstick, the level must be topped-up to 
avoid damage to the engine.

This is indicated by a message in the 
instrument panel.

This is indicated by a message in the 
instrument panel. Contact a CITROËN dealer 
or a qualified workshop.

35

1

Instruments

Jumpy_en_Chap01_instruments-de-bord_ed01-2016

AdBlue

®

 fluid range 

indicators

Once the AdBlue

®

 tank is on reserve or after 

detection of a fault with the SCR emissions 
control system, when the ignition is switched 
on, an indicator displays an estimate of the 
distance that can be covered, the range, before 
engine starting is prevented.
In the event of simultaneous system fault and 
low AdBlue

®

 level, the shortest range figure is 

the one displayed.

In the event of the risk of non-starting related to a lack of AdBlue

®

The engine start prevention system 
required by regulations is activated 
automatically once the AdBlue

®

 tank is 

empty.

Remaining range greater than 1 500 miles (2 400 km

)

Pressing this button will display the remaining 
range.

F  Then select "Diagnostic

".

Above 3 000 miles (5 000 km), the value is not 
specified.

When switching on the ignition, there is no 
automatic display of range in the instrument 
panel.

The range is then displayed temporarily.

You can access this information in the touch 
screen, if your vehicle has one.

F  Select the "Driving

" menu.

Remaining range between 350 and 1500 miles (600 and 2 400 km)

When switching on the ignition, this warning 
lamp comes on, accompanied by an audible 
signal and the display of a message (e.g.: "Top 
up emissions additive: Starting prevented in 
900 miles") indicating the remaining range 
expressed in miles or kilometres.

F  Select "OPTIONS

".

For more information on AdBlue

®

 and 

the SCR system, and in particular on 
topping-up the AdBlue

®

, refer to the 

corresponding section.

If your vehicle has an LCD instrument panel, 
"NO START IN" is displayed.
When driving, the message is displayed every 
200 miles (300 km) until the fluid has been 
topped-up.
Go to a CITROËN dealer or a qualified 
workshop to have the AdBlue

®

 topped-up.

You can also top-up the tank yourself.

36

Instruments

Remaining range between 0 and 350 miles (0 and 600 km)

When switching on the ignition, this warning 
lamp flashes, accompanied by an audible 

signal and the display of a message (e.g. "Top 

up emissions additive: Starting prevented in 

350 miles") indicating the remaining range 

expressed in miles or kilometres.

Breakdown related to a lack of AdBlue

®

When switching on the ignition, this 
warning lamp flashes, accompanied 
by an audible signal and the display 
of the message "Top up emissions 
additive: Starting prevented".

To be able to start the engine, 
we recommend that you call on 
a CITROËN dealer or a qualified 
workshop for the top-up required.
If you carry out the top-up yourself, it 
is essential to add at least 3.8 litres of 
AdBlue

®

 to the tank.

For more information on AdBlue

®

 and 

the SCR system, and in particular on 
topping-up the AdBlue

®

, refer to the 

corresponding section.

If your vehicle has an LCD instrument panel, 
"NO START IN" is displayed.

If your vehicle has an LCD instrument panel, 
"NO START IN" is displayed.

When driving, the message is displayed every 
30 seconds until the fluid has been topped-up.
Go to a CITROËN dealer or a qualified 
workshop to have the AdBlue

®

 topped-up.

You can also top-up the tank yourself.
Otherwise you will not be able to restart your 
engine.

The AdBlue

®

 tank is empty: the system required 

by regulations prevents engine starting.

37

1

Instruments

Jumpy_en_Chap01_instruments-de-bord_ed01-2016

Starting prevented

Every time the ignition is switched on, these 
warning lamps come on, accompanied by an 
audible signal and the display of the message 
"Emissions fault: Starting prevented".

You have exceeded the authorised 
driving limit: the starting prevention 
system inhibits engine starting.

To be able to start the engine, you must call on 
a CITROËN dealer or a qualified workshop.

In the event of a fault with the SCR emissions control system

A system that prevents engine starting is activated automatically from 650 miles (1 100 km) after confirmation of a fault with the SCR emissions 
control system. Have the system checked by a CITROËN dealer or a qualified workshop as soon as possible.

If it is a temporary fault, the alert 
disappears during the next journey, 
after self-diagnosis of the SCR system.

In the event of the detection  
of a fault

These warning lamps come on, accompanied 
by an audible signal and the display of the 
message "Emissions fault".
The alert is triggered when driving when the 
fault is detected for the first time, then when 
switching on the ignition for subsequent 
journeys, while the fault persists.

During an authorised driving phase (between 
650 miles and 0 miles) (1 100 km and 0 km)

If a fault with the SCR system is confirmed (after 
30 miles (50 km) covered with the permanent 
display of the message signalling a fault), these 
warning lamps come on, accompanied by an 
audible signal and the display of a message 
(e.g.: "Emissions fault: Starting prevented in 
150 miles") indicating the remaining range 
expressed in miles or kilometres.

If your vehicle has an LCD instrument panel, 
"NO START IN" is displayed.

While driving, the message is displayed every 

30 seconds while the fault with the SCR system 

persists.

The alert is repeated when switching on the ignition.

You should go to a CITROËN dealer or a qualified 

workshop as soon as possible.
Otherwise, you will not be able to restart your 

engine.

If your vehicle has an LCD instrument panel, 
"NO START IN" is displayed.

38

Instruments

Distance recorders

The total and trip distances are displayed for 
thirty seconds when the ignition is switched off, 
when the driver's door is opened and when the 
vehicle is locked or unlocked.

When travelling abroad, you may 
have to change the units of distance: 
the display of road speed must be in 
the official units (miles or km) for the 
country. The change of units is done via 
the screen configuration menu, with the 
vehicle stationary.

Total distance recorder

It measures the total distance travelled by the 
vehicle since its first registration.

Trip distance recorder

It measures the distance travelled since it was 
reset to zero by the driver.

F

  With the ignition on, press this 

button until zeros appear.

39

1

Instruments

Jumpy_en_Chap01_instruments-de-bord_ed01-2016

Lighting dimmer

F

  With the exterior lighting on, press this 

button to raise the level of brightness.

F

  With the exterior lighting on, press this 

button to lower the level of brightness.

As soon as the lighting reaches the required 
level of brightness, release the button.

At the instrument panel

With the touch screen

F  Press on the Settings

 button.

F  Select "OPTIONS

".

F  Select "Screen configuration

".

You can also switch off the screen. To do this:

F  Select the "Brightness

" tab.

F  Press on the Settings

 button.

F Select 

Switch off screen

.

F  Press on "Confirm" to save and 

quit.

F

  Adjust the brightness by moving 

the cursor.

The screen goes off completely.
Press on the screen again (anywhere on its 
surface) to activate it.

This system allows the brightness of the instruments and controls to be adjusted to suit the ambient 
light level.

40

Instruments

System that gives you information on the current journey (range, fuel consumption…).

Trip computer

Display of information

F  Press the button on the end of the wiper 

control stalk to display the different trip 
computer tabs in turn.

F

  Or, depending on equipment, press the 

thumbwheel on the steering wheel

.

-  The current information with:

●  the range,
●  the current fuel consumption,
●  the Stop & Start time counter.

Trips "1" and "2" are independent but their use 
is identical.
For example, trip "1" can be used for daily 
figures, and trip "2" for monthly figures.

- Trip 

"2"

 with:

●  the average speed,
●  the average fuel consumption,
●  the distance travelled,
  for the second trip.

- Trip 

"1"

 with:

●  the average speed,
●  the average fuel consumption,
●  the distance travelled,
  for the first trip.

Depending on equipment, a 2

nd

 trip is available.

41

1

Instruments

Jumpy_en_Chap01_instruments-de-bord_ed01-2016

Trip reset

With LCD text instrument panel

F  When the trip is displayed, press the button 

on the end of the wiper control stalk

.

F

  Or, depending on equipment, press the 

thumbwheel on the steering wheel for 
more than two seconds.

F  When the desired trip is displayed, press 

the reset button in the instrument panel for 
more than two seconds.

With LCD text or matrix 
instrument panel

With LCD instrument panel

F  When the trip is displayed, press the button 

on the end of the wiper control stalk for 
two seconds.

42

Instruments

A few definitions

Range

(miles or km)
The distance which can still be 
travelled with the fuel remaining in 
the tank (related to the average fuel 
consumption over the last few miles 
(kilometres) travelled).

This value may vary following a change 
in the style of driving or the relief, 
resulting in a significant change in the 
current fuel consumption.

When the range falls below 20 miles (30 km), 
dashes are displayed. After filling with at least 
8 litres of fuel, the range is recalculated and is 
displayed when it exceeds 60 miles (100 km).

If dashes are displayed continuously 
while driving in place of the digits, 
contact a CITROËN dealer or a 
qualified workshop.

This function is only displayed from  
20 mph (30 km/h).

Current fuel consumption

(mpg or l/100 km or km/l)
Calculated over the last few seconds.

Average fuel consumption

(mpg or l/100 km or km/l)
Calculated since the last trip reset.

Average speed

(mph or km/h)
Calculated since the last trip reset.

Distance travelled

(miles or km)
Calculated since the last trip reset.

Stop & Start time counter

(minutes / seconds or hours / 
minutes)

If your vehicle is fitted with Stop & Start, a time 
counter calculates the time spent in STOP 
mode during a journey.
It resets to zero every time the ignition is 
switched on.

43

1

Instruments

Jumpy_en_Chap01_instruments-de-bord_ed01-2016

Use this button to confirm.

Use this button to quit.

Use the buttons on either side of the touch 
screen for access to the menus, then press the 
virtual buttons in the touch screen.

Menus

Driving

.

Allows certain functions to be switched 
on and off and their settings adjusted.

Connectivity

.

Radio Media

.

Connected navigation

.

Adjust volume/Mute.
On/Off.

Settings

.

Allows configuration of the display 
and the system.

Telephone

.

Touch screen

As a safety measure, the driver must 
only carry out operations requiring 
sustained attention with the vehicle 
stationary.

For more information on the touch 
screen, refer to the Audio and 
telematics

 section.

44

Instruments

Driving menu

The systems with settings that can be adjusted are detailed in the table below.
For more information on a driving assistance system refer to the corresponding section.

Button

Corresponding function

Comments

Under-inflation initialisation

Reinitialisation of the under-inflation system.

Blind spot monitoring 
system

Activation/Deactivation of the function.

Stop & Start system

Activation/Deactivation of the function.

or

Lane departure warning 
system

Activation/Deactivation of the function.

Automatic headlamp dip

Activation/Deactivation of the function.

45

1

Instruments

Jumpy_en_Chap01_instruments-de-bord_ed01-2016

Button

Corresponding function

Comments

Vehicle settings
To deactivate/activate a 
function, press OFF/ON.
To modify a setting (lighting 
duration, ...) or find additional 
information, press the symbol 
for the function.

Access to other functions with settings that can be adjusted.
Select or deselect the tabs at the bottom of the touch screen to sort the display of the desired 
functions.

Lighting

:

-  "Directional headlamps": activation/deactivation of the directional headlamps.
-  "Guide-me-home lighting": activation/deactivation of the automatic guide-me-home lighting.
-  "Welcome lighting": activation/deactivation of the exterior welcome lighting.
-  "Mood lighting": activation/deactivation of the interior mood lighting.

Access

:

-  "Hands-Free Access": activation/deactivation of the motorized opening and closing of a side 

door by the hands-free system,

-  "Locks your vehicle after the motorized closing of a side door, using hands-free access.": 

activation/deactivation of the locking of your vehicle after the motorized closing of a side door 
by the hands-free system.

Assistance (driving aids)

:

-  "Rear wiper in reverse": activation/deactivation of the operation of the rear wiper in reverse.
-  "Recommended speed display": activation/deactivation of the speed limit recognition system, 

allowing a speed setting to be given to the cruise control or speed limiter.

-  "Collision risk alert and automatic braking": activation/deactivation of collision risk alerts.
-  "Fatigue Detection System": activation/deactivation of the driver fatigue detection system.

Diagnostic

List of current alerts.

Parking sensors

Activation/Deactivation of the function.

Adjust speed settings

Memorisation of speed settings for the speed limiter or active cruise control.

46

Instruments

With the touch screen

Setting the time and date

F  Select "Setting the time-date

".

F  Press on Settings for acces to 

the different menus.

F

  Modify the settings in the associated 

"Date" or "Time" fields then press on 
"Confirm

".

F  Press on "Confirm" to save and 

quit.

F  Select "OPTIONS

".

F  Select the "Date" or "Time

" tab.

You can choose to synchronise the 
time and date with the GPS navigation 
system (if fitted to your vehicle) so 
that these settings are adjusted 
automatically.

With the audio system

F  Press the MENU button for access to the 

main menu

.

F  Press the "7" or "8" button to select the 

Personalisation-configuration menu, 
then confirm by pressing the "OK" button.

F  Press the "5" or "6" and "7" or "8" buttons 

to set the date and time, then confirm by 
pressing the "OK" button.

F  Press the "5" or "6" button to select the 

Display configuration menu then confirm 
by pressing the "OK" button.

Without audio system

F

  Press this button to display the following 

settings in turn:

- hours,
- minutes,
-  12 or 24 hour format.


Content   ..  1  2  3  4   ..