Citroen Berlingo Multispace (2017 year). Instruction - part 12
 

  Index      Citroen     Citroen Berlingo Multispace - instruction 2017 year in english


Search            


Content   ..  10  11  12  13   ..


Citroen Berlingo Multispace (2017 year). Instruction - part 12


175

QUICK HELP

8

Berlingo2VP_en_Chap08_Aide-rapide_ed02-2016

Changing a wheel

Berlingo2VP_en_Chap08_Aide-rapide_ed02-2016

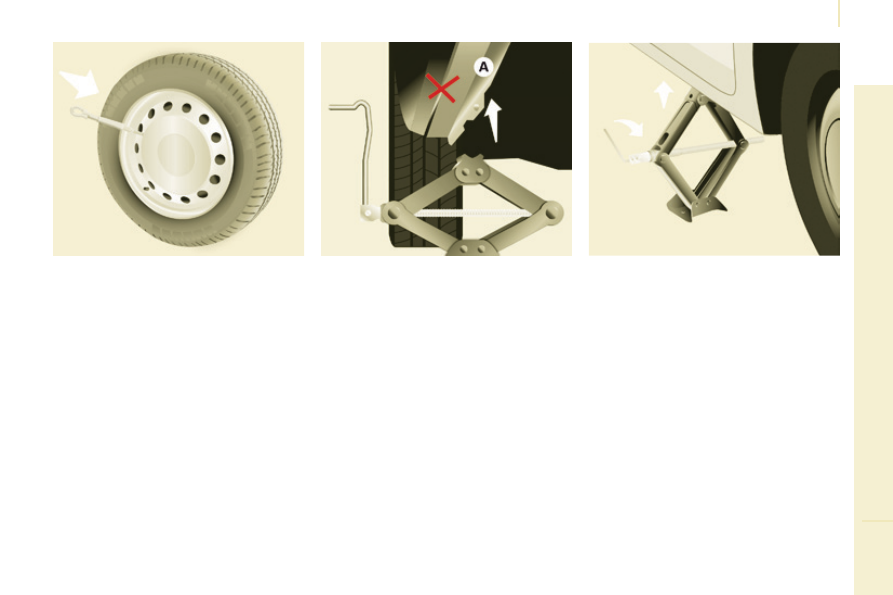
4. Removing the wheel with punctured tyre

-  Position the foot of the jack on the 

ground and ensure that it is directly 

below the front or rear jacking 

point provided on the underbody, 
whichever is closest to the wheel to 

be changed.

-  Extend the jack until its head 

comes into contact with the jacking 

point used; the vehicle's contact 
area A must be engaged with the 

head of the jack.

Raise the vehicle until there is 

sufficient space between the wheel 

and the ground, so that the (not 
punctured) spare wheel can be 

easily fitted.

Resume and complete the 

unscrewing of the wheel bolts.

Remove the bolts and remove the 

wheel.

-  Remove the wheel trim.

Loosen the wheel bolts and start 

unscrewing them.

Ensure that the jack is stable, the foot 

of the jack must be in contact with the 

ground, and directly below the jacking 

point used.
If the ground is slippery or loose, the 

jack may slip or drop - Risk of injury!

Ensure that the jack is positioned only 

at one of the jacking points under the 

vehicle, making sure that the vehicle's 

contact surface is centred on the head 

of the jack.

Otherwise there is a risk of damage 

to the vehicle and/or of the jack 

dropping - Risk of injury!

Do not extend the jack until you have 

started unscrewing the bolts on the 
wheel to be changed and have placed 

the chock under the wheel diagonally 

opposite.

176

Berlingo2VP_en_Chap08_Aide-rapide_ed02-2016

Changing a wheel

Berlingo2VP_en_Chap08_Aide-rapide_ed02-2016

When using the non-uniform spare 
wheel, do not exceed a speed of 

50 mph (80 km/h).

The spare wheel is not designed to 

be used over long distances. Have 

the tightening of the bolts and the tyre 

pressure checked by a CITROËN 

dealer or a qualified workshop as soon 

as possible.
Have the original wheel repaired 

and refitted by a CITROËN dealer 

or a qualified workshop as soon as 

possible.

5. Fitting the spare wheel

Position the wheel on the hub and 

start tightening the bolts by hand.

Carry out an initial tightening of the 

bolts using the wheelbrace.

Lower the vehicle completely by 

folding the jack, then remove the 

jack.

Tighten the bolts again using the 
wheelbrace, tighten them fully 

without forcing them.

Place the wheel to be repaired in 

the carrier.

-  Secure the carrier on the hook then 

raise the carrier by tightening the 

bolt with the wheelbrace.

-  Fully tighten the bolt, then check 

that the wheel is held flat against 

the floor.

If this is not the case, repeat the 

operation.

Never go underneath a vehicle 

that is supported only by a jack 

(use a stand).

Never use a power driver in place of 

the wheelbrace.

177

QUICK HELP

8

Berlingo2VP_en_Chap08_Aide-rapide_ed02-2016

Changing a wheel

Berlingo2VP_en_Chap08_Aide-rapide_ed02-2016

FITTING THE WHEEL  
TRIM

The tyre valve must be centred in the 

wheel trim cut-out.

This position is essential for fitting the 

wheel trim correctly on the steel wheel. 

(If the valve is not correctly aligned with 
the cut-out, the anti-rotation system 
will be in contact with the heads of the 

wheel bolts and risks being damaged 

if the user persists in fitting the wheel 

trim in this incorrect position).

Ensure that all of the clips are 
engaged except the last one 

(opposite the valve hole).

-  Strike the wheel trim with the palm 

of your hand, opposite the valve 

in the area of the last fixing clip 

(always in the direction of clipping).

Ensure that the outer edge of 
the wheel trim is not deformed or 

pushed into the wheel:

●  Correct position for the edge of 

the wheel trim.

●  Incorrect position for the edge of 

the wheel trim.

Refer to the "Instruments and 
controls" section of chapter 3, 

"Tyre under-inflation detection" 

part, for recommendations after 

changing a wheel fitted with a tyre 

under-inflation detection sensor.

Refer to the "Identification 

markings" section of chapter 9 to 

locate the tyre label.

6. Refitting the repaired wheel

The wheel is refitted as described in 

step 5, not forgetting to refit the wheel 

trim.

178

Berlingo2VP_en_Chap08_Aide-rapide_ed02-2016

Changing a wheel

Berlingo2VP_en_Chap08_Aide-rapide_ed02-2016

Check the position of the tyre 
valve relative to the ring of the 
wheel trim.

Valve not positioned correctly

: below 

the ring.

Observe the wheel trim fitting 

procedure, so as to avoid 

breaking the fixing clip and 

deformation at the edge of the  
wheel trim.

Deformation of the edge of the wheel 

trim at the valve, because it is fitted 

incorrectly.

Valve positioned correctly

: below the 

ring.

179

QUICK HELP

8

Berlingo2VP_en_Chap08_Aide-rapide_ed02-2016

Snow screen

Berlingo2VP_en_Chap08_Aide-rapide_ed02-2016

REMOVABLE SNOW SCREEN
(BLANKING COVER)

According to country, the removable 
snow screen is installed on the lower 
part of the front bumper to prevent the 
accumulation of snow at the radiator 

cooling fan.

Fitting

Removal

Offer up the snow screen facing its 
centring pin A

 on the front bumper.

Put it in place by pressing at each 
clip B

 located in the four corners.

 Do not forget to remove the 
snow screen when the exterior 
temperature is higher than 10°C 

(no risk of snowfall) and when 

towing.

Pass a screwdriver into the hole 

located near each of the clips.

Use the screwdriver as a lever to 
unclip the four clips B

 in turn.

180

Berlingo2VP_en_Chap08_Aide-rapide_ed02-2016

Snow chains

Berlingo2VP_en_Chap08_Aide-rapide_ed02-2016

SNOW CHAINS

In wintry conditions, snow chains 
improve traction as well as the 

behaviour of the vehicle when braking.

 The snow chains must be fitted 

only to the driving wheels. They 

must never be fitted to "space-

saver" type spare wheels.

 Take account of the legislation in 

force in your country on the use 
of snow chains and the maximum 

running speed authorised.

Advice on installation
F

  If you have to fit the chains during 

a journey, stop the vehicle on a flat 

surface on the side of the road.

F

  Apply the parking brake and 

position any wheel chocks to 

prevent movement of your vehicle.

F  Fit the chains following the 

instructions provided by the 

manufacturer.

F  Move off gently and drive for a  

few moments, without exceeding 

30 mph (50 km/h).

F

  Stop your vehicle and check that 

the snow chains are correctly 

tightened.

It is recommended that before you 

leave, you practise fitting the snow 

chains on a level and dry surface.

Use only the chains designed to be 

fitted to the type of wheel fitted to your 

vehicle:

For more information on snow chains, 
contact a CITROËN dealer or a 

qualified workshop.

Original 

tyre size

Maximum link 

size.

195/65 R15

9 mm

195/70 R15

205/65 R15

215/55 R16

215/50 R17

Avoid driving with chains on roads 
that have been cleared of snow, 

to avoid damaging your vehicle's tyres 

and the road surface. If your vehicle 

is fitted with alloy wheels, check that 

no part of the chain or its fixings is in 

contact with the wheel rim.

181

QUICK HELP

8

Berlingo2VP_en_Chap08_Aide-rapide_ed02-2016

Changing a bulb

Berlingo2VP_en_Chap08_Aide-rapide_ed02-2016

CHANGING A BULB

Type A
All glass bulb: pull gently 

as it is fitted by pressure.

Type C
Halogen bulb: release the 

retaining spring from its 

housing.

Type B
Bayonet bulb: press 

on the bulb then turn it 

anticlockwise.

Types of bulb
Various types of bulb are fitted to your 

vehicle.

To remove them:

Type D
Light-emitting diode 

(LED): for replacement 

of the daytime running 
lamps, contact a 
CITROËN dealer or a 

qualified workshop.

182

Berlingo2VP_en_Chap08_Aide-rapide_ed02-2016

Changing a bulb

Berlingo2VP_en_Chap08_Aide-rapide_ed02-2016

2. Sidelamps
Type A
, W5W - 5W

Remove the cover by pulling the 

flexible rubber tab.

-  Remove the bulb holder fitted by 

pressure by pulling the connector.

-  Change the bulb.

-  Ensure that the cover is refitted 

correctly all round to assure correct 

sealing.

Front lamps

1.  Dipped / Main beam headlamps
Type C
, H4 - 55W

Remove the centre cover by pulling 

the flexible rubber tab.

-  Disconnect the electrical connector.

-  Release the retaining tab.

-  Change the bulb taking care 

to align the metal part with the 

grooves on the lamp.

-  Reposition the retaining tab.

-  Ensure that the cover is refitted 

correctly all round to assure correct 

sealing.

High pressure washing

Open the bonnet. To access the bulbs, 

reach behind the headlamp unit.
Carry out the operations in reverse 

order to refit each bulb and check that 

the bonnet is closed securely.

Halogen bulbs must be changed 

with the headlamp off. Wait a few 

minutes (risk of serious burns). 

Do not touch the bulb directly with your 

fingers, use lint-free cloths.
It is normal for condensation to form 

inside the headlamps. Regular use of 

the vehicle eliminates this misting.
The bulbs must be changed with 
the ignition off or with the battery 

disconnected. Wait approximately 

3 minutes after changing the bulb 

before reconnecting the battery.

Check that the lamps operate correctly 

after each operation.

When using this type of washing 
on stubborn dirt, do not persist on 

the headlamps, the lamps and their 
edges to avoid damaging their coating 

and seals.

183

QUICK HELP

8

Berlingo2VP_en_Chap08_Aide-rapide_ed02-2016

Changing a bulb

Berlingo2VP_en_Chap08_Aide-rapide_ed02-2016

3. Direction indicators
Type B
, PY21W - 21W (amber)

Remove the cover by pulling the 

flexible rubber tab.

Turn the bulb holder a quarter turn 

anticlockwise.

Remove the bulb by pressing it 

lightly while turning it anticlockwise.

-  Change the bulb.

-  Ensure that the cover is refitted 

correctly all round to assure correct 

sealing.

4. Front foglamps
Type C
, H1 - 55W

Remove the three clips and the 
screw securing the wheel arch liner, 

located below the bumper.

-  Move the wheel arch liner upwards.

Disconnect the bulb holder 
connector by pressing the tab at 

the top.

Remove the bulb holder by 
squeezing the two clips (at top and 

bottom) using a finger and thumb.

Replace the module (bulb holder 

and bulb).

Carry out the operations in reverse 

order to fit the module and refit the 

wheel arch liner.

184

Berlingo2VP_en_Chap08_Aide-rapide_ed02-2016

Changing a bulb

Berlingo2VP_en_Chap08_Aide-rapide_ed02-2016

Side repeater

Type A, WY5W - 5W (amber)

Push the repeater towards the rear 
and disengage it by pulling the 

front.

Contact a CITROËN dealer to 
obtain a new repeater which is a 

sealed component.

-  To refit, engage the repeater 

towards the rear and bring it 

towards the front.

Courtesy lamps

Type A, 12V5W - 5W

Unclip the lens by sliding a 
screwdriver in the slots on each 

side of the courtesy lamp.

-  Pull the bulb out and change it.

Clip the lens in its housing and 

ensure that it is secured correctly.

Front / Rear

185

QUICK HELP

8

Berlingo2VP_en_Chap08_Aide-rapide_ed02-2016

Changing a bulb

Berlingo2VP_en_Chap08_Aide-rapide_ed02-2016

Rear lamps

This procedure requires the use of 
the spanner supplied with the tools for 

changing a wheel.

When refitting, take care to 

reposition the tabs and the wiring 
correctly to avoid trapping the 

wiring.

After changing the rear direction 
indicator bulb, the reinitialisation time is 

above 2 minutes.

Move aside the 4 tabs then extract 

the bulb holder.

Remove the faulty bulb by 
pressing it lightly while turning it 

anticlockwise.

-  Change the bulb.

When removing the lamp unit:

with tailgate, pull the lamp unit 
towards the centre of the vehicle,

with hinged doors, pull the lamp 

unit towards you.

For more information on bulbs, refer to 

the "Types of bulb".
1.  Brake lamps / sidelamps 
 

Type B

, P21/5W - 21/5W

2.  Direction indicators 
 

Type B, PY21W - 21W (amber)

3.  Reversing lamps 
 

Type B, P21W - 21W

4.  Foglamps 
 

Type B, P21W - 21W

High pressure jet washing

When using this type of washing 
on stubborn dirt, do not persist on 
the headlamps, the other lamps 

and their edges to avoid damaging 

their coating and seals.

Chapter 9, "Changing a wheel" 

section.

Identify the failed bulb, then open 

the rear doors to 180°.

Chapter 3, "Access" section.

-  Remove the two fixing bolts using 

the spanner provided.

-  Pull the lamp unit from the outside.

Holding the lamp, disconnect the 

electrical connector.

186

Berlingo2VP_en_Chap08_Aide-rapide_ed02-2016

Changing a bulb

Berlingo2VP_en_Chap08_Aide-rapide_ed02-2016

Number plate lamps

-  Unscrew the two nuts.

-  Push the pins.

If necessary, disconnect the 

connector to remove the lamp.

-  Change the bulb.

Third brake lamp

Type A, W16W - 16W

Type A, W5W - 5W

With tailgate

Disengage the plastic lens using a 

screwdriver.

-  Change the bulb.

Replace the plastic lens and press 

on it.

With hinged doors
-  Unclip the interior trim.

Disconnect the connector by 

moving aside its tab.

Turn the bulb holder a quarter turn 

anticlockwise.

-  Change the bulb.

-  Put the bulb holder back in place 

and reconnect the connector.

-  Put the trim back in place.

187

QUICK HELP

8

Berlingo2VP_en_Chap08_Aide-rapide_ed02-2016

Changing a fuse

Berlingo2VP_en_Chap08_Aide-rapide_ed02-2016

CHANGING A FUSE

The fuseboxes are located:

in the lower dashboard on the left-
hand side (behind the cover),

-  under the bonnet (near the battery).
The information given concerns only 
those fuses which can be changed by 
the user using the tweezer, located 
behind the dashboard storage 

compartment on the right-hand side. 

For any other work, visit a CITROËN 

dealer or a qualified workshop.

Removing and fitting a fuse

Always replace a failed fuse with a 
fuse of the same rating.

Motor trade technicians: for 

complete information on the fuses 
and relays, refer to the "Repair 

Manual" diagrams via the dealer 

network.
CITROËN will not accept responsibility 
for the cost incurred in repairing 
your vehicle or for rectifying the 
malfunctions resulting from the 
installation of accessories not 
supplied and not recommended by the 

CITROËN network and not installed 

in accordance with its instructions, 
in particular when the combined 
consumption of all of the additional 
equipment connected exceeds 

10 milliamperes.

Before replacing a fuse, the cause of 

the incident must be identified and 

rectified.

●  Use the tweezer.

188

Berlingo2VP_en_Chap08_Aide-rapide_ed02-2016

Changing a fuse

Berlingo2VP_en_Chap08_Aide-rapide_ed02-2016

Dashboard fuses

Tilt the cover to gain access to the 

fuses.

Fuses 

 F

Amperes 

 A

Allocation

1

15

Rear wiper

2

-

Not used

3

5

Airbag

4

10

Air conditioning, diagnostic socket, mirror control, 

headlamp beam

5

30

Electric windows

6

30

Locks

7

5

Rear courtesy lamp, front map reading lamp, roof 
console

8

20

Audio equipment, screen, tyre under-inflation 

detection, alarm and siren

9

30

Front and rear 12V socket

10

15

Central column

11

15

Low current ignition switch

12

15

Rain and sunshine sensor, airbag

13

5

Instrument panel

14

15

Parking sensors, digital air conditioning controls, 

hands-free phone kit

15

30

Locks

16

-

Not used

17

40

Rear screen/mirrors demist/defrost

189

QUICK HELP

8

Berlingo2VP_en_Chap08_Aide-rapide_ed02-2016

Changing a fuse

Berlingo2VP_en_Chap08_Aide-rapide_ed02-2016

Passenger compartment fuses

Fuses 

 F

Amperes 

 A

Allocation

1

-

Not used

2

20

Heated seats

3

-

Not used

4

15

Folding mirrors relay

5

15

Refrigeration equipment socket relay

190

Berlingo2VP_en_Chap08_Aide-rapide_ed02-2016

Changing a fuse

Berlingo2VP_en_Chap08_Aide-rapide_ed02-2016

Fuses under the bonnet

After opening the bonnet, unclip and tilt 
the corresponding box to gain access 

to the fuses.

Fuses 

 F

Amperes 

 A

Allocation

1

20

Engine management

2

15

Horn

3

10

Front and rear wash-wipe pump

4

-

Not used

5

15

Engine components

6

10

Steering wheel angle sensor, DSC

7

10

Brake switch, clutch switch

8

25

Starter motor

9

10

Headlamp beam motor, fleet management unit

10

30

Engine components

11

40

Not used

12

30

Wipers

13

40

Built-in systems interface

14

30

Pump

15

10

Right-hand main beam headlamp

16

10

Left-hand main beam headlamp

17

15

Right-hand dipped beam headlamp

18

15

Left-hand dipped beam headlamp


Content   ..  10  11  12  13   ..