Citroen Berlingo Dag (2011 year). Instruction - part 4


  Index      Citroen     Citroen Berlingo Dag - instruction 2011 year in english


Search            


Content   ..  2  3  4  5   ..


Citroen Berlingo Dag (2011 year). Instruction - part 4


 5

1

   Steering mounted controls   

EA

SE 

O

F

 U

SE 

a

n

d

 C

O

MF

O

R

T

3

  2

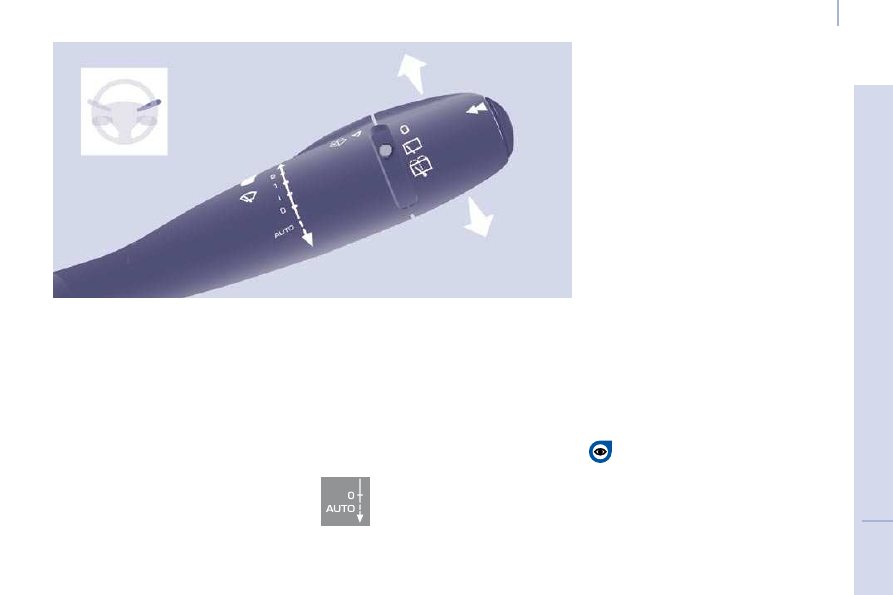
    Fast wipe (heavy rain). 

  1

    Normal wipe (moderate rain). 

  l    Intermittent wipe. 
  0    Off. 
     Single wipe  

  (press downwards). 
 In the  I ntermittent position, the wiping 

speed is in proportion to the vehicle 

speed. 

 WINDSCREEN WIPER STALK 

  Manual windscreen wipers 

 Whenever the ignition has been 

switched off for more than one minute, 

 with the windscreen wiper stalk in  

 position 2, 1 or I, the stalk must be 

reactivated: 

   -   move the stalk to any position, 

  -   then move it back to the required 

position.   

 Do not cover the rain sensor, 

located in the centre of the 

windscreen, behind the mirror. 

  Activation 
 Press the control downwards. 

Activation of the function is 

accompanied by a message on the 

display. 

  Deactivation/Switching off 
 Place the windscreen wipers stalk in 

position  I ,  1  or  2

 . Deactivation of the 

function is accompanied by a message 

on the display. 

 In the event of   malfunction of the 

automatic windscreen wipers, the 

windscreen wipers will operate in 

intermittent mode. 
 Contact a CITROËN dealer to have the 

system checked. 

 In the  AUTO  position, the windscreen 

wipers operate automatically and 

adapt their speed to the   intensity   of the 

rainfall. 
 When not in  AUTO  mode, for the 

other positions, refer to the manual 

windscreen wipers section. 

 The automatic windscreen wipers 

function must be reactivated if the 

ignition has been switched off for more 

than one minute, by pressing the stalk 

downwards.  

 When using an automatic car 

wash, switch off the ignition to 

avoid triggering of the automatic 

wiping. 

 In winter, it is advisable to wait for the 

windscreen to completely clear of ice 

before operating the automatic wipe.   

  Automatic windscreen wipers 

52

   Steering mounted controls   

   Wash-wipe and headlamp wash  
 Pull the stalk towards you, the wash-

wipe is accompanied by a timed sweep 

of the wipers. 
 The headlamp wash is linked with the 

wash-wipe, it is triggered if the dipped 

headlamps are on. 

 Turn the ring past the fi rst 

notch: the windscreen wash 

then the windscreen wiper 

operate for a fi xed time. 

 In winter, in the event of a 

considerable amount of snow 

or ice, switch on the rear screen 

demister. Once de-icing is complete, 

remove the snow or ice which has 

accumulated on the rear wiper 

blade. You can then operate the rear 

windscreen wiper.  

 To top up the levels, refer to the 

"Levels" section of chapter 6.  

  Special position of the 
windscreen wipers 

 In the minute following switching 

off of the ignition, any action on the 

stalk positions the wipers against the 

windscreen uprights. 
 This action enables you to position 

the wiper blades for winter parking, 

cleaning or replacement. 

 Refer to the "Changing a 

windscreen wiper blade" section of 

chapter 7. 

 To park the wipers in their normal 

position after this has been done, 

switch on the ignition and move 

the stalk.  

 Turn the ring to the fi rst notch.  

  Rear windscreen wiper 

  Rear windscreen wash 

 5

3

   Steering mounted controls   

EA

SE 

O

F

 U

SE 

a

n

d

 C

O

MF

O

R

T

3

 CRUISE CONTROL "CRUISE" 

 In order for it to be programmed or 

activated, the vehicle speed must be 

greater than 25 mph (40 km/h) with at 

least 4th gear engaged. 

 This cruise control shows the function 

selection status on the instrument 

panel and displays the programmed 

speed: 

 Function selected, 
 displaying of the 

"Cruise Control" 
symbol. 

 Function deactivated, 
  OFF

  (example at 

107 km/h). 

 Function activated 

 (example at 107 km/h). 

 Vehicle speed above 

(e.g. 118 km/h), 

 the programmed 

speed is displayed 

fl ashing. 

 Operating fault 

detected, 
  OFF

  - the dashes 

fl ash. 

 "This is the speed at which the driver 

wishes to drive". 

 This aid to driving in free-fl owing 

traffi c enables the vehicle to maintain 

the speed programmed by the driver, 

unless a steep gradient makes this 

impossible. 

5

4

   Steering mounted controls   

  Selecting the function 

   -   Place the switch in the  CRUISE  

position. The cruise control is 

selected but is not yet active and 

no speed has been programmed.   

  First activation/
programming a 
speed 

   -   Reach the chosen 

speed by pressing 

the accelerator. 

  -  

Press the  SET -  or  SET +  button.  

 This programmes/activates the 

reference speed and the vehicle will 

maintain this speed.  

  Temporary exceeding of the 
speed 

 It is possible to  accelerate

  and drive 

momentarily at a speed greater than 

the programmed speed. The value 

programmed fl ashes. 

 When the accelerator pedal is 

released, the vehicle will return to the 

programmed speed.  

  Deactivation (off) 

   -  

Press this button or 

the brake or clutch 

pedal.   

  Reactivation 

   -   Following deactivation of the cruise 

control, press this button.  

 Your vehicle will return to the last 

programmed speed. 

 Alternatively, you can repeat the "fi rst 

activation" procedure.  

 5

5

   Steering mounted controls   

EA

SE 

O

F

 U

SE 

a

n

d

 C

O

MF

O

R

T

3

  Changing the 
programmed speed 

 There are two methods 

of memorising a 

speed higher than the 

previous one: 

  Switching the function off 

  Operating fault 

 The programmed speed is cleared then 

replaced by three dashes. Contact a 

CITROËN dealer to have the system 

checked.  

  Cancelling the programmed 
reference speed 

 When the vehicle becomes stationary, 

after switching off the ignition, the 

system no longer memorises a speed.  

 Without using the accelerator: 
   -  

press the  Set +  button.  

 A brief press increases the speed by 

1 mph (km/h). 

 A maintained press increases the 

speed in steps of 5 mph (km/h). 

 Using the accelerator: 
   -  

exceed the memorised speed until 

the speed required is reached, 

  -  

press the  Set +  or  Set -  button.  

 To memorise a speed lower than the 

previous one: 
   -  

press the  Set -  button.  

 A brief press decreases the speed by 

1 mph (km/h). 

 A maintained press decreases the 

speed in steps of 5 mph (km/h).  

   -   Place the dial in position  0  or switch 

off the ignition to switch everything 

off.   

  Good practice 

 When changing the programmed 

reference speed by means of a 

maintained press, pay attention as 

the speed can increase or decrease 

rapidly. 
 Do not use the cruise control on 

slippery roads or in heavy traffi c. 

 In the event of a steep slope, the cruise 

control cannot prevent the vehicle from 

exceeding the programmed speed. 

 In any event, the cruise control cannot 

replace the need to observe the speed 

limits, nor can it replace the need for 

vigilance and responsibility on the part 

of the driver. 

 It is advisable to leave your feet near 

the pedals. 

 To avoid any jamming under the 

pedals: 

   -   ensure that the mat and its fi xings 

on the fl oor are positioned correctly, 

  -   never place one mat on top of 

another.   

56

   Steering mounted controls   

 However, pressing the pedal beyond 

this point of resistance to the fl oor 

permits exceeding of the programmed 

speed. To resume use of the limiter, 
simply reduce the pressure on the 

accelerator pedal gradually and return 

to a speed below that programmed. 
  The operating actions may be 
carried out when stationary, with the 
engine running, or with the vehicle 
moving.
  

 This speed limiter shows the function 

selection status on the instrument 

panel and displays the programmed 

speed: 

 SPEED LIMITER "LIMIT" 

 Function selected, 
 displaying of the 

"Speed Limiter" 
symbol. 

 Function deactivated, 

 last programmed speed - OFF 

 (example at 65 mph 

(107 km/h)). 

 Function activated 

 (example at 65 mph 

(107 km/h)). 

 Vehicle speed above 

 (example 70 mph 

(118 km/h)), 

 the programmed 

speed is displayed 

fl ashing. 
 Operating fault 

detected, 
  OFF

  - the dashes 

fl ash. 

 "This is the selected speed which the 

driver does not wish to exceed". 

 This selection is made with the engine 

running while stationary or with the 

vehicle moving. The minimum speed 

which can be programmed is 20 mph 

(30 km/h). 

 The speed of the vehicle responds 

to the pressure of the driver's foot as 

far as the accelerator pedal point of 

resistance which indicates that the 

programmed speed has been reached. 

 5

7

   Steering mounted controls   

a

n

d

 C

O

MF

O

R

T

3

  Selecting the function 

   -   Place the dial in the  LIMIT  position. 

The limiter is selected but is not yet 

active. The display indicates the 

last programmed speed.   

  Programming a speed 

 A speed can be programmed without 

activating the limiter but with the 

engine running. 
 To memorise a speed higher than the 

previous one: 
   -  

press the  Set +  button.  

 A brief press increases the speed by 

1 mph (km/h). 

 A maintained press increases the 

speed in steps of 5 mph (km/h). 

 To memorise a speed lower than the 

previous one: 
   -  

press the  Set -  button.  

 A brief press decreases the speed by 

1 mph (km/h). 

 A maintained press decreases the 

speed in steps of 5 mph (km/h).  

  Activation/Deactivation (off) 

 Pressing this button once activates 

the limiter, pressing the button again 

deactivates it (OFF).  

5

8

   Steering mounted controls   

  Exceeding the programmed 
speed 

 Pressing the accelerator pedal in order 

to exceed the programmed speed 

will have no effect unless you press 

the pedal  

fi rmly  beyond the  point of 

resistance . 
 The limiter is deactivated temporarily 

and the programmed speed fl ashes. 
 To return to the limiter function, reduce 

your speed to below the programmed 

speed.  

  Switching the function off 

   -   Place the dial in position  0  or switch 

off the ignition to switch the system 
off.  

 The last programmed speed remains in 

the memory.  

  Operating fault 

 The programmed speed is cleared 

then replaced by three dashes. 

 Contact a CITROËN dealer to have the 

system checked. 

  Good practice   

  Flashing of the speed 

 The speed fl ashes: 

   -   following forcing of the accelerator 

point of resistance, 

  -   when the limiter cannot prevent an 

increase in the vehicle speed due 

to the profi le of the road or on a 

steep descent, 

  -   in the event of sharp acceleration.   

 In any event, the speed limiter cannot 

replace the need to observe speed 

limits, nor can it replace the need for 

vigilance and responsibility on the part 

of the driver. 

 Always pay attention to the profi le 

of the road and sharp acceleration 

and stay in complete control of your 

vehicle. 

 To avoid any jamming under the 

pedals: 

   -   ensure that the mat and its fi xings 

on the fl oor are positioned correctly, 

  -   never place one mat on top of 

another.  

 5

9

EA

SE 

O

F

 U

SE 

a

n

d

 C

O

MF

O

R

T

3

      Ventilation      

 VENTILATION 

 the side vents and the central 

vents, 

  Air flow 

 the footwells, 

 the windscreen and the footwells, 

 the windscreen. 

 The air distribution can be 

modulated by placing the 

control in the intermediate 

positions, marked " ".  

  Manual adjustments: 

  Air distribution 

 The air supply distribution is 

determined by the following symbols: 

 in the red zone, triggers 

heating of the interior 

ambient air.  

 in the blue zone, triggers 

cool air, 

 The force of the blown air 

at the vents varies from 1 to 

the strongest 4. Position 0 
switches it off. 
 Remember to adjust this 

control in order to reach the 

ambient air comfort level.  

   Heating control panel  

  Air conditioning control panel   

 Temperature 

 Control positioned: 

60

   Ventilation   

  Intake of exterior air 

  Recirculation of interior air 

  Air conditioning A/C 

 The diode on the button 
is off. This is the preferred 

operating position.  

 Pressing the button triggers 

the operation of the air 

conditioning, the diode is lit. 

Pressing the button again 

switches the function off and 

the diode is switched off. 

 The air conditioning does not operate if 

the air fl ow is set to 0.  

 The air conditioning can only operate 

with the engine running. 

 The diode on the button is 

lit. Recirculation temporarily 

prevents exterior odours 

and smoke from entering the 

passenger compartment. 

 Used with the setting of the force of 

blown air (from 1 to 4), recirculation 

enables you to obtain the required 

ambient air comfort level more quickly 

with both hot or cold settings. 
 This position should only be temporary. 

When your ambient air comfort level 

has been reached, return to the 

intake of exterior air position to permit 

renewal of the air in the passenger 

compartment and avoid misting. This 

operating mode is preferable.  

 6

1

EA

SE 

O

F

 U

SE 

a

n

d

 C

O

MF

O

R

T

3

      Ventilation      

  Good practice 

 For maximum cooling or heating of the 

passenger compartment, it is possible 

to exceed the value 15 by turning until 

LO is displayed or the value 27 by 

turning until HI is displayed. 

 On entering the vehicle, the inside 

temperature may be much colder (or 

warmer) than is comfortable. There is 

no advantage in changing the value 

displayed in order to quickly reach the 

level of comfort required. The system 

will use its maximum performance to 

reach the comfort value set.  

 DIGITAL AIR CONDITIONING WITH SEPARATE SETTINGS  

  Automatic operation 

  AUTO comfort programme 
 This is the normal air conditioning 

system operating mode. 

  Driver or passenger side comfort 
value 
 The value indicated in the screen 

corresponds to a level of comfort and 

not a temperature in degrees Celsius 

or Fahrenheit. 

 Turn this control to the left 

or to the right to decrease or 

increase the value. A setting 

around the value 21 provides 

optimum comfort.However, 

depending on your requirements, a 

setting between 18 and 24 is usual. 

 Do not cover the sunshine sensor 

located on the dashboard.   

 Press this button, the  AUTO  

symbol is displayed. 

 In accordance with the comfort 

value selected, the system 

controls the distribution, the 

fl ow and the intake of air to guarantee 

comfort and a suffi cient circulation of 

air in the passenger compartment. No 

further action on your part is required. 

 When the engine is cold, to prevent 

an excessive diffusion of cold air, the 

air diffuser will reach its optimum level 

gradually. 

 For your comfort, the settings are 

stored when the ignition is switched off 

and are reinstated the next time the 

vehicle is started. 

 The automatic function will no longer 

be maintained if you change a setting 

manually (AUTO is cleared).  

FOR THE DRIVER AND PASSENGER 

62

   Ventilation   

  Manual operation 

 You can, according to your 

requirements, make a different selection 

from that offered by the system by 

changing a setting. The other functions 

will still be controlled automatically. 

Pressing the  AUTO  button restores fully 

automatic operation. 

  Air distribution 
 Pressing this button several 

times in succession directs 

the air fl ow towards: 

   -  

the windscreen, 

  -   the windscreen and footwells, 
  -  

the footwells, 

  -   the side vents, central vents and 

footwells, 

  -   the side vents and central vents.   

  Air fl ow 
 Press the  small fan  button to 

reduce the fl ow or the  large 

fan

  button to increase the 

fl ow. 

 On the display, the blades of the fan fi ll 

when the fl ow is increased.  

  Switching the air 
conditioning On/Off 
 Press this button, the  A/C 

 symbol is displayed and the 

air conditioning is activated. 

  Deactivating the system 

 Press the air fl ow  small fan  

button until the fan symbol 

disappears from the display. 

 This action deactivates all of the 

system's functions, with the exception 

of the air recirculation and rear screen 

demisting (if fi tted on your vehicle). 

Your comfort setting is no longer 

maintained and is switched off. 

  Intake of exterior air/
Recirculation of interior air 
 Press this button to 

recirculate the interior air. 

The recirculation symbol is 

displayed. 

Pressing the  large fan  
button or the  AUTO  button 

reactivates the system with 

the values set before it was 

deactivated.  

 Recirculation prevents exterior odours 

and smoke from entering the passenger 

compartment. Avoid prolonged operation 

in interior air recirculation mode (risk of 

condensation, odour and humidity). 

 Pressing this button again activates the 

intake of exterior air.  

 Pressing this button again switches off 

the air conditioning.  

  The ventilation outlet, located 

in the glove box, diffuses 

cool air (if the air conditioning 

is on) regardless of the reference 

temperature requested in the 

passenger compartment and 

regardless of the exterior temperature.   

 For your comfort, do not deactivate the 

system for long periods.

 6

3

EA

SE 

O

F

 U

SE 

a

n

d

 C

O

MF

O

R

T

3

      Ventilation      

 DE-ICING AND DEMISTING 

  Manual mode 

 Direct the control to this 

temperature setting. 

 Increase the air fl ow setting. 

 Press the air conditioning. 

 Returning to exterior air 

intake open permits renewal 

of the air in the passenger 

compartment (diode off).  

 Direct the control to this air 

distribution setting. 

  De-icing the rear screen and/or 
mirrors 

 Pressing this button, with the 

engine running, activates the 

rapid demisting - de-icing of 

the rear screen and/or electric 

mirrors. 

 This function switches off: 
   -  

when the button is pressed, 

  -  

when the engine is switched off, 

  -   automatically to prevent excessive 

energy consumption.   

64

   Ventilation   

 DE-ICING AND DEMISTING  

 GOOD PRACTICE 

  Vents 

  "Leave them open"  
 For optimum distribution and diffusion 

of hot or cool air in the passenger 

compartment, there are adjustable 

central and side vents which can 

be directed sideways (right or left) 

or vertically (up or down). For your 

comfort while driving, do not close 

them and direct the fl ow of air towards 

the windows instead. 

 Air vents in the footwells and directed 

towards the windscreen complete the 

equipment. 

 Do not block the vents located at the 

windscreen or the air extractor located 

in the boot.  

  Dust filter, odour filter 
(activated carbon) 

 This fi lter traps certain dust and limits 

odours. 
 Ensure that this fi lter is in good 

condition and have all of the fi lter 

elements replaced regularly. 


Refer to the "Checks" section of 

chapter 6.  

  Air conditioning 

 In all seasons, the air conditioning 

should only be used with the windows 

closed. However, if the interior 

temperature remains high after a 

prolonged period parked in the sun, do 

not hesitate to ventilate the passenger 

compartment for a few minutes. 

 Use the AUTO mode as much as 

possible as it permits optimised 

control of all of the functions: air fl ow, 

passenger compartment comfort 

temperature, air distribution, air 

intake mode or air recirculation in the 

passenger compartment. 

 Operate the air conditioning system for 

5 to 10 minutes, once or twice a month, 

to keep it in perfect working order. 

 It is normal that the condensation 

created by the air conditioning system 

results in a fl ow of water which may 

form a puddle under the vehicle when 

parked. 

 If the system does not produce cold air, 

do not use it and contact a CITROËN 

dealer.  

  Automatic mode: visibility 
programme 
 The comfort programme (AUTO) may 

not be suffi cient to quickly demist or 

de-ice the windows (humidity, several 

passengers, ice). 

 In this case, select the visibility 

programme. The visibility programme 

indicator light comes on. 

 It activates the air conditioning, the air 

fl ow and provides optimum distribution 

of the ventilation to the windscreen and 

side windows. 
 It deactivates the air recirculation.   

 6

5

EA

SE 

O

F

 U

SE 

a

n

d

 C

O

MF

O

R

T

3

   Seats   

 FRONT SEATS 

 The following adjustments are 

available:  

  1 - Forwards/backwards adjustment 
 Lift the bar and slide the seat forwards 

or backwards.  

  3 - Driver's seat height adjustment 
 To raise the seat, pull the control 

upwards then take your weight off the 

seat cushion. 

 To lower the seat, pull the control 

upwards then push on the seat 

cushion.  

  2 - Seat back angle adjustment 
 With your back pressed against the 

seat back, move the lever forwards 

and set the required angle.  

66

      Seats      

 Never drive with the head 

restraints removed; they must be 

in place and correctly adjusted.  

  Adjustable armrest 
 To access the vertical position, raise 

the armrest until it locks. 

 Lower the armrest to return it to a 

position for use. 
 To remove the armrest, press the 

release button from the vertical position 

and move aside the armrest. 

 To put the armrest back in place, clip it 

in the vertical position. 

 If the vehicle is fi tted with the additional 

console and an armrest, to fold the 

passenger seat to the table position 

remove the console or the armrest.   

  Front heated seats control 

 Each front seat may be fi tted with a 

control located on the side part of the 

cushion. 
 Press to switch on the cushion heating. 

 Press again to switch it off.  

  Head restraint height adjustment 
 

To raise the head restraint, slide it vertically 

upwards. 

 To lower the head restraint, press the 

button and slide the head restraint vertically 

downwards. 

 The adjustment is correct when the upper 

edge of the head restraint is level with the 

top of the head. 

 To remove the head restraint, press the 

button and pull the head restraint upwards. 

 To re-install the head restraint, engage 

the rods in the holes making sure they are 

aligned with the seat back. 


Content   ..  2  3  4  5   ..