Citroen Xsara Picasso (2005 year). Instruction - part 6


  Index      Citroen     Citroen Xsara Picasso - instruction 2005 year in english


Search            


Content   ..  4  5  6  7   ..


Citroen Xsara Picasso (2005 year). Instruction - part 6


III

III

R A D I O P R E - E Q U I P M E N T

Radio connections
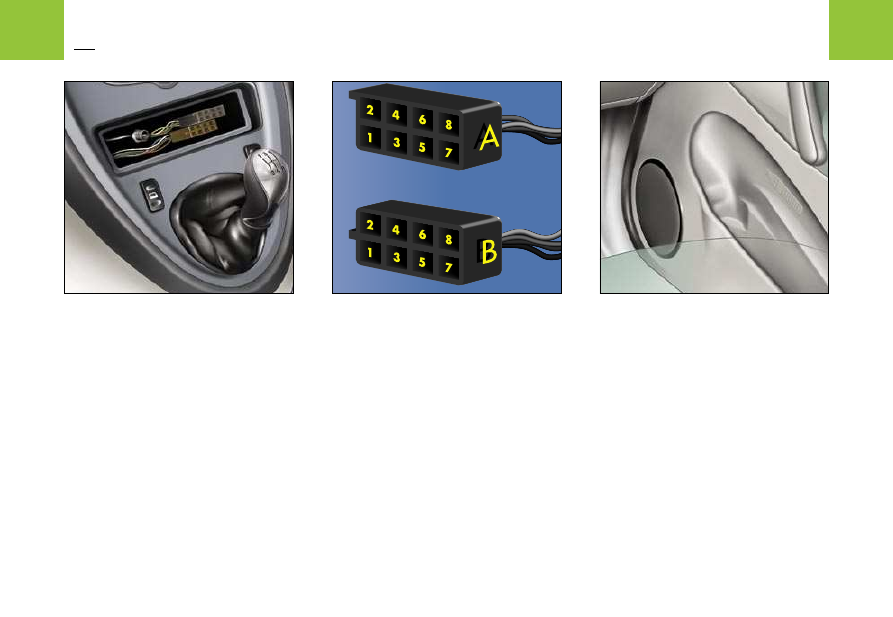
Remove the storage bin to gain access to the wiring and connections allow-

ing the audio system, loudspeakers and aerial wire to be connected.

Note: To connect the audio system, consult the CITROËN dealer network.

CITROËN radio option
See the separate instruction booklet in the vehicle document pack.

Fitting speakers to the front and

rear doors
Remove the grille to gain access to

the connections.

Front:
Diameter: 165 mm

Rear:
Diameter: 130 mm or 165 mm
Fitting of 165 mm speakers is pos-

sible at the rear, by means of cut-

ting a section in the inner door

panel as indicated.

On the dashboard
Two tweeters, one at each end of the dashboard.
Unclip the grille and pull it, connect the tweeters, secure them to the grille by

swivelling them by 1/4 of a turn, refit the grilles.

86

III

III

S u n r o o f

Glass sun roof
The sun roof offers you two open-

ing positions:
- An initial press opens to the com-

fort position.

- A second press gives maximum

opening position.

To close the sun roof, use the re-

verse procedure.

An anti-pinch device stops the sun roof from sliding shut if it meets an obsta-

cle, in which case it reopens.

After a disconnection of the battery or in the event of a malfunction,

you have to re-initialise the antipinch function.
To do this: place the control in the fully open or maximum tilt position, then

press the control, and keep it pressed for at least 1 second after the fully

open position has been reached.
Warning: During this operation, the anti-pinch device does not function.

Advice

At speeds greater than 60 km/h (approx. 40 mph), it is advised to drive with

the sun roof in the comfort position.

Always remove the ignition key when leaving the vehicle,

even for short periods.

In the event of pinching when the sun roof is in operation,

you should reverse the roof movement.

For this, reverse the position of the control concerned.

When the driver actions the sun roof control,

he should first make sure that passengers

are not obstructing the closing of the sun roof.

The driver should ensure that passengers operate

the sun roof control correctly.

ALWAYS PAY ATTENTION TO WHERE CHILDREN

ARE WHEN OPERATING THE ROOF.

87

A

B

IV

IV

O p e n i n g t h e b o n n e t

Bonnet release lever
Pull the release lever situated be-

low the dashboard to unlock the

bonnet.

Action latch A, located under the

centre forward edge of the bonnet,

and pull the bonnet up.
Position the bonnet stay as shown

in the illustration.
There are two possible positions.

Closing
Reposition the bonnet stay in its

clip and press firmly in place.
Lower the bonnet and then allow it

to drop shut.

Make sure that the bonnet is securely locked

Avoid operating the bonnet when there are high winds.

89

A

B

IV

IV

1 . 6 i E N G I N E

90

A

B

IV

IV

2 . 0 i 1 6 V E N G I N E

91

A

B

IV

IV

E N G I N E H D i 9 0

Due to the fact that the diesel

system is a high pressure sys-

tem:
IT IS FORBIDDEN TO CARRY

OUT ANY REPAIRS TO THE SYS-

TEM.

HDi engines are of a highly technical nature.

All maintenance and repairs require specific qualifications

which only your CITROËN Dealer can guarantee.

92

A

B

IV

IV


Due to the fact that the diesel

system is a high pressure sys-

tem:
IT IS FORBIDDEN TO CARRY

OUT ANY REPAIRS TO THE SYS-

TEM.

HDi engines are of a highly technical nature.

All maintenance and repairs require specific qualifications

which only your CITROËN Dealer can guarantee.

93

E N G I N E S ฀ H D i ฀ 9 2 ฀ A N D ฀ 1 1 0

IV

IV

L E V E L S

A

Air intake filter

B

Air filter
Follow the recommendations in

the Maintenance Guide.

Engine coolant
The fluid level must be sit-

uated within the MAX and

MIN marks visible on the

reservoir.

If the engine is hot, wait 15 minutes.

Quality: See “Maintenance Guide”.

Never work on the cooling system

if the engine is hot.

Windscreen and rear

screen washer fluid
It is recommended that

you

use

products

ap-

proved by CITROËN.

Positive terminal

12 volt battery
See “Emergency starting

with a slave battery”

Engine oil
Check the oil level with

the vehicle parked on lev-

el ground, after the engine

has been switched off for at least fif-

teen minutes.

Quality: See “Maintenance Guide”.

Take out the oil dipstick.
The level must be between

the MAX and MIN marks

on the dipstick

It should never exceed

the maximum mark.

MAX

MIN

Brake fluid
The fluid level must be sit-

uated within the MAX and

MIN marks visible on the

reservoir.

Quality: See “Maintenance Guide”.

If the warning lamp comes

on: stop the vehicle

Power steering oil
Check the level with the

engine switched off.

Quality:

See

“Mainte-

nance Guide”.

When working under the bonnet, when the engine is hot (even stopped

and the ignition switched off), the cooling fan could operate at any time.

The engine oil level should be checked frequently between services

(as recommended by the manufacturer), as well as before long journeys.

Consult “User Precautions” at the end of this handbook.

94

IV

IV

L E V E L S

Power steering oil
Check the level with the engine

switched off.
The fluid level must be situated

within the MAX and MIN marks visi-

ble on the reservoir.
NEVER run the engine without oil in

the pump reservoir; the pump will

be severely damaged and could

seize.

Quality: See “Maintenance Guide”.

Engine oil
Check the oil level with the vehicle

parked on level ground, after the

engine has been switched off for at

least fifteen minutes.
Take out the oil dipstick.
The level must be between the

MAX and MIN marks on the dip-

stick

Adding engine oil
Remove the dipstick before top-

ping up.
Check the level after filling.
It should never exceed the maxi-

mum mark.
Screw on the cap before closing

the bonnet.

Quality: See “Maintenance Guide”.

When working under the bonnet, when the engine is hot (even stopped

and the ignition switched off), the cooling fan could operate at any time.

95

IV

IV

L E V E L S

Radiator - coolant
The coolant must only be checked

or topped up if the power unit is

cold.

Engine hot:
Wait fifteen minutes or until such

time as the temperature is below

100°C, then slowly untighten the

cap to allow the pressure to fall,

taking care to protect yourself with

e.g. a cloth.

Topping up the cooling system
The coolant level should be between the MAX and MIN

marks on the header tank.
Top up the level. If you have to add more than 1 litre, you

should have the cooling system checked by CITROËN.
Make sure that the cap is on correctly.

Note: The necessity to top up frequently would indicate a

malfunction that should be checked at the earliest opportunity.
Renewal of coolant fluid should be carried out only by a CITROËN Dealer.

Quality: See “Maintenance Guide”.

When working under the bonnet, when the engine is hot (even stopped

and the ignition switched off), the cooling fan could operate at any time.

Note฀:฀
The฀cooling฀fan฀may฀operate฀for฀some฀ten฀minutes฀after฀the฀engine฀has฀been฀
switched฀off.

96

IV

IV

L E V E L S

Windscreen and rear screen

washer fluid
For best results as well as for your

safety, use only CITROËN ap-

proved products which protect at

temperatures as low as –25°C to

–30°C.

Capacity: See “Capacities”.

Brake fluid reservoir
Check and top up at regular inter-

vals.
The fluid level must be situated

within the MAX and MIN marks visi-

ble on the reservoir.
If the warning lamp lights, stop im-

mediately and contact the nearest

CITROËN dealer.

Brake fluid
The synthetic fluid not only gives protection against corrosion but also en-

sures correct functioning of the braking system in all environmental condi-

tions, therefore you should only use the synthetic product recommended by

the manufacturer. (this fluid must be replaced every two years).
These important requirements are detailed in your vehicle's Maintenance

Guide.

Quality: See “Maintenance Guide”.

When working under the bonnet, when the engine is hot (even stopped

and the ignition switched off), the cooling fan could operate at any time.

97

IV

IV

D I E S E L I N J E C T I O N

E Q U I P M E N T

Priming the fuel system
HDi ENGINE:
In the event of running out of fuel:
After adding fuel, turn the ignition key to position M, then operate the starter motor until the engine starts.

Injection pump
Do not remove the seals on the pump setting screws under any circumstances.
Alteration of the settings might lead to early engine failure and loss of warranty cover.

Draining water from the fuel filter
Bleed regularly (each time the engine is drained).
To remove the water, loosen the bleed screw at the bottom of the filter.
Operate until all the water has been expelled.

HDi engines are of a highly technical nature.

All maintenance and repairs require specific qualifications

which only your CITROËN Dealer can guarantee.

98

99

IV

IV

C A P A C I T I E S


Capacity฀(in฀litres)฀

1.6i฀

2.0i฀

HDi฀

HDi฀

HDi

16V฀

90฀

92฀

110

฀ -฀Engine฀oil
฀ ฀฀
Drain/refill฀

฀ ฀฀With฀change฀of฀filter฀cartridge฀

3.50฀

4.25฀

4.50฀

3.85฀

3.85

-฀Screen฀wash฀fluid

4.00฀

4.00฀

4.00฀

4.00฀

4.00

A

C

B

Starting฀the฀engine฀after฀a฀battery฀disconnection฀and฀reconnection
-฀Turn฀the฀ignition฀key.

-฀Wait฀approx.฀ten฀seconds฀before฀actioning฀the฀starter฀so฀as฀to฀allow฀the฀

electronic฀systems฀to฀reinitialise.฀It฀may฀be฀necessary฀to฀re-enter฀the฀radio฀

code.

Note฀:฀After฀a฀battery฀disconnection฀or฀if฀there฀is฀a฀malfunction,฀you฀must฀

reinitialise฀the฀anti-pinch฀on฀the฀driver’s฀window฀and฀on฀the฀sun฀roof.

Be฀aware฀that,฀during฀this฀manoeuvre,฀the฀anti-pinch฀device฀is฀not฀

operational.

With฀removable฀front฀LH฀seat฀:฀

To฀access฀the฀battery฀:฀

-฀ slide฀ the฀ seat฀ as฀ far฀ as฀ possible฀

forwards,

-฀remove฀the฀plastic฀protection฀

A,฀at฀

the฀rear฀of฀the฀seat.

To฀change฀the฀battery฀:
-฀remove฀the฀head฀restraint,

-฀ slide฀ the฀ seat฀ as฀ far฀ as฀ possible฀

forwards,

-฀ using฀ the฀ tool฀ located฀ in฀ the฀ rear฀

LH฀ storage฀ compartment,฀ undo฀

the฀two฀screws฀

B฀situated฀at฀the฀

rear฀on฀the฀RH฀slide฀and฀the฀screw฀

C฀ situated฀ at฀ the฀ rear฀ on฀ the฀ LH฀

slide,

-฀then฀slide฀the฀seat฀as฀far฀as฀possi-

ble฀rearwards,

-฀tilt฀the฀seat฀forwards฀to฀access฀the฀

battery.

To฀reposition฀the฀front฀LH฀seat฀:

-฀perform฀the฀above฀actions฀in฀reverse฀order,

-฀check฀that฀the฀seat฀is฀properly฀secured.

Change฀of฀battery.฀

Replace฀the฀battery฀with฀one฀of฀the฀same฀type฀

(with฀venting).

100

1 2 ฀ V O L T ฀ B A T T E R Y ฀

IV

IV

B

–3

+1

+2

C

A

–3

–4

C

101

IV

IV

1 2 v o l t b a t t e r y

Emergency starting with a slave battery
If the battery is discharged, the vehicle can be started with either a slave bat-

tery or the battery on another vehicle.
Check that the voltage of the slave battery is correct (12 volts).
If you use the battery on another vehicle, the engine of this assisting vehicle

should be switched off. The two vehicles should not be touching one another.
Lift the isolating protection on the + terminal.
Connect the cables in the order indicated in the illustration. Make sure that a

good contact is made (to prevent all risk of sparks).

It is essential to adhere to the correct sequence as indicated.
Start the engine of the assisting vehicle and let it run at a fast idle for about a

minute.
Then start the engine of the vehicle with the discharged battery.

Note: Ensure that the insulating protection is refitted to the positive terminal

after any work.

Positive terminal on a vehicle

which has broken down. (under

the bonnet) (under the bonnet).

Slave battery
Earth point on broken down vehi-

cle.

Advice

Do not touch the cable clamps dur-

ing the procedure.
Do not lean over the batteries.
Disconnect the cables in the re-

verse order to connection, ensuring

that they do not touch each other.

16 9

14 4 7

11 6 5 1

12 10

21 20 15

22

102

IV

IV

F U S E S

Fuse box
There are two fuse boxes, one below the dashboard and one under the bon-

net.

Fuses under the dashboard
To gain access to the fuses under the dashboard, open the cover.

Replacing a fuse
Before replacing a fuse, it is essential to find the cause of the inci-

dent and to rectify it. The fuse identification numbers are indicated

inside the fuse box.
The fuses positions which are not numbered are for spare fuses.

Replace a blown fuse with one of the same rating (the same

colour).

Good

Faulty


Content   ..  4  5  6  7   ..