Citroen C-Zero (2017 year). Instruction - part 10


  Index      Citroen     Citroen C-Zero - instruction 2017 year in english


Search            


Content   ..  8  9  10  11   ..


Citroen C-Zero (2017 year). Instruction - part 10


9

Technical data

143

C-Zero_en_Chap09_caracteristiques-techniques_ed01-2016

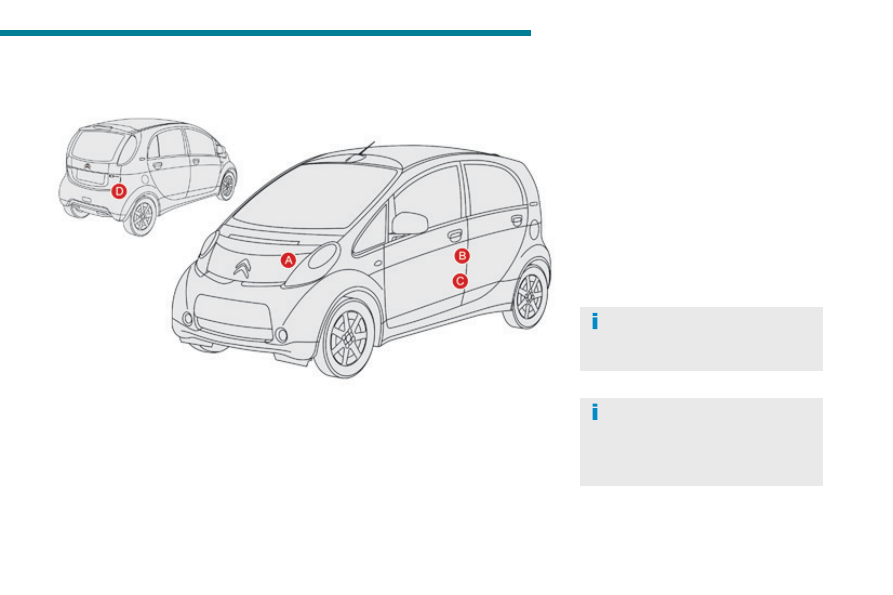
Identification markings

Various visible markings for the identification of your vehicle.

A.  Service - Replacement  

Parts identification plate.

This plate is riveted to the underside of the 
bonnet.

The original tyres fitted to the vehicle 
may have a load index or speed rating 
higher than those given on the label; 
this has no effect on the inflation 
pressures.

B. Tyre identification label.
This label is affixed to the driver's centre pillar.

It bears the following information:
-  the tyre pressures (in bars).
-  the tyre specification.
-  the type of tyre.

C. Manufacturer's plate

.

This plate is riveted to the left-hand centre 
pillar.

D. Vehicle identification number (VIN).
This number is engraved on the inner wheel 
arch, inside the boot, right-hand side.

For information on fitting snow chains, 
contact a CITROËN dealer or a 
qualified workshop.

It bears in particular the following information:
-  the vehicle model.
-  the paint code.
-  the type, variant, version, etc.

Technical data

144

C-Zero_en_Chap09_caracteristiques-techniques_ed01-2016

Low tyre pressures increase your 
vehicle's power consumption, therefore 
reducing its range.

Checking tyre pressures
The tyre pressures should be checked when 
cold at least monthly.
The pressures given on the label are valid 
for cold tyres. If you have driven for more 
than 10 minutes or for more than 6 miles 
(10 kilometres) at more than 30 mph (50 km/h), 
the tyres will be warm; in this case 0.3 bar 
(30 kPa) should be added to the pressures 
given on the label.

Never reduce the pressure of a warm 
tyre.

.

Audio and Telematics

145

C-Zero_en_Chap10a_RDE2_ed01-2016

Audio system / Bluetooth

®

Contents

First steps 

146

Radio 

147

Media 

149

Telephone 

152

Audio settings 

155

Configuration 

156

Screen menu map(s) 

157

Frequently asked questions 

158

As a safety measure, the driver must only carry out operations 
which require prolonged attention while the vehicle is stationary.
When the engine is switched off and to prevent discharging of 
the battery, the system switches off after activation of energy 
economy mode.

After a battery disconnection, a code has to be entered for 
operation of the audio system.
A maximum of five attempts are possible. For the last two attempts, 
a 15 minutes wait is imposed between each attempt.
Refer to the end of this document to find the label indicating this 
code:

Audio and Telematics

146

C-Zero_en_Chap10a_RDE2_ed01-2016

First steps

On / Off, volume adjustment.

Selection of the source:
Radio (FM1, FM2), CD, USB, AUX, 
Streaming.
Telephone: accept an incoming call.
Telephone, continuous press: end 
a call, access the calls log of the 
telephone connected.

Display the list of stations received, 
the CD/USB tracks or folders.
Press and hold: update the list of 
stations received.

Automatic search for a lower radio 
frequency.
Select the previous track for the CD 
or USB source.
Navigation in a list.
Press and hold: rewind.

Automatic search for a higher radio 
frequency.
Select the next track for the CD or 
USB source.
Navigation in a list.
Press and hold: fast forward.

Adjust audio settings: sound 
ambience, treble, bass, loudness, 
distribution, left/right balance, front/
rear balance, automatic volume.

Abandon the current operation.
Go up one level (menu or folder).

Select one of the preset radio 
stations.
Radio, press and hold: preset a radio 
station.
Other than radio: see the 
corresponding sections.

Eject CD.

Open the main menu.

.

Audio and Telematics

147

C-Zero_en_Chap10a_RDE2_ed01-2016

Radio

Presetting a station

Selecting a station

Managing a list

Entering a frequency

Press SRC/TEL

 several times in 

succession to select the FM1 or FM2 
radio band.

A continuous press on one of the 
buttons presets the station being 
listened to. The name of the station is 
displayed accompanied by an audible 
signal to confirm the preset.

Press a button to listen to the 
corresponding preset station.

Select "Radio"

.

Select "Write freq."

.

Press +

.

or

press - to select the desired 
frequency.

Press one of the buttons briefly to 
change to the next or previous letter.

A continuous press on LIST builds 
or updates the list of stations; audio 
reception is cut momentarily.

Press LIST to display the list of 
stations received in alphabetical 
order.

Select the desired radio station by 
pressing one of the buttons.

Confirm by pressing "OK".

Confirm with "OK".

The exterior environment (hills, buildings, 
tunnel, car park, below ground, etc.) may 
prevent reception, even in RDS station 
tracking mode. This phenomenon is 
normal in the propagation of radio waves 
and is in no way indicative of a fault with 
the audio system.

Press on MENU

.

Audio and Telematics

148

C-Zero_en_Chap10a_RDE2_ed01-2016

Select "Radio"

.

Select "Radio"

.

Select "Radio"

.

Select or deselect "RDS" to switch 
RDS on or off.

Select or deselect "TXT" to activate 
or deactivate the display of "RADIO 
TEXT".

Select or deselect "TA" to activate 
or deactivate the reception of traffic 
messages.

Confirm with "OK" to save the 
setting.

Confirm with "OK" to save the 
setting.

Confirm with "OK" to save the 
setting.

Receiving TA messages

RDS

Displaying "RADIO TEXT"

The TA (Traffic Announcement) 
function gives priority to TA alert 
messages. To operate, this function 
needs good reception of a radio station 
transmitting this type of message. 
When a traffic report is transmitted, the 
current audio source (Radio, CD, USB, 
etc.) is interrupted automatically to play 
the TA message. Normal playback of 
the audio source resumes at the end of 
the transmission of the message.

RDS, if activated, enables you to continue 
listening to the same station by automatic 
retuning to alternative frequencies. 
However, in certain conditions, coverage 
of an RDS station may not be assured 
throughout the country as radio stations 
do not cover 100 % of the territory. This 
explains the loss of reception of the 
station during a journey.

"RADIO TEXT" is information 
transmitted by the radio station related 
to the current programme or song.

With source FM1 or FM2, 
press MENU

.

With the radio displayed on the 
screen, press MENU

.

Press MENU

.

.

Audio and Telematics

149

C-Zero_en_Chap10a_RDE2_ed01-2016

Media

USB port

This unit comprises a USB port 
and a Jack auxiliary socket, 
depending on model.

Connect a USB memory stick to the USB port 
or connect a USB device to the USB port using 
a suitable cable (not supplied).

The system constitutes playlists (in 
temporary memory), whose creation 
time can be from a few seconds to 
several minutes at the first connection.
Limiting the number of non-music files 
and the number of folders reduces this 
waiting time. The playlists are updated 
every time the ignition is switched off or 
a USB memory stick is connected.
The lists are memorised: if there is no 
change in the lists, the next loading 
time will be shorter.

Press SRC/TEL repeatedly to 
select "USB

".

Press one of these buttons to select 
the next or previous track in the list.

Press and hold one of these buttons 
for fast forward or rewind.

Press one of these buttons to select 
the next or previous folder in the 
order chosen.

Press LIST to display the structure of 
the folders in the compilation.

Select a line in the list.

Confirm with "OK".

Up a level in the menu.

Select "Media"

.

Select the play mode: "Normal"
"Random""Random all" or 
"Repeat"

.

Select or deselect "TA" to switch 
traffic announcements on or off.

Press MENU

.

To protect the system, do not use a 
USB hub.

Audio and Telematics

150

C-Zero_en_Chap10a_RDE2_ed01-2016

Press the SRC/TEL button 
repeatedly to select "CD

".

Press one of these buttons to go to 
the previous or next track in the list.

Press and hold one of these buttons 
for fast forward or back.

CD player

Insert a CD into the player, play starts 
automatically.
Insert an MP3 compilation CD into the CD 
player.
The audio system searches for audio tracks, 
which can take from a few to several dozen 
seconds before play starts.

Press one of these buttons to select 
the previous or next folder according 
to the category chosen.

Press LIST to display the folder 
structure of the compilation.

Select a line in the list.

Confirm with "OK".

Return to the top level of the folder structure to 
select the type of tracks.
- By 

Folders

 (CD or USB): all folders 

containing audio files recognised on the 
peripheral device, in alphabetical order 
without following the folder structure.

- By 

Artist

 (USB only): all of the artist names 

defined in the ID3 Tags, in alphabetical 
order.

- By 

Genre

 (USB only): all of the genres 

defined in the ID3 Tags.

- By 

Playlist

 (CD or USB): if playlists have 

been saved.

The audio system will only play files with 
".mp3", ".wma" and ".wav" on a CD and can 
also play files with ".ogg" extension only on 
USB.

It is recommended that file names be of no 
more than 20 characters and avoiding special 
characters (e.g. " ? ; ù) so as to avoid any 
problem reading or displaying the files.

In order to be able to play a recorded CDR or 
CDRW, when recording it is preferable to select 
standards ISO 9660 level 1. 2 or Joliet.
If the disc is recorded in another format, it may 
not be played correctly.
It is recommended that the same recording 
standard is always used for an individual disc, 
with as low a speed as possible (4x maximum) 
for optimum sound quality.
In the particular case of a multi-session CD, the 
Joliet standard is recommended.

Information and advice

The playlists accepted on CD, MP3, iPod and 
USB connection are types ".m3u" and ".wpl".
The number of files recognised is limited to 
5,000 in 500 folders on a maximum of 8 levels.

.

Audio and Telematics

151

C-Zero_en_Chap10a_RDE2_ed01-2016

Use only USB memory sticks formatted to 
FAT32 (File Allocation Table).

The use of genuine Apple

®

 USB cables 

is recommended to ensure correct 
operation.

On a single disc, the CD player can read up 
to 255 MP3 files spread over 8 folder levels 
with a maximum of 192 folders. However, it is 
recommended that this be kept to 2 levels so 
as to limit the time taken to access and play 
the CD.
During play, the folder structure is not 
observed.

Do not connect a hard disk or USB device other 
than audio players to the USB port. This may 
cause damage to your installation.

To protect the system, do not use a 
USB hub.

Bluetooth

®

 audio streaming

Streaming allows music files on a telephone to 
be heard via the vehicle's speakers.

Connect the telephone: see the "Telephone
section.

In the "Bluetooth: Audio

" menu, select the 

telephone to connect.
The audio system connects automatically to a 
newly paired telephone.

The control of common tracks is possible 
via the audio system control buttons and 
the steering mounted controls**. Contextual 
information can be displayed in the screen.

Activate the streaming source by 
pressing the SRC/TEL* button.

The audio quality depends on the quality of the 
transmission from the telephone.

*  In certain cases, the playing of audio files 

must be initiated from the telephone.

** If the telephone supports the function.

Connecting Apple

®

 players

Connect the Apple

®

 player to the USB port 

using a suitable cable (not supplied).
Play starts automatically.

Management of the device is via the audio 
system controls.

The classifications available are those on the 
portable player connected (artists / albums / 
genres / playlists / audiobooks / podcasts).

The software version of the audio system may 
not be compatible with the generation of your 
Apple

®

 player..

Audio and Telematics

152

C-Zero_en_Chap10a_RDE2_ed01-2016

Telephone

Pairing a Bluetooth

®

 telephone

For safety reasons and because they 
require prolonged attention on the part 
of the driver, the operations for pairing 
of the Bluetooth mobile telephone 
with the Bluetooth hands-free system 
of your audio system must be carried 
out with the vehicle stationary and the 
ignition on.

Visit www.citroen.co.uk for more information 
(compatibility, more help, etc.).

Activate the telephone's Bluetooth function and 
ensure that it is set as visible to all (refer to the 
telephone instructions).

Press the MENU

 button.

The services available depend on 
the network, the SIM card and the 
compatibility of the Bluetooth telephone 
used.
Consult your telephone's manual and 
your operator to find out which services 
are available to you.

Only one telephone can be paired at a time.

A message is displayed on the screen of the 
telephone: enter the same code and confirm.

If pairing fails, try again; the number of 

attempts is not limited.

A message appears on the screen to confirm 
the result of the connection.

Pairing can also be initiated from the 
telephone by searching for detected 
Bluetooth devices.

The directory and the calls list can be 
accessed after the synchronisation 
period (if the telephone is compatible).
Automatic connection must be 
configured in the telephone to allow 
the connection each time the vehicle is 
started.

Select "Bluetooth"

.

Select the telephone to be paired 
from the list.

A virtual keypad is displayed on the 
screen: choose a 4 digit code.

Select "Search

".

A window is displayed with "Searching 
device

".

In some cases, the Bluetooth address of the 
telephone may appear instead of the name of 
the telephone.

Confirm with "OK".

Confirm with "OK".

.

Audio and Telematics

153

C-Zero_en_Chap10a_RDE2_ed01-2016

Press the MENU

 button.

Press the MENU

 button.

Managing connections

Making a call

From the directory

Select "Bluetooth"

.

Select "Telephone"

.

Select "Call"

.

Select "Directory"

.

"Delete"

 to delete the pairing.

Select or deselect:

" Tel."

: hands-free connection

"Audio"

: play audio files

Indicates connection of the audio 
profile.

Indicates connection of the hands-
free profile.

Select "BT management" and 
confirm. The list of paired telephones 
is displayed.

In the list, select a telephone to pair.

Confirm with "OK".

"OK"

 to confirm the choice.

Select the desired number.

Confirm with "OK" to start the call.

It is not possible to pair more than 
5 telephones. Press MENU and 
select "Bluetooth"

. Select "BT 

management"

. If 5 telephones are 

already paired, select the telephone to 
delete by pressing "OK" and selecting 
"Delete"

.

Audio and Telematics

154

C-Zero_en_Chap10a_RDE2_ed01-2016

Receiving a call

An incoming call is announced by a ring and a 
superimposed display in the screen.

For access to the calls list, it is also 
possible to press MENU, select 
"Telephone", then select "Call", and 
finally select "Calls list"

.

The calls list includes the calls sent 
from and by from the vehicle via the 
connected telephone.
It is possible to make a call directly from 
the telephone; stop the vehicle as a 
safety measure.

Making a call

Recently called numbers*

In the list of calls, select the number 
and choose "Missed calls", "Dialed 
calls"
 or "Answered calls"

.

Press and hold SRC/TEL to display 
the calls list.

Press SRC/TEL

.

on SRC/TEL

 also rejects an 

incoming call.

or

or

or

Scroll through the calls list.

Confirm with "OK".

"OK"

 starts the call.

Press one of these buttons to go to 
the previous or next page in the list.

*  Depending on the compatibility of the 

telephone.

select "YES" to accept the call,

select "NO"

 to reject the call.

Pressing and holding the back 
button,

.

Audio and Telematics

155

C-Zero_en_Chap10a_RDE2_ed01-2016

Managing calls

In the contextual menu, select "Hang 
up"

 to end the call.

Select "Micro OFF" to switch off the 
microphone.

Select "Combined mode" to transfer 
the call to the telephone.

Press ¯

 to display the audio settings 

menu.
Press ¯

 to go to the next setting.

Select "Micro OFF" to switch the 
microphone on again.

Select "Combined mode" to transfer 
the call to the vehicle.

In the contextual menu:

From the contextual menu:

In certain cases, the combined mode has 
to activated from the telephone.
The Bluetooth connection will be 
restored automatically if the ignition 
has been switched off, then on again 
(depending on the compatibility of the 
telephone).

The distribution, or spatialisation of sound, 
is an audio process which allows the 
sound quality to be improved according to 
the setting chosen, corresponding to the 
position of the listeners in the vehicle.

Hang up

Secret - Mute

Combined mode

Pressing and holding on SRC/TEL 
also ends the call.

(so that the caller cannot hear)

(to leave the vehicle without ending the call)

The settings available are:
-  AMBIANCE: BASS, TREBLE and 

LOUDNESS.

-  BALANCE (left/right balance), FADER 

(front/rear balance).

-  SOUND DIST. (driver or passenger).
-  AUTO VOLUME.

The AMBIANCE, TREBLE and BASS 
audio settings are different and 
independent for each sound source.

Audio settings

Audio and Telematics

156

C-Zero_en_Chap10a_RDE2_ed01-2016

Configuration

Press the MENU

 button.

Select "Config."

.

Select "Displaying" to activate or 
deactivate scrolling text.

Select "Language"

 to modify the 

display language.

Select "Version"

 for information on 

the software.

Select "Unit"

 to modify the units for 

temperature (Celsius, Fahrenheit).

Select "System" when you want to 
install an update. Information can be 
obtained from a CITROËN dealer.

Display and language settings

.

Audio and Telematics

157

C-Zero_en_Chap10a_RDE2_ed01-2016

Screen menu map(s)

3

3

3

3

3

3

3

3

3

3

3

3

3

3

3

4

4

4

Directory

Scrolling text

Deutsch

Italiano

Español

Português

Русский

Celsius

English

Nederlands

Français

Português-Brasil

Türkçe

Fahrenheit

Calls list

Missed calls

Dialed calls

Answered calls

Radio

Telephone

Bluetooth

Config.

RDS

TXT

Write freq.

Media

Normal

Random all

TA

Call

BT management

Unit

Search

Displaying

Language

Version

System

Phone status

1

1

1

1

2

2

2

2

2

2

2

2

2

2

2

2

2

1

2

2

MENU

Random

Repeat

TA

2

2

2

Audio and Telematics

158

C-Zero_en_Chap10a_RDE2_ed01-2016

Frequently asked questions

The following tables contain answers to the most frequently asked questions.

QUESTION

ANSWER

SOLUTION

There is a difference in 
sound quality between the 
different audio sources 
(radio, CD...).

For optimum sound quality, the audio settings (volume, bass, treble, 
ambience, loudness) can be adapted to the different sound sources, 
which may result in audible differences when changing source 
(radio, CD...).

Check that the audio settings (volume, bass, 
treble, ambience, loudness) are adapted to the 
sources listened to. It is advisable to adjust 
audio settings (bass, treble, Front-Rear balance, 
Left-Right balance) to the middle position, select 
the musical ambience and set the loudness 
correction to the "Active" position in CD mode or 
to the "Inactive" position in radio mode.

When changing the 
settings for treble and 
bass, the ambience setting 
is deselected.
When changing the 
ambience setting, treble 
and bass are reset to zero.

Choosing an ambience imposes settings for treble and bass. 
Modifying one without the other is only possible with a personalised 
ambience.

Modify the treble and bass settings or the 
ambience setting to obtain the desired sound 
quality.

When changing the 
balance setting, distribution 
is deselected.

Choosing the "driver" distribution setting imposes a balance setting. Modify the balance setting or the distribution 

setting to obtain the desired sound quality.


Content   ..  8  9  10  11   ..