Citroen Jumpy Multispace Dag (2008 year). Instruction - part 6
 

  Index      Citroen     Citroen Jumpy Multispace Dag - instruction 2008 year in english


Search            


Content   ..  4  5  6  7   ..


Citroen Jumpy Multispace Dag (2008 year). Instruction - part 6


8

0

   Mirrors and windows   

 MIRRORS 

 This mirror is spherical to broaden the field 
of side vision. Objects observed are, in 
reality, closer than they appear. Therefore, 
take this into account in order to judge the 
distance correctly. 

 MIRRORS AND WINDOWS 

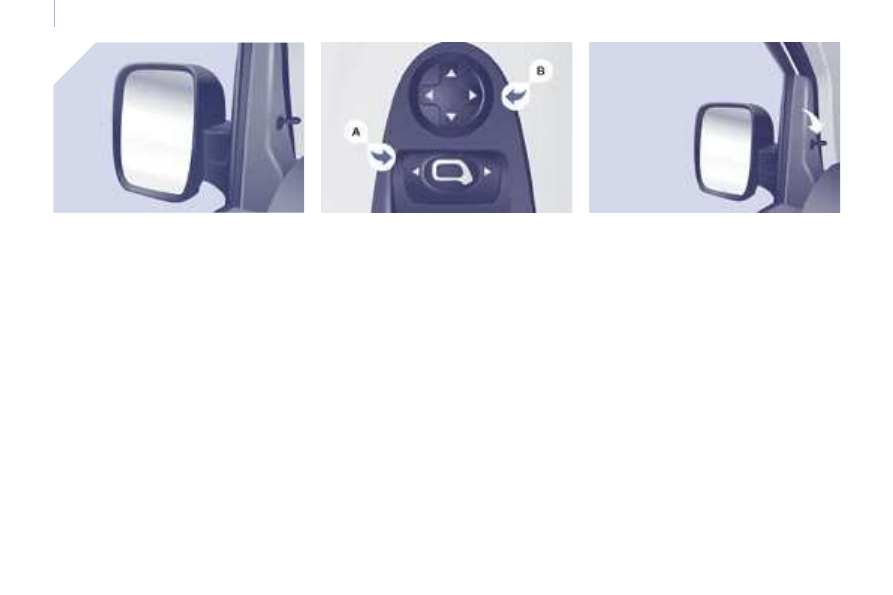
  Electric folding 

 If your vehicle is fitted with this function, 
the mirrors can be folded electrically from 
the inside, with the vehicle parked and the 
ignition on: 

   -  

Place switch  A  in the centre position. 

  -  

Pull switch  A  rearwards.  

  Heated mirrors 

 If your vehicle is fitted with this function, 
press the rear screen demisting button.  

 The folding/unfolding on locking/unlocking 
can be deactivated. 
 Consult a CITROËN dealer.    

  Electric exterior mirrors 

   -  

Move switch  A  to the right or to the left 
to select the corresponding mirror. 

  -  

Move knob  B  in all four directions to 
adjust. 

  -  

Return switch  A  to the centre position.  

 From the outside, lock the vehicle using the 
remote control or the key.  

  Electric unfolding 

 The electric unfolding of the mirrors is 
possible with the remote control or the key 
on unlocking the vehicle, unless folding 
was selected using switch  A . In this case, 
pull the switch rearwards from the centre 
position again. 

  Manual exterior mirrors 

 Move the lever in all four directions to 
adjust. 

 When the vehicle is parked, the exterior 
mirrors can be folded back manually. 

 If the mirror casing has come out of its 
initial location, with the vehicle stationary, 
reposition the mirror casing manually or use 
the electric folding switch. 

 There is no risk of breakage even in the 
presence of ice.  

   Mirrors and windows   

E

R

G

O

N

O

M

IE

 e

C

O

N

F

O

R

T

3

  Manual interior mirror 

 The interior mirror has two positions: 

   -  

day (normal), 

  -  

night (anti-dazzle).  

 To change from one to the other, push or 
pull the lever on the lower edge of the mirror.  

 MONITORING MIRROR 

 This mirror, placed on top of the central 
mirror, enables the driver or front passenger 
to observe all the rear seats. 

 Fitted on its own ball joint, its manual 
adjustment is simple and provides a view of 
the rear interior of the vehicle. 

 It can also be adjusted for improved visibility 
during manoeuvres or when overtaking. 

 REAR WINDOWS  

  2nd row side windows 

 If fitted on your vehicle, the 2nd row side 
windows can be opened. 

 Squeeze the two controls then move the 
window sideways. 4 notches are available. 

 While driving, the window must be closed or 
secured on one of the 4 notches.  

  3rd row rear quarter lights 

 These are fixed.   

8

2

   Mirrors and windows   

 ELECTRIC WINDOWS 

   1.   Driver's electric window control 

  2.   Passenger electric window control  

 The electrical functions of the electric 
windows are deactivated: 

   -  

approximately 45 seconds after the 
ignition is switched off, 

  -  

after one of the front doors is opened, if 
the ignition is off.   

  Reinitialisation 

 Following reconnection of the battery, the safety 
auto-reverse function must be reinitialised. 

 Lower the window fully, then raise it, it will 
rise in steps of a few centimetres each time 
the control is pressed.

Repeat the operation until the window is fully 
closed. 

 Continue to press the control for at least one 
second after the window closed position has 
been reached. 

 The safety auto-reverse does not operate 
during these operations.  

 There are two operating modes: 

  Manual mode 

 Press or pull the control, without passing the 
point of resistance. The window stops when 
you release the control.  

  Automatic mode 

 Press or pull the control, beyond the point 
of resistance. The window opens or closes 
fully when the control is released. Pressing 
the control again stops the movement of the 
window. 

  Safety auto-reverse 

 If your vehicle is fitted with the safety auto-
reverse function, when the window rises 
and meets an obstacle, it stops and partially 
lowers. 

 In the event of unwanted opening of the 
window on closing, press the control until 
the window is fully open. Within the next
4 seconds, pull the control until the window 
is fully closed. 

 The safety auto-reverse does not operate 
during these operations.  

  Good practice 

 If the electric windows meet an obstacle 
during operation, you must reverse the 
movement of the window. To do this, press 
the control concerned. 

 When the driver operates the passenger 
electric window controls, he must ensure 
that no one is preventing correct closing of 
the windows. 

 The driver must ensure that the passengers 
use the electric windows correctly. 

 Be aware of children when operating the 
windows.  

S
O
S

SOURCE

MODE

BAND

ESC

2

abc

5

jkl

8

tuv

3

def

6

mno

9

wxyz

1

4

ghi

7

pqrs

0

#

MENU

LIST

TA 

PTY

DARK

8

3

8

3

 The GPS audio/telephone is coded in such a way that 
it will only operate in your vehicle. If it is to be installed 
in another vehicle, contact a  CITROËN  dealer for 

it will only operate in your vehicle. If it is to be instal

e. If it is

confi guration of the system. 

 For safety reasons, it is imperative that the driver carries 

out operations which require prolonged attention while 
the vehicle is stationary. 


 CONTENTS 

        01 First steps  

pg. 84  

       02 Display and general menu   pg. 85  

       03 GPS  

pg. 87  

       04 Traffi c information  

pg. 95  

       05 Audio/Video  

pg. 97  

       06 Telephone  

pg. 104  

       07 Trip computer  

pg. 107  

       08 Control short-cuts  

pg. 109  

       09 Confi guration  

pg. 111  

       10 Display fl ow charts  

pg. 112   

IN

-C

A

R

 T

EC

H

N

O

LO

G

Y

4

  MULTIMEDIA AUDIO 

  MULTIMEDIA AUDIO 

EQUIPMENT/TELEPHONE  

  JUKEBOX FUNCTION (10 GB)/GPS (EUROPE) 

 When the engine is switched off and to prevent 

discharging of the battery, the audio/telephone may 

switch off after a few minutes.  

84

01  FIRST STEPS 

 CD eject 

 On - Off 

 Volume dial 

Source:  selection of the radio or Jukebox, CD changer. 

Mode:  selection with displaying of the TRIP, TEL, NAV 

or AUDIO mode chosen 

Dark:  hide the screen display, until completely black, 

by successive presses. Pressing again reactivates the 
display. 

Band:  selection of the FM1, FM2, FMast, AM 
wavebands. 

TA:  TA Traffi c Announcements function on/off 

PTY 

Types of Programme function on/off by means 

of a long press 

of a long press 

 Alpha-numeric telephone keypad for the 

same uses, dial, call, hang up, enter. 
 Direct access to the  CITROËN  services. 

ESC:  clears the current selection 

 return to the previous selection 

Menu:  displays the general screen 

:   sound settings 

  List:  displays the list of radio stations received 
 the list of CD tracks or MP3/Jukebox directories 

 updating of the stations received. 

 Navigator which selects 

the choices 

above or the step by step or 
rapid advances. 

 Pressing the navigation dial 

confi rms the choice, 
but does not store it. 

 A long press is 
required. 

 For a detailed global view of the 

menus available, refer to the 

"Display fl ow chart" section of this 
chapter. 

The CD equipment

becomes DVD

compatible.

02

8

5

 DISPLAY AND GENERAL MENU 

  > COLOUR DISPLAY 

 This displays the following information, via the GPS audio/

telephone control pad: 

   -   the time, 
  -   the date, 

  -   the exterior temperature (if there is a risk of ice, you are warned by a 

message), 

  -   the audio source displays (radio, CD, jukebox, ...), 

  -   the telematic system displays (telephone, services, ...), 

  -   the accesses check (doors, boot, ...), 

  -   the warning messages (e.g.: "Fuel level low") and vehicle function 

status messages (e.g.: "Auto lighting activated") displayed temporarily, 

  -   the trip computer display, 

  -   the GPS (Europe) satellite navigation system displays.  

 New 

 The system uses the complete and detailed NAVTEQ maps installed directly on the equipment's hard disc. There is no longer any need to insert a 

map CD in the CD player. The updates of the maps of France and of the other European countries, offered by our partner NAVTEQ, will be available 

from the  CITROËN  network.    

map CD in the CD player. The updates of the maps of France and of the other European countries, offered by our partner NAVTEQ, will be available 

map CD in the CD player. The updates of the maps of France and of the other European countries, offered by our partner NAVTEQ, will be available 

 Display confi guration: refer to 10 - Display fl ow chart. 

Telephone

Orange

Time:
Date: 

86

02  DISPLAY AND GENERAL MENU 

 MAP: orientation, details, 
display. 

 AUDIO FUNCTIONS: radio, 
CD, Jukebox, options. 

 For maintenance of the display, 
the use of a soft, non-abrasive 

cloth (spectacles cloth) is 

recommended without any 
additional product. 

 TELEMATIC: telephone, 
directory, SMS. 

 CONFIGURATION: vehicle, 

display, time, languages, 

voice, auxiliary socket (AUX) 

parameters. 

parameters. 

 VIDEO: activation, parameters. 

 VEHICLE DIAGNOSTICS: 

warnings log. 

 NAVIGATION GUIDANCE: GPS, 

stages, options. 

 TRAFFIC INFORMATION: 

TMC information, messages. 

MENU

ESC

LIST

MENU

ESC

MENU

LIST

ESC

MENU

LIST

ESC

MENU

LIST

ESC

MENU

LIST

ESC

MENU

LIST

11

22

33

55

77

44

66

88

ESC

MENU

LIST

ESC

MENU

LIST

03

8

7

 GPS 

  SELECTING A DESTINATION 

 Press the MENU button. 

 Turn the dial and select the 

NAVIGATION GUIDANCE function. 

 Press the dial to confi rm the selection. 

 Turn the dial and select the 

DESTINATION CHOICE function. 

 Press the dial to confi rm the selection. 

 Press the dial to confi rm the selection. 

 Turn the dial and select the 

ENTER AN ADDRESS function. 

 When the country has been selected, 
turn the dial and select 
the TOWN function. 

TOWN

ENTER AN ADDRESS

DESTINATION CHOICE

 Tip: for a detailed global view of the menus available, refer to the "Display fl ow charts" section 
of this chapter. 

88

ESC

MENU

LIST

2

abc

5

jkl

8

tuv

3

def

6

mno

9

wxyz

1

4

ghi

r

7

pq s

0

#

ESC

MENU

LIST

99

12

12

14

14

10

10

13

13

ESC

MENU

LIST

ESC

MENU

LIST

11

11

ESC

MENU

LIST

 Press the dial to confi rm the selection. 

 Turn the dial and select the letters of 

the town one by one confi rming each 

time by pressing the dial. 

 Select OK and press the dial to 

confi rm. 

 To speed up the process, the POST CODE can be 

entered instead of the name of the town. 

 Use the alphanumeric keypad to enter the letters and 

digits and "*" to correct. 

 Press the dial to confi rm the selection. 

 Select OK on the ENTER AN 

ADDRESS page. 

 Repeat steps 8 to 12 for the ROAD and N° functions. 

OK

OK

 Select the STORE function to record the address entered in a 

directory record and press the dial to confi rm the selection. 

 The points of interest (POI) indicate all of the service locations in the 

vicinity (hotels, various businesses, airports...).  

STORE

PARIS

POI

ESC

LIST

MENU

ESC

MENU

LIST

ESC

MENU

LIST

ESC

MENU

LIST

ESC

MENU

LIST

MENU

11

22

33

44

55

66

77

88

ESC

MENU

LIST

ESC

MENU

LIST

ESC

MENU

LIST

03

8

9

  GUIDANCE OPTIONS 

       GPS 

 The route chosen by the GPS audio/telephone depends directly on the guidance options. 
 Changing these options may completely change the route. 

 Press the MENU button. 

 Turn the dial and select the 

NAVIGATION GUIDANCE function. 

 Press the dial to confi rm the selection. 

 Turn the dial and select the 

GUIDANCE OPTIONS function. 

 Turn the dial and select the DEFINE 

CALCULATION CRITERIA function. 

 Press the dial to confi rm the selection. 

 Press the dial to confi rm the selection. 

GUIDANCE OPTIONS

DISTANCE/TIME

DEFINE CALCULATION CRITERIA

 Turn the dial and select, for example, 

the DISTANCE/TIME function. 

90

ESC

MENU

LIST

MENU

99

10

10

11

11

12

12

11

22

33

44

55

ESC

MENU

LIST

ESC

MENU

LIST

ESC

MENU

LIST

ESC

MENU

LIST

ESC

LIST

MENU

ESC

MENU

LIST

ESC

MENU

LIST

ESC

MENU

LIST

 Turn the dial and select the TRAFFIC 
INFO function if it is not ticked. 

 Press the dial to confi rm the selection. 

 Select OK and press the dial to 

confi rm.  

INFO TRAFFIC

 Press the dial to confi rm the selection. 

 Tick this box for optimum operation of the traffi c information, 

diversions will be suggested. 

OK

       GUIDANCE SPEECH SYNTHESIS 

 Press the MENU button. 

 Turn the dial and select the 

NAVIGATION GUIDANCE function. 

 Press the dial to confi rm the selection. 

GUIDANCE OPTIONS

 Turn the dial and select the 

GUIDANCE OPTIONS function. 

 Press the dial to confi rm the selection. 

ESC

MENU

LIST

ESC

MENU

LIST

ESC

MENU

LIST

MENU

66

88

11

22

33

44

ESC

MENU

LIST

ESC

MENU

LIST

S

O

S

SOURCE

MODE

BAND

T

PT

Y

DARK

ESC

MENU

LIST

77

ESC

MENU

LIST

03

9

1

OK

DEACTIVATE

 Press the MENU button. 

 Turn the dial and select 

the MAP function. 

 Press the dial to confi rm the selection. 

 Turn the dial and select 

the MAP DETAILS function. 

 Permits selection of the services 

which can be seen on the map 

(hotels, restaurants...). 

       ACTIONS ON THE MAP 

MAP DETAILS

 During the announcements, the volume of each 

speech synthesis function (guidance, traffi c 

information...) can be adjusted directly. 

 GUIDANCE SPEECH 

SYNTHESIS 

 Select the ADJUST SPEECH 

SYNTHESIS function and press the 

dial to confi rm. 

 GPS 

ADJUST SPEECH SYNTHESIS

 Select the DEACTIVATE function and 

press the dial to confi rm. 

 Select OK and press the dial to 

confi rm. 

92

ESC

MENU

LIST

MENU

ESC

MENU

LIST

ESC

LIST

MENU

ESC

MENU

LIST

ESC

MENU

LIST

1

22

33

44

55

66

ESC

MENU

LIST

ESC

MENU

LIST

77

03

 For improved visibility, beyond the scale of 10 km, the map automatically switches to North 
Orientation. 

 Turn the dial and select 

the MAP function. 

 Press the MENU button. 

 Press the dial to confi rm the selection. 

 Turn the dial and select 

the 3D VIEW tab. 

 Select OK   and press the dial to 

confi rm.  

 Turn the dial and select 

the MAP ORIENTATION function. 

 Press the dial to confi rm the selection. 

  3D VIEW/MAP ORIENTATION 

 GPS 

MAP ORIENTATION

3D VIEW

OK

ESC

MENU

LIST

MENU

ESC

MENU

LIST

ESC

LIST

MENU

ESC

MENU

LIST

ESC

MENU

LIST

1

22

33

44

55

66

77

ESC

MENU

LIST

ESC

MENU

LIST

03

9

3

 Press the MENU button. 

 Press the dial to confi rm the selection. 

 Turn the dial and select 

the MAP function. 

 Turn the dial and select 

the MAP IN WINDOW or 

FULL SCREEN MAP tab. 

 Select OK   and press the dial to 

confi rm.  

 Press the dial to confi rm the selection. 

 Turn the dial and select 

the DISPLAY MAP function. 

  DISPLAYING THE MAP IN A WINDOW 

OR IN FULL SCREEN MODE 

 GPS 

DISPLAY MAP

FULL SCREEN MAP

OK

MAP IN WINDOW

94

ESC

LIST

MENU

MENU

11

ESC

MENU

LIST

22

33

44

55

ESC

MENU

LIST

99

ESC

MENU

LIST

88

ESC

MENU

LIST

77

ESC

MENU

LIST

66

ESC

MENU

LIST

ESC

MENU

LIST

ESC

MENU

LIST

03

  ADDING A STAGE 

 During guidance, press the MENU 
button. 

 Turn the dial and select the 

NAVIGATION GUIDANCE function. 

 Press the dial to confi rm the selection. 

 Turn the dial and select the 

JOURNEY LEGS AND ROUTE 
function. 

JOURNEY LEGS AND ROUTE

 Select OK and press the dial to 

confi rm the order of the stages. 

 When the new address has been 
entered, select OK and press the dial 

to confi rm. 

 Enter for example a new address. 

 Select the ADD A STAGE function 

(9 stages maximum) and press the 

dial to confi rm. 

 Press the dial to confi rm the selection. 

 The stage must be completed or deleted before the guidance can 
continue to the next destination. 

 Otherwise, the GPS audio/telephone will always guide you back to 

the previous stage.  

ENTER AN ADDRESS

ADD A STAGE

 GPS 

OK

OK

ESC

LIST

MENU

MENU

11

ESC

MENU

LIST

22

33

ESC

MENU

LIST

44

55

ESC

MENU

LIST

66

77

ESC

MENU

LIST

88

ESC

MENU

LIST

ESC

MENU

LIST

ESC

MENU

LIST

04

9

5

  ACTIVATING THE FILTER ON THE ROUTE/

AROUND THE VEHICLE 

 We recommend a fi lter on the route and a fi lter around the vehicle of: 
   -   5 km or 10 km for a region with heavy traffi c, 
  -   20 km for a region with a normal level of traffi c, 
  -   100 km for long journeys (motorway).  

 Press the MENU button. 

 Turn the dial and select the 

TRAFFIC INFORMATION function. 

 Press the dial to confi rm the selection. 

FILTER TRAFFIC INFORMATION

 Turn the dial and select the 

FILTER TRAFFIC INFORMATION 
function. 

 Press the dial to confi rm the 
selection. 

GEOGRAPHIC FILTER

 Select the GEOGRAPHIC FILTER 

function and press the dial to confi rm. 

 Turn the dial and select 

the ON THE ROUTE tab. 

OK

       TRAFFIC INFORMATION 

 Select OK and press the dial to 

confi rm.  


Content   ..  4  5  6  7   ..