RAM 5500 Chassis Cab (2017 year). Manual - part 9


  Index      RAM     RAM 5500 Chassis Cab (2017 year) - manual in english


Search            copyright infringement  


Content      ..     7      8      9      10     ..


RAM 5500 Chassis Cab (2017 year). Manual - part 9


2. Turn the headlight switch to the AUTO headlight posi-

tion.

3. Push the multifunction lever away from you (toward

front of vehicle) to engage the high beam mode.

NOTE:

This system will not activate until the vehicle is at

or above 20 mph (32 km/h).

To Deactivate

1. Pull the multifunction lever toward you (or rearward in

vehicle) to manually deactivate the system (normal
operation of low beams).

2. Push back on the multifunction lever to reactivate the

system.

Parking Lights And Panel Lights

To turn on the parking lights and instrument panel
lights, rotate the headlight switch clockwise. To turn

off the parking lights, rotate the headlight switch back to
the O (Off) position.

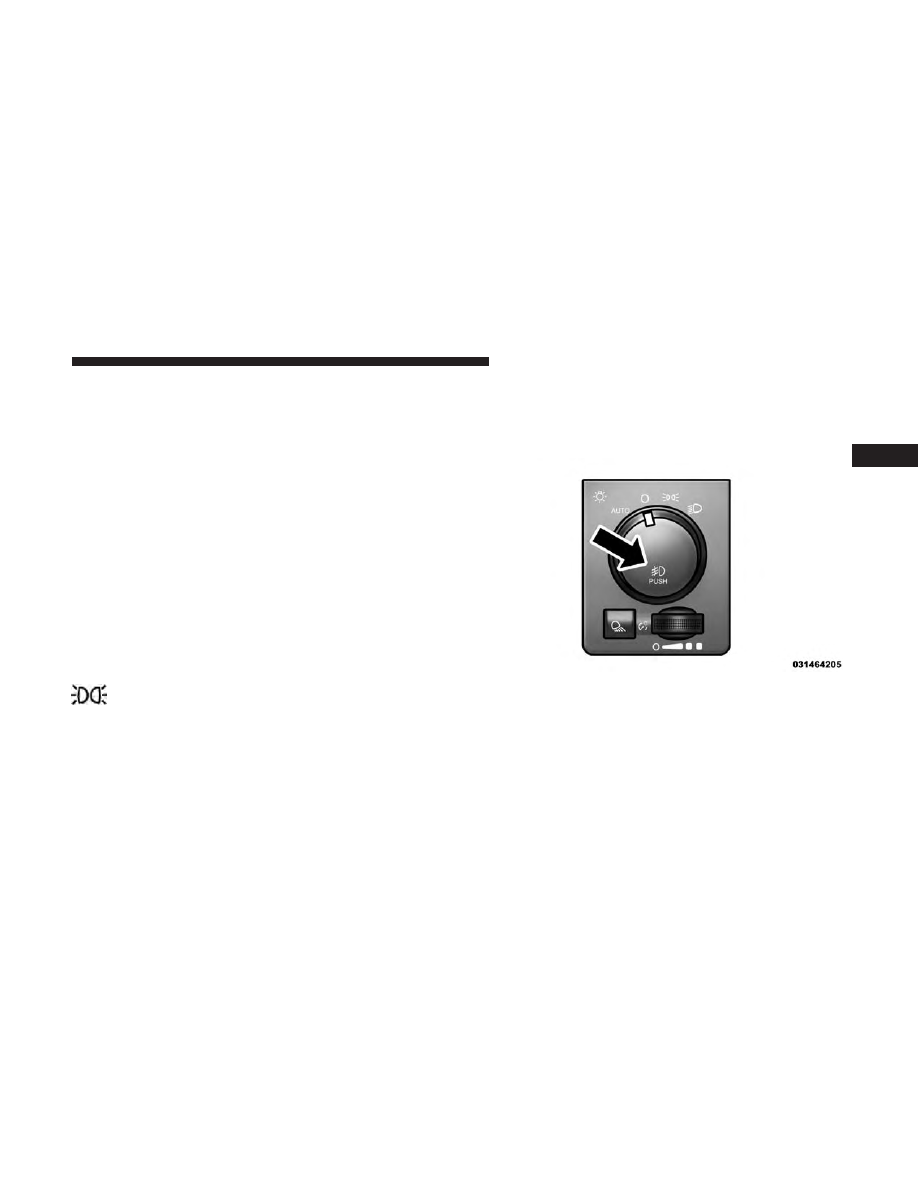
Fog Lights — If Equipped

The fog lights are turned on by rotating the headlight
switch to the parking light or headlight position and
pushing in the headlight rotary control.

The fog lights will operate only when the parking lights are
on or when the vehicle headlights are on low beam. An
indicator light located in the instrument cluster display
will illuminate when the fog lights are on. The fog lights
will turn off when the switch is pushed a second time,
when the headlight switch is rotated to the off position, or
the high beam is selected.

Fog Light Switch

3

UNDERSTANDING THE FEATURES OF YOUR VEHICLE

133

-------------------------------------------------------------------------------------------------------------------------------------------------------------

Lights-On Reminder

If the headlights, parking lights, or cargo lights are left on
after the ignition is turned OFF, a chime will sound when
the driver’s door is opened.

Battery Saver

To protect the life of your vehicle’s battery, load shedding
is provided for both the interior and exterior lights.

If the ignition is OFF and any door is left ajar for 10 minutes
or the dimmer control is rotated all the way up to the dome
ON position for 10 minutes, the interior lights will auto-
matically turn off.

NOTE:

Battery saver mode is cancelled if the ignition is

ON.

If the headlights remain on while the ignition is cycled OFF,
the exterior lights will automatically turn off after eight
minutes. If the headlights are turned on and left on for
eight minutes while the ignition is OFF, the exterior lights
will automatically turn off.

Interior Lights

Courtesy and dome lights are turned on when the front
doors are opened, when the dimmer control (rotating

wheel on the bottom of the switch) is rotated to the far right
detent position. If your vehicle is equipped with Remote
Keyless Entry and the UNLOCK button is pushed on the
key fob the courtesy and dome lights will turn on. When a
door is open and the interior lights are on, rotating the
dimmer control all the way left, to the OFF detent, will
cause all the interior lights to go out. This is also known as
the

⬙Party⬙ mode because it allows the doors to stay open

for extended periods of time without discharging the
vehicle’s battery.

The brightness of the instrument panel as well as the
ambient lighting can be regulated by rotating the dimmer
control right (brighter) or left (dimmer). When the head-
lights are on you can supplement the brightness of the
odometer, trip odometer, radio and overhead console by
rotating the control to the right until you hear a click. This
feature is termed the “Parade” mode and is useful when
headlights are required during the day.

134

UNDERSTANDING THE FEATURES OF YOUR VEHICLE

-------------------------------------------------------------------------------------------------------------------------------------------------------------

NOTE:

If your vehicle is equipped with a touchscreen, the

dimming of the touchscreen is programmable through the
Uconnect system. Refer to “Uconnect Settings ” in “Under-
standing Your Instrument Panel” for further details.

Courtesy/Reading Lights

Both lights in the overhead console and rear passenger
compartment will illuminate as courtesy lights when a
door is opened, when the dimmer control is rotated to the
courtesy light position (full right position), or when the
UNLOCK button is pushed on the Remote Keyless Entry

key fob, if equipped. These lights are also operated indi-
vidually as reading lights by pushing on the corresponding
lens.

Dimmer Control

Front Courtesy/Reading Lights

3

UNDERSTANDING THE FEATURES OF YOUR VEHICLE

135

-------------------------------------------------------------------------------------------------------------------------------------------------------------

NOTE:

The courtesy/reading lights will remain on until

the switch is pushed a second time, so be sure they have
been turned off before leaving the vehicle. If the interior
lights are left on after the ignition is turned OFF, they will
automatically turn off after 15 minutes.

Ambient Light

The overhead console is equipped with an ambient light
feature. This light casts illumination for improved visibility
of the floor console area.

Rear Passenger Courtesy/Reading Light

Ambient Light

136

UNDERSTANDING THE FEATURES OF YOUR VEHICLE

-------------------------------------------------------------------------------------------------------------------------------------------------------------

Cargo Light

The cargo light is turned on by pushing on the cargo light
button.

The cargo light will also turn on for approximately 60
seconds when a key fob UNLOCK button is pushed, as
part of the Illuminated Entry feature.

Multifunction Lever

The multifunction lever is located on the left side of the
steering column.

Turn Signals

Move the multifunction lever up or down and the arrows
on each side of the instrument cluster display will flash to
show proper operation of the front and rear turn signal
lights.

NOTE:

If either light remains on and does not flash, or

there is a very fast flash rate, check for a defective outside
light bulb. If an indicator fails to light when the lever is
moved, it would suggest that the indicator bulb is defec-
tive.

Cargo Light Button

Turn Signal Lever

3

UNDERSTANDING THE FEATURES OF YOUR VEHICLE

137

-------------------------------------------------------------------------------------------------------------------------------------------------------------

Lane Change Assist

Tap the lever up or down once, without moving beyond
the detent, and the turn signal (right or left) will flash three
times then automatically turn off.

Flash-To-Pass

You can signal another vehicle with your headlights by
partially pulling the multifunction lever toward the steer-
ing wheel. This will cause the high beam headlights to turn
on until the lever is released.

High/Low Beam Switch

Push the multifunction lever toward the instrument panel
to switch the headlights to high beam. Pulling the multi-
function lever back toward the steering wheel will turn the
low beams back on, or shut the high beams off.

WINDSHIELD WIPERS AND WASHERS

Windshield Wipers

The wipers and washers are operated by a switch in the
multifunction lever. Turn the end of the handle to select the
desired wiper speed.

High/Low Beam Switch

138

UNDERSTANDING THE FEATURES OF YOUR VEHICLE

-------------------------------------------------------------------------------------------------------------------------------------------------------------

Windshield Wiper Operation

Rotate the end of the lever upward, to the first detent past
the intermittent settings for low-speed wiper operation.
Rotate the end of the lever upward to the second detent
past the intermittent settings for high-speed wiper opera-
tion.

Intermittent Wiper System

The intermittent feature of this system was designed for
use when weather conditions make a single wiping cycle,

with a variable pause between cycles, desirable. For maxi-
mum delay between cycles, rotate the control knob into the
upper end of the delay range.

The delay interval decreases as you rotate the knob until it
enters the low continual speed position. The delay can be
regulated from a maximum of about 18 seconds between
cycles, to a cycle every one second. The delay intervals will
double in duration when the vehicle speed is 10 mph
(16 km/h) or less.

Windshield Washers

To use the windshield washer, push the washer knob,
located on the end of the multifunction lever, inward to the
second detent. Washer fluid will be sprayed and the wiper
will operate for two to three cycles after the washer knob is
released from this position.

If the washer knob is depressed while in the delay range,
the wiper will operate for several seconds after the washer
knob is released. It will then resume the intermittent
interval previously selected. If the washer knob is pushed
while in the off position, the wiper will turn on and cycle
approximately three times after the wash knob is released.

To prevent freeze-up of your windshield washer system in
cold weather, select a solution or mixture that meets or

Windshield Wiper/Washer Switch

3

UNDERSTANDING THE FEATURES OF YOUR VEHICLE

139

-------------------------------------------------------------------------------------------------------------------------------------------------------------

exceeds the temperature range of your climate. This rating
information can be found on most washer fluid containers.

WARNING!

Sudden loss of visibility through the windshield could
lead to a collision. You might not see other vehicles or
other obstacles. To avoid sudden icing of the wind-
shield during freezing weather, warm the windshield
with the defroster before and during windshield
washer use.

Mist Feature

When a single wipe to clear off road mist or spray from a
passing vehicle is needed, push the washer knob, located
on the end of the multifunction lever, inward to the first
detent and release. The wipers will cycle one time and
automatically shut off.

NOTE:

The mist feature does not activate the washer

pump; therefore, no washer fluid will be sprayed on the
windshield. The wash function must be used in order to
spray the windshield with washer fluid.

Rain Sensing Wipers — If Equipped

This feature senses moisture on the windshield and auto-
matically activates the wipers for the driver. The feature is
especially useful for road splash or overspray from the
windshield washers of the vehicle ahead. Rotate the end of
the multifunction lever to one of five settings to activate
this feature.

NOTE:

If your vehicle is equipped with a touchscreen, this

feature can be programmed through the Uconnect system.
Refer to “Uconnect Settings” in “Understanding Your
Instrument Panel” for further information.

If your vehicle is not equipped with a touchscreen, this
feature can be programmed through the instrument cluster
display. Refer to “Instrument Cluster Display” in “Under-
standing Your Instrument Panel” for further information.

The sensitivity of the system can be adjusted with the
multifunction lever. Wiper delay position 1 is the least
sensitive, and wiper delay position 5 is the most sensitive.
Setting 3 should be used for normal rain conditions.
Settings 1 and 2 can be used if the driver desires less wiper
sensitivity. Setting 4 and 5 can be used if the driver desires
more sensitivity. Place the wiper switch in the OFF position
when not using the system.

140

UNDERSTANDING THE FEATURES OF YOUR VEHICLE

-------------------------------------------------------------------------------------------------------------------------------------------------------------

NOTE:

• The Rain Sensing feature will not operate when the

wiper switch is in the low or high-speed position.

• The Rain Sensing feature may not function properly

when ice, or dried salt water is present on the wind-
shield.

• Use of Rain-X or products containing wax or silicone

may reduce Rain Sensing performance.

The Rain Sensing system has protection features for the
wiper blades and arms, and will not operate under the
following conditions:

• Low Ambient Temperature — When the ignition is first

turned ON, the Rain Sensing system will not operate
until the wiper switch is moved, vehicle speed is greater
than 0 mph (0 km/h), or the outside temperature is
greater than 32°F (0°C).

• Transmission In NEUTRAL Position — When the igni-

tion is ON, and the transmission is in the NEUTRAL
position, the Rain Sensing system will not operate until
the wiper switch is moved, vehicle speed is greater than
5 mph (8 km/h), or the gear selector is moved out of the
NEUTRAL position.

• Remote Start Mode Inhibit — On vehicles equipped

with Remote Starting system, Rain Sensing wipers are
not operational when the vehicle is in the remote start
mode. Once the operator is in the vehicle and has placed
the ignition switch in the RUN position, rain sensing
wiper operation can resume, if it has been selected, and
no other inhibit conditions (mentioned previously) exist.

3

UNDERSTANDING THE FEATURES OF YOUR VEHICLE

141

-------------------------------------------------------------------------------------------------------------------------------------------------------------

TILT STEERING COLUMN

This feature allows you to tilt the steering column upward
or downward. The tilt lever is located on the steering
column, below the multifunction lever.

Pull the lever toward the steering wheel to unlock the
steering column. With one hand firmly on the steering
wheel, move the steering column up or down, as desired.
Release the lever to lock the steering column firmly in
place.

WARNING!

Do not adjust the steering column while driving.
Adjusting the steering column while driving or driv-
ing with the steering column unlocked, could cause the
driver to lose control of the vehicle. Failure to follow
this warning may result in serious injury or death.

DRIVER ADJUSTABLE PEDALS — IF EQUIPPED

The adjustable pedals system is designed to allow a greater
range of driver comfort for steering wheel tilt and seat
position. This feature allows the brake, accelerator, and
clutch pedals (if equipped) to move toward or away from
the driver to provide improved position with the steering
wheel.

The adjustable pedal switch is located to the left side of the
steering column.

Tilt Steering Lever

142

UNDERSTANDING THE FEATURES OF YOUR VEHICLE

-------------------------------------------------------------------------------------------------------------------------------------------------------------

• The pedals can be adjusted with the ignition OFF.
• The pedals cannot be adjusted when the vehicle is in

REVERSE or when the Electronic Speed Control System
is on. The following messages will appear on vehicles
equipped with an instrument cluster display if the
pedals are attempted to be adjusted when the system is
locked out (“Adjustable Pedal Disabled — Cruise Con-
trol Engaged” or “Adjustable Pedal Disabled — Vehicle
In Reverse”).

NOTE:

• Always adjust the pedals to a position that allows full

pedal travel.

• Further small adjustments may be necessary to find the

best possible seat/pedal position.

• For vehicles equipped with Driver Memory Seat, you

can use your Remote Keyless Entry key fob or the
memory switch on the driver’s door trim panel to return
the adjustable pedals to pre-programmed positions. Re-
fer to “Driver Memory Seat” in “Understanding The
Features Of Your Vehicle” for further information.

WARNING!

Do not adjust the pedals while the vehicle is moving.
You could lose control and have an accident. Always
adjust the pedals while the vehicle is parked.

CAUTION!

Do not place any article under the adjustable pedals or
impede its ability to move as it may cause damage to
the pedal controls. Pedal travel may become limited if

(Continued)

Adjustable Pedals Switch

3

UNDERSTANDING THE FEATURES OF YOUR VEHICLE

143

-------------------------------------------------------------------------------------------------------------------------------------------------------------

CAUTION! (Continued)

movement is stopped by an obstruction in the adjust-
able pedal’s path.

HEATED STEERING WHEEL — IF EQUIPPED

The steering wheel contains a heating element that helps
warm your hands in cold weather. The heated steering
wheel has only one temperature setting. Once the heated
steering wheel has been turned on it will operate for up to
95 minutes before automatically shutting off. The heated
steering wheel can shut off early or may not turn on when
the steering wheel is already warm.

The heated steering wheel control button is located on the
center of the instrument panel below the climate controls.

If your vehicle is equipped with a touchscreen, the heated
steering wheel control button is located within the climate
or controls screen of the touchscreen.

• Press the heated steering wheel button

once to turn

the heating element On.

• Press the heated steering wheel button

a second time

to turn the heating element Off.

NOTE:

The engine must be running for the heated steering

wheel to operate.

Vehicles Equipped With Remote Start

On models that are equipped with remote start, the heated
steering wheel can be programmed to come on during a
remote start.

If your vehicle is equipped with a touchscreen, this feature
can be programmed through the Uconnect system. Refer to
“Uconnect Settings” in “Understanding Your Instrument
Panel” for further information.

If your vehicle is not equipped with a touchscreen, this
feature can be programmed through the instrument cluster
display. Refer to “Instrument Cluster Display” in “Under-
standing Your Instrument Panel” for further information.

WARNING!

• Persons who are unable to feel pain to the skin

because of advanced age, chronic illness, diabetes,
spinal cord injury, medication, alcohol use, exhaus-
tion, or other physical conditions must exercise care
when using the steering wheel heater. It may cause

(Continued)

144

UNDERSTANDING THE FEATURES OF YOUR VEHICLE

-------------------------------------------------------------------------------------------------------------------------------------------------------------

WARNING! (Continued)

burns even at low temperatures, especially if used
for long periods.

• Do not place anything on the steering wheel that

insulates against heat, such as a blanket or steering
wheel covers of any type and material. This may
cause the steering wheel heater to overheat.

ELECTRONIC SPEED CONTROL

When engaged, the Electronic Speed Control takes over
accelerator operations at speeds greater than 25 mph
(40 km/h).

The Electronic Speed Control buttons are located on the
right side of the steering wheel.

NOTE:

In order to ensure proper operation, the Electronic

Speed Control System has been designed to shut down if
multiple speed control functions are operated at the same
time. If this occurs, the Electronic Speed Control System
can be reactivated by pushing the Electronic Speed Control
ON/OFF button and resetting the desired vehicle set
speed.

Electronic Speed Control Switches

1 — ON/OFF

3 — SET -

2 — RES +

4 — CANCEL

3

UNDERSTANDING THE FEATURES OF YOUR VEHICLE

145

-------------------------------------------------------------------------------------------------------------------------------------------------------------

To Activate

Push the ON/OFF button. The Cruise Control Set Indicator
Light in the instrument cluster display will illuminate. To
turn the system off, push the ON/OFF button a second
time. The Cruise Control Set Indicator Light will turn off.
The system should be turned off when not in use.

WARNING!

Leaving the Electronic Speed Control system on when
not in use is dangerous. You could accidentally set the
system or cause it to go faster than you want. You could
lose control and have an accident. Always leave the
system OFF when you are not using it.

To Set A Desired Speed

Turn the Electronic Speed Control ON. When the vehicle
has reached the desired speed, push the SET (-) button and
release. Release the accelerator and the vehicle will operate
at the selected speed.

NOTE:

The vehicle should be traveling at a steady speed

and on level ground before pushing the SET (-) button.

To Deactivate

A soft tap on the brake pedal, pushing the CANCEL
button, or normal brake pressure while slowing the vehicle
will deactivate the Electronic Speed Control without eras-
ing the set speed from memory.

Pushing the ON/OFF button or turning the ignition to the
OFF position erases the set speed from memory.

To Resume Speed

To resume a previously set speed, push the RES (+) button
and release. Resume can be used at any speed above
25 mph (40 km/h).

To Vary The Speed Setting

To Increase Speed

When the Electronic Speed Control is set, you can increase
speed by pushing the RES (+) button.

The drivers preferred units can be selected through the
instrument panel settings if equipped. Refer to “Getting To
Know Your Instrument Panel” for more information. The
speed increment shown is dependant on the chosen speed
unit of U.S. (mph) or Metric (km/h):

146

UNDERSTANDING THE FEATURES OF YOUR VEHICLE

-------------------------------------------------------------------------------------------------------------------------------------------------------------

U.S. Speed (mph)

• Pushing the RES (+) button once will result in a 1 mph

increase in set speed. Each subsequent tap of the button
results in an increase of 1 mph.

• If the button is continually pushed, the set speed will

continue to increase until the button is released, then the
new set speed will be established.

Metric Speed (km/h)

• Pushing the RES (+) button once will result in a 1 km/h

increase in set speed. Each subsequent tap of the button
results in an increase of 1 km/h.

• If the button is continually pushed, the set speed will

continue to increase until the button is released, then the
new set speed will be established.

To Decrease Speed

When the Electronic Speed Control is set, you can decrease
speed by pushing the SET (-) button.

The drivers preferred units can be selected through the
instrument panel settings if equipped. Refer to “Getting To
Know Your Instrument Panel” for more information. The
speed decrement shown is dependant on the chosen speed
unit of U.S. (mph) or Metric (km/h):

U.S. Speed (mph)

• Pushing the SET (-) button once will result in a 1 mph

decrease in set speed. Each subsequent tap of the button
results in a decrease of 1 mph.

• If the button is continually pushed, the set speed will

continue to decrease until the button is released, then the
new set speed will be established.

Metric Speed (km/h)

• Pushing the SET (-) button once will result in a 1 km/h

decrease in set speed. Each subsequent tap of the button
results in a decrease of 1 km/h.

• If the button is continually pushed, the set speed will

continue to decrease until the button is released, then the
new set speed will be established.

To Accelerate For Passing

Press the accelerator as you would normally. When the
pedal is released, the vehicle will return to the set speed.

Using Electronic Speed Control On Hills

The transmission may downshift on hills to maintain the
vehicle set speed.

3

UNDERSTANDING THE FEATURES OF YOUR VEHICLE

147

-------------------------------------------------------------------------------------------------------------------------------------------------------------

NOTE:

The Electronic Speed Control system maintains

speed up and down hills. A slight speed change on
moderate hills is normal.

On steep hills, a greater speed loss or gain may occur so it
may be preferable to drive without Electronic Speed Con-
trol.

WARNING!

Electronic Speed Control can be dangerous where the
system cannot maintain a constant speed. Your vehicle
could go too fast for the conditions, and you could lose
control and have an accident. Do not use Electronic
Speed Control in heavy traffic or on roads that are
winding, icy, snow-covered or slippery.

PARKSENSE REAR PARK ASSIST — IF EQUIPPED

The ParkSense Rear Park Assist system provides visual and
audible indications of the distance between the rear fascia
and a detected obstacle when backing up, e.g. during a
parking maneuver. Refer to “ParkSense System Usage
Precautions” in this section for limitations of this system
and recommendations.

ParkSense will retain the last system state (enabled or
disabled) from the last ignition cycle when the ignition is
changed to the ON/RUN position.

ParkSense can be active only when the gear selector is in
REVERSE. If ParkSense is enabled at this gear selector
position, the system will remain active until the vehicle
speed is increased to approximately 7 mph (11 km/h) or
above. When in REVERSE and above the system’s operat-
ing speed, a warning will appear within the instrument
cluster display indicating the vehicle speed is too fast. The
system will become active again if the vehicle speed is
decreased to speeds less than approximately 6 mph
(9 km/h).

ParkSense Sensors

For the 3500, 4500 and 5500 Chassis Cab vehicles, the rear
ParkSense sensors are shipped loose. Please Refer to the
Ram Body Builders Guide for more information.

The four ParkSense sensors, located in the rear fascia/
bumper, monitor the area behind the vehicle that is within
the sensors’ field of view. The sensors can detect obstacles
from approximately 18 in (45 cm) up to 79 in (200 cm) from
the rear fascia/bumper in the horizontal direction, depend-
ing on the location, type and orientation of the obstacle.

148

UNDERSTANDING THE FEATURES OF YOUR VEHICLE

-------------------------------------------------------------------------------------------------------------------------------------------------------------


Content      ..     7      8      9      10     ..