Chrysler Town & Country (2016 year). Manual - part 29


  Index      Chrysler     Chrysler Town & Country (2016 year) - manual in english


Search            copyright infringement  


Content      ..     27      28      29      30     ..


Chrysler Town & Country (2016 year). Manual - part 29


Manual Heating And Air Conditioning System —
If Equipped

The controls for the manual system in this vehicle contain
a series of outer rotary dials and inner push knobs. These
comfort controls can be set to obtain desired interior
conditions.

With the Three-Zone Temperature Control system, each
front seat occupant can independently control the Heat-
ing, Ventilation and Air Conditioning operations coming
from the outlets on their side of the vehicle.

The primary control for the rear blower is on the front
climate control unit located on the instrument panel.
When the front control is in any position other than rear,
the front control operates all the rear functions.

The rear airflow modes will mirror the front unit opera-
tion. Rear Panel mode is automatically selected when the
front control is in the Panel mode. When the front unit is
in Bi-Level mode, airflow will be emitted from both the

upper and lower rear outlets. When the front control is in
Floor, Defrost, or Mix modes, airflow will be directed out
of the rear floor outlets.

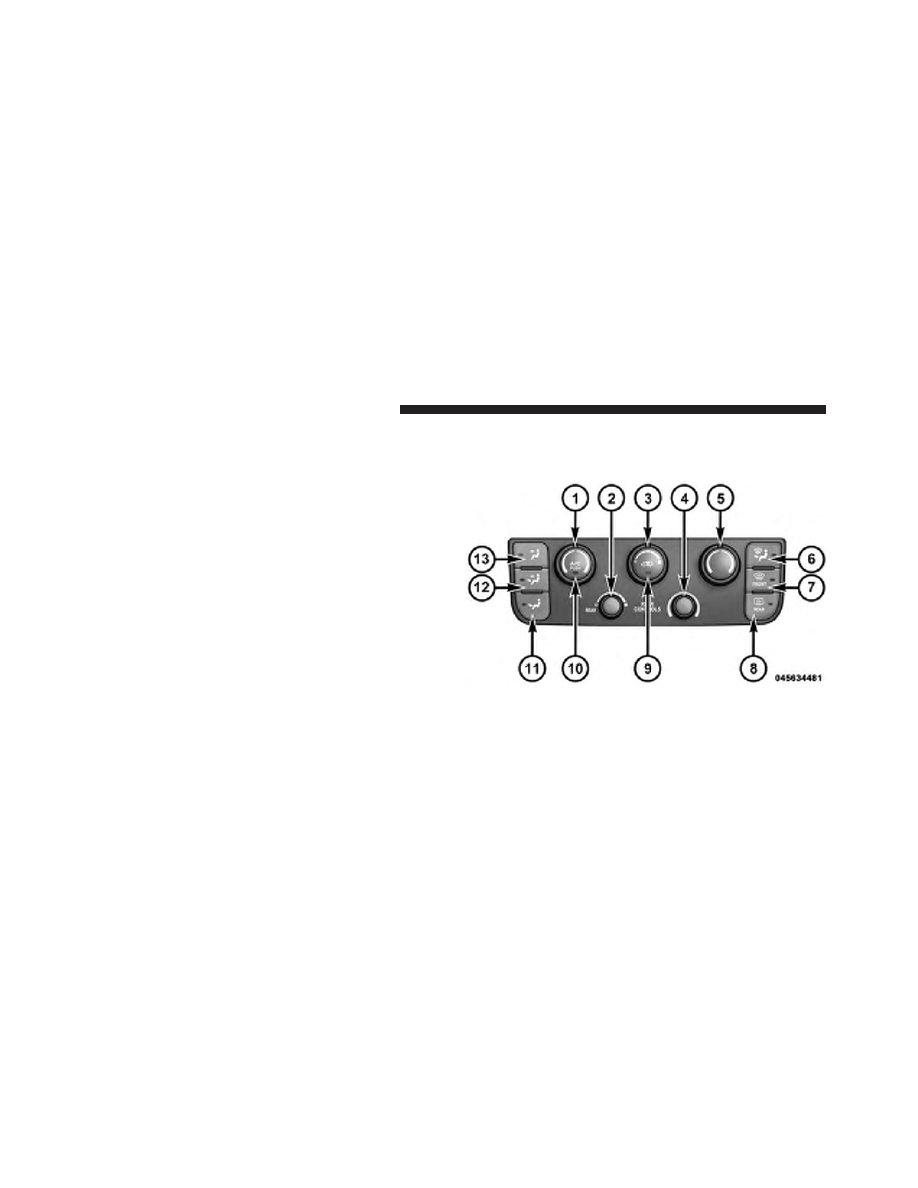
Manual Temperature Controls

460

UNDERSTANDING YOUR INSTRUMENT PANEL

-------------------------------------------------------------------------------------------------------------------------------------------------------------

1. Left Front Temperature Control

Provides left front seat occupant with independent tem-
perature control. Turn left for cooler or right for warmer
temperature settings.

2. Rear Blower Control — If Equipped

Use this control to regulate the amount of air forced
through the rear system in any mode you select. The rear
blower speed increases as you move the control to the
right from the “O” (Off) position. There are seven blower
speeds. To allow the rear overhead control, turn blower
knob fully to the left, past The

⬙O⬙ off position into the

“REAR” control position.

3. Front Blower Control

Use this control to regulate the amount of air forced
through the system in any mode you select. The blower
speed increases as you move the control to the right from
the “O” (Off) position. There are seven blower speeds.

4. Rear Temperature Control — If Equipped

Provides temperature control for the rear cabin. Turn left
for cooler or right for warmer temperature settings in the
rear cabin.

5. Right Front Temperature Control

Provides right front seat occupant with independent
temperature control. Turn left for cooler or right for
warmer temperature settings.

6. Mix Mode

Air is directed through the floor, defrost and side
window demist outlets. This setting works best in

cold or snowy conditions that require extra heat at the
windshield. This setting is good for maintaining comfort,
while reducing moisture on the windshield.

4

UNDERSTANDING YOUR INSTRUMENT PANEL

461

-------------------------------------------------------------------------------------------------------------------------------------------------------------

7. Front Defrost Mode

Air is directed through the windshield and side
window demist outlets. Use Defrost mode with

maximum blower and temperature settings for best
windshield and side window defrosting.

NOTE:

The air conditioning compressor may operate in

Mix and Defrost, even if the A/C button is not pushed.
This dehumidifies the air to help dry the windshield. To
improve fuel economy, use these modes only when
necessary.

8. Electronic Rear Window Defrost

Push this button to turn on the rear window
defroster and the heated outside mirrors (if

equipped). An indicator in the button will illuminate
when the rear window defroster is on. The rear window
defroster automatically turns off after approximately 10
minutes.

NOTE:

• You can turn off the heated mirror feature at anytime

by pushing the rear window defroster switch a
second time.

• To prevent excessive battery drain, use the rear

window defroster only when the engine is operating.

CAUTION!

Failure to follow these cautions can cause damage to
the heating elements:
• Use care when washing the inside of the rear

window. Do not use abrasive window cleaners on
the interior surface of the window. Use a soft cloth
and a mild washing solution, wiping parallel to the
heating elements. Labels can be peeled off after
soaking with warm water.

(Continued)

462

UNDERSTANDING YOUR INSTRUMENT PANEL

-------------------------------------------------------------------------------------------------------------------------------------------------------------

CAUTION! (Continued)

• Do not use scrapers, sharp instruments, or abrasive

window cleaners on the interior surface of the
window.

• Keep all objects a safe distance from the window.

9. Recirculation Control Button

Push this button to choose between outside air
intake or recirculation of the air inside the
vehicle. An indicator light will illuminate when
you are in Recirculation mode. Only use the

Recirculation mode to temporarily block out any outside
odors, smoke, or dust, and to cool the interior rapidly
upon initial start-up in very hot or humid weather.

NOTE:

• If the Recirculation button is pushed when the

system is in Defrost mode the Recirculation LED
indicator will flash three times to indicate Recircula-
tion mode is not allowed.

• Continuous use of the Recirculation mode may make

the inside air stuffy and window fogging may occur.
Extended use of this mode is not recommended.

• In cold or damp weather, the use of the Recirculation

mode will cause windows to fog on the inside
because of moisture buildup inside the vehicle. For
maximum defogging, select the outside air position.

• In order to prevent fogging, when the Recirculation

button is pushed and the mode control is set to
Panel, the A/C will engage automatically.

• The A/C can be deselected manually without dis-

turbing the mode control selection.

4

UNDERSTANDING YOUR INSTRUMENT PANEL

463

-------------------------------------------------------------------------------------------------------------------------------------------------------------

10. Air Conditioning (A/C) Button

Push and release to change the current setting.
The indicator illuminates when ON.

NOTE:

If your air conditioning performance seems

lower than expected, check the front of the A/C con-
denser (located in front of the radiator), for an accumu-
lation of dirt or insects. Clean with a gentle water spray
from behind the radiator and through the condenser.
Fabric front fascia protectors may reduce airflow to the
condenser, reducing air conditioning performance.

11. Floor Mode Button

Air is directed through the floor outlets with a
small amount through the defrost and side win-

dow demist outlets.

12. Bi-Level Mode Button

Air is directed through the panel and floor outlets.

NOTE:

There is a difference in temperature (in

any conditions other than full cold or full hot), between
the upper and lower outlets for added comfort. The
warmer air goes to the floor outlets. This feature gives
improved comfort during sunny but cool conditions.

13. Panel Mode Button

Air is directed through the outlets in the instru-
ment panel. These outlets can be adjusted for

direction, and turned on or off to control airflow.

NOTE:

For maximum airflow to the rear, the center

instrument panel outlets can be directed toward the rear
seat passengers.

464

UNDERSTANDING YOUR INSTRUMENT PANEL

-------------------------------------------------------------------------------------------------------------------------------------------------------------

Economy Mode

If ECONOMY mode is desired, push the A/C button to
turn off the indicator light and the A/C compressor.
Rotate the temperature control knob to the desired tem-
perature. Also, make sure to select only Panel, Bi-Level or
Floor modes.

Max A/C

For maximum cooling use the A/C and Recirculation
mode buttons at the same time.

Rear Manual Climate Control — If Equipped

The Rear Manual Climate Control system has floor air
outlets at the rear of the right side sliding door, and
overhead outlets at each outboard rear seating position.
The unit provides warm or cool air through the floor and
upper outlets.

The rear blower and temperature controls for the rear
seat passengers are located in the headliner, near the
center of the vehicle.

Rear Manual Climate Controls

1 — Rear Blower

3 — Rear Mode

2 — Rear Temperature

4 — Rear Climate Control Lock

4

UNDERSTANDING YOUR INSTRUMENT PANEL

465

-------------------------------------------------------------------------------------------------------------------------------------------------------------

Rear Blower Control

The rear blower control knob can be manually set to off,
or any fixed blower speed, by rotating the knob from low
to high. This allows the rear seat occupants to control the
volume of air circulated in the rear of the vehicle.

CAUTION!

Interior air enters the Rear Automatic Temperature
Control System through an intake grille, located in
the right side trim panel behind the third row seats.
The heater outlets are located in the right side trim
panel, just behind the sliding door. Do not block or
place objects directly in front of the inlet grille or
heater outlets. The electrical system could overload
causing damage to the blower motor.

Rear Temperature Control

To change the temperature in the rear of the vehicle,
rotate the temperature knob counterclockwise to lower
the temperature, and clockwise to increase the tempera-
ture. The rear temperature settings are displayed in the
front ATC panel.

When rear controls are locked by the front system, the
Rear Temperature Lock symbol on the temperature knob
is illuminated and any rear overhead adjustments are
ignored.

Rear Mode Control

Headliner Mode

Air comes from the outlets in the headliner. Each
of these outlets can be individually adjusted to

direct the flow of air. Moving the air vanes of the outlets
to one side will shut off the airflow.

466

UNDERSTANDING YOUR INSTRUMENT PANEL

-------------------------------------------------------------------------------------------------------------------------------------------------------------

Bi-Level Mode

Air comes from both the headliner outlets and the
floor outlets.

NOTE:

In many temperature positions, the Bi-Level

mode is designed to provide cooler air out of the head-
liner outlets and warmer air from the floor outlets.

Floor Mode

Air comes from the floor outlets.

Automatic Temperature Control (ATC) — If
Equipped

• Front Three-Zone ATC allows both driver and front

passenger seat occupant, and rear seat occupants to
select individual comfort settings.

• When occupants in the vehicle select the AUTO mode

operation, a comfort temperature can be set by using
the temperature up and down buttons, and the auto
blower operation will be set automatically.

• The system can be controlled manually, if desired.
• SYNC feature links the controls for all three zones,

allowing one comfort setting (driver setting) for the
cabin, if desired.

The Three-Zone ATC system automatically maintains the
interior comfort level desired by the driver and all
passengers. The system automatically adjusts the air
temperature, the airflow volume, amount of outside air
recirculation and the airflow direction. This maintains a
comfortable temperature, even under changing condi-
tions.

4

UNDERSTANDING YOUR INSTRUMENT PANEL

467

-------------------------------------------------------------------------------------------------------------------------------------------------------------

1. Air Conditioning (A/C) Button

Push and release to change the current Air Conditioning
(A/C) setting, the indicator illuminates when A/C is ON.
Performing this function will cause the ATC to switch
into manual mode.

2. Blower Control Display

This display shows the current Blower speed selection.

3. Left Front Seat Occupant Temperature Display

This display shows the temperature setting for the left
front seat occupant.

4. Mode Display

This display shows the current Mode selection (Panel,
Bi-Level, Floor, Mix).

5. Rear Temperature Control Display

This display shows the current Rear Temperature Control
settings.

6. Front Auto Indicator

This indicates when the system is in Front Auto mode.

Front ATC Panel

468

UNDERSTANDING YOUR INSTRUMENT PANEL

-------------------------------------------------------------------------------------------------------------------------------------------------------------

7. Auto Indicator

This indicates when the system is in Auto mode.

8. Right Front Seat Occupant Temperature Display

This display shows the temperature setting for the right
front seat occupant.

9. Front Defrost Button

Push and release to change the current setting, the
indicator illuminates when ON. Performing this function
will cause the ATC to switch into manual mode. The
blower will engage immediately if the Defrost mode is
selected.

10. Passenger Temperature Control Up/Down Button

Provides the passenger with independent temperature
control. Push the top button for warmer temperatures or
the lower button for cooler temperature settings.

11. Rear Control Button

Provides toggle operation between front control screen
and rear control screen. Push the button to activate the
rear climate control screen and allow the front seat
occupants control over the rear climate settings.

12. Rear Window Defrost

Push this button to turn on the rear window defroster
and the heated outside mirrors (if equipped). An indica-
tor in the button will illuminate when the rear window
defroster is on. The rear window defroster automatically
turns off after approximately 10 minutes.

13. Rear Lock

Push and release the Rear Lock button on the front ATC
panel to lock and unlock the rear climate controls.

4

UNDERSTANDING YOUR INSTRUMENT PANEL

469

-------------------------------------------------------------------------------------------------------------------------------------------------------------

14. Auto Temperature Control Button

Controls airflow temperature, distribution, volume, and
the amount of air recirculation automatically. Push and
release to select. Refer to “Automatic Operation” for
more information. Performing this function will cause
the ATC to switch between manual mode and automatic
modes.

15. Climate Control OFF Button

Push and release to turn the Climate Control OFF. If the
control is OFF, push any button to turn the control ON.

16. Blower Control

There are seven blower speeds, the blower speed in-
creases as you move the control to the right from the
lowest blower setting. Performing this function will
cause the ATC to switch into manual mode.

17. Mode Control Button

Push and release to select between Modes (Panel, Bi-
Level, Floor, Mix). Performing this function will cause the
ATC to switch into manual mode.

18. Recirculation Control Button

Push and release to change the current setting, the
indicator illuminates when ON.

19. SYNC Button

Push and release to control the temperature setting for all
three zones from the driver temperature control.

20. Driver Temperature Control Up/Down Button

Provides the driver with independent temperature con-
trol. Push the top button for warmer temperatures or the
lower button for cooler temperature settings.

470

UNDERSTANDING YOUR INSTRUMENT PANEL

-------------------------------------------------------------------------------------------------------------------------------------------------------------

Automatic Temperature Control (ATC)

Automatic Operation

1. Push the AUTO button on the front ATC Panel and the

words Front Auto will illuminate in the front ATC
display, along with two temperatures for the driver
and front passenger. The system will then automati-
cally regulate the amount of airflow.

2. Next, adjust the temperature you would like the

system to maintain, by adjusting the driver, passenger,
and rear temperatures. Once the desired temperature
is displayed, the system will achieve and automati-
cally maintain that comfort level.

3. When the system is set up for your comfort level, it is

not necessary to change the settings. You will experi-
ence the greatest efficiency by simply allowing the
system to function automatically.

NOTE:

• It is not necessary to move the temperature settings.

The system automatically adjusts the temperature,
mode and fan speed to provide comfort as quickly as
possible.

• The temperature can be displayed in English or Metric

units by selecting the “Display Units of Measure in”
customer-programmable feature. Refer to the “Elec-
tronic Vehicle Information Center (EVIC) — Customer-
Programmable Features” in this Section.

To provide you with maximum comfort in the automatic
mode, during cold start-ups, the blower fan will remain
on low until the engine warms up. The fan will engage
immediately if the Defrost mode is selected, or by chang-
ing the front blower knob setting.

4

UNDERSTANDING YOUR INSTRUMENT PANEL

471

-------------------------------------------------------------------------------------------------------------------------------------------------------------

Manual Operation Override

This system offers a full complement of manual override
features. The AUTO symbol in the front ATC display will
be turned off when the system is being used in the
manual mode.

NOTE:

The system will not automatically sense the

presence of fog, mist or ice on the windshield. DEFROST
mode must be manually selected to clear the windshield
and side glass.

Air Conditioning (A/C)

The Air Conditioning (A/C) button allows the operator
to manually activate or deactivate the air conditioning
system. When in A/C mode with the ATC set to a cool
temperature, dehumidified air flows through the air
outlets. If Economy mode is desired, push the A/C
button to turn off the A/C mode in the ATC display and
deactivate the A/C system.

NOTE:

• If the system is in Mix or Defrost Mode, the A/C can

be turned off, but the A/C system shall remain active
to prevent fogging of the windows.

• If not operating in AUTO mode, the system will not

automatically sense the presence of fog, mist or ice on
the windshield. DEFROST mode must be manually
selected to clear the windshield and side glass.

• If fog or mist appears on the windshield or side glass,

select Defrost mode and adjust blower speed if
needed.

472

UNDERSTANDING YOUR INSTRUMENT PANEL

-------------------------------------------------------------------------------------------------------------------------------------------------------------

Controlling The Rear Climate Controls From The
Front ATC Panel

The Three-Zone ATC system allows for adjustment of the
rear climate controls from the front ATC panel.

To change the rear system settings:

• Push ⬙REAR⬙ button to change control to rear control

mode, Rear display (below) will appear. Control func-
tions now operate rear system.

• To return to Front screen, push ⬙REAR⬙ button again,

or it will revert to the Front screen after six seconds.

1. Mode Display

This display shows the current Mode selection.

2. Rear Temperature Display

This display shows the temperature setting for the rear
seat occupants.

Front ATC Panel Rear Control Display

4

UNDERSTANDING YOUR INSTRUMENT PANEL

473

-------------------------------------------------------------------------------------------------------------------------------------------------------------

3. Blower Control Display

This display shows the current Blower speed selection.

4. Rear Auto Indicator

This indicates when the system is in Rear Auto mode.

Rear Mode Control

Headliner Mode

Air comes from the outlets in the headliner. Each
of these outlets can be individually adjusted to

direct the flow of air. Moving the air vanes of the outlets
to one side will shut off the airflow.

Bi-Level Mode

Air comes from both the headliner outlets and the
floor outlets.

NOTE:

In many temperature positions, the Bi-Level

mode is designed to provide cooler air out of the head-
liner outlets and warmer air from the floor outlets.

Floor Mode

Air comes from the floor outlets.

Rear Automatic Temperature Control (ATC) — If
Equipped

The rear ATC system has floor air outlets at the rear of the
right side sliding door, and overhead outlets at each
outboard rear seating position. The system provides
heated air through the floor outlets or cool, dehumidified
air through the headliner outlets.

The rear system temperature control is on the front ATC
panel located on the instrument panel.

474

UNDERSTANDING YOUR INSTRUMENT PANEL

-------------------------------------------------------------------------------------------------------------------------------------------------------------

Pushing the Rear Temperature Lock button on the front
ATC panel, illuminates a lock symbol in the rear display.
The rear temperature and air source are controlled from
the front ATC panel.

Rear second row occupants can only adjust the rear ATC
control when the Rear Temperature Lock button is turned
off.

The rear ATC system is located in the headliner, near the
center of the vehicle.

1. Push the Rear Temperature Lock button on the front

ATC panel. This turns off the Rear Temperature Lock
icon in the rear temperature knob.

Rear ATC Control Features

1 — Blower Speed

3 — Rear Mode

2 — Rear Temperature

4 — Rear Temperature Lock

4

UNDERSTANDING YOUR INSTRUMENT PANEL

475

-------------------------------------------------------------------------------------------------------------------------------------------------------------


Content      ..     27      28      29      30     ..