Chrysler PT Cruiser. Manual - part 862
 

  Index      Chrysler     Chrysler PT Cruiser - service repair manual 2005 year


Search            


Content   ..  860  861  862  863   ..


Chrysler PT Cruiser. Manual - part 862


and is contaminated with metal or friction material
particles, a complete transaxle recondition is proba-
bly required. Be sure to examine the fluid on the dip-
stick closely. If there is any doubt about its condition,
drain out a sample for a double check.

Mopar

t ATF+4 (Automatic Transmission Fluid)

when new is red in color. The ATF is dyed red so it
can be identified from other fluids used in the vehicle
such as engine oil or antifreeze. The red color is not

permanent and is not an indicator of fluid condition.
As the vehicle is driven, the ATF will begin to look
darker in color and may eventually become brown.
This is normal. ATF+4 also has a unique odor that
may change with age. Consequently, odor and color
cannot be used to indicate the fluid condition
or the need for a fluid change.

After the fluid has been checked, seat the dipstick

fully to seal out water and dirt.

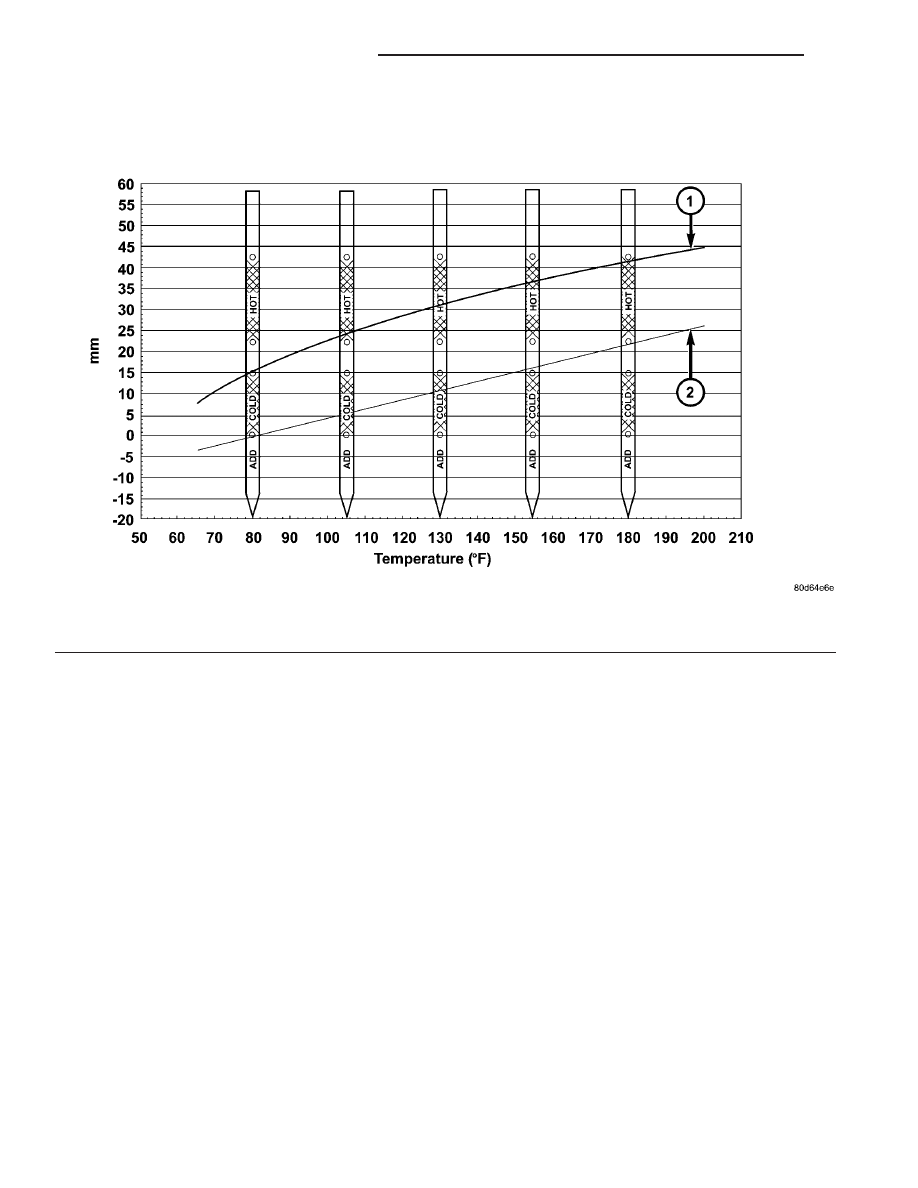
Fig. 209 Transmission Fluid Temperature Chart

1 - MAX. LEVEL

2 - MIN. LEVEL

21 - 402

41TE AUTOMATIC TRANSAXLE

PT

FLUID (Continued)

GEAR SHIFT BEZEL

REMOVAL

(1) Loosen set screw and remove knob from shifter

handle (Fig. 210).

(2) Remove the center console assembly as shown

in (Fig. 211).

(3) Remove shifter bezel (Fig. 212).

INSTALLATION

(1) Install gearshift bezel (Fig. 212).
(2) Install center console assembly (Fig. 211).
(3) Install gearshift knob and tighten set screw to

2 N·m (17 in. lbs.) torque (Fig. 210).

GEAR SHIFT CABLE

REMOVAL

(1) Loosen set screw and remove knob from shifter

handle (Fig. 213).

Fig. 210 Gearshift Knob Removal/Installation

1 - SHIFTER KNOB
2 - SET SCREW

Fig. 211 Center Console Removal/Installation

1 - CENTER CONSOLE

Fig. 212 Shifter Bezel Removal/Installation

1 - BEZEL
2 - SCREW (4)

Fig. 213 Gearshift Knob Removal/Installation

1 - SHIFTER KNOB
2 - SET SCREW

PT

41TE AUTOMATIC TRANSAXLE

21 - 403

(2) Remove the center console assembly as shown

in (Fig. 214).

(3) Remove shifter bezel (Fig. 215).

(4) Disconnect shift cable from shifter mechanism

as shown in (Fig. 216).

(5) Remove three grommet plate to floor pan nuts

as shown in (Fig. 216).

(6) Remove air cleaner assembly (Fig. 217).

Fig. 214 Center Console Removal/Installation

1 - CENTER CONSOLE

Fig. 215 Shifter Bezel Removal/Installation

1 - BEZEL
2 - SCREW (4)

Fig. 216 Gearshift Cable at Shifter Assembly

1 - SHIFTER ASSEMBLY
2 - GROMMET PLATE NUT
3 - SHIFT CABLE

Fig. 217 Air Cleaner Assembly Removal/Installation

1 - AIR CLEANER ASSEMBLY

21 - 404

41TE AUTOMATIC TRANSAXLE

PT

GEAR SHIFT CABLE (Continued)

(7) Disconnect both battery cables, remove battery

hold down clamp and bolt, and remove battery (Fig.
218).

(8) Remove battery tray (Fig. 219) from bracket.

(9) Disconnect shifter cable from shift lever and

remove from bracket (Fig. 220).

(10) Raise vehicle on hoist.
(11) Remove catalytic converter heat shield (Fig.

221).

Fig. 218 Battery Removal/Installation

1 - BATTERY

Fig. 219 Battery Tray Removal/Installation

1 - BATTERY TRAY

Fig. 220 Gear Shift Cable at Transaxle

1 - SHIFT LEVER
2 - SHIFT CABLE

Fig. 221 Catalytic Converter Heat Shield

1 - CONVERTER HEAT SHIELD

PT

41TE AUTOMATIC TRANSAXLE

21 - 405

GEAR SHIFT CABLE (Continued)


Content   ..  860  861  862  863   ..