Chrysler Stratus Convertible. Manual - part 374
(3) Install camshaft seal(s). Camshaft must be
installed before the camshaft seal is installed. Refer
to procedure in this section.
(4) Install camshaft sprocket(s) and tighten to 88
N·m (65 ft. lbs.).
(5) Install timing belt. Refer to procedure in this
section.
(6) Install rocker arm assemblies in correct order
as removed. Tighten the rocker arm assemblies in
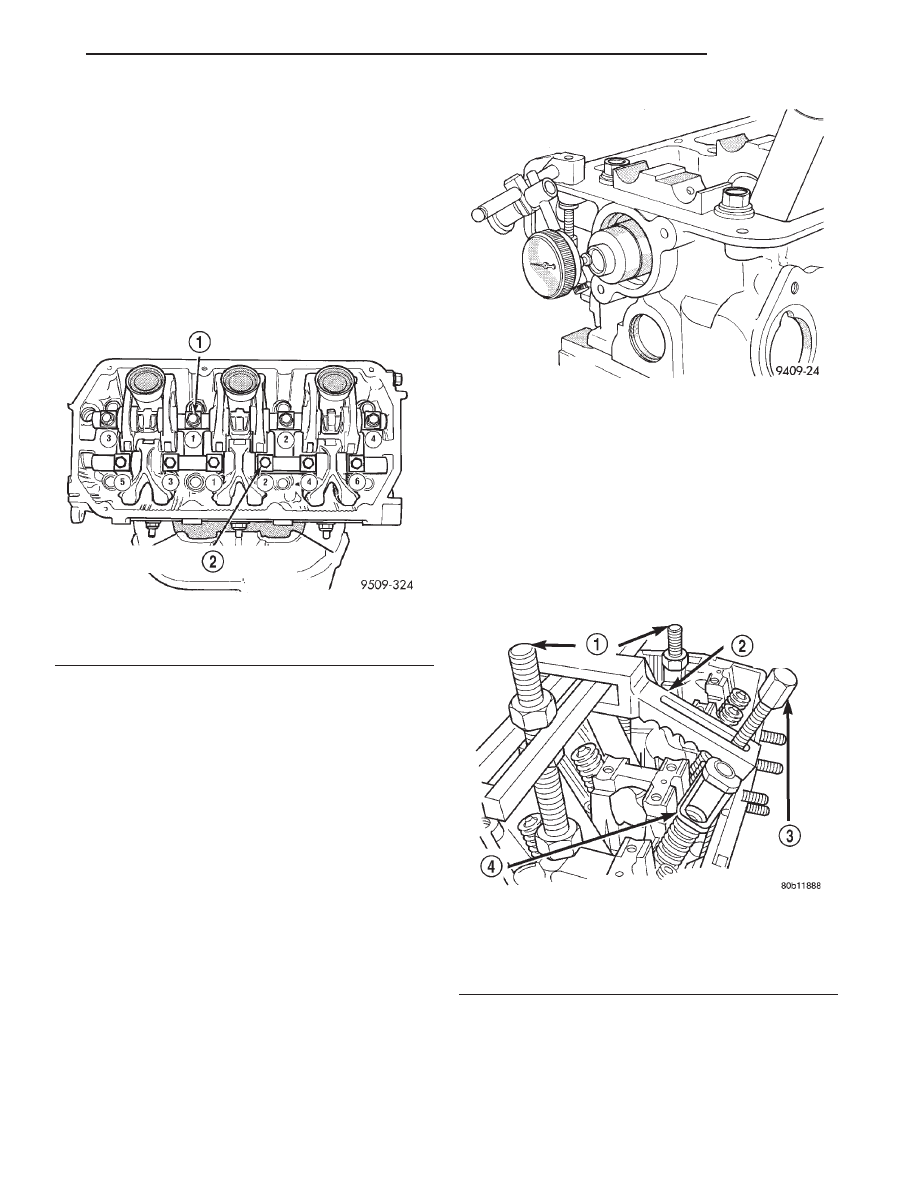
sequence shown in (Fig. 62) to 31 N·m (276 in. lbs.).
(7) Remove Special Tools MD-998443, auto lash
adjuster retainers.
(8) Install cylinder head covers, lower intake man-
ifold, and upper intake manifold. Refer to procedures
in this section.
CAMSHAFT END PLAY
(1) Oil camshaft journals and install camshaft
without rocker arm assemblies.
(2) Using a suitable tool, move camshaft as far
rearward as it will go.
(3) Zero dial indicator (Fig. 63).
(4) Move camshaft as far forward as it will go.
(5) End play travel: 0.1 - 0.2 mm (0.004 - 0.008
in.). Max. Travel: 0.4 mm (0.016 in.)
VALVE SPRINGS AND SEALS—IN VEHICLE
SERVICE
REMOVAL
(1) Remove cylinder head cover(s). Refer to proce-
dure in this section.
(2) Remove rocker arm shaft assemblies. Refer to
procedure in this section.
(3) Rotate crankshaft until piston is at TDC on
compression stroke.
(4) Remove spark plug from applicable cylinder.
(5) Using a air hose attached to an adapter tool,
install it into the spark plug hole. Apply 90-120 psi
air pressure.
(6) Use Special Tool MD-998772A with Mounting
Post 6886, Forcing Screw Arm 6887, Forcing Screw
6765 and Adapter 6885 (Fig. 64) to compress valve
springs and remove valve locks.
(7) Remove valve spring.
(8) Remove valve stem seals with suitable tool
(Fig. 65).
INSTALLATION
(1) Install the “gray” valve seal onto the intake
valve guide and the “grayish green” seal onto the
exhaust valve guide (Fig. 66).
(2) Using Special Tool MD-998774, install valve
seal by tapping lightly until seal is in place (Fig. 67).
Fig. 62 Rocker Arm Shaft Tightening Sequence
1 – INTAKE ROCKER ARM SHAFT TIGHTEN SEQUENCE
2 – EXHAUST ROCKER ARM SHAFT TIGHTEN SEQUENCE
Fig. 63 Camshaft End Play
Fig. 64 Valve Springs—Removing and Installing
1 – MOUNTING POST 6886
2 – FORCING SCREW ARM 6887
3 – FORCING SCREW 6765
4 – ADAPTER 6885
JX
ENGINE
9 - 37
REMOVAL AND INSTALLATION (Continued)