Chrysler Stratus Convertible. Manual - part 373
INSTALLATION
CAUTION: When cleaning cylinder head surfaces,
DO NOT use a metal scraper because the surfaces
could be cut or ground, Use ONLY a wooden or
plastic scraper.
(1) Clean surfaces of cylinder head and block.
Install new head gasket over locating dowels.
(2) Install cylinder head on locating dowels.
(3) Install 10 mm Allen hex head bolts with wash-
ers.
CAUTION: Attach the head bolt washer in the direc-
tion shown in (Fig. 54).
(4) Tighten cylinder head bolts using the following
procedure:
(a) Tighten cylinder head bolts in sequence (Fig.
55) to 108 N·m (80 ft. lbs.).
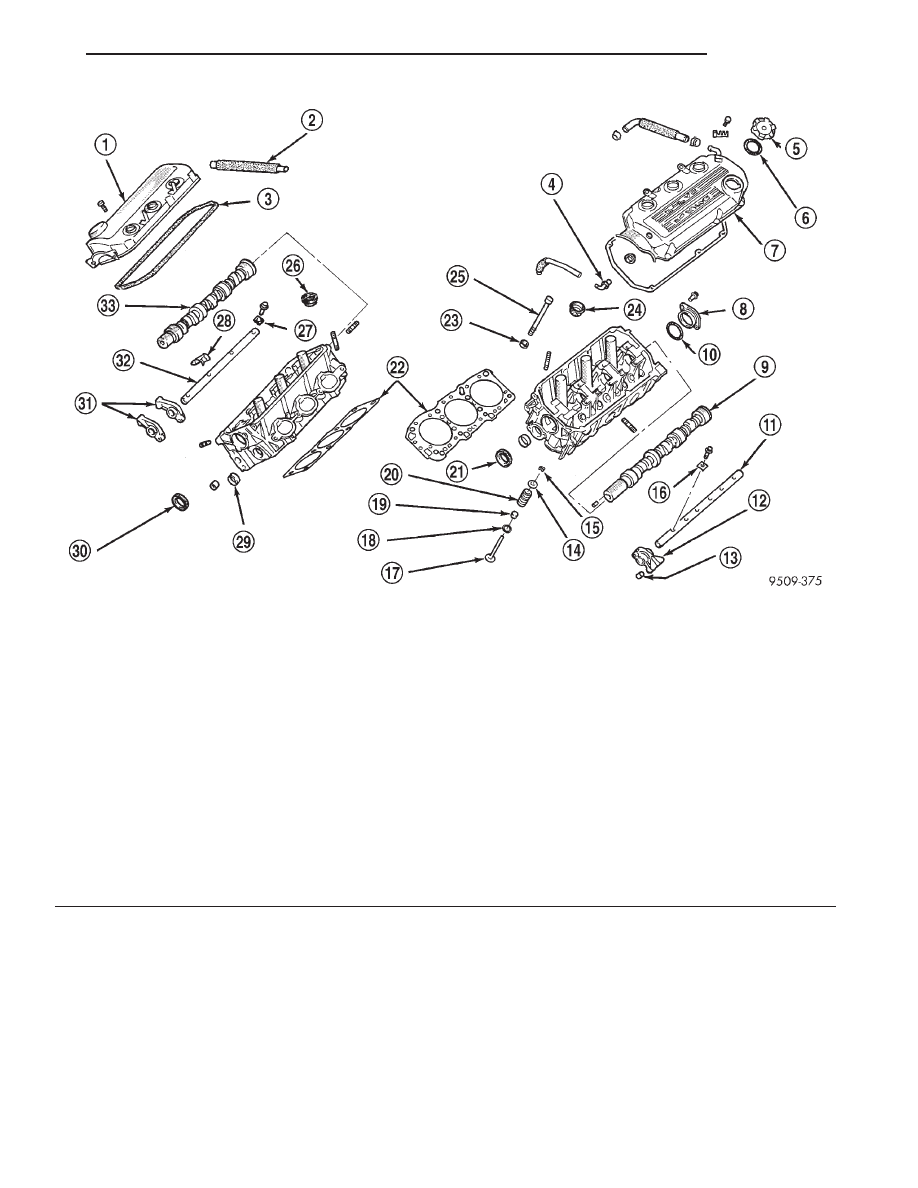
Fig. 52 Cylinder Head Components
1 – CYLINDER HEAD COVER
2 – BREATHER HOSE
3 – GASKET
4 – PCV VALVE
5 – OIL FILLER CAP
6 – GASKET
7 – CYLINDER HEAD COVER
8 – CAMSHAFT THRUST CASE
9 – CAMSHAFT (LEFT SIDE)
10 – O-RING
11 – EXHAUST ROCKER ARM SHAFT
12 – EXHAUST ROCKER ARM
13 – HYDRAULIC LASH ADJUSTER
14 – SPRING RETAINER
15 – LOCKS
16 – CAP
17 – VALVE
18 – SPRING SEAT
19 – VALVE STEM SEAL
20 – SPRING
21 – SEAL
22 – HEAD GASKETS
23 – WASHER
24 – SEAL
25 – CYLINDER HEAD BOLT
26 – SEAL
27 – CAP
28 – SPRING
29 – CAP
30 – SEAL
31 – INTAKE ROCKER ARMS
32 – INTAKE ROCKER ARM SHAFT
33 – CAMSHAFT (RIGHT SIDE)
JX
ENGINE
9 - 33
REMOVAL AND INSTALLATION (Continued)