Chrysler Stratus Convertible. Manual - part 266
 

  Index      Chrysler     Chrysler Stratus Convertible - service repair manual 1995-2000 year


Search            


Content   ..  264  265  266  267   ..


Chrysler Stratus Convertible. Manual - part 266


SIDE TURN SIGNAL REPEATER LAMP BULB

REMOVAL

(1) Open door to gain access to the rear of side

repeater lamp (Fig. 7).

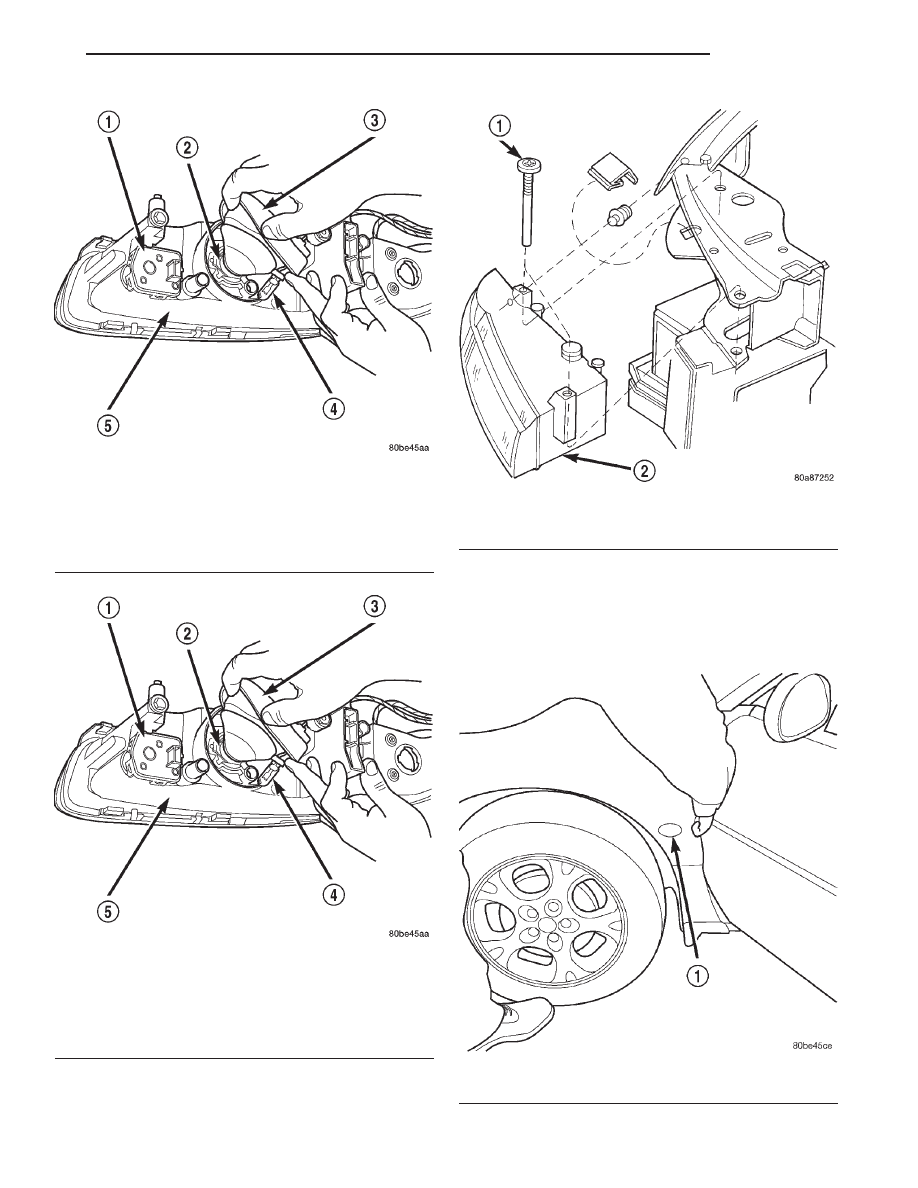
Fig. 9 Headlamp Module Orientation

1 – HEADLAMP LEVELING MOTOR
2 – HEADLAMP
3 – PROTECTIVE RUBBER BOOT
4 – FRONT POSITION LAMP
5 – HEADLAMP MODULE

Fig. 10 Headlamp Module Orientation

1 – HEADLAMP LEVELING MOTOR
2 – HEADLAMP
3 – PROTECTIVE RUBBER BOOT
4 – FRONT POSITION LAMP
5 – HEADLAMP MODULE

Fig. 11 Headlamp Module Retaining Screws

1 – MODULE SCREWS
2 – HEADLAMP MODULE

Fig. 12 Access to Side Turn Signal Repeater Lamp

1 – SIDE TURN SIGNAL REPEATER LAMP

JX

LAMPS

8L - 9

REMOVAL AND INSTALLATION (Continued)

(2) Depress upper and lower tabs on repeater lamp

to release lamp from fender (Fig. 8).

(3) Rotate side repeater lamp socket counter clock-

wise one quarter turn and pull from lamp (Fig. 8).

(4) Rotate bulb counter clockwise one quarter turn

and pull from socket.

INSTALLATION

(1) Install bulb in socket.
(2) Verify lamp operation.

(3) Install side repeater lamp on lamp socket (Fig.

9).

(4) Install lamp in front fender opening.

Rear Fog, Tail, Stop, Turn and Backup Lamp
Bulbs

REMOVAL

(1) Open decklid

(2) Working from inside the trunk, remove the (3)

plastic retaining nuts from the tail lamp assembly.

NOTE: Place a towel between rear fascia and tail
lamp assembly to prevent vehicle paint damage.

Fig. 13 Side Repeater Lamp

1 – FRONT FENDER
2 – SIDE REPEATER LAMP
3 – REPEATER LAMP SOCKET

Fig. 14 Side Repeater Lamp

1 – FRONT FENDER
2 – SIDE REPEATER LAMP
3 – REPEATER LAMP SOCKET

Fig. 15 Tail lamp Orientation

1 – REAR FOG LAMP
2 – TAIL, STOP LAMP
3 – TURN SIGNAL LAMP
4 – BACKUP LAMP

8L - 10

LAMPS

JX

REMOVAL AND INSTALLATION (Continued)

(3) Pull the tail lamp assembly straight away from

the quarter panel until the mounting studs clear
there locating holes.

(4) Rotate the appropriate bulb socket counter-

clockwise and pull it straight from the tail lamp
assembly (Fig. 15).

(5) Pull the lamp bulb straight from its socket

(Fig. 15).

INSTALLATION

(1) Install the lamp bulb in its socket.

(2) Verify lamp operation (Fig. 16).
(3) Install the lamp socket in the tail lamp assem-

bly.

(4) Install the tail lamp assembly on the vehicle.

Tighten retaining nuts until slight tension is felt.

LICENSE PLATE LAMP BULB

REMOVAL

(1) Remove screws holding license plate lamp to

rear fascia.

(2) Remove lamp from opening in rear fascia (Fig.

18).

Fig. 16 Tail lamp Orientation

1 – REAR FOG LAMP
2 – TAIL, STOP LAMP
3 – TURN SIGNAL LAMP
4 – BACKUP LAMP

Fig. 17 License Plate Lamps

1 – LAMP RETAINING SCREWS
2 – DUAL REAR LICENSE PLATE LAMPS
3 – REAR FASCIA

Fig. 18 Removing License Plate Lamp

1 – REAR BUMPER FASCIA
2 – LICENSE PLATE LAMP

JX

LAMPS

8L - 11

REMOVAL AND INSTALLATION (Continued)

(3) Rotate lamp socket counter clockwise one quar-

ter turn and pull lamp socket from lamp housing.

(4) Pull bulb from socket (Fig. 19).

INSTALLATION

(1) Install bulb in lamp socket.
(2) Verify lamp operation.

(3) Install lamp socket in lamp housing.

(4) Position lamp and install retaining screws.

Fig. 19 License Plate Lamp Bulb

1 – BULB
2 – LICENSE PLATE LAMP

Fig. 20 License Plate Lamps

1 – LAMP RETAINING SCREWS
2 – DUAL REAR LICENSE PLATE LAMPS
3 – REAR FASCIA

8L - 12

LAMPS

JX

REMOVAL AND INSTALLATION (Continued)


Content   ..  264  265  266  267   ..