Chrysler Stratus Convertible. Manual - part 79
 

  Index      Chrysler     Chrysler Stratus Convertible - service repair manual 1995-2000 year


Search            


Content   ..  77  78  79  80   ..


Chrysler Stratus Convertible. Manual - part 79


(6) Verify that all retainers are installed as shown

in (Fig. 128). Retainers should be flush or below
valve body surface.

(7) Install check balls into position as shown in

(Fig. 129). If necessary, secure them with petrolatum
or transmission assembly gel for assembly ease.

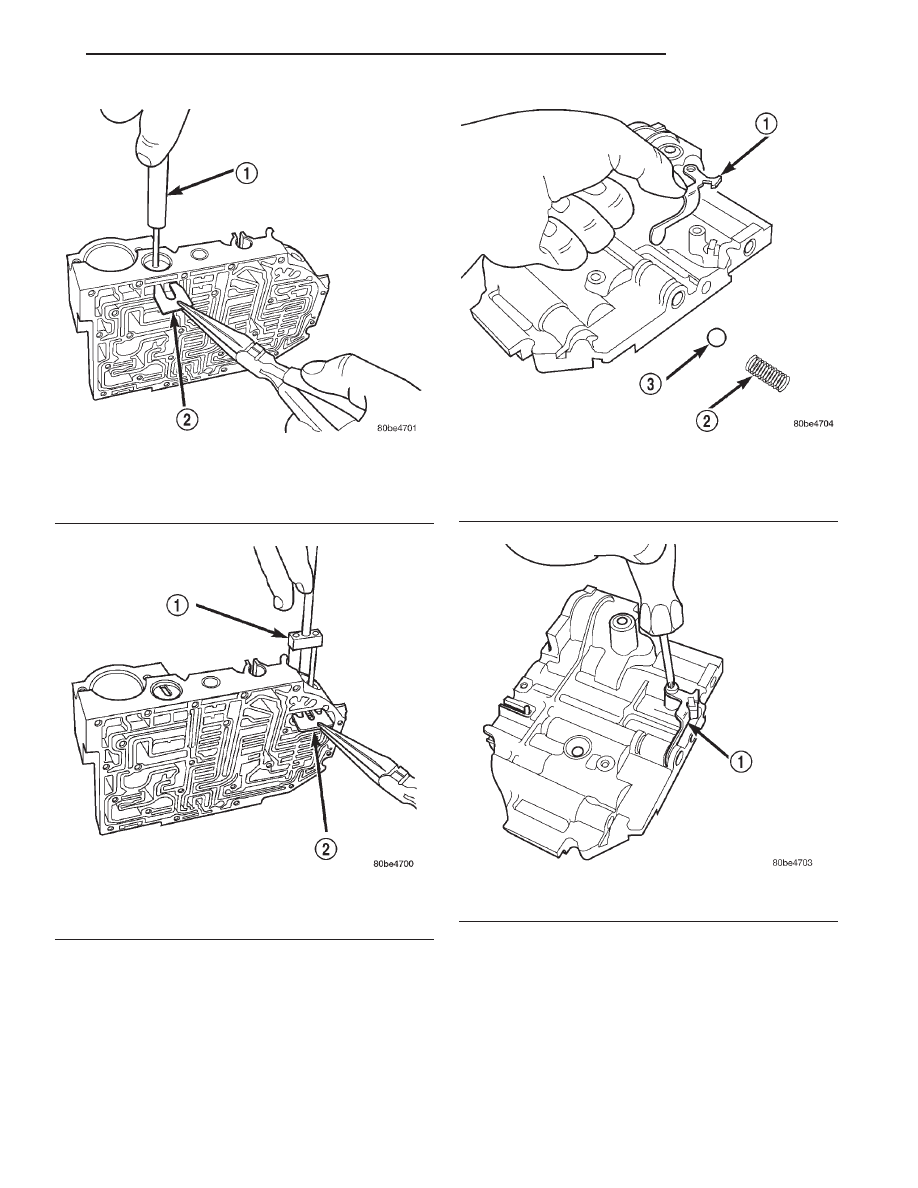
Fig. 124 Install Regulator Valve Spring Retainer

using Tool 6302

1 – TOOL 6302
2 – RETAINER

Fig. 125 Install Dual Retainer Plate using Tool 6301

1 – TOOL 6301
2 – RETAINER

Fig. 126 Vent Reservoir Check Valve and Spring

1 – RETAINER
2 – SPRING
3 – BALL

Fig. 127 Install Vent Reservoir Check Valve Retainer

1 – RETAINER

JX

TRANSAXLE

21 - 55

DISASSEMBLY AND ASSEMBLY (Continued)

Fig. 128 Valve Retainer Location

1 – RETAINER
2 – RETAINER

Fig. 129 Ball Check Location

1 – (#4) BALL CHECK LOCATION
2 – (#2) BALL CHECK LOCATION
3 – RETAINER

4 – (#3) BALL CHECK LOCATION
5 – LOW/REVERSE SWITCH VALVE
6 – T/C LIMIT VALVE

21 - 56

TRANSAXLE

JX

DISASSEMBLY AND ASSEMBLY (Continued)

(8) Install thermal valve into transfer plate (Fig.

130).

(9) Install separator plate to valve body (Fig. 131).

(10) Install the overdrive clutch (#5) check valve to

separator plate (Fig. 132)

(11) Install oil screen to separator plate (Fig. 133).

Fig. 130 Install Thermal Valve

1 – THERMAL VALVE

Fig. 131 Install Separator Plate

1 – SEPARATOR PLATE
2 – VALVE BODY

Fig. 132 Install Overdrive Clutch (#5) Check Valve

1 – OVERDRIVE CLUTCH (#5) CHECK VALVE

Fig. 133 Install Oil Screen

1 – OIL SCREEN

JX

TRANSAXLE

21 - 57

DISASSEMBLY AND ASSEMBLY (Continued)

(12) Install transfer plate to valve body and sepa-

rator plate. Make sure oil screen and #5 check valve
do not bind (Fig. 134).

(13) Install twenty-four transfer plate to valve

body screws (Fig. 135) and torque to 5 N·m (45 in.
lbs.).

(14) Install 2/4 Accumulator components as shown

in (Fig. 136).

(15) Torque 2/4 Accumulator retainer to 5 N·m (45

in. lbs.) (Fig. 137).

(16) Install

Manual

Shaft/Rooster

Comb

and

Transmission Range Sensor (Fig. 138).

Fig. 134 Install Transfer Plate

1 – TRANSFER PLATE

Fig. 135 Install Valve Body to Transfer Plate Screws

1 – SCREW (24)
2 – TRANSFER PLATE
3 – VALVE BODY

Fig. 136 2/4 Accumulator Assembly

1 – VALVE BODY
2 – RETAINER PLATE
3 – DETENT SPRING
4 – SPRINGS
5 – SEALS
6 – PISTON

Fig. 137 2/4 Accumulator Retaining Plate

1 – 2–4 ACCUMULATOR RETAINING PLATE
2 – DETENT SPRING

21 - 58

TRANSAXLE

JX

DISASSEMBLY AND ASSEMBLY (Continued)


Content   ..  77  78  79  80   ..