Chrysler Stratus Convertible. Manual - part 64
DISASSEMBLY
(1) If both shocks are being serviced at the same
time, mark the coil spring and shock assembly
according to which side of the vehicle the shock was
removed from, and which shock the coil spring was
removed from.
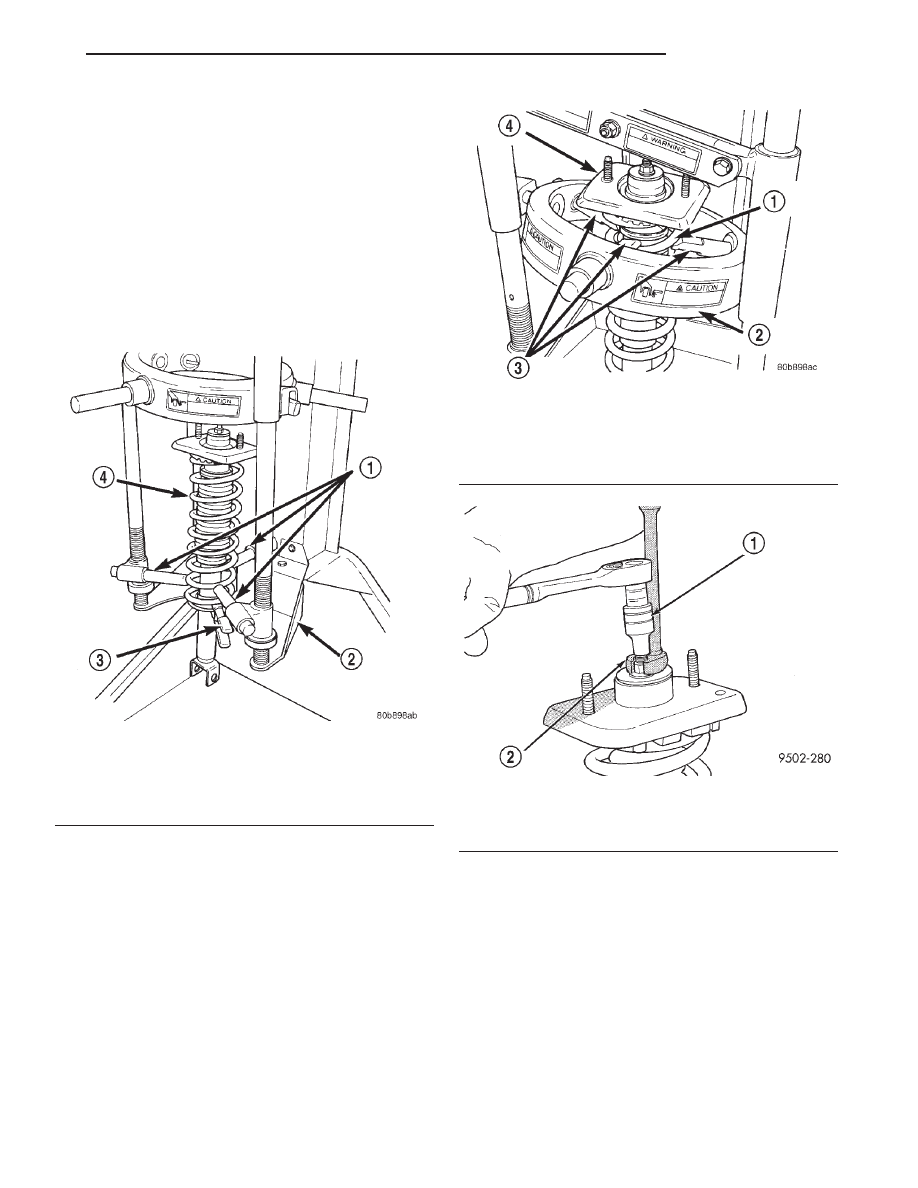
(2) Position the shock assembly in the strut coil
spring
compressor
following
the
manufacturer’s
instructions. Set the lower hooks and install the
clamp on the lower end of the coil spring, so the
shock is held in place once the shock shaft nut is
removed (Fig. 43). Lower the upper hooks and posi-
tion them on the coil spring near the top (Fig. 44).
WARNING: DO NOT REMOVE THE SHOCK ROD
NUT BEFORE THE COIL SPRING IS COMPRESSED.
THE COIL SPRING IS HELD UNDER PRESSURE
AND MUST BE COMPRESSED, REMOVING SPRING
TENSION FROM THE UPPER MOUNTING BRACKET
BEFORE THE ROD NUT IS REMOVED.
(3) Compress the coil spring until all coil spring
tension is removed from the upper mounting bracket.
(4) Hold the shock rod from rotating using special
socket Snap-On A136, or an equivalent, and remove
the retainer nut (Fig. 45).
(5) Remove the upper shock rod bushing retainer
washer from the shock rod.
(6) Remove the upper shock mount and the rod
isolator bushings as an assembly from the rod of the
shock absorber.
(7) Remove the upper coil spring isolator from the
top of the coil spring (Fig. 46).
(8) Remove the lower shock rod bushing washer
from the top of the dust boot and shock absorber rod
(Fig. 46).
(9) Remove the dust shield and cup as an assem-
bly from the shock absorber rod by pulling both
straight up and off the shock rod (Fig. 46).
(10) Remove the clamp from the bottom of the coil
spring and remove the shock absorber, lower spring
Fig. 43 Lower Hooks And Clamp
1 – LOWER HOOKS
2 – STRUT SPRING COMPRESSOR
3 – CLAMP
4 – COIL SPRING
Fig. 44 Upper Hooks Positioned
1 – COIL SPRING
2 – SPRING COMPRESSOR
3 – UPPER HOOKS
4 – UPPER MOUNT
Fig. 45 Retainer Nut Removal/Installation
1 – SHOCK ABSORBER SOCKET SNAP-ON A136
2 – CROW FOOT
JX
SUSPENSION
2 - 65
DISASSEMBLY AND ASSEMBLY (Continued)