Chery Tiggo 5 (T21). Manual - part 524
 

  Index      Chery     Chery Tiggo 5 (T21) - service repair manual 2014 year


Search            


Content   ..  522  523  524  525   ..


Chery Tiggo 5 (T21). Manual - part 524


49–

7

49

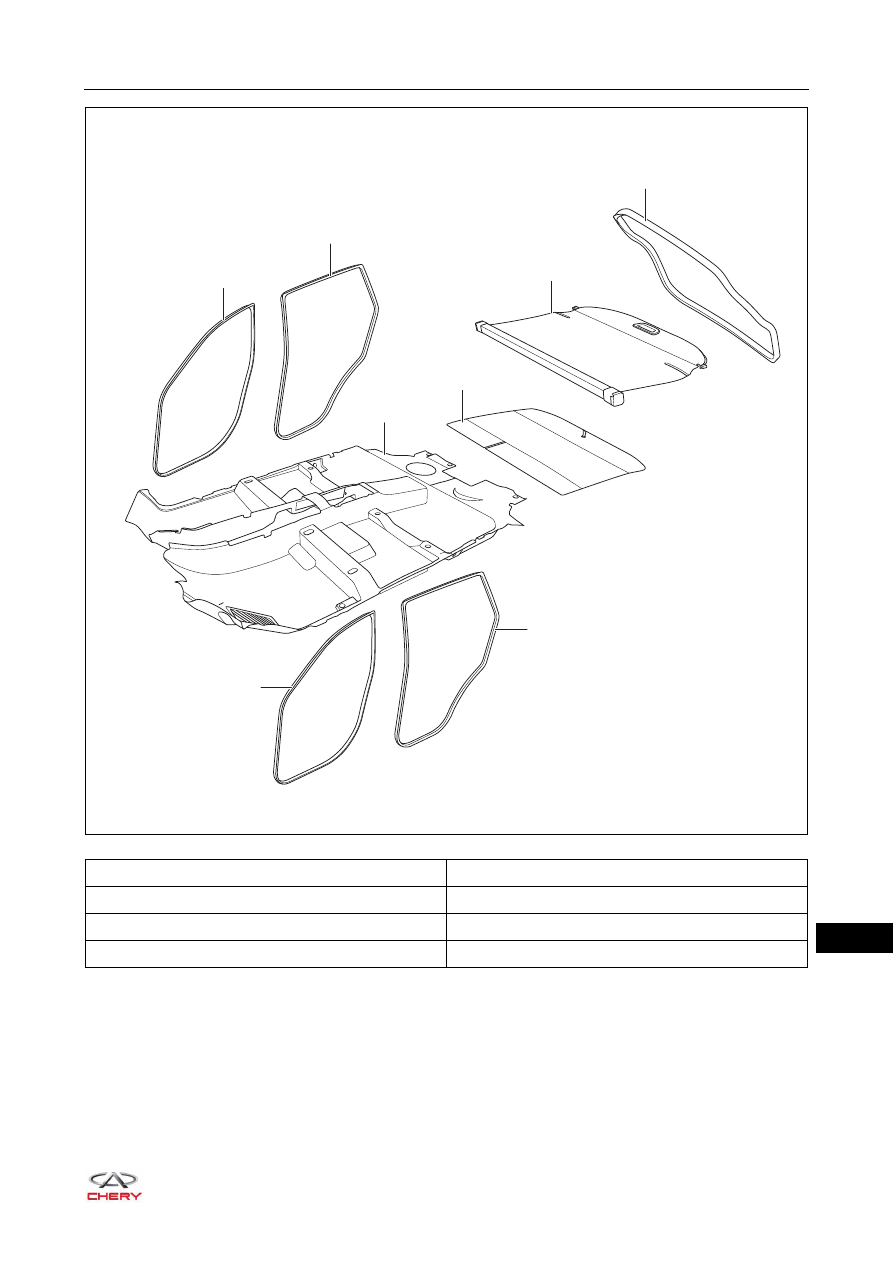
The interior includes following parts: roof assembly, door scuff plate assembly, doorsill pressure plate 
assembly, sun visor assembly, door opening weatherstrip, passenger grip assembly, pillar protector assembly, 
tonneau cover assembly and carpet assembly, etc.

1 - Front Right Door Opening Weatherstrip

2 - Rear Right Door Opening Weatherstrip

3 - Front Floor Carpet Assembly

4 - Luggage Compartment Carpet Assembly

5 - Tonneau Cover Assembly

6 - Back Door Weatherstrip

7 - Front Left Door Opening Weatherstrip

8 - Rear Left Door Opening Weatherstrip

RT21490030

8

7

6

5

4

3

1

2

49–

8

49

Specifications

Torque Specifications

Tool

General Tool

Description

Torque (N·m)

A-pillar Lower Protector Assembly Fixing Nut

5 ± 1

B-pillar Upper Protector Assembly Fixing Screw

1.5 ± 1

Back Door Baffle Plate Assembly Fixing Screw

1.5 ± 1

Back Door Baffle Plate Assembly Fixing Nut

1.5 ± 1

C-pillar Lower Protector Assembly Fixing Screw

1.5 ± 1

C-pillar Upper Protector Assembly Fixing Screw

1.5 ± 1

Sun Visor Assembly Fixing Screw

3 ± 0.5

Sun Visor Holder B Fixing Screw

3 ± 0.5

Front Seat Belt Assembly Lower Fixing Bolt

50 ± 5

Rear Seat Belt Lower Fixing Bolt

50 ± 5

Passenger Grip Assembly Fixing Bolt

5 ± 1

Interior Front Dome Light Assembly Fixing Screw

1.5 ± 0.5

Interior Rear Dome Light Assembly Fixing Screw

1.5 ± 0.5

High Pitched Speaker Fixing Screw

3 ± 0.5

Fuel Tank Opening Bracket Assembly Fixing Bolt 

10 ± 1

Ground Wire Harness Fixing Nut

15 ± 2

Interior Crow Plate

RCH0000025

49–

9

49

ON-VEHICLE SERVICE

Front Door Scuff Plate Assembly

Removal

HINT:

 Use the same procedures for the right side and left side.

 Procedures listed below are for the left side.

1. Remove the front left door scuff plate assembly.

a. Using an interior crow plate, pry up the claws of front 

door scuff plate assembly, and remove the front left 
door scuff plate assembly.

Installation

Installation is in the reverse order of removal.

CAUTION

 Make sure to wear safety equipment to prevent accidents when removing the front door scuff plate 

assembly.

 Appropriate force should be applied when removing the front door scuff plate assembly. Be careful not to 

operate roughly.

 Prevent interior and body paint from being scratched when removing the front door scuff plate assembly.

RT21490040

CAUTION

 Make sure front door scuff plate assembly is installed in place during installation.

49–

10

49

Rear Door Scuff Plate Assembly

Removal

HINT:

 Use the same procedures for the right side and left side.

 Procedures listed below are for the left side.

1. Remove the rear left door scuff plate assembly.

a. Using an interior crow plate, pry up the claws of rear 

door scuff plate assembly, and remove the rear left 
door scuff plate assembly.

Installation

Installation is in the reverse order of removal.

CAUTION

 Make sure to wear safety equipment to prevent accidents when removing the rear door scuff plate 

assembly.

 Appropriate force should be applied when removing the rear door scuff plate assembly. Be careful not to 

operate roughly.

 Prevent interior and body paint from being scratched when removing the rear door scuff plate assembly.

RT21490041

CAUTION

 Make sure rear door scuff plate assembly is installed in place during installation.


Content   ..  522  523  524  525   ..