Chery S11 / Chery QQ. Manual - part 26
 

  Index      Chery     Chery S11 / Chery QQ - service repair manual


Search            


Content   ..  24  25  26  27   ..


Chery S11 / Chery QQ. Manual - part 26


Chery QQ Service Manual                                                                Chassis System 


24. Check brake pedal vibration and  
stroke.  

 If brake pedal is felt stable and 

the  stroke  does  not  exceed 
specified value, go to step 25. 

 If brake pedal is felt soft and 

the  stroke  exceeds  specified 
value, don’t drive vehicle and 
go to step 26. 

25. Start engine and check the pedal. 

 If the pedal is felt stable, go to 

step 27. 

 If the pedal is felt soft, don’t 

drive vehicle and got to step 26 
again.


26. Make sure that the bad feeling of 
the pedal and the bad stroke are not 
caused by bad adjusting for friction 
line or other mechanical malfunction. 
Repeat draining out air process for 
brake system and go to step 1 again. 
Warning: Don’t move vehicle before 
the  brake  pedal  is  not  stable. 
Otherwise it will cause accident or 
personal hurt. 
27. Test vehicle on road at middle 
speed to brake vehicle (without ABS) 
in  order  to  make  sure  that  brake 
system is normal. 
 
2)Braking system hand work exhaust 
procedure 
p down brake pedal when draining air 
for system. 
Points of attention:Make sure that 
the bad feeling of the pedal and the 
bad stroke are not caused by bad 
adjusting for friction line or other 
mechanical malfunction. Repeat 
draining out air process for brake 
system and go to step 1 again. 
1.Check the level of fluid and fill 
fluid to correct level if necessary. 
2. Slowly open one of brake pipe 
connector on ABS regulator to pour 
into the fluid. 
3. Step down the pedal to 75% of whole 
stroke and keep a period of time. 
4. When no any bubbles in the fluid, 
close brake connector on ABS 
regulator 
Fixture 
N.m。Screw brake pipe connector on ABS 
regulator to 16N.m. 
5.  For other connector, repeat step 
2 to step 4. 


17


Chery QQ Service Manual                                                                Chassis System 


6.  Check and fill fluid to suitable 
level. 
7. Lift and support vehicle. 
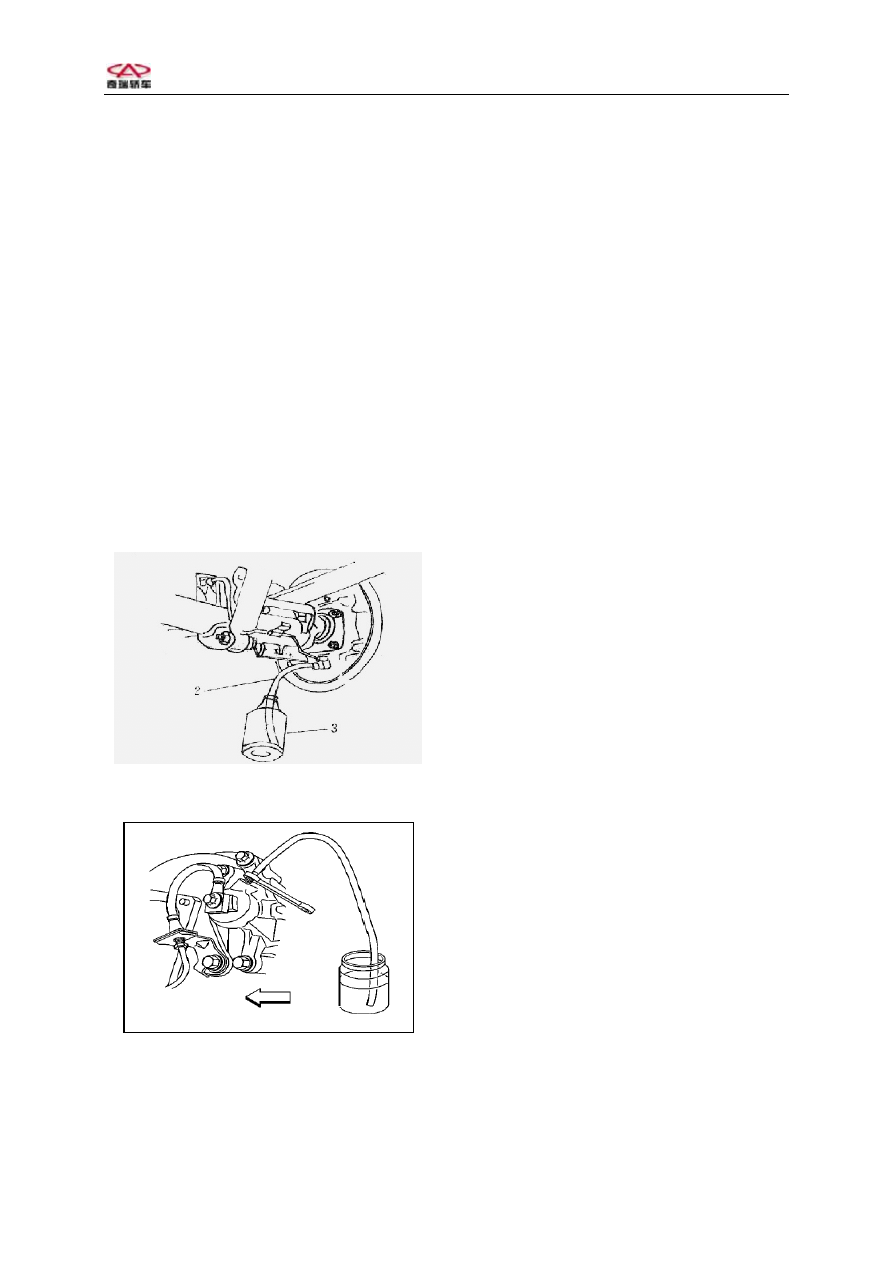
8.  Install transparent plastic hose 
to right rear valve. 
9.  Put  other  end  of  hose  into  the 
container with clean fluid. 
10. Step down the pedal for several 
times and keep step down. Loosen the 
valve. 
11. When the valve does not drain out 
fluid, close the valve. 
12. Repeat step 10 and step 11 until 
no any bubbles in brake pipe. 
13. Step down the pedal and keep on 
to screw the valve. 


6、Hydraulic braking system 

rinse 

1)Pressure rinse 
Warning: Only use clean OPEL DOT 4 
fluid in sealed container. Don’t use 
polluted fluid, otherwise it will 
cause damage to parts, bad brake or 
personal hurt.  
Warning: Don’t fill fluid too much. 
It will flow out to engine exhaust 
parts to result fire. 
Attention:The compressed air 
draining unit can be used to resin 
system. The compressed air must be 
clean and dry. Prevent wet air or 
other dirt to pollute system. 

Exhaust operation ( II )

1.  Clear fluid reservoir cover and 
neighbor parts. 
2.  Remove the cover. 
3.  Drain out any fluid in the 
reservoir. 
4.  Use clean brake fluid to fill the 
reservoir to suitable level. 
5.  Use connector 1 to connect 
draining unit and reservoir 
Connection.. 
6.  Apply pressure to system. 
7.  Support and lift vehicle. 


18


Chery QQ Service Manual                                                                Chassis System 


8.  Resin the brake according to 
following steps. 

 Right rear 
 Left rear 
 Right front 
 Left front 

9.  Install transparent plastic hose 
to right rear valve. 
10. Put  other  end  of  hose  into  the 
container with clean fluid. 
11. Slowly open the valve to flow out 
fluid. 
12. Close the valve when no bubbles 
appear. fix the valve to 8 N.m. 


Remove exhaust valve socket 
 
14. If imperatively replace as 
follows all rubber parts. 

 Brake hose assembly. 
 Master brake cylinder rubber 

parts. 

 Brake pliers and brake drum seal. 

15. Check the level of fluid and fill 
fluid to correct level if necessary. 
16、Install reservoir cover. 
17. Drain out air in brake system. 
Please refer to “ Draining out air 
in hydraulic system”. 
18. Lower vehicle 


2)Hand work rinse 
Points of attention:Use suitable 
container and cloth to absorber brake 
fluid and prevent the fluid to 
contact any paint surface. 
1.  Clear fluid reservoir cover and 
neighbor parts. 
2. Remove the cover. 
3. Drain out any fluid in the 
reservoir. 
4. Use clean OPEL DOT 4 brake fluid 
to fill the reservoir to suitable 
level. 
5. Install the cover. 
6. Lift and support the vehicle. 
7. Rinse the brake system according 
to following steps: 

 Right rear 
 Left rear 
 Right front 
 Left front 

8. Install transparent plastic hose 
to right rear exhaust valve. 
9. Put the other end of hose into 
container with clean fluid. 
10. Slowly open the valve to flow out 
fluid. 
11. When clean fluid begins to flow 
out, close the valve. 


19


Chery QQ Service Manual                                                                Chassis System 


Fixture 
Screw exhaust valve to 8N.m. 
12. If imperatively replace as 
follows all rubber parts. 

 Brake hose assembly. 
 Master brake cylinder rubber 

parts. 

 Brake pliers and brake drum seal. 

13.  Drain  out  air  in  the  system. 
Please refer to “Drain out air in the 
system”. 
14.  Check the fluid level in the 
reservoir. Fill the fluid to correct  
level if necessary. 
15. Install reservoir cover. 
16. Lower vehicle  
Check whether leak 
1. Connect test pipe with brake 
pliers and brake drum. 
2. Install pressure gauge to display 
the pressure. 
3.  Repeat step down the pedal hard 
to set up 20 Pa pressure. 
4.  Install  the  pedal  tensioner 
between driver seat and the pedal. 
5.  Test  time  is  lasting  about  5 
minutes. 
6.  If  no  leak  in  the  system,  the 
pressure set up will keep constant. 
7. If the pressure is dropping, check 
if any leak in the system. Drain out 
the air in the system. 


7、Vacuum actuator replace 

Disassembly procedure 
1、Remove master cylinder and 
prorating valve from vacuum booster. 
Points of Attention 
Don’t remove brake pipe from master 
cylinder and prorating valve. 
2、Remove vacuum hose from vacuum 
booster. 
3、Remove brake light switch 
connector. Turn light switch to pull 
out. 
4、Remove spring pins of brake pedal 
and vacuum booster lever and pull out 
pins. 
Attention:Remove vacuum booster only 
the lever and the pedal is 
disconnected. 

5、Loosen 4 bolts on vacuum booster. 
6、Pull out vacuum booster from left 
of engine. 

Vacuum actuator check 
There are two methods for checking 
vacuum booster. One is to use tester. 
The other is confirming working 
condition without tester. 
Attention: 
Make sure no any air in system during 
checking. 


20


Content   ..  24  25  26  27   ..