Chery S11 / Chery QQ. Manual - part 24
 

  Index      Chery     Chery S11 / Chery QQ - service repair manual


Search            


Content   ..  22  23  24  25   ..


Chery S11 / Chery QQ. Manual - part 24


Chery QQ Service Manual                                                                Chassis System 


2. Take off the outer cover of the 

storage  tank,  draw  the  braking 
liquid inside the tank by way of 
a  suction  tube.  The  more 
thoroughly  the  discharge  of  the 
braking liquid, the better. 

Points of attention: 

Watch out the overflow of the braking 
liquid. 

Do not allow the braking liquid to 
stain on the surface of the paint or 
of the other parts and components so 
as to avoid possible corrosion. If 
the  braking  liquid  stains  on  the 
surface  of  the  other  parts  and 
components,  an  immediate  cleaning 
should be done to wipe them off.  

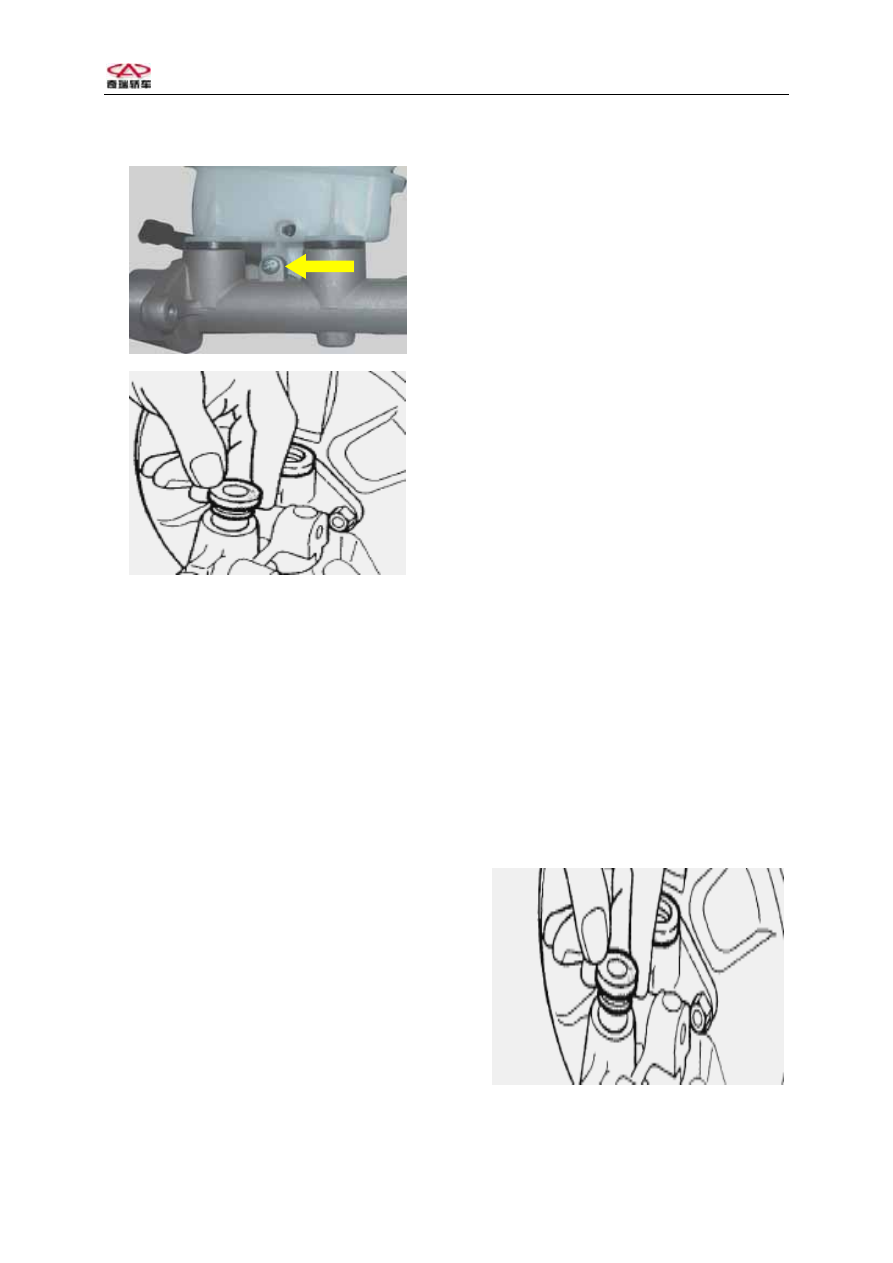
3.  Use a screwdriver to remove the 
fixing  screw  between  the  liquid 
storage tank and the master pump. 


4.  Separate  the  storage  tank  from 
the master pump. 

5.  Take  out  the  sealing  rubber 
sheath between the storage tank and 
the master pump. 

6.  Check  to  see  if  there  are  any 
cracks or deformations of the storage 
tank. 

7.  Check  the  cover  of  the  liquid 
storage tank. 

Make  proper  replacements  if 

there are any damages as follows. 

 Cut openings 
 Breaks and cracks 
 Scrapes 
 Deformations 

8.  Clean  the  liquid  storage  tank 
with  the  compressed  air  not 
containing lubricating agents.  

Steps of installation 
1. Apply adhesive agent for braking 
master pumps (or clean braking liquid) 
onto the new sealing sheath, and 
install the rubber sheath into the 
master pump, and then install the 
liquid storage tank. 


9


Chery QQ Service Manual                                                                Chassis System 


2. Fix the braking master pump and the 
storage tank with screws, and tighten 
the screw with a torque of 23-27N.m. 
3.  Connect  the  plug  of  the  liquid 
level sensor of the storage tank. 

4. Refill the braking liquid. 
5. Discharge the air inside the 
braking system, and check to see if 
there is any leakage. Refer to the 
“Air Discharge of Braking System” 
for details. 
 
3) Dismounting and installation of 
the braking master pump 


I.  Dismounting  of  the  master 

pump 

1.  Remove the wire plug of the liquid 
level sensor of the storage tank. 

2. Take off the outer cover of the 

storage  tank,  and  draw  out  the 
remaining braking liquid inside the 
tank with a suction tube.  

The more thoroughly the discharge of 
the braking liquid, the better.  

Attention: Watch out for overflow of 
braking liquid. 
3、Use the oil pipe wrench to loosen 
the  two  oil    outlet  pipes  on  the 
master pump. 
4、Loosen the fastening screw nuts of 
the  brake  master  pump  and  vacuum 
actuation pump. 
5、Take off the master pump. 


10


Chery QQ Service Manual                                                                Chassis System 


4)Installation of the braking master 
pump 
1.  Check  to  see  if  there  are  any 
damages on the sealing ring at the 
joining section of the master pump 
and the vacuum actuator pump. Make 
proper  replacement  if  the  ring  is 
damaged.  

2. Mount the master pump on the vacuum 
actuator. Install the proportion 
distribution valve stand, with two 
fastening screw nuts. Tighten with a 
torque of 23-27N.m. 
3. Turn the two braking pipelines a 
few threads manually, then tighten 
the pipeline with a wrench with a 
torque of 14—18N.m. 
 
Attention: 

 The joints of the braking pipes 

must be clean; 

 First  turn  the  pipelines  a  few 

threads 

with 

hands 

when 

connecting  the  pipes  so  as  to 
avoid any possible damage to the 
pipe joints. 

4.  Connect  the  plug  of  the  liquid 
level sensor. 

5. Refill the braking liquid. 
Discharge the air of the braking 
system by referring to the “Air 
Discharge for Braking System”. 
Check to see if there is any leakage 
in the system. 
 
Attention: It is not allowed to use 
absorber oil or any liquid containing 
mineral oils. It is not allowed to use 
the braking liquid contained in the 
vessels that once contained mineral  


oils  or  that  has  been  made  wet  by 
water, because the mineral oils might 
lead to the expansion or deformation 
of the rubber parts in the braking 
system, and water will dissolve the 
braking liquid, which will reduce the 
boiling point of the braking liquid. 
To  prevent  from  contaminations, 
please screw the liquid storage tank 
cover tightly. 

It  is  strictly  forbidden  to  use 

mixed  braking  liquid.  It  is 
recommended  to  use  the  DOT-4 
Shell-brand braking liquid. 
 

2、Brake pedal replace


1、Removal stop lamp switch plug. 
2、Remove the split pin for the brake 
pedal and the vacuum actuation pump, 
then take of the pin bolt 
3. Loose brake pedal shaft lock nut, 
from right unsling pedal shaft 
4. Removal pedal and spring 
Steps of installation 
1. Use special lubricant to 
lubricate pedal shaft. 
2. Replacing assembly with brake 
bush when replacing brake pedal. 
3. Install pedal and spring on 
installing position, and insert 
pedal shaft on support. 
4. Note to install washers on two 
sides when installing pedal and 
spring. 
5. Fix pedal shaft with nuts to the 
support. Screw torque is 30-40N.m. 
6.  Connect vacuum booster handspike 
to brake pedal. Insert the spring 
pins to handspike. 


11


Chery QQ Service Manual                                                                Chassis System 


3、Proportioning valve replace 

Disassembly procedure 
Points of attention: 
Don’t clean the valve in any 
cleaning liquid. 
1.  Remove the cover of reservoir. 
Pump out brake fluid in reservoir. 
The more the better. 
2. Support vehicle. 
3.  Clean dusts on brake cylinder, 
pipe and the valve. 
4.  Use wrench to remove the 
connector between the valve and brake 
cylinder. 
5.  Remove the brake pipe between the 
valve to four wheel cylinders. 
6.  Remove nuts for valve, and remove 
the valve.  
 
Steps of installation 
 
1.  Put valve bush on the nut of 
support with hand, but don’t screw 
tightly. 
2.  Put four brake connectors on the 
valve with hand. Put pipe that 
connected with brake cylinder and the 
valve with hand. 
3.  Screw nuts of the valve with 
torque 10N.m. 
4.  Use wrench to fix the connector on 
brake cylinder and the valve with 
torque 23-27N.m. 
5.  Fill brake fluid. Refer 
“ draining out hydraulic system” 
when draining out pressure. 


Brake pedal parts 

1.Pedal pad;2.Brake pedal;3.Gasket;4.Pedal 

return spring;5.Bolt;6.Nut;7.Pedestal. 


12


Content   ..  22  23  24  25   ..