Chery A18. Manual - part 69
 

  Index      Chery     Chery A18 - service repair manual


Search            


Content   ..  67  68  69  70   ..


Chery A18. Manual - part 69


Section 

Disassembly & assembly of the instrument panel


I. Disassembly & assembly of the instrument panel accessories 

1. Preparation 

Tools:  Socket  wrench,  open-end  wrench,  Phillips  screwdriver,  slotted 

screwdriver 

2. Attention 

2.1 Please put on necessary appliances for labor protection in order to avoid 

the accident 

2.2 Cut the negative electrode of the accumulator before the disassembly of 

the electric apparatus   

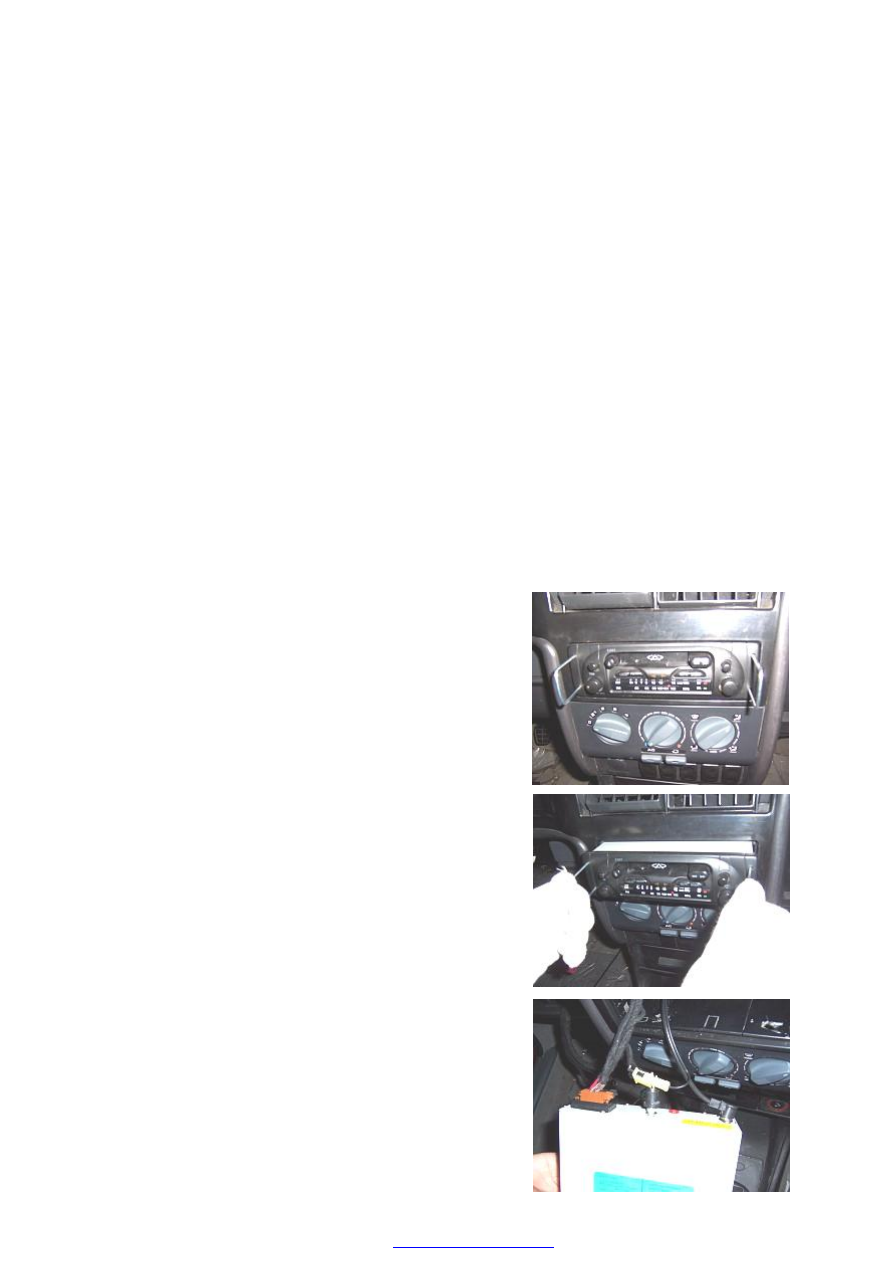
3. Disassembly & assembly of the radio & tape player 

3.1. Disassembly steps 

3.1.1.  Disassemble  the  radio  &  tape  player  with  the  special 

tool and put in the right way 


3.1.2.  Apply  the  force  in  parallel  by  hands  to  draw  out  the 

radio & tape player   


3.1.3.  Take  out  the  plug-in  unit  at  the  back  of  the  radio  & 

tape player and take out the radio & tape player 


3.2. Assembly steps 

Assemble according to the inverted sequence of the disassembly 

4. Disassembly & assembly of the air conditioner controlled panel 

4.1. Disassembly steps 

4.1.1.  Prize  up  the  shield  cover  of  the  air  conditioner 

controlled panel with the slotted screwdriver 


4.1.2.  Unscrew  fixing  bolts  of  the  air  conditioner 

controlled panel with the Phillips screwdriver, take out the 

rear plug and take out the air conditioner controlled panel. 


4.2. Assembly steps 

Assemble  according  to  the  inverted  sequence  of  the 

disassembly 

5. Disassembly & assembly of the glove box 

5.1. Disassembly steps 

5.1.1. Open the cover of the glove box, and unscrew 2 bolts 

at  left  &  right  side  connecting  with  the  instrument  panel 

with the Phillips screwdriver 


5.1.2.  Unscrew  2  fixing  bolts  on  the  glove  box  with  the 

Phillips screwdriver 


5.1.3. Take out the glove box assembly 


5.2. Assembly steps 

Assemble  according  to  the  inverted  sequence  of  the 

disassembly 

6. Disassembly & assembly of the combined instruments 

6.1. Disassembly steps 

6.1.1.  Carefully  prize  up  the  air  outlets  at  the  two  sides  of 

the combined instruments with the screwdriver 


6.1.2.  Unscrew  under  fixing  bolts  below  the  air  outlet  seat 

with the Phillips screwdriver 


6.1.3. Unscrew above fixing bolts of the air outlet seat with 

the Phillips screwdriver 


6.1.4.  Unscrew  fixing  bolts  connecting  the  combined 

instrument  board  and  instrument  panel  main  parts  with  the 

Phillips screwdriver   


6.1.5.  Unscrew  fixing  bolts  of  the  right  air  outlet  of  the 

combined instruments with the Phillips screwdriver 


6.1.6. Take out the buttons of the front & rear fog lamps 


6.1.7. Carefully prize up the switch of the fog lamp with the 

slotted screwdriver   


Content   ..  67  68  69  70   ..