Chery A18. Manual - part 62
 

  Index      Chery     Chery A18 - service repair manual


Search            


Content   ..  60  61  62  63   ..


Chery A18. Manual - part 62


Chapter III Disassembly & Maintenance of the Car Door 

I. Disassembly, assembly & maintenance of the front door 

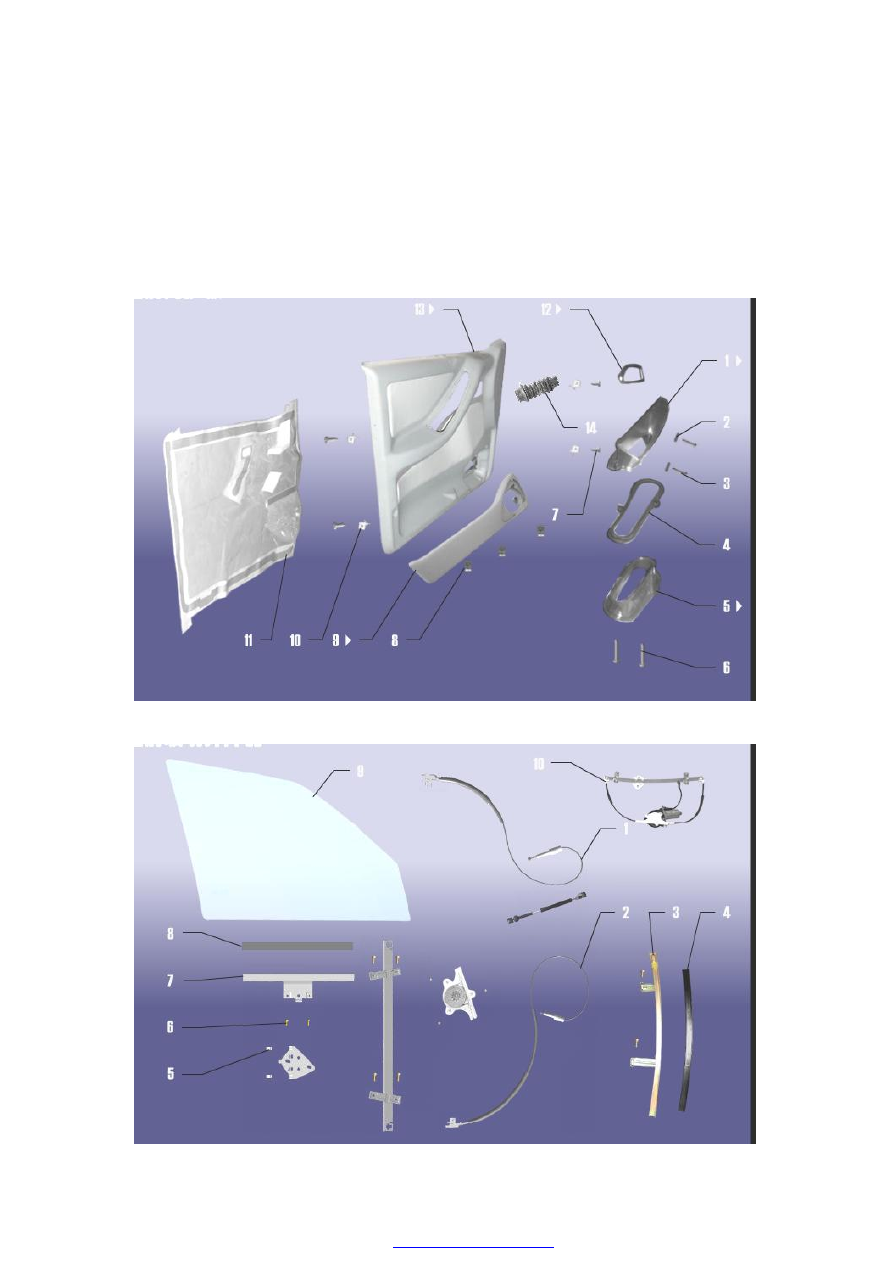
1. Lamp system constitution diagram 


2. Preparation 

Tools: Flat-end screwdriver, Phillips screwdriver, socket wrench 10#, 13#, pinchers 

3. Attentions 

3.1. Please put on necessary appliances for labor protection in order to avoid the accident 

3.2. Please cut the electricity of the battery package for fear spoiling electric devices 

3.3. Pay attention to the right steps of the disassembly of the glass for fear spoiling the glass 

4. Disassembly steps 

4.1.The  handle  of  the  inside  door  is  fixed  to  the  inside 

panel  of  the  door  through  its  self-locking  mechanism  & 

bolts  firstly  push  the  protective  frame  according  to  the 

shown direction of the black arrow tip and then take it out 

according to the shown direction of the white arrow tip 


4.2. Prize up the upper end cover of the glass lifting rotary 

handle,  unscrew  fixing  bolts  of  the  rotary  handle  with  the 

Phillips screwdriver and then take it out 


4.3.  Disassemble  the  downside  bolts  (each  bolt  at  the  left 

& right) of the inside handrail of the door. The down cover 

can be opened after the disassembly of the bolts 


4.4.  After  opening  the  down  end  cover  of  the  handrail, 

other  2  bolts  fixing  the  upper  end  cover  can  be  seen  and 

the down ends cover can be taken out after the disassembly 

of bolts 


4.5.After totally disassembling upper & down end cover of 

the  inside  handrail  of  the  door,  check  along  the  inside 

shield  two-side  edge,  may  find  2  bolts  at  the  central  area, 

each bolt at left & right side. After taking out bolts, pull up 

the inside shield from down to up. 


  (Shown as the figure: take out the inside shield upwards) 


4.6.  After  disassembling  inside  shield  of  the  door,  firstly 

take out the plug of the horn harness. After well putting the 

inside  shield  of  the  door,  take  out  the  horn  outside  cover. 

At  last  unscrew  4  fixing  bolts  of  the  front  horn  with  the 

Phillips screwdriver and take out the horn assembly. 


4.7.  In  order  to  disassemble  any  parts  of  the  door,  the 

water-proof  need  to  be  taken  out  and  the  door  knob  & 

fixing clips also need to be taken out. 


4.8.  Shown  as  the  arrow  in  the  figure,  the  lock  is  fixed  to 

the door frame through 2 fixing bolts. Screwed  moment:

20±2N.m 


4.9.  Disassemble  the  lock  controlled  device,  take  out 

fixing  clips  of  the  controlled  device  &  lock  device  when 

disassembling  the  lock.  The  manual  lock  device  located 

between  the  assembly  position  of  the  lock  and  the  starter 

and  the  choosing  level  are  the  same  in  the  car  with  the 


4.10.Shown  as  the  arrow  in  the  figure,  unscrew  2  fixing 

bolts inside lock of the front door & the handle, then push 

it rightwards and then may take it out directly 


4.11.  Unscrew  2  inner  triangle  plate  bolts  fixing  exterior 

rear view mirror with the Phillips screwdriver   


4.12.  After  disassembling  the  inner  triangle  plate  of  the 

rear view  mirror,  may see 3 bolts  which are located in the 

triangle  form,  fixing  exterior  rear  view  mirror.  After 

disassembling  these  3  bolts,  the  exterior  rear  view  mirror 

assembly can be taken out by hands directly. 


4.13.  Drop  the  glass  to  the  lowest  position,  and  then 

unscrew  2  bolts  fixing  the  glass  with  the  Phillips 

screwdriver 


Content   ..  60  61  62  63   ..