Chery A15 / 480 LHD model. Manual - part 75


  Index      Chery     Chery A15 / 480 LHD model - service repair manual


Search            


Content   ..  73  74  75  76   ..


Chery A15 / 480 LHD model. Manual - part 75


CLUTCH OVERHAUL 

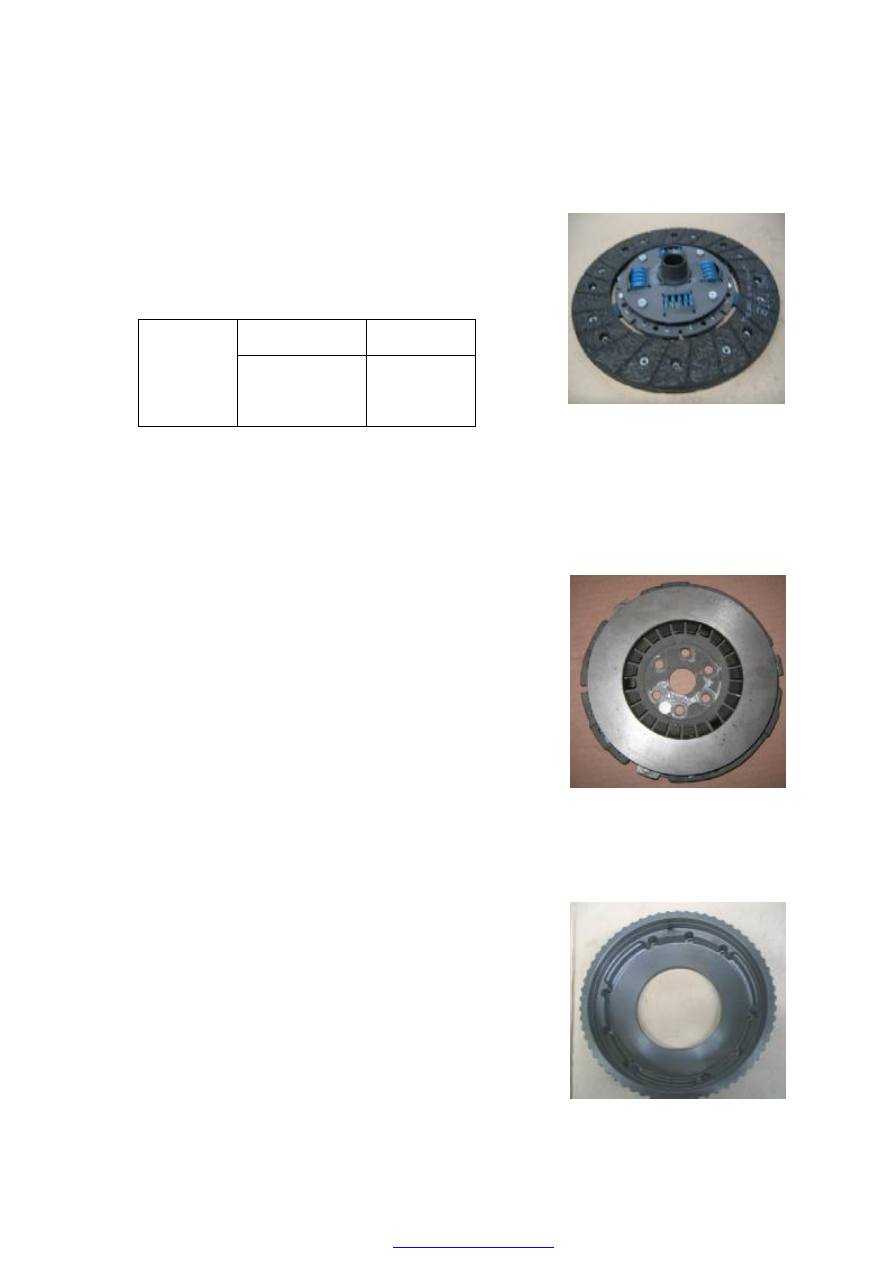
·  Clutch  friction  disk:  measure  the  dent  depth  of 

rivet  head,  i.e. the  distance  between the rivet  head 
and the friction disk surface. In case it is found that 
the  depth  reaches  the  using  limit  for  any  hole,  the 
friction disk shall be changed. 

Standard value  Maintenance 

Rivet head 

Dent depth 

1.5mm 

0.06in 

0.5mm 

0.02in 

·Measure the clutch disc runout using a dial indicator. 

If the runout is excessive, replace the clutch disc. 

Runout          0.8mm    max 


Clutch pressure plate: 

·Examine  whether  the  diaphragm  spring  has 

abnormal wear or damage. 

·Examine whether the pressure plate has wear or hot 

point. 

·In  case  of  any  abnormality,  the  pressure  plate  shall 

be  changed.  The  pressure  plate  shall  not  be 
disassembled  into  two  parts:  diaphragm  spring  and 
pressure plate. 

·Measure the clutch pressure plate runout using a dial 

indicator.  If  the  runout  is  excessive,  replace  the 
clutch disc. 

Runout          0.25mm    max 

Flywheel: 

·Examine  whether the  connection  surface  of  friction 

disk  exists  abnormal  wear  or  hot  point;  the  change 
or maintenance shall be conducted if necessary. 

·Measure the  flatness of the flywheel with a straight 

edge and a feeler gauge. If not as specified, replace 
the clutch cover. 

Maximum clearance      0.05mm 

Service limit                    0.15mm 


CLUTCH INSTALLATION 

Before the assembly, flywheel surfaces and pressure 
plate shall be clear and dry. 
——Assemble the pressure plate on the crankshaft 

and  screw  up  bolts  in  accordance  with 
prescribed moment. 


—— Assemble release disk and fit on snap ring. 
—— Assemble clutch disk. 
 

N•m 

Kg-m 

1b-ft 

Pressure plate 

assembly bolt 

Torque 

57-65 

5.7-6.5 

41.5-47.0 


—— Assemble flywheel. 
——Screw up flywheel bolt uniformly according to 

the diagonal line. 

——Coat  a  thin  layer  of  grease  on  the  input  axle 

and  then  assemble  the  transmission  with 
engine. 


Remarks: 
When  put  the  input  axle  of  transmission  into  the 
clutch  friction  disk,  the  flywheel  shall  be  revolved 
until  the  input  axle  of  transmission  and  spline 
meshed. 
 

N•m 

Kg-m 

1b-ft 

Flywheel 

bolt 

Torque 

18-28 

1.8-2.8 

13.5-20.0 


TROUBLE DIAGNOSIS 


Trouble 

symptom 

Cause 

Treatment method 

Slip of clutch   

•Free travel (free play) of clutch pedal is wrong. 
•Abrasion or oil stain for clutch friction disk. 
•Distortion  for  friction  disk 、 pressure  plate  or 

flywheel surface. 
•Diaphragm springs become weaker. 

Adjust free travel 

Change friction disk 

Change 

frication 

disk, 

pressure plate or flywheel 

Change clutch pressure plate 

Uncompleted 

segregation of 

clutch 

•Free travel of clutch pedal is wrong. 
•Diaphragm  springs  become  weaker  or  abrasion  for 

stabber fingertip. 

•Rust for input axle spline. 
•Mutilation  or  abrasion  for  input  axle  spline  of 

transmission. 
•Excessive  nodding  action  for  clutch  friction  disk 

assembly. 
•Abrasion or oil stain for clutch friction disk. 

Adjust free travel   

Change pressure plate 


Lubricate 

Change the input shaft 


Change friction disk 


Change friction disk 

Vibration of 

clutch 

•Brighten  of  clutch  friction  disk  (to  become 

glassiness). 
•Oil stain for clutch friction disk. 
•Bad  skid  of  segregation  bearing  on  the  bearing 

sleeve of transmission. 
•Shimmy  of  clutch  friction  disk  assembly  or  bad 

connection of friction disk. 
•Vibration  reduction  torsion  springs  of  clutch 

friction disk assembly become weaker. 
•Loose of rivet of clutch friction disk. 
•Distortion of pressure plate or flywheel surface. 

 
•Loose  of  the  binding  bolt  of  flywheel  or  loose  of 

binding bolt of pressure plate assembly. 

Repair  or  change  friction 

disk 

Change friction disk 

Lubricate 


Change friction disk 


Change friction disk 


Change friction disk 

Change  pressure  plate  or 

flywheel 

Screw down 

Clutch noise 

•Abrasion or mutilation for segregation bearing. 
•Abrasion for front bearing of input axle. 
•Abnormal noise for clutch friction disk. 
•Crack for clutch friction disk. 
•Abnormal  noise  for  pressure  plate  and  diaphragm 

spring. 

Change segregation bearing 

Change input shaft bearing 

Change friction disk 

Change friction disk 

Change pressure plate 

Non-separation of 

clutch 

•Clutch friction disk has fat liquor. 
•Serious wear of clutch friction disk. 
•Rivet head is displayed in surface of disk. 
•Torsion springs become weaker 

Change friction disk 

Change friction disk 

Change friction disk 

Change friction disk 


COOLING SYSTEM 

DESCRIPTION OF COOLING SYSTEM


… … …… …… … …… …… … …… …E-2


COMPONENTS OF 480 ENGINE COOLING SYSTEM … … ……………………E-2 

WORKING  PRINCIPLE  OF  COOLING  SYSTEM  …  …  ……  ……  …  …………E-2 

PARAMETERS OF COOLING SYSTEM … … …… …… … …… …… … …… E-3


ENGINE COOLANT … … …… …… … …… …… … …… …… … …………… …E-3


COOLANT DISCHARGE … … …… …… … …… …… … ………………………E-3 

COOLING  SYSTEM  CLEANING …  …  …… ……  …  ……  …… … ………    …E-3 

COOLANT FILLING … … …… …… … …… …… … …… …… … ……………E-4 

COOLING SYSTEM CHECKUP …… …… ……… ……… ……… …… …… …E-5 

COOLING SYSTEM MAINTENANCE WARNING … … …… …… … ………    …E-5


WARNING … … ………… ………… ………… ………… …… …… … …… …E-5


WATER PUMP … … …… …… … …… …… … …… … … … ………………………E-6


STRUCTURE    … … …… …… … …… …… … …… …… … …… …… … …E-6 

DISASSEMBLY/ASSEMBLY  … … ……  …… … …… ……  …  ……  ……  …  …E-6 

THERMOSTAT


… … …… …… … …… …… … …… …… … …… …… … …… …E-7 

DISASSEMBLY/ASSEMBLY  … …  ……  …… … ……  ……  …  ……  ……  …  …E-7


WATER TEMPERATURE  SENSOR  … … ……  ……  … …… ……  …  ………… …E-9


DISASSEMBLY/ASSEMBLY  … …  ……  …… … ……  ……  …  ……  ……  …  …E-9 

CHECKING … … …… …… … …… …… … …… …… … …… …… … …… E-9


COOLING  FAN … … …… …… … …… …… … …… …… … …… …… … …… E-9


DISASSEMBLY/ASSEMBLY  … …  ……  …… …  ……  ……  … …… ……  …  …E-9 

GUIDELINE FOR DISASSEMBLY … … …… …… … …… …… … ……… …E-10 

EXPANSION RESERVOIR


… … …… …… … …… …… … …… …… … …… …E-11 

DISASSEMBLY/ASSEMBLY … … …… …… … …… …… … …… …… … …E-11


ASSEMBLY OF RADIATOR …… …… …… … ……… …… … …… …… … …… E-12


DISASSEMBLY/ASSEMBLY … … …… …… … …… …… … …… …… … …E-12


Content   ..  73  74  75  76   ..