Chery A15. Manual - part 230
 

  Index      Chery     Chery A15 - service repair manual


Search            


Content   ..  228  229  230  231   ..


Chery A15. Manual - part 230


2. Camshaft sprocket wheel – unfixing 
(1) Detach the storage battery cathode 
fittings.  
(2) Unfix the valve chamber cover (see 
Engine/cylinder cover/valve chamber 
cover – Fixing).  
(3) Unfix the crank shaft position sensor. 
(4) Unfix the camshaft position sensor.  
(5) Turn the camshaft and align the 
triangle timing mark on the camshaft 
sprocket wheel.  
(6) Turn the camshaft to where the the 
triangle mark is.  
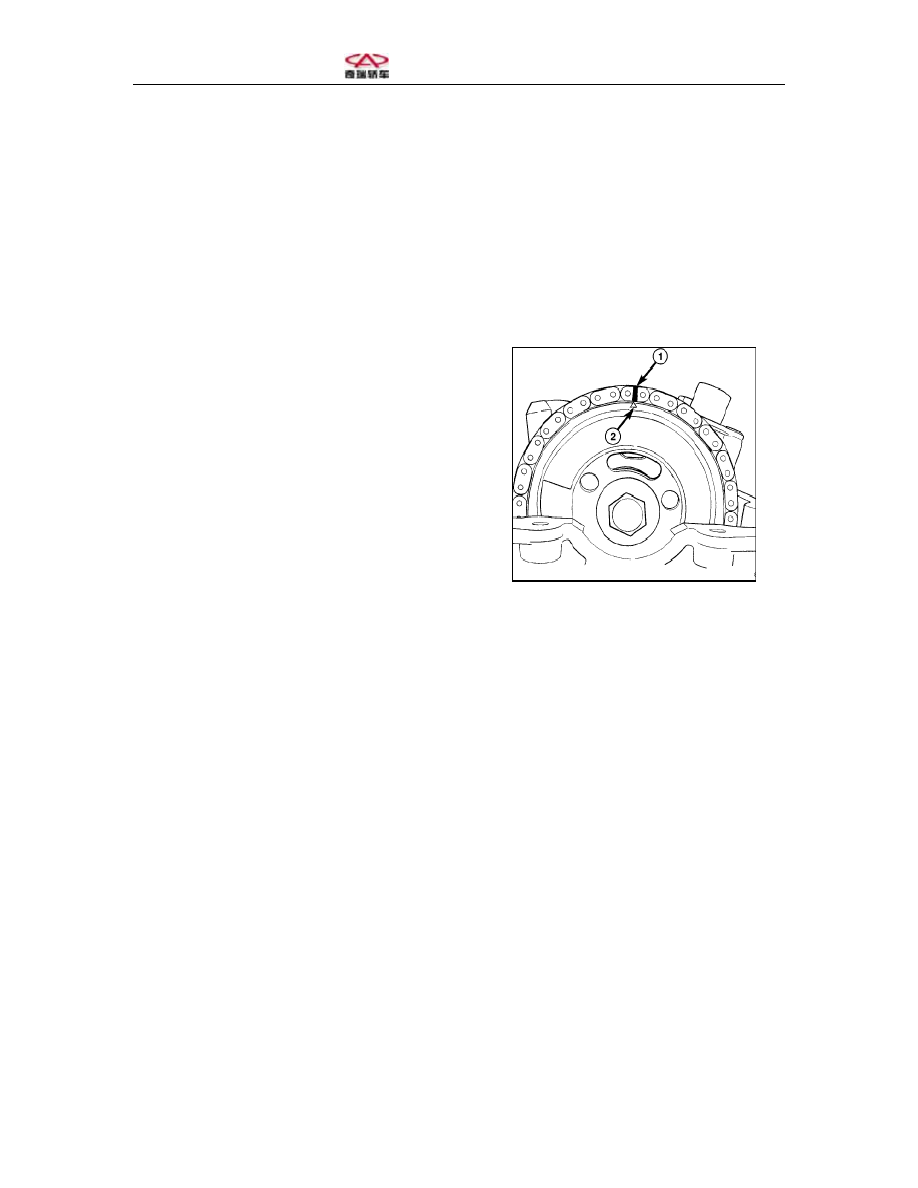
(7) Align the timing chain mark with the 
canshaft timing mark (Figure 20).  


1-Timing mark 
2-Camshaft sprocket timing mark 


(8) Fix the crank shaft sprocket wheel 
with the special tool and screw off the 
crank shaft sprocket wheel bolts.  
(9) Unfix the timing chain tensioner off 
the cylinder body and unfix the engine 
oil chamber and timing chain tensioner.  
(10) Unfix the camshaft sprocket wheel 
off the crank shaft.  
 
 
Five. Crank shaft sprocket wheel 
1. Unfixing 
(1) Unfix the timing chain 
(2) Unscrew the crank shaft shock 
absorber bolts and unfix the crank shaft 
sprocket with special tools (Figure 21).  


Figure 20 Timing Chain Mark 


(3) Fix the crank shaft and unfix the 
sprocket wheel.  
 
 
1-Special tool 
2-Special tool 
3-Special tool 


2. Fixing 
(1) Fix the crank shaft sprocket wheel 
with special tools (Figure 22) 
(2) Fix the crank shaft sprocket wheel 
with special tools.  
(3) Fix the sprocket wheel and do not 
turn the crank shaft.  
 
 
1-Special tool 
2-Special tool 
3-Special tool 


Six. Fixing the camshaft sprocket 
wheel 
(1) Align with the timing sporcket wheel 
mark and fix the timing chain onto the 
camshaft sprokect wheel.  
(2) Screw on the camshaft sprocket 
wheel bolts with a torque of 115N.m.  
(3) Reset the timing chain tensioner.  
(a) Take out the engine oil chamber from 
the timing chain tensioner (Figure 25).  
(b) Place the timing chain onto an even 
surface.  
(c) Manually press the tensioner as the 
figure shows (Figure 26).  
(4) Fix the engine oil chamber onto the 
timing chain tensioner (Figure 25).  
(5) Fix the timing chain tensioner with a 
torque of 62N.m (46ft.lbs). 


Figure 21 Unfixing the Crank Shaft 

Sprocket Wheel 


Figure 22 Fixing the Crank Shaft 

Sprocket Wheel 


(6) Pry off the right timing chain with a 
screw driver (Figure 23). 
(7) Fix the valve chamber cover (see 9-
Engine/cylinder cover/valve chamber 
cover – fixing). 
(8) Fix the camshaft position sensor with 
a torque of 10N.m.  
(9) Connect the storage battery cathode.  


Seven. Timing sprocket wheel and 
guide board 
1. Fixing 
(1) Fix the left timing chain guide board 
with a screwing torque of 28N.m 
(250in.lbs) (Figure 19). 
(2) Fix the right timing chain guide 
board with a screwing torque of 28N.m 
(Figure 24). 
(3) Unfix the valve chamber cover to 
allow the timing chain to move freely.  
(4) Fix the timing chain crank shaft 
sproket wheel and align it with the 
timing mark (Figure 24).  
1-Align the camshaft with the single 
mark.  
2-Camshaft sprocket wheel 
3-Left timing chain guide board (moving) 
4-Right timing chain guide board (fixing) 
5-Piston chamber 
6-Engine oil chamber 
7-Timing chain tensioner 
8-Crank shaft sprocket wheel 
9-Timing chain 
10-Crank shaft timing mark shall be 
aligned with the double metal marks 


Figure 23 Actuate the Timing Chain 

Tensioner 


Figure 24 Timing Driving System 


(5) Fix the camshaft sprocket wheel.  
(6) Fix the camshaft sprocket wheel, use 
special tools to fix the sprocket wheel 
with a torque of 115N.m. 
1-Check valve 
2-Tensioner plug 
3-Engine oil chamber 
4-Timing chain tensioner 
 
 
(7) Readjust the timing chain tensioner 
as follows:  
(a) Take out the engine oil chamber from 
the timing chain tensioner (Figure 25). 
(b) Place the tensioner on an even 
surface. 
(c) Press open the check valve and 
manually press the tenioner (Figure 26).  
(d) Fix the engine oil chamber into the 
timing chain tensioner (Figure 25).  
(8) Fix the engine oil chamber of timing 
chain tensioner into the tensioner.  
(9) Fix the timing chain tensioner by 
screwing on the plug with a torque of 
62N.m (46ft.lbs.) 
(10) Press down the left timing chain 
guide board to allow the chain to move 
freely (Figure 27).  


(11) Fix the cylinder cover plug with a 
screwing torque of 18N.m. 
(12) Fix the valve chamber cover (see 
Engine/Cylinder Cover/Valve Chamber 
Cover – Fixing). 
(13) Fix the camshaft position sensor 
with a torque of 10N.m (85in.lbs) and 
connect the plug.  


Figure 25 Timing Chain Tensioner 


Figure 26 Reset the Timing Chain 

Tensioner 


Figure 27 Actuate the Timing Chain 

Tensioner 


Content   ..  228  229  230  231   ..