Chery A series. Manual - part 113


  Index      Chery     Chery A series - service repair manual


Search            copyright infringement  


Content   ..  111  112  113  114   ..


Chery A series. Manual - part 113


Technical parameters 

Voltage valueV

   Current 

value

A 

11 

Less than 90 


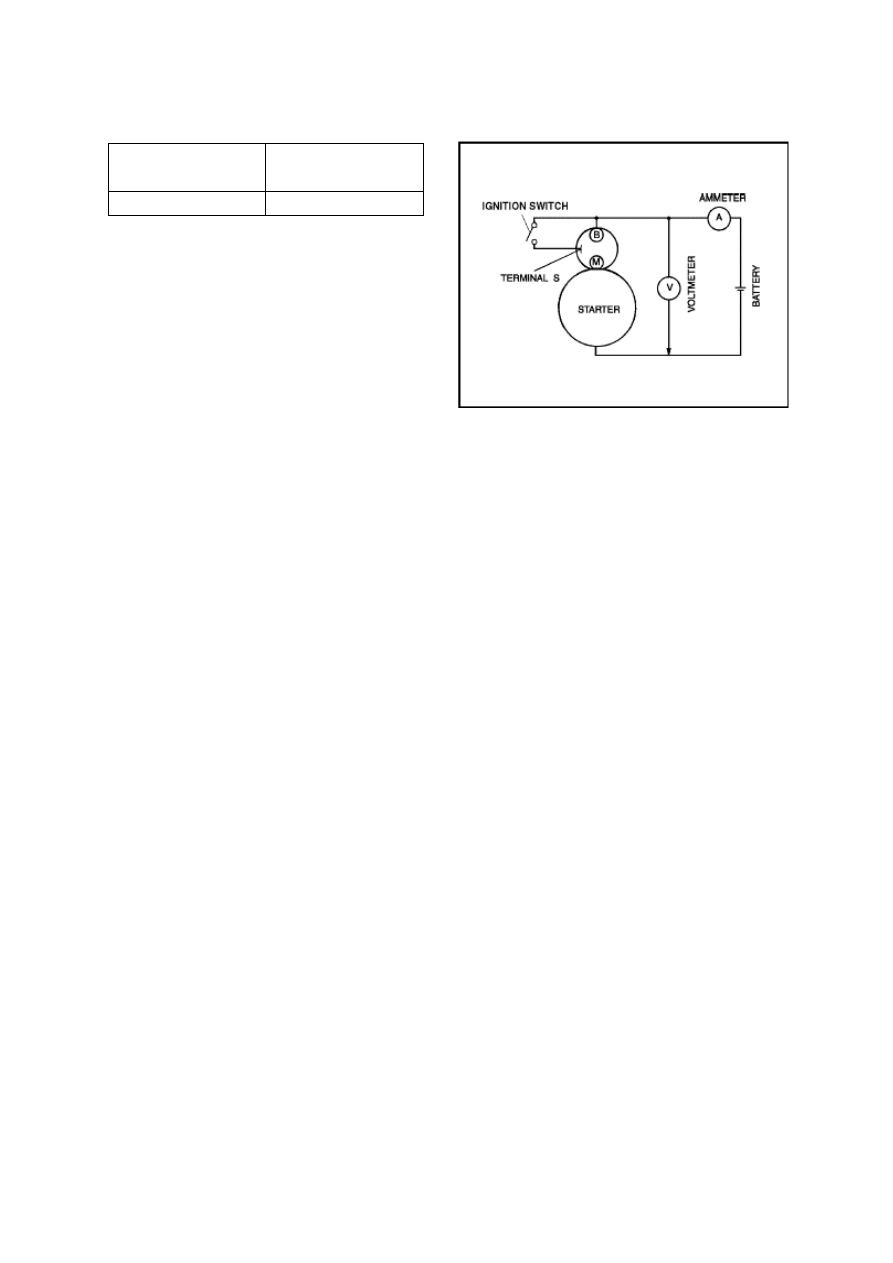
LOAD INSPECTION OF STARTER 

1. Verify that the battery is fully charged. 

2. Initiate the engine, and check whether any block or noise during the rotation of the starter 

rotor. 

● If there is no abnormality, then please check the followings: 

Remove the starter and check the solenoid switch and starter. 

● Check the related winding coil and ignition switch. 


T-10


LIGHTING SYSTEM 

REMOVAL/INSTALLATION OF LIGHTINGS FOR THE COMPLETE CAR 

1. Headlamp 

Removal  Disconnect the negative grid of 
the battery
) 

Remove the radiator grille, and use sleeve to 
remove the four fixing bolts of the 
headlamp. 

Unplug the wiring harness connector behind 
the headlamp holder. 

Then place the headlamp on the 

corresponding position. 

Installation 

Install the headlamp properly on the 

corresponding position, and ensure that the 
fixing hole position of the bolt is concentric 
with the welded nut on the crossbeam of the 
headlamp; 


Use 4 bolts, spacers and 1 nut to locate the 
position of the front headlamp, put down the 
front hood, confirm and adjust position of 
the headlamp (whether it is extruding or 
intruding; the requirement is such that the 
headlamp should be slightly extruded 
beyond the front hood border. The arc shape 
of the headlamp can be felt by hand), after 
that tighten the fastener, with a tightening 
torque of 1.5±0.2 N.m; 

Install the radiator grille, and pay attention 
not to scratch the paint on the protection 
bumper; ensure that the spacing between the 
left and right fenders is symmetrical. 

Connect the wiring harness plug to the lamp 
holder socket. 


2. Removal/Installation of the front fog lamp: (Disconnect the negative grid of the 
battery) 

Connect the corresponding connector to the wiring harness of the fog lamp; 

T-11


Place the fog lamp into the installation hole from the front, and ensure that the 3 screw 
holes are concentric with the holes on the front bumper; 

Tighten the 3 self-tapping screws, with a tightening torque of 1.5±0.2N.m; 

Install the grilles on the bottom part (see instruction in car body) 

3. Removal/installation of side turn signal lamp: (Disconnect the negative grid of the 
battery)   

Connect the wiring harness from the lamp holder; 

First align the clipping end with car body in the correct direction, and then press it in by 
force. 

4. Removal/installation of fixed part of tail 
lamps (including position lamp/brake lamp, 
and turn signal lamp): 

Align at the holes of car body, so as to install 
the lamp on the body properly; 

Tighten the 3 fixing screws, pay attention to 
adjust the facial gap with the car body, feel 
the difference in height with hand and make 
necessary adjustment while tightening; 

Plug the wiring harness onto the lamp 

holder, and put back the carpet. 

5. Removal/installation of moving part for 
the tail lamp (including the backup lamp 
and tail fog lamp) 

Align at the holes of the car body, so as to 
install the lamp on the body properly; 

Tighten the 4 fixing screws, pay attention to 
adjust the facial gap and spacing (the trunk 
lid may be  closed) with the car body and 
fixing parts, feel the difference in height 
with hand and make necessary adjustment 
while tightening; 

Plug the wiring harness onto the lamp 

holder, and put down the trunk lid. 


6. Removal/installation of license lamp 

Connect the connector of the wiring harness properly; 

Align the self-tapping screw with the hole center of expansion nut; tighten two self-tapping 

screws with a tightening torque of 1.5±0.2N.m. Assemble the guard plate of license lamp; 


T-12


Align lock core of the trunk with the hole, so as to match the guard plate with the car body 
properly; 

Tighten 2 self-tapping screw, pay attention to adjust the facial gap, spacing and other 
differences between the car body and the movable part, feel the difference in height with 
hand and make necessary adjustment while tightening; 

Open the trunk lid; 

Tighten 2 square nuts of the fixing bolt; 

Assemble the linkage rod, lid, etc. of the lock hole (see instruction of car body), and then 
put down the trunk lid.   

7. Removal/installation of interior ceiling 
lamp 

Connect the connector of the wiring harness 
properly; 

Place it right into the installation hole of the 
ceiling towards the correct direction, firstly 
align one end with the ceiling and then press 
the ceiling light into the proper position with 
hand. 


8. Removal/installation of trunk lamp 

Open the trunk lid; 

Connect the connector of the wiring harness properly; 

Use the clipping end side to latch with cover of the back loudspeaker, after that just press 
the light into it with hand. Put down the trunk lid;   

9. Removal/installation of high mounted stop lamp 

Press the two ends so as to separate the lamp holder and the lamp housing, and then pull out 
the conducting wire connector;   

Plug both of the single-terminal sockets of the conducting wires into the inserting plates of 
the windscreen; 

Install the lamp housing according to the combination structure of the clipping slot, pay 
attention to the matching of the inverted slot with the fixing pin, so as to ensure that the 
lamp housing is firmly clipped to the position; 

Plug the conducting wire and lamp holder properly, and ensure that the lamp holder and 

housing are assembled in the proper position. 


T-13


Content   ..  111  112  113  114   ..