BMW 325xi Sports Wagon (2006 year). Instruction - part 12


  Index      BMW     BMW 325xi Sports Wagon - instruction 2006 year in english


Search            


Content   ..  10  11  12 


BMW 325xi Sports Wagon (2006 year). Instruction - part 12


M

o

bi

lity

 203

Re

fe

re

n

c

e

At

 a

 g

la

n

c

e

Co

n

tr

o

ls

D

riv

in

g ti

ps

C

o

m

m

uni

ca

ti

o

n

s

Na

v

iga

ti

on

En

te

rt

a

in

m

e

n

t

Giving and receiving assistance

Emergency calling*

Conditions for an emergency call:

>

Full preparation package mobile phone

>

BMW Assist is enabled. Enabling BMW 
Assist, refer to page

174

.

>

Radio readiness is on.

>

The car phone is logged on to a mobile tele-
phone network.

>

The emergency call system is operable.

If your subscription contract with BMW Assist 
expires, the car phone can be deactivated by a 
BMW Center without having to schedule an 
appointment at a workshop. Once the car 
phone has been deactivated, emergency calls 
are not possible. The car phone can be reacti-
vated by a BMW Center after signing a new 
contract.

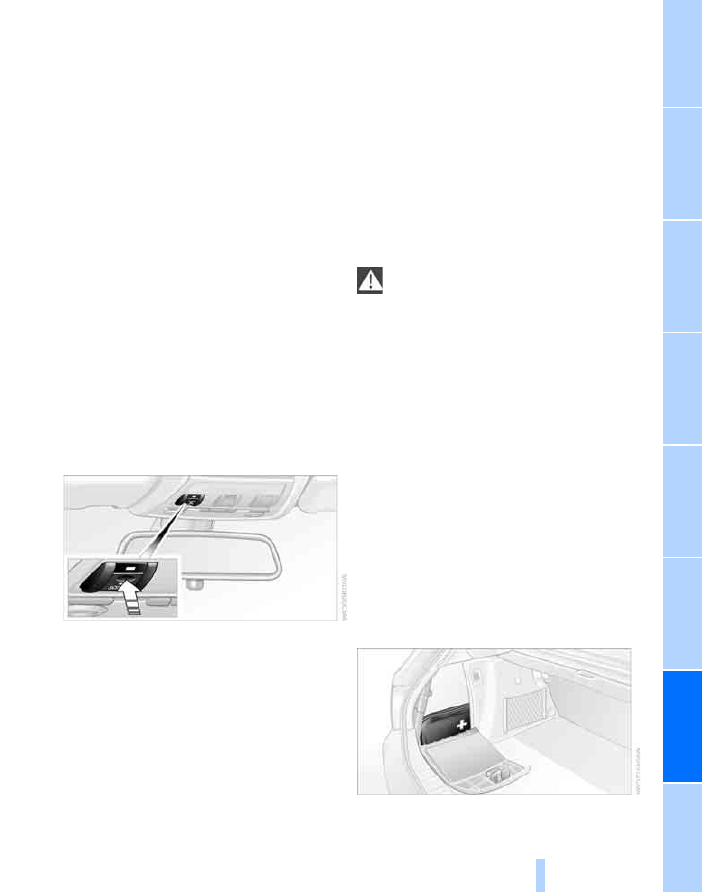
Initiating an emergency call

1.

Briefly press the cover flap to open.

2.

Press the button for at least 2 seconds.

The LED in the button lights up. As soon as the 
voice connection to the BMW Assist response 
center has been established, the LED flashes.
If the circumstances allow this, remain in the 
vehicle until the connection has been estab-
lished. You will then be able to provide a 
detailed description of the situation.
If the current location of your vehicle can be 
determined, it will be transmitted to the BMW 
Assist response center.

If the LED is flashing but the emergency 
response center cannot be heard over the 
hands-free system, it is possible that the 
hands-free system is malfunctioning. The 
emergency response center may still be able to 
hear you, however.
Under certain conditions, an emergency call is 
automatically initiated immediately after a 
severe accident. The automatic emergency call 
is not affected by the button being pressed.

For technical reasons, the emergency call 
cannot be guaranteed under unfavorable 

conditions.

<

Roadside Assistance

The BMW Group's Roadside Assistance ser-
vice is there to assist you around the clock in 
the event of a breakdown, including on week-
ends and public holidays.
The phone numbers of the Roadside Assis-
tance in your home country can be found in the 
Contact brochure.
In vehicles equipped with BMW Assist or 
TeleService, you can establish contact with the 
BMW Group's Roadside Assistance for break-
down assistance directly via iDrive, refer to 
page

176

.

First aid pouch*

The first aid pouch is located on the left-hand 
side of the cargo area.

Giving and receiving 

as

sistance

204

Some of the articles contained in the first aid 
pouch have a limited service life. Therefore, 
check the expiration dates of the contents reg-
ularly and replace any items in good time, if nec-
essary.

Warning triangle*

The warning triangle is located behind the left-
hand trim in the cargo area. Press the tab to take 
it out.

Jump starting

If the car's own battery is flat, your BMW's 
engine can be started by connecting two 
jumper cables to another vehicle's battery. You 
can also use the same method to help start 
another vehicle. Only use jumper cables with 
fully-insulated clamp handles.

Do not touch any electrically live parts 
when the engine is running, or a fatal acci-

dent may occur. Carefully adhere to the follow-
ing sequence, both to prevent damage to one or 
both vehicles, and to guard against possible 
personal injuries.

<

Preparation

1.

Check whether the battery of the other 
vehicle has a voltage of 12 volts and 
approximately the same capacitance in Ah. 
This information can be found on the bat-
tery.

2.

Switch off the engine of the assisting vehi-
cle.

3.

Switch off any consumers in both vehicles.

There must not be any contact between 
the bodies of the two vehicles, otherwise 

there is a danger of shorting.

<

Connecting jumper cables

Connect the jumper cables in the correct 
order, so that no sparks which could 

cause injury occur at the battery.

<

Your BMW has a jump-starting connection in 
the engine compartment which acts as the bat-
tery's positive terminal, refer also to the Engine 
compartment overview on page

191

. The cap is 

marked with +.

1.

Pull the cap of the BMW jump-starting con-
nection up to remove.

2.

Attach one terminal clamp of the plus/+ 
jumper cable to the positive terminal of the 
battery or a starting-aid terminal of the vehi-
cle providing assistance.

3.

Attach the second terminal clamp of the 
plus/+ jumper cable to the positive terminal 
of the battery or a starting-aid terminal of 
the vehicle to be started.

4.

Attach one terminal clamp of the minus/– 
jumper cable to the negative terminal of the 
battery or to an engine or body ground of 
the assisting vehicle. 

M

o

bi

lity

 205

Re

fe

re

n

c

e

At

 a

 g

la

n

c

e

Co

n

tr

o

ls

D

riv

in

g ti

ps

C

o

m

m

uni

ca

ti

o

n

s

Na

v

iga

ti

on

En

te

rt

a

in

m

e

n

t

Your BMW has a special nut as body ground 
or negative pole.

5.

Attach the second terminal clamp of the 
minus/– jumper cable to the negative termi-
nal of the battery or to the engine or body 
ground of the vehicle to be started.

Starting the engine

1.

Start the engine of the donor vehicle and 
allow it to run for a few minutes at slightly 
increased idle speed.

2.

Start the engine on the other vehicle in the 
usual way. 
If the first start attempt is not successful, 
wait a few minutes before another attempt 
in order to allow the discharged battery to 
recharge.

3.

Let the engines run for a few minutes.

4.

Disconnect the jumper cables by reversing 
the above connecting sequence.

If necessary, have the battery checked and 
recharged.

Never use spray fluids to start the 
engine.

<

Tow-starting, towing away

Observe the applicable laws and regula-
tions for tow-starting and towing vehi-

cles.

<

Do not transport any occupants other 
than the driver in a vehicle that is being 

towed.

<

Using a tow fitting

The screw-in tow fitting must always be carried 
in the car. It can be screwed in at the front or 
rear of the BMW.
It is stored in the onboard tool kit underneath 
the cover on the right-hand side of the cargo 
area, refer to page

197

.

Use only the tow fitting provided with the 
vehicle and screw it all the way in. Use the 

tow fitting for towing on paved roads only. Avoid 
lateral loading of the tow fitting, e.g. do not lift 
the vehicle by the tow fitting. Otherwise the tow 
fitting and the vehicle could be damaged.

<

Access to screw thread

Rectangular cover panel in bumper:
Press on the upper edges of the cover panel.

Front

Rear

Being towed

Make sure that the ignition is switched on, 
refer to page

53

, otherwise the low-beam 

headlamps, tail lamps, turn signal indicators and 
windshield wipers may be unavailable. If the 
electrical system fails, do not attempt to tow-
start or tow away the car. The electric steering 

Giving and receiving 

as

sistance

206

wheel lock cannot be disengaged and the car is 
not steerable. Jump starting, refer to page

204

Power steering assistance is not available when 
the engine is not running. Thus, braking and 
steering will require increased effort.

<

Switch on the hazard warning flashers, depend-
ing on local regulations.

Manual transmission

Gearshift lever in idle position.

Automatic transmission

Selector lever in position N.
Changing selector lever positions, refer to 
page

56

.

Do not exceed a towing speed of 45 mph 
or 70 km/h and a towing distance of 

90 miles/150 km, otherwise the automatic 
transmission may be damaged.

<

Towing with a tow bar

The towing vehicle must not be lighter 
than the towed vehicle, otherwise it may 

be impossible to maintain control.

<

The tow fittings used should be on the same 
side on both vehicles. Should it prove impossi-
ble to avoid mounting the tow bar at an angle, 
please observe the following:

>

Clearance and maneuvering capability will 
be sharply limited during cornering.

>

The tow bar will generate lateral forces if it is 
attached offset.

Attach the tow bar to the tow fittings only, 
as attaching it to other parts of the vehicle 

could result in damage.

<

Towing with a tow rope

When starting off in the towing vehicle, make 
sure that the tow rope is taut.

To avoid jerking and the associated 
stresses on vehicle components when 

towing, always use nylon ropes or nylon straps. 
Attach the tow rope to the tow fittings only, as 
attaching it to other parts of the vehicle could 
result in damage.

<

Towing with a tow truck

Have the BMW transported with a tow truck 
with a so-called lift bar or on a flat bed.

Do not lift the vehicle by a tow fitting or 
body and chassis parts, otherwise dam-

age may result.

<

325xi

Do not tow a BMW with xDrive with just 
the front or rear axle raised, otherwise the 

wheels could lock up and the transfer case 
could be damaged.

<

Have the BMW transported on a flatbed surface 
only.

Tow-starting

If the electrical system fails, do not 
attempt to tow-start or tow away the car. 

The electric steering wheel lock cannot be dis-
engaged and the car is not steerable. Jump 
starting, 
refer to page

204

.

<

Do not tow-start vehicles with an auto-
matic transmission. Only tow-start vehi-

cles with a catalytic converter with the engine 
cold. It is better to jump start the engine, refer to 
page

204

.

<

M

o

bi

lity

 207

Re

fe

re

n

c

e

At

 a

 g

la

n

c

e

Co

n

tr

o

ls

D

riv

in

g ti

ps

C

o

m

m

uni

ca

ti

o

n

s

Na

v

iga

ti

on

En

te

rt

a

in

m

e

n

t

1.

Switch on the hazard warning flashers, 
comply with local regulations.

2.

Switch on the ignition, refer to page

53

.

3.

Shift into 3rd gear. 

4.

Have the vehicle tow-started with the clutch 
completely depressed and slowly release 
the clutch. After the engine starts, immedi-
ately depress the clutch completely again.

5.

Stop at a suitable location, remove the tow 
bar or rope and switch off the hazard warn-
ing flashers.

6.

Have the vehicle checked.

Reference

This chapter contains technical data,

short commands for the voice command

system and an index that will help you

find information most quickly.

Reference

Technical data

210

Technical data

Engine data

 325xi

Displacement

cu in/cm

µ

182.8/2,996

Number of cylinders

6

Maximum power output

hp

215

at engine speed 

rpm

6,250

Maximum torque 

lb ft/Nm

185/251

at engine speed 

rpm

2,750

Re

fe

re

n

c

e

 211

At

 a

 g

la

n

c

e

Co

n

tr

o

ls

D

riv

in

g ti

ps

C

o

m

m

uni

ca

ti

o

n

s

Na

v

iga

ti

on

En

te

rt

a

in

m

e

n

t

M

o

bi

lity

Dimensions

All dimensions given in inches/mm. Smallest turning circle diam.: 38 ft 9 in/11.8 m

Technical data

212

Weights

Never exceed either the approved axle loads or 
the gross vehicle weight.

325xi

Curb weight

>

with manual transmission

lbs/kg

3,737/1,695

>

with automatic transmission 

lbs/kg

3,781/1,715

Approved gross weight

>

with manual transmission

lbs/kg

4,839/2,195

>

with automatic transmission 

lbs/kg

4,883/2,215

Load

lbs/kg

1,102/500

Approved front axle load 

lbs/kg

2,293/1,040

Approved rear axle load

lbs/kg

2,646/1,200

Approved roof load capacity 

lbs/kg

165/75

Cargo area capacity

cu ft/l

16.2/460 - 48.9/1,385

Re

fe

re

n

c

e

 213

At

 a

 g

la

n

c

e

Co

n

tr

o

ls

D

riv

in

g ti

ps

C

o

m

m

uni

ca

ti

o

n

s

Na

v

iga

ti

on

En

te

rt

a

in

m

e

n

t

M

o

bi

lity

Capacities

Notes

Fuel tank

US gal/liters

approx. 16.1/61

Fuel grade: page

183

including reserve of

US gal/liters

approx. 2.1/8.0

Window washer system

For more details: page

59

including headlamp washers 

US quarts/liters

approx. 6.3/6.0

Engine with oil filter renewal

US quarts/liters

approx. 6.9/6.5 BMW High Performance

Synthetic Oil

Oil grades: page

193

Sho

rt c

o

mmand

s f

o

th

e vo

ic

e c

o

mm

an

d s

y

st

em

214

Short commands for the voice command 

system

With short commands you can carry out certain 
functions directly, regardless of which menu 

item is selected. Here are the important short 
commands for the voice command system.

Assistance window

Communication

*

Function

Command

To call up assistance window

20

{Assistance window}

To select display in the assistance window

20

{Assistance window map facing north}, 

{Assistance window map direction of travel}, 
{Assistance window arrow display}, 
{Assistance window perspective}, 
{Assistance window current position}, 
{Assistance window trip computer} or
{Assistance window onboard info}

To change the scale in the assistance 
window

134

{Assistance window scale ... feet} or
{Assistance window scale ... miles}

Function

Command

To open phone

167

{Phone}

To dial phone number

167

{Dial number} 

To display phone book

167

{A to Z}

To select from phone book

167

{Call ...} or
{Dial name}

To display "Top 8"

167

{Top 8}

Redialing

167

{Redial}

To display "Received calls"

167

{Received calls}

To display "Missed calls"

167

{Missed calls}

To display "Bluetooth"

163

{Bluetooth}

To call up BMW Assist

174

{BMW Assist}

To open "BMW Service"

176

{BMW Service}

To open "BMW Contact"

177

{BMW Contact}

To open "BMW Contact Numbers"

177

{BMW Contact numbers}

Re

fe

re

n

c

e

 215

At

 a

 g

la

n

c

e

Co

n

tr

o

ls

D

riv

in

g ti

ps

C

o

m

m

uni

ca

ti

o

n

s

Na

v

iga

ti

on

En

te

rt

a

in

m

e

n

t

M

o

bi

lity

Navigation

Onboard info

Function

Command

To call up navigation

126

{Navigation}

To display current position

136

{Current position}

To open "Enter address"

121

{Enter address}

To open "New destination"

121

{New destination}

To display "Input map"

125

{Input map}

To open "Information"

126

{Info menu}

To display address book

128

{Address book} or
{From address book}

To display destination list

127

{Destination list}

To switch on destination guidance

132

{Start guidance}

To switch off destination guidance

132

{Stop guidance}

To display route criteria

131

{Route preference}

To switch on voice instructions

135

{Navigation info on}

To switch off voice instructions

135

{Navigation info off}

To repeat voice instructions

135

{Repeat navigation info}

To show arrow display

133

{Arrow display}

To display map

134

{Map}, {Map facing north},
{Map direction of travel} or 
{Perspective}

To call up a route

123

132


{Route}

To open "New route"

136

{New route}

To change scale

134

{Scale ... miles} or
{Scale ... feet}

To display towns/cities and streets along the 
route

135

{Route list}

Function

Command

To open "Car Data"

69

{Car Data}

To display onboard info

69

{Onboard info}

To display trip computer

69

{Trip computer}

To open speed limit

79

{Limit}

To open stopwatch

79

{Stopwatch}

Sho

rt c

o

mmand

s f

o

th

e vo

ic

e c

o

mm

an

d s

y

st

em

216

Entertainment

Function

Command

Tone control

141

{Audio}

To switch on radio

144

{Radio on},
{FM on} or
{AM on}

To open "FM"

144

{FM menu}

To open "AM"

144

{AM menu}

To open "All stations"

144

{FM All stations}

To select radio station

144

{Station} name or
{Choose station}

To open "Presets"

144

{FM presets} or
{AM presets}

To select radio presets

144

{Choose preset}

To open "Manual"

145

{FM manual} or
{AM manual}or
{Choose frequency}, 

{Frequency ... Megahertz}

To open strongest radio station

145

{AM Autostore}

To open "WB"

147

{Weather Band menu}

To switch on Weather Band

147

{Weather Band on}

To select Weather Band station

147

{Choose Weather Band station}

To open "SAT"

150

{SAT radio menu}

To switch on satellite radio

150

{SAT radio}

To open "Presets" of satellite radio

151

{SAT radio presets}

To open "All channels" of satellite radio

150

{SAT radio all channels}

To open "Categories" of satellite radio

150

{SAT radio categories}

To call up CD player

152

{CD menu}

To switch on CD player

152

{CD}

To call up CD changer

152

{CD changer menu}

To switch on CD changer

152

{CD changer}

To select CD

152

{CD 1...6}

To select track

153

{CD track ...}

To select CD and track

153

{CD 1...6 track ...}

To select track

153

{Track ...}

To call up DVD

152

{DVD player menu}

Re

fe

re

n

c

e

 217

At

 a

 g

la

n

c

e

Co

n

tr

o

ls

D

riv

in

g ti

ps

C

o

m

m

uni

ca

ti

o

n

s

Na

v

iga

ti

on

En

te

rt

a

in

m

e

n

t

M

o

bi

lity

Climate

 menu

To switch on DVD

152

{DVD player}

To select music track on DVD

153

{DVD track ...}

To start sound output for external audio 
device

158

{Audio Aux on}

Function

Command

Function

Command

To open "Vent settings"

95

{Vent settings}

To open "Automatic programs"

96

{Automatic programs}

Function

Command

To open "Door locks"

30

32

{Door locks}

To open "Steering wheel buttons"

48

{Steering wheel buttons}

To open "Lighting"

57

{Lighting}

To open "Communication settings"

174

{Communication settings}

To open "BMW Service settings"

174

{BMW Service settings}

To open "BMW Service"

176

{BMW Service}

To open "Service requirements"

73

175

{Service requirements}

To open "Service"

73

175

{Service}

To display "Check Control messages"

76

{Check Control messages}

To open "Display settings"

80

{Display settings}

To activate road-speed limit

79

{Limit on}

To deactivate road-speed limit

79

{Limit off}

To set brightness of Control Display

80

{Brightness}

To open "Units"

67

{Units}

To open "Languages"

80

135

{Languages}

To open "Time"

75

{Time}

To open "Date"

76

{Date}

To open "PDC"

81

{PDC}

To open "FTM"

86

{FTM}

To open "Entertainment settings"

141

{Entertainment settings}


Content   ..  10  11  12