BMW 325xi Sports Wagon (2006 year). Instruction - part 10
 

  Index      BMW     BMW 325xi Sports Wagon - instruction 2006 year in english


Search            


Content   ..  8  9  10  11   ..


BMW 325xi Sports Wagon (2006 year). Instruction - part 10


Telephoning

168

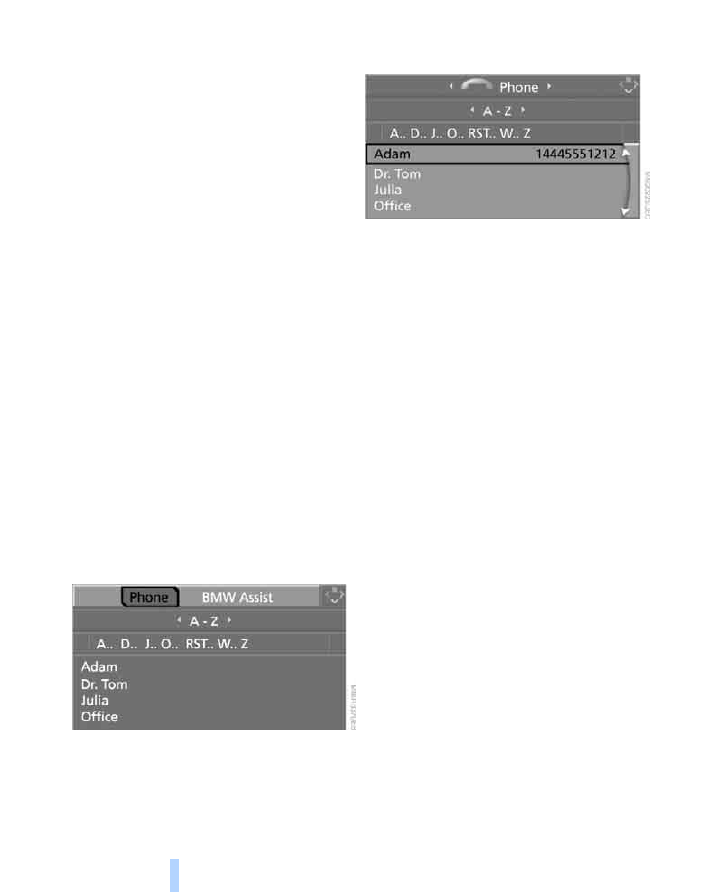
Five lists are available:

>

"A - Z" 
The entries in your mobile phone's phone 
book, consisting of names and phone num-
bers, are sorted alphabetically.

>

"Top 8"
The eight numbers dialed most frequently 
from the "A - Z" phone book are automati-
cally stored in the Top 8 list. The list is 
sorted by frequency.

>

"Redial"
The last eight phone numbers you have 
dialed are automatically stored. The last 
number dialed is at the top of the list.

>

"Missed calls"
The phone numbers of the last eight 
rejected calls are stored. This requires the 
telephone number of the caller to have been 
transmitted.

>

"Received calls"
The phone numbers of the last eight 
accepted calls are stored. This requires the 
telephone number of the caller to have been 
transmitted.

Selecting phone numbers from phone 

book

The "A - Z" list is available for your phone book 
entries. The phone book entries appear on the 
Control Display.

1.

Select "Phone" and press the controller.

2.

Select "A - Z" and press the controller.

3.

To limit the number of displayed entries, 
select the initial letter of the desired entry 
and press the controller.

4.

Select the desired entry and press the con-
troller.

5.

Select "Call" and press the controller.
The system dials the number.

If different phone numbers are stored in the 
mobile phone under one name, e.g. office and 
home, the name is shown once for each phone 
number.
You can change a phone number stored in the 
phone book, e.g. to call a specific extension:

1.

Select "Phone" and press the controller.

2.

Select "A - Z" and press the controller.

3.

Select the desired entry and press the con-
troller.

4.

Select "Add digits" and press the controller.

5.

Change the phone number.

6.

Select "Dial number" and press the control-
ler.

Dialing stored phone numbers from a 
list

To select an entry and establish a connection:

 169

En

te

rt

a

in

m

e

n

t

Re

fe

re

n

c

e

At

 a

 g

la

n

c

e

Co

n

tr

o

ls

D

riv

in

g ti

ps

C

o

m

m

uni

ca

ti

o

n

s

Na

v

iga

ti

on

M

o

bi

lity

1.

Select "Phone" and press the controller.

2.

Select a list and press the controller:

>

"Top 8"

>

"Redial"

>

"Missed calls"

>

"Received calls"

3.

Select the desired entry and press the con-
troller.

4.

Select "Call" and press the controller.
The system dials the number.

Deleting an individual entry

1.

Select the desired entry from the list and 
press the controller.

2.

Select "Delete" and press the controller.
The entry is deleted.

Deleting the entire list

1.

Select an entry from the list and press the 
controller.

2.

Select "Delete all numbers" and press the 
controller.

3.

If applicable, select "Yes" and press the 
controller.
The list is deleted.

Touch tone dialing

Touch-tone code is required for access to net-
work services or for controlling devices, e.g. for 
remote querying on an answering machine.
This function is available whenever there is a 
connection.

1.

Establish connection.

2.

Press the controller.

3.

Select "Keypad" and press the controller.

4.

Select the desired touch-tone button


and 

press the controller.
Each selection is transmitted immediately 

Telephoning

170

and is confirmed by a tone, depending on 
the type of mobile phone you are using.

Switching between mobile 

phone and hands-free system

From mobile phone to hands-free 

system

You can continue ongoing calls outside of the 
vehicle's Bluetooth range via the hands-free 
system as long as the engine is running or the 
ignition is switched on. Depending on your 
mobile phone, the system automatically 
switches to hands-free mode.
With mobile phones that do not automatically 
switch to hands-free mode:

>

Depending on the type of mobile phone you 
are using, you can continue the conversa-
tion via the hands-free system, if necessary. 
Refer to the display on your mobile phone 
and/or your mobile phone's operating 
instructions.

>

Press the 

 button above the storage 

compartment. The changeover can take 
several seconds.

From hands-free system to mobile 
phone

If you are making a call via the hands-free sys-
tem, you can also continue the call via the 
mobile phone, if necessary, depending on your 
mobile phone model. Refer to the display on 
your mobile phone and/or your mobile phone's 
operating instructions.

Operation by voice 

commands*

The concept

You can operate your mobile phone without 
having to take a hand off the steering wheel. 
During your entries, you will be guided in many 
cases by announcements and questions.
The same prerequisites apply as for operation 
via iDrive, refer to page

166

.

Symbols in the Owner's Manual

Saying commands

Activating the system

1.

Briefly press the 

 button on the steering 

wheel.
A sound signal indicates that you can say 
commands.

2.

Say the command.
The text or numbers that the voice com-
mand system has registered will appear on 
the Control Display.

Ending/canceling operation by voice 
commands

Briefly press the 

 button on the steering 

wheel or

In dialogs where text is spoken, e.g. a name 
rather than a command, canceling is only possi-
ble using the button on the steering wheel.

Having the possible commands read 
aloud

The system recognizes specific commands 
that must be pronounced exactly word for word. 
You can have the possible commands for any 
function read aloud to you:

{...}Say the specified commands word for 
word.
{{...}} Indicates responses of the system.

{Cancel}.

{Help}

 171

En

te

rt

a

in

m

e

n

t

Re

fe

re

n

c

e

At

 a

 g

la

n

c

e

Co

n

tr

o

ls

D

riv

in

g ti

ps

C

o

m

m

uni

ca

ti

o

n

s

Na

v

iga

ti

on

M

o

bi

lity

Using alternative commands

Often there is more than a single command to 
run a function, e.g.: 

Digits from zero to nine are recognized.
You can say each digit individually or group 
them into a sequence to accelerate the input.

Example: dialing phone numbers

Start the dialog:
Press the 

 button on the steering wheel.

Adjusting volume

You can adjust the volume for the instructions 
from the system:

Turn the button during an instruction to select 
the desired volume.
This volume for the instructions is maintained, 
even if the other audio sources are set to mini-
mum volume.
The setting is stored for the remote control cur-
rently in use.

Calling

Dialing phone numbers

Correcting phone numbers

After the last spoken sequence of digits has 
been repeated by the system, you can delete 
this sequence of digits. 

The command 

{Correct number} can be 

repeated as often as you like.

Deleting entry

{Delete} is used to delete all the digits entered 
so far.

Voice phone book

The phone book entries can be called up auto-
matically from your mobile phone's memory.


{Dial name} or {Name}. 

Command

Response

{Dial number}

{{Please say the number}}

e.g. 

{123 456 7890}

{{123 456 7890. Continue?}}

{Dial}

{{Dialing number}}

1.

{Dial number}.
The dialog for establishing a telephone 
connection is opened.

2.

Say the phone number.
For telephone calls abroad, say 

{Plus} 

and then the country code.

3.

{Dial}.
The connection to the desired sub-
scriber is established.

{Correct number}.
The digits are deleted.

Telephoning

172

Selecting an entry

The connection to the phone number of the 
selected entry is established. 

Redialing

The 

{Redial} command calls up "Redial".

Notes

The commands in English were available 
as of this printing. Other languages are 

currently in preparation. To operate the mobile 
phone via the voice command system, refer to 
page

22

.

<

Important for voice commands

For voice commands, bear in mind the follow-
ing:

>

Pronounce the commands smoothly and at 
normal volume, avoiding excessive empha-
ses and pauses.

>

Keep the doors, windows and glass sunroof 
closed to prevent interference from outside 
noise.

>

Avoid ambient noise in the vehicle while 
speaking.

Inserting/removing snap-in 

adapter

1.

Press area

1 around the button and take off 

the cover.

2.

Insert the snap-in adapter in the front and 
press it downward until it engages.

To remove the snap-in adapter:
Press area 

1 around the button.

Inserting mobile phone

1.

If applicable, remove the protective cap 
from the mobile phone's antenna connector 
so that the mobile phone can engage in the 
snap-in adapter.

2.

With its buttons facing upward, slide the 
mobile phone up towards the electrical con-

1.

{Dial name}.
The dialog for selecting an entry is 
opened.

2.

Say the name when prompted.

3.

Confirm the prompt with 

{Yes}.

 173

En

te

rt

a

in

m

e

n

t

Re

fe

re

n

c

e

At

 a

 g

la

n

c

e

Co

n

tr

o

ls

D

riv

in

g ti

ps

C

o

m

m

uni

ca

ti

o

n

s

Na

v

iga

ti

on

M

o

bi

lity

tact points and press it downward until it 
engages.

The mobile phone's battery is charged as soon 
as the vehicle is in radio readiness or the steer-
ing is unlocked.

To conserve battery power, you should 
avoid using the mobile phone when the 

ignition is switched off.

<

Remove the mobile phone

Press the button.

TeleService, BMW Assist

174

TeleService , BMW Assist

TeleService

TeleService supports you when communicat-
ing with a BMW Center. The built-in car phone 
can be used to transmit data on the service sta-
tus of your vehicle or legally mandated inspec-
tions directly to your BMW Center. This is the 
same data that is also stored for CBS Condition 
Based Service in the remote control. Your BMW 
Center can then contact you, and you can make 
an appointment that suits you while you are still 
on the road. Your advantage here is that your 
BMW Center can prepare in advance for the 
required maintenance work. The TeleService 
functions are country-specific: depending on 
the country in which you are driving, data on 
your vehicle's service status or legally man-
dated inspections are transmitted to your BMW 
Center either automatically before a service due 
date or when you place a call to the BMW Cen-
ter. Your BMW Center will be glad to provide 
more detailed information.

BMW Assist

BMW Assist provides you with other services in 
addition to TeleService. For example, the posi-
tion data of your vehicle can be transferred to 
the BMW Assist response center if an emer-
gency call

has been initiated.

Many functions of BMW Assist depend on the 
individually agreed contract. Data transmission, 
e.g. of the CBS Condition Based Service, differs 
from country to country.
A subscriber contract for BMW Assist must be 
signed and enabling must be completed before 
you can use BMW Assist.
If your subscription contract with BMW Assist 
expires, the car phone can be deactivated by a 
BMW Center without having to schedule an 
appointment at a workshop. Once the car 
phone has been deactivated, emergency calls 
are not possible. The car phone can be reacti-

vated by a BMW Center after signing a new 
contract.
You can also utilize BMW Assist services via the 
Internet. The range of services offered is 
expanded continually.

Requirements

You can use TeleService or BMW Assist when 
the following requirements are met:

>

The installed car phone is logged on to a 
mobile telephone network. This network 
must be capable of transmitting the ser-
vices.

>

To transmit position data, the vehicle must 
be able to determine the current position. 
This can be displayed on the Control Dis-
play.

>

A GPS signal must be available in order for 
TeleService or BMW Assist to be enabled 
and updated.

>

For BMW Assist: you must have applied for 
BMW Assist at your BMW Center or BMW 
customer service.

Enabling TeleService or BMW Assist

For you to be able to use the services of 
TeleService or BMW Assist, these must be 
enabled.

Requirements

>

Make sure that the vehicle can determine its 
current location. Reception is best when 
you have an unobstructed view to the sky.

>

Leave radio readiness switched on while 
connecting to the system.

Enabling

iDrive concept, refer to page

16

.

*

*

 175

En

te

rt

a

in

m

e

n

t

Re

fe

re

n

c

e

At

 a

 g

la

n

c

e

Co

n

tr

o

ls

D

riv

in

g ti

ps

C

o

m

m

uni

ca

ti

o

n

s

Na

v

iga

ti

on

M

o

bi

lity

1.

Press the 

 button.

This opens the start menu.

2.

Press the controller to open the   menu.

3.

Select "Communication settings" and 
press the controller.

4.

Select "BMW Service settings" and press 
the controller.

5.

Select "Service Status" and press the con-
troller.

6.

Select "Enable services" and press the con-
troller. 
TeleService and, if applicable, BMW Assist 
are enabled; data exchange with the service 
center starts.

Enabling takes a few minutes. The status is dis-
played on the Control Display. If you open 
another menu, the enabling process continues 
to run in the background.

Services offered

The following special features apply for the ser-
vices of TeleService and BMW Assist:

>

The services offered are country-specific.

>

Voice contact is established or data are 
transferred, depending on the equipment 
and the country. In some countries, it is 
possible to do both.

>

The data transferred can be the vehicle 
data, your current position or the data of the 
CBS Condition Based Service.

Automatic service notification*

The data on the service status of your vehicle or 
on legally mandated inspections is transmitted 
automatically directly to your BMW Center prior 
to the due date. You can check when the BMW 
Center was notified.
iDrive concept, refer to page

16

.

1.

Open the start menu.

2.

Press the controller to open the   menu.

3.

Select "Service" and press the controller.

4.

Select "Service requirements" and press 
the controller.

5.

Select "Service notification" and press the 
controller.

TeleService, BMW Assist

176

Roadside Assistance

You can call the Roadside Assistance

*

 of the 

BMW Group should you require help in the 
event of a breakdown.
iDrive concept, refer to page

16

.

1.

Press the 

 button.

This opens the start menu.

2.

Move the controller forwards to select 
"Communication".

3.

Select "BMW Assist" and press the control-
ler.

4.

Select "BMW Service" and press the con-
troller.

5.

Select "Roadside Assistance" and press 
the controller.

If the current position can be determined, 
the current vehicle location is displayed.

6.

Select "Start service" and press the con-
troller.

Contact with Roadside Assistance will be 
established.

Setting up contact with your BMW 
Center or BMW Customer Relations

You can contact your BMW Center, e.g. to 
arrange a service appointment.

For information related to your vehicle, call the 
BMW Customer Relations.
A prerequisite for this is that your mobile phone 
is paired with the vehicle.
iDrive concept, refer to page

16

.

1.

Press the 

 button.

This opens the start menu.

2.

Press the controller to open the   menu.

3.

Select "Service" and press the controller.

4.

Select "BMW Service" and press the con-
troller.

5.

Select the desired BMW Center:

>

"Service Request"

>

"Customer Relations"

6.

Press the controller.

7.

Select "Start service" and press the con-
troller.

Contact with the desired BMW Center will be 
established.

Adapting TeleService or 

BMW Assist

Displaying and updating services

If the services offered by TeleService or BMW 
Assist change, you will be notified. In this case 
you should update the service functions.

1.

Open the start menu.

2.

Press the controller to open the   menu.

3.

Select "Communication settings" and 
press the controller.

4.

Select "BMW Service settings" and press 
the controller.

 177

En

te

rt

a

in

m

e

n

t

Re

fe

re

n

c

e

At

 a

 g

la

n

c

e

Co

n

tr

o

ls

D

riv

in

g ti

ps

C

o

m

m

uni

ca

ti

o

n

s

Na

v

iga

ti

on

M

o

bi

lity

5.

Select "Service Status" and press the con-
troller.
The current services available from 
TeleService or BMW Assist are displayed.

6.

If applicable, select "Options"and press the 
controller.

7.

Select "Update services" and press the 
controller.

Terminating services

When you terminate services, the connection to 
BMW Assist is deactivated.

1.

Open the start menu.

2.

Press the controller to open the   menu.

3.

Select "Communication settings" and 
press the controller.

4.

Select "BMW Service settings" and press 
the controller.

5.

Select "Service Status" and press the con-
troller.

6.

Select "Options" and press the controller.

7.

Select "Terminate services" and press the 
controller.

TeleService or BMW Assist is blocked from 
use, and your vehicle's current position will not 
be transmitted during an emergency call

*

. To 

cancel the service block, the system must be 
reactivated, refer to page

174

. Your contractual 

agreement is not affected by this.
The automatic service notification can be dis-
abled separately. Please contact your BMW 
Center for this purpose.
Enable TeleService and, if applicable, BMW 
Assist once again to log on again.

Displaying vehicle data

When TeleService or BMW Assist is activated, 
the license plate and the vehicle identification 
number of your vehicle can be displayed.

1.

Open the start menu.

2.

Press the controller to open the   menu.

3.

Select "Communication settings" and 
press the controller.

4.

Select "BMW Service settings" and press 
the controller.

5.

Select "Profile" and press the controller.

To adjust the license plate, please contact your 
BMW Center.

BMW Contact*

You can establish a voice connection to the fol-
lowing services without enabling BMW Assist 
as long as your mobile phone is paired with the 
vehicle:

>

Roadside Assistance

of the BMW Group if 

you need help in the event of a breakdown

>

BMW Service if you wish to schedule a ser-
vice appointment, for example

>

BMW Customer Relations

for information 

related to your vehicle

iDrive concept, refer to page

16

.

1.

Press the 

 button.

This opens the start menu.

2.

Move the controller forwards to select 
"Communication".

TeleService, BMW Assist

178

3.

Select "BMW Contact" and press the con-
troller.

4.

Select "BMW Contact Numbers" and press 
the controller.

5.

Select one of the following menu items and 
press the controller:

>

"Roadside Assistance"

>

"Customer Relations"

>

"Service Request"

6.

Select "Call" and press the controller.

Contact will be established.

R

e

fueling

182

Refueling

Always switch off the engine before refu-
eling, otherwise, fuel cannot be added to 

the tank and a message will be displayed.

<

Take all precautionary measures and 
observe all applicable regulations when 

handling fuel. Do not carry any spare fuel con-
tainers in your vehicle. They can develop a leak 
and cause an explosion or cause a fire in the 
event of an accident.

<

Gas cap

Opening

1.

Open fuel filler door. To do so, lightly press 
the rear edge.

2.

Turn the gas cap counterclockwise.

3.

Place the gas cap in the bracket attached to 
the fuel filler door.

Closing

Fit the cap and turn it clockwise until you clearly 
hear a click.

Do not jam the strap attached to the gas 
cap between the gas cap and the vehicle. 

A message will be displayed if the gas cap is 
loose or missing.

<

Manually releasing the fuel filler door

In the event of an electrical malfunction, you can 
release the fuel filler door manually:

1.

Fold up the cargo area floor panel.

2.

Remove the cover from the right-hand side 
panel of the cargo area. To do so, turn the 
screws, arrows 

1, 90° and take out the 

cover, arrow 

2.

3.

Pull the knob with the fuel pump symbol. 
The fuel filler door is released.

Observe the following when refueling

When handling fuels always observe any 
safety guidelines posted at the service 

station.

<

When refueling, insert the filler nozzle com-
pletely into the filler pipe. Lifting the filler nozzle 
during refueling leads to

>

premature pump shutoff

>

a reduced efficiency of the fuel-vapor 
recovery system.

The fuel tank is full when the filler nozzle clicks 
off the first time.

Fuel tank capacity

Approx. 16.1 US gallons/61 liters, including the 
reserve capacity of 2.1 US gallons/8 liters.

Refuel as soon as possible once your 
cruising range falls below 30 miles/

50 km, otherwise engine functions are not 
ensured and damage can occur.

<

M

o

bi

lity

 183

Re

fe

re

n

c

e

At

 a

 g

la

n

c

e

Co

n

tr

o

ls

D

riv

in

g ti

ps

C

o

m

m

uni

ca

ti

o

n

s

Na

v

iga

ti

on

En

te

rt

a

in

m

e

n

t

Fuel specifications

Do not fill the tank with leaded fuel, as this 
would cause permanent damage to the 

catalytic converter.

<

Required fuel

Premium Unleaded Gasoline

The minimum octane rating is 91. 
If you use gasoline with this minimum octane 
rating, the engine may produce knocking 
sounds when starting at high outside tempera-
tures. This has no affect on the engine life.
Minimum octane rating corresponds to the Anti 
Knock Index AKI and is determined according 
to the so-called (R+M)/2 method.

Do not fill the tank with leaded fuel, as this 
would cause permanent damage to the 

catalytic converter.

<

Use high-quality brands

Field experience has indicated significant dif-
ferences in fuel quality: volatility, composition, 
additives, etc., among gasolines offered for sale 
in the United States and Canada. Fuels contain-
ing up to and including 10% ethanol or other 
oxygenates with up to 2.8% oxygen by weight, 
that is, 15% MTBE or 3% methanol plus an 
equivalent amount of co-solvent, will not void 
the applicable warranties with respect to 
defects in materials or workmanship.

The use of poor-quality fuels may result in 
drivability, starting and stalling problems 

especially under certain environmental condi-
tions such as high ambient temperature and 
high altitude. 
Should you encounter drivability problems 
which you suspect could be related to the fuel 
you are using, we recommend that you respond 
by switching to a recognized high-quality 
brand. 
Failure to comply with these recommendations 
may also result in unscheduled maintenance.

<

Wh

eels

 and

 tire

s

184

Wheels and tires

Tire inflation pressures

Information for your safety

It is not merely the tires' service life, but also 
driving comfort and, to a great extent, driving 
safety that depend on the condition of the tires 
and the maintenance of the specified tire pres-
sure.

Check the tire inflation pressure regularly 
and correct it, if necessary: at least twice a 

month and before starting long trips. If you fail 
to observe this precaution you may be driving 
on tires with incorrect tire pressures, a condi-
tion that can not only compromise your vehi-
cle's driving stability, but also lead to tire dam-
age and the risk of an accident. Do not drive 
with deflated, i.e. flat tires, except when using 
Run-Flat Tires. A flat tire will seriously impair 
your vehicle's handling and braking response. 
Attempts to drive on a flat tire can lead to loss of 
control over the vehicle.

<

Checking pressure

Only check tire inflation pressure when the 
tires are cold. This means after a maximum of 
1.25 miles/2 km driving or when the vehicle has 
been parked for at least 2 hours. When tires are 
warm, the tire inflation pressure is higher.

After correcting tire inflation pressures, 
always reinitialize the Flat Tire Monitor, 

refer to page

86

.

<

Inflation pressure specifications

The tables below provide all the correct inflation 
pressures for the specified tire sizes at ambient 
temperature.

The inflation pressures apply to the tire 
sizes approved and tire brands recom-

mended by BMW; a list of these is available 
from your BMW Center.

<

For correct identification of the right tire infla-
tion pressures, observe the following:

>

Tire sizes for your vehicle

>

Load conditions

>

Maximum allowable driving speed

Tire inflation pressures for driving up to 
100 mph or 160 km/h

For normal driving up to 100 mph or 160 km/h 
and to achieve optimum driving comfort, adjust 
pressures to the respective tire inflation pres-
sures listed on the following pages in the col-
umns for traveling speeds up to a maximum of 
100 mph  or  160 km/h.
These tire inflation pressures can also be found 
on the driver's-side door post when the driver's 
door is open.

The maximum permissible speed for 
these tire pressures is 100 mph or 

160 km/h. Do not exceed this speed, otherwise 
tire damage and accidents could occur.

<

Tire inflation pressures for driving 
above 100 mph or 160 km/h

In order to drive at maximum speeds in 
excess of 100 mph or 160 km/h, adjust 

pressures to the respective tire inflation pres-
sures listed on the following pages in the col-
umns for traveling speeds including those 
exceeding 100 mph or 160 km/h. Otherwise tire 
damage and accidents could occur.

<

Observe all national and local maximum speed 
limits, otherwise violations of the laws could 
occur.

M

o

bi

lity

 185

Re

fe

re

n

c

e

At

 a

 g

la

n

c

e

Co

n

tr

o

ls

D

riv

in

g ti

ps

C

o

m

m

uni

ca

ti

o

n

s

Na

v

iga

ti

on

En

te

rt

a

in

m

e

n

t

Tire inflation pressures for the 325xi

Tire size 

Pressure specifications in psi/kPa 

Traveling speeds

up to a max. of

100 mph / 160 km/h

Traveling speeds

including those exceeding

100 mph  /  160 km/h

All pressure specifications in 
the table are indicated in 
psi/kilopascal with cold tires. 
Cold = ambient temperature

without Sports package:

205/55 R 16 91 H M+S
225/45 R 17 91 H M+S
225/50 R 16 92 H M+S
225/45 R 17 94 V M+S XL

32/220

39/270

32/220

38/260

36/250

44/300

Front: 225/45 R 17 91 V

32/220

-

32/220

-

36/250

-

Rear: 255/40 R 17 94 V

-

35/240

-

32/220

-

39/270

Front: 225/35 R 19 88 Y XL

39/270

-

35/240

-

39/270

Rear: 255/30 R 19 91 Y XL

-

44/300

-

38/260

-

44/300

with Sports package:

205/55 R 16 91 H M+S
225/45 R 17 91 H M+S
225/50 R 16 92 H M+S

32/220

39/270

32/220

38/260

36/250

44/300

225/45 R 17 94 V M+S XL

32/220

39/270

35/240

42/290

42/290

49/340

Front: 225/45 R 17 91 V

32/220

-

33/230

-

38/260

-

Rear: 255/40 R 17 94 V

-

35/240

-

36/250

-

44/300

Front: 225/35 R 19 88 Y XL

39/270

-

38/260

-

42/290

Rear: 255/30 R 19 91 Y XL

-

44/300

-

41/280

-

46/320

More details on the permissible load and weights can be found on page

212

.

Wh

eels

 and

 tire

s

186

Tire identification marks

Knowledge of the labeling on the side of the tire 
makes it easier to identify and choose the right 
tires.

Tire size

Speed code letter

Q = up to 100 mph or 160 km/h
T = up to 118 mph or 190 km/h
H = up to 131 mph or 210 km/h
V = up to 150 mph or 240 km/h
W = up to 167 mph or 270 km/h
Y = up to 186 mph or 300 km/h

Tire Identification Number

Tires with DOT codes meet the guidelines of 
the US Department of Transport.
DOT code:

Tire age

The manufacturing date of tires is contained in 
the tire coding: DOT … 0705 means that the 
tire was manufactured in week 7 of 2005.
BMW recommends that you replace all tires 
after 6 years at most, even if some tires may last 
for 10 years.

Uniform Tire Quality Grading

Quality grades can be found where applicable 
on the tire sidewall between tread shoulder and 
maximum section width. For example:
Tread wear 200 Traction AA 
Temperature A

DOT Quality Grades

Tread wear 
Traction AA A B C 
Temperature A B C

All passenger car tires must conform to 
Federal Safety Requirements in addition 

to these grades.

<

Tread wear

The tread wear grade is a comparative rating 
based on the wear rate of the tire when tested 
under controlled conditions on a specified gov-
ernment test course. For example, a tire graded 
150 would wear one and one-half (1

γ) times as 

well on the government course as a tire graded 
100. The relative performance of tires depends 
upon the actual conditions of their use, how-
ever, and may depart significantly from the 
norm due to variations in driving habits, service 
practices and differences in road characteris-
tics and climate.

Traction

The traction grades, from highest to lowest, are 
AA, A, B, and C. 
Those grades represent the tire's ability to stop 
on wet pavement as measured under controlled 
conditions on specified government test sur-
faces of asphalt and concrete. A tire marked C 
may have poor traction performance.

The traction grade assigned to this tire is 
based on straight-ahead braking traction 

tests, and does not include acceleration, cor-
nering, hydroplaning, or peak traction charac-
teristics.

<

e.g.
Nominal width in mm
Aspect ratio in 

Ξ 

Radial belt construction
Rim diameter in inches
Load rating,
not on ZR tires
Speed code letter, in
front of the R on ZR tires

225/45 R

1

7 91 V

e.g.
Manufacturer's code 
for tire make
Tire size and 
tire design
Tire age

DOT xxxx xxx 0705


Content   ..  8  9  10  11   ..