BMW 3.0i Roadster & Coupe (2005 year). Instruction - part 6


  Index      BMW     BMW 3.0i Roadster & Coupe - instruction 2005 year in english


Search            


Content   ..  4  5  6 


BMW 3.0i Roadster & Coupe (2005 year). Instruction - part 6


Refere

nce

At a gl

anc

e

Controls

Dr

iv

ing

 tip

s

Mobi

li

ty

 97

Pull the ends of the rubber bands upward and 
out of the fasteners.

Always observe all legal regulations 
requiring a warning triangle to be carried 

in the vehicle.

<

First-aid kit* 

The first-aid kit is located beneath the passen-
ger seat.

To open

Pull the handle and fold the cover downward.

To close

Fold the cover up and engage the catch.

Some of the articles in the first-aid kit 
have a limited period of use before expira-

tion. For this reason, check the expiration dates 
of each of the items regularly, and replace any 
with passed dates. These items can be pur-
chased in any drugstore or pharmacy.
Always observe all legal regulations requiring a 
first-aid kit to be carried in the vehicle.

<

Jump-starting 

When your battery is discharged you can use 
two jumper cables to start your vehicle with 
power from the battery in a second vehicle. You 
can also use the same method to help start 
another vehicle. Always use jumper cables with 
fully insulated handles on the terminal clamps.

Do not touch components carrying cur-
rent on a running engine. Contact with 

these components can cause fatal injury. Care-

fully observe the following instructions to avoid 
personal injury and/or damage to one or both 
vehicles.

<

Preparations

1.

Check whether the battery of the support 
vehicle has 12 volts and approximately the 
same capacity – measured in Ah. This infor-
mation is provided on the battery

2.

Stop the engine of the support vehicle

3.

Switch off all electrical accessories in both 
vehicles.

Make absolutely certain that there is no 
contact between the bodywork of the two 

vehicles: short circuit hazard.

<

Connecting jumper cables

Always adhere to this sequence when 
connecting jumper cables; failure to 

observe this procedure can lead to sparks at the 
battery terminals and pose an injury hazard.

<

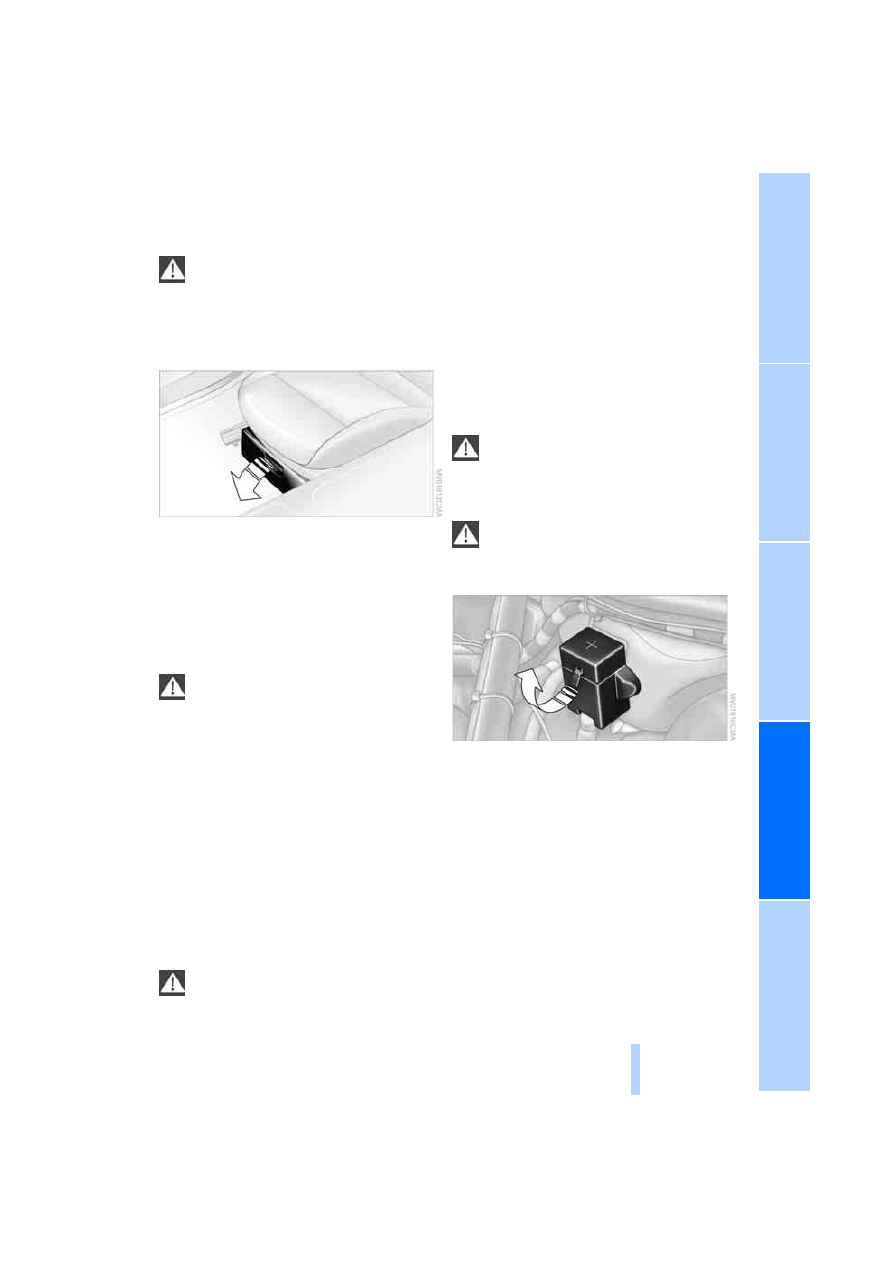
The auxiliary jump-starting terminal located in 
your BMW's engine compartment acts as the 
positive battery terminal. Refer to the engine 
compartment overview on page

85

. The cover 

is marked with a

+.

1.

Open the cover of the BMW auxiliary jump-
starting terminal. Do so by pulling the tab

2.

With the 

jumper cable, connect the posi-

tive terminal of the drained battery and the 
positive terminal of the support battery.
To do this:
Connect one terminal clamp to the positive 
terminal of the battery or to an auxiliary 
jump-starting terminal of the support vehi-
cle.
Connect the second terminal clamp to the 

Giving and receiving assistance

98

positive terminal of the battery or to an aux-
iliary jump-starting terminal of the vehicle to 
be jump-started.

Your BMW is equipped with a special nut, 
refer also to the engine compartment over-
view on page

85

3.

With the

 jumper cable, connect the nega-

tive terminals of both vehicles. 
To do this:
Attach one cable clamp to the negative bat-
tery terminal or to a suitable ground on the 
engine or body work of the support vehicle.
Attach the second cable clamp to the nega-
tive battery terminal or to a suitable ground 
on the engine or body work of the vehicle to 
be jump-started.

Starting the engine

1.

Start the engine of the support vehicle and 
let it run for several minutes at a slightly ele-
vated engine idle speed

2.

Start the engine of the other vehicle as 
usual. 
If the first start attempt is not successful, 
wait a few minutes before another attempt 
in order to allow the discharged battery to 
recharge

3.

Allow the engines to run for several minutes

4.

Then disconnect the jumper cables in 
reverse sequence

5.

Depending on the cause of the fault, have 
the battery checked and recharged.

Never use spray starter fluids to start the 
engine.

<

Towing and tow-starting the 

vehicle 

Using the towing eyelet 

The screw-in towing eyelet is stored in the 
onboard tool kit; be sure that it remains in the 
vehicle at all times. It can be attached at the 
front or rear of your BMW.

Observe the following instructions in 
order to avoid damaging the towing eye-

let or the vehicle: use only the towing eyelet 
supplied with the vehicle, and screw it in firmly 
until it stops. Use the towing eyelet for towing 
on paved roads only. Avoid subjecting the tow-
ing eyelet to lateral loads, e.g. do not lift the 
vehicle using the towing eyelet.

<

Access to the threaded socket 

Press out the cover with a screwdriver inserted 
in the recess at the top.

Being towed

Make sure that the ignition key is in posi-
tion 1, because the steering lock could 

otherwise engage and the vehicle could no 
longer be steered. There is no power assist 
while the engine is off. Therefore, you will need 
to exert more force to brake and steer the vehi-
cle.

<

Turn on the hazard warning flashers, if required 
by national regulations. If the electrical system 
has failed, clearly identify the vehicle being 
towed, e.g. by placing a sign or a warning trian-
gle in the rear window.

Vehicles with manual transmission

Gearshift lever in idling position.

Refere

nce

At a gl

anc

e

Controls

Dr

iv

ing

 tip

s

Mobi

li

ty

 99

Vehicles with automatic transmission

Selector lever in position N.

Do not exceed a towing speed of 45 mph /
70 km/h or a towing distance of 90 miles/

150 km. Otherwise, the automatic transmission 
could be damaged.

<

Vehicles with sequential manual 

gearbox SMG

To push or tow the vehicle, turn on the ignition 
and move the selector lever to position N, then 
turn the ignition off again.

Towing methods

In some countries, it is not permitted to tow the 
vehicle with a tow bar or tow rope on public 
roads.
Familiarize yourself with the applicable towing 
regulations for the country in which you are 
driving.

With a tow bar 

The towing vehicle must not be lighter 
than the vehicle being towed; otherwise, 

vehicle handling can no longer be controlled.

<

The towing eyelets of both vehicles should be 
on the same side. If the tow bar can only be 
used in a diagonal position, please note the fol-
lowing:

>

Clearance is restricted while you are driving 
around corners

>

The inclination of the tow bar produces late-
ral force.

Only attach the tow bar to the towing eye-
lets. Other parts of the vehicle could oth-

erwise be damaged.

<

With a tow rope

When the towing vehicle is driving off, make 
sure that the tow rope is taut.

Use nylon ropes or straps for towing 
because they prevent sudden jerking 

movements. Attach tow ropes only to the tow-
ing eyelet. Other parts of the vehicle could oth-
erwise be damaged.

<

With a tow truck 

Have the BMW transported by a tow truck with 
a lift sling, or on a flatbed.

Do not lift the vehicle by the towing eye-
let, or by parts of the body or chassis. 

Otherwise damage could result.

<

Tow-starting 

Do not tow-start vehicles with automatic 
transmission.

Jump-starting, refer to page

97

.

<

Only tow-start vehicles with catalytic conver-
ters if the engine is cold. It is better to have the 
vehicle jump-started, refer to page

97

.

1.

Turn on the hazard warning flashers; com-
ply with national regulations

2.

Turn the ignition key to position 2

3.

Engage the 3rd gear. For vehicles with 
SMG, refer to following column

4.

Have the vehicle towed with the clutch 
pedal completely depressed and then 
slowly release the clutch pedal. After the 
engine has started, immediately depress 
the clutch pedal again completely

5.

Pull over at a suitable location, remove the 
tow bar or tow rope, and turn on the hazard 
warning flashers

6.

Have the vehicle checked.

Vehicles with sequential manual 
gearbox SMG

>

Have the vehicle towed with the selector 
lever in position N

>

Select sequential mode. The correct gear 
will automatically be selected and engaged.

Technical data

102

Technical data

Engine data

Z4 2.5i

Z4 3.0i

Displacement
Number of cylinders

cu in/cm

µ

152.1/2,494

6

181.7/2,979

6

Maximum power output 
at engine speed

hp/kW

rpm

184/141

6,000

225/170

5,900

Maximum torque 
at engine speed

lb ft/Nm

rpm

181/245

3,500

221/300

3,500

Refere

nce

At a gl

anc

e

Controls

Dr

iv

ing

 tip

s

Mobi

li

ty

 103

Weights

Z4 2.5i

Z4 3.0i

Curb weight
with manual transmission
with SMG
with automatic transmission

lbs/kg
lbs/kg
lbs/kg

2,932/1,330
2,976/1,350
2,998/1,360

2,998/1,360
3,020/1,370
3,042/1,380

Approved gross vehicle weight
with manual transmission
with SMG
with automatic transmission

lbs/kg
lbs/kg
lbs/kg

3,483/1,580
3,527/1,600
3,549/1,610

3,549/1,610
3,571/1,620
3,593/1,630

Load

lbs/kg

551/250

551/250

Approved front axle load

lbs/kg

1,720/780

1,742/790

Approved rear axle load

lbs/kg

1,841/835

1,863/845

Luggage compartment capacity 
with convertible top compartment panel raised

cu ft/l
cu ft/l

8.5/240
9.2/260

8.5/240
9.2/260

Never exceed either the approved axle loads or the approved gross vehicle weight.

Technical data

104

Dimensions 

All measurements in inches/millimeters. Smallest turning circle dia. 32 ft 2 in/9.8 m.

Refere

nce

At a gl

anc

e

Controls

Dr

iv

ing

 tip

s

Mobi

li

ty

 105

Capacities 

Notes

Fuel tank 
reserve 

gal./liters
gal./liters

approx. 14.5/55
approx. 2.1/8

Fuel specifications: page

76

Windshield washer system/
Headlamp washer system

quarts/liters
quarts/liters

approx. 3.2/3 
approx. 5.3/5

For details: page

86

Cooling system including heating 
circuit
with manual transm. or SMG
with automatic transmission

quarts/liters
quarts/liters

8.8/8.3
9.3/8.8

For details: page

87

Engine with oil filter renewal

quarts/liters 6.9/6.5

For details: page

87


Content   ..  4  5  6