BMW 3 (E46). Manual - part 35


  Index      BMW     BMW 3 (E46) - service repair manual 2006 year


Search            


Content   ..  33  34  35  36   ..


BMW 3 (E46). Manual - part 35


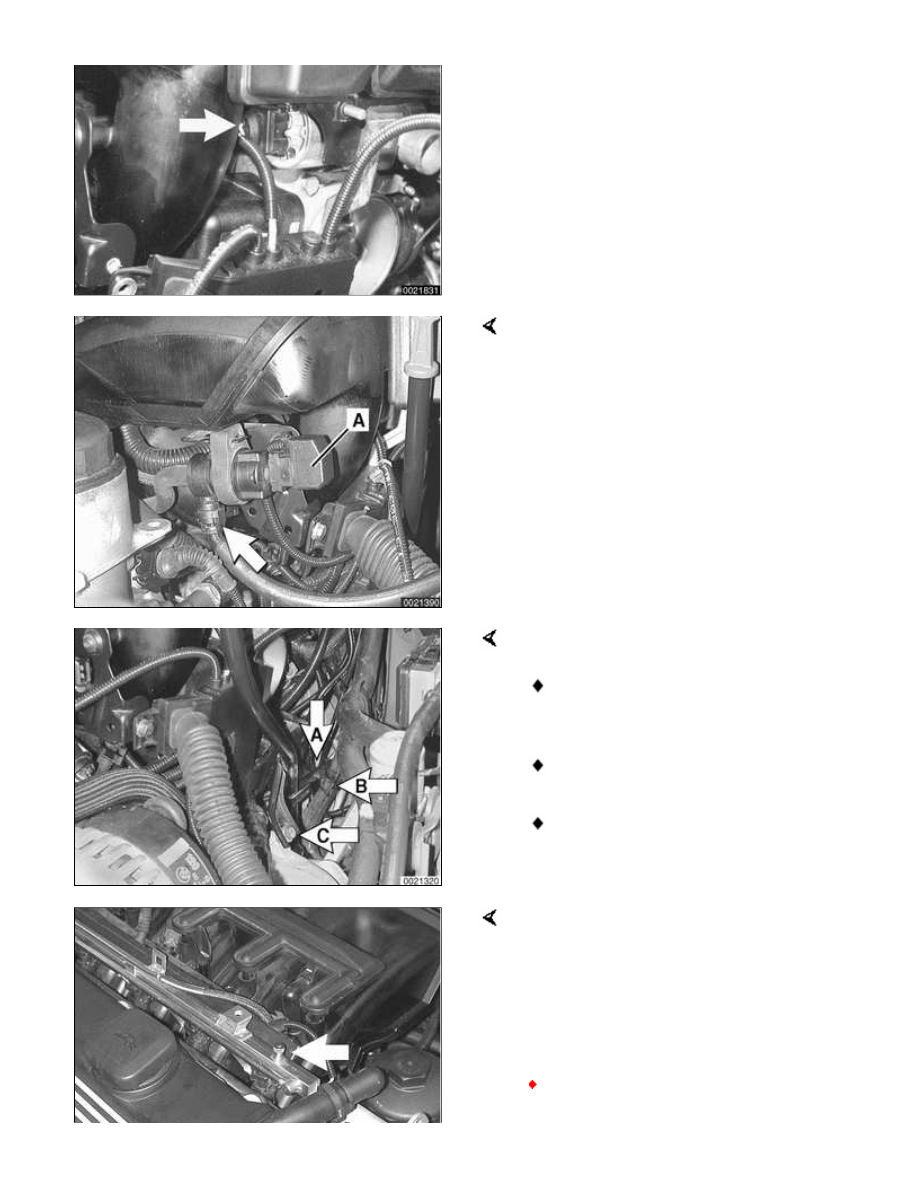
Detach electrical harness connector at
fuel tank venting valve (A). Disconnect
hose at quick disconnect fitting
(arrow).

Remove dipstick guide tube:

Detach wiring harness brackets
from tube (A).

Detach fuel lines from tube (B).

Remove lower guide tube
mounting bolt (C). Pull out dip
stick guide tube.

Remove schræder valve cap (arrow)
from air connection on fuel rail. Using a
tire chuck, blow fuel back through feed
line using a brief burst of compressed
air (maximum of 3 bar or 43.5 psi).

WARNING!

Fuel in fuel line is under

pressure (approx. 3 - 5 bar or 45
- 75 psi) and may be expelled
under pressure. Do not smoke or
work near heaters or other fire
hazards. Keep a fire
extinguisher handy. Before
disconnecting fuel hoses, wrap
a cloth around fuel hoses to
absorb any leaking fuel. Catch
and dispose of escaped fuel.
Plug all open fuel lines.

Always unscrew the fuel tank
cap to release pressure in the
tank before working on the tank
or lines.

 -

Raise car and support in a safe
manner.

CAUTION!

Make sure the car is stable and well
supported at all times. Use a
professional automotive lift or jack
stands designed for the purpose. A
floor jack is not adequate support.

 -

Remove protective engine splash
guard.

Working beneath car (on left side
under driver seat), remove fuel filter
cover and clamp fuel hose(s).

Detach fuel hose(s) from fuel line(s)
(arrows) using special fuel line
removal tool 16 1 050 or equivalent.
Seal off fuel line(s) with BMW special

tools 13 5 281/13 5 282.

CAUTION!

Fuel may be expelled under
pressure. Do not smoke or work near
heaters or other fire hazards. Keep a
fire extinguisher handy. Before
disconnecting fuel hoses, wrap a
cloth around fuel hoses to absorb
any leaking fuel. Plug all open fuel
lines.

Working underneath car, remove lower
intake manifold support mounting bolt
(arrow), located adjacent to left engine
mount.

Remove fuel rail mounting bolts
(arrows).

Carefully pry fuel rail off manifold.

Separate fuel line support bracket
at rear of intake manifold.

Thread fuel line(s) out of rear of
engine compartment while lifting
fuel rail out.

Remove manifold mounting nuts
(arrows).

Lift up manifold just enough to detach
positive cables from starter motor
terminal 50 (arrow).

 -

Remove intake manifold from
cylinder head while carefully
checking for electrical connections
or hoses.

CAUTION!

Stuff clean rags into open intake
ports to prevent any parts from
falling into the engine intake.

 -

Intake manifold Installation is
reverse of removal.

Use new fuel injector seals.

Carefully check intake manifold
gasket and replace if necessary.

Inspect O-ring seal between mass
air flow sensor and air filter
housing. To facilitate reassembly,
coat seal with acid-free grease.
nothing

CAUTION!

When reattaching throttle assembly
harness connector, connector is fully
tightened when arrows on connector
and plug line up.

Tightening torques

Intake manifold to cylinder head

M7

15 Nm (11 ft-lb)

M8

22 Nm (16 ft-lb)


Content   ..  33  34  35  36   ..