Alfa Romeo Giulia (2022 year). Manual in english - page 11
 

  Index      Manuals     Alfa Romeo Giulia (2022 year). Manual in english


Search            copyright infringement  


Content      ..     9      10      11      12     ..


Alfa Romeo Giulia (2022 year). Manual in english - page 11


 STARTING AND DRIVING

176

according to the season: summer type,

winter type and arctic type (cold,

mountain areas).
In the event of refuelling with diesel

which is unsuitable for the operating

temperature, it is advisable to mix

the diesel with a specific additive,

introducing it to the tank before the

anti-freeze and then the diesel.

REFUELING PROCEDURE

The fuel flap is unlocked when the central

door locking system is released, while it

is automatically locked when the central

locking system is applied.

Opening the flap

To refuel proceed as follows:

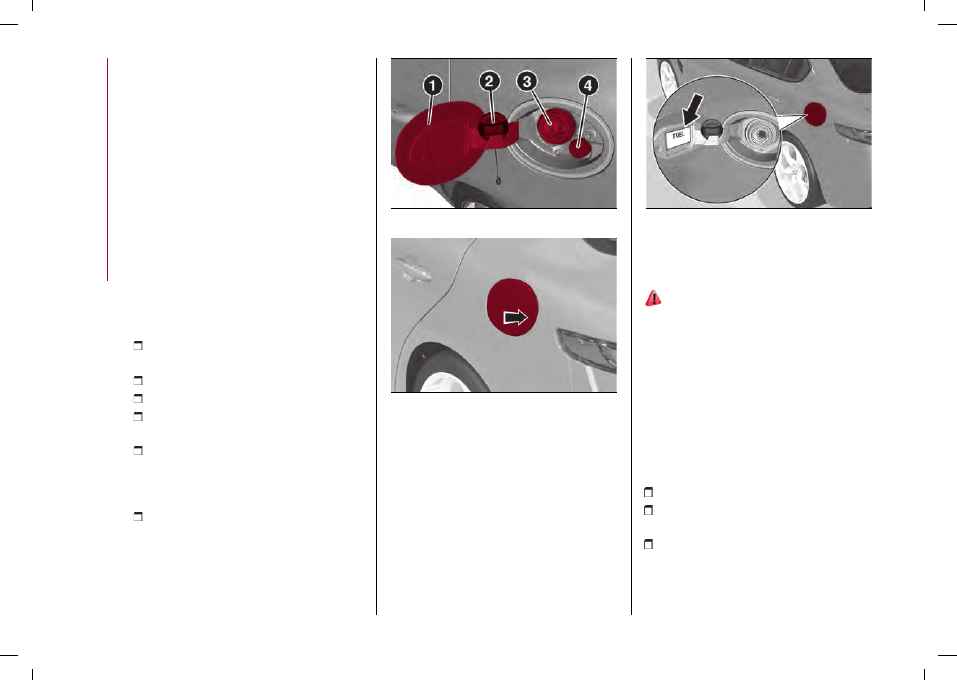
open the flap (1) fig. 194 by pressing on

the point shown by the arrow fig. 195;

remove the closing cap (2) fig. 194;
put the cap back in position;
insert the nozzle in the filler (3) fig. 194

and refuel;

once refuelling is complete, before

removing the fuel nozzle, wait at least 10

seconds to allow the fuel to flow into the

tank;

then remove the dispenser from the

filler, close the cap and then close the

flap.

194

07226S0041EM

195

07206S0001EM

The refuelling procedure described

previously is illustrated on the label

applied inside the fuel flap.
The label also has the fuel type

(UNLEADED FUEL = petrol; DIESEL =

diesel fuel) and the symbol that certifies

compliance with the EN228 (petrol),

EN590 and EN16734 (diesel) standards,

fig. 196.

196

07206S0002EM

TOPPING UP AdBlue® DIESEL

EMISSIONS ADDITIVE

(2.2 JTD versions only)

156)

Preliminary Conditions

AdBlue® freezes at temperatures lower

than 12.2 °F (-11 °C). If the car stands for

a long time at this temperature refilling

could be difficult. For this reason, it is

advised to park the car in a garage and/or

heated environment and wait for the

AdBlue® to return to liquid state before

topping up.
Proceed as follows:

park the car on level ground;
switch off the engine by turning the

ignition device to STOP;

open the fuel flap (1) fig. 194, undo

and remove the cap (4) (blue) from the
AdBlue® filler and place it in the specific

housing (the same one used for housing
the fuel cap (2), see fig. 194).

-------------------------------------------------------------------------------------------------------------------------------------------------------------

177

Refilling with nozzles

You can fill up at any AdBlue®

distributor.
Proceed as follows:

insert the AdBlue® nozzle in the filler,

start refilling and stop refilling at the

first shut-off (the shut-off indicates that
the AdBlue® tank is full). Do not proceed

with the refilling, to prevent spillage of
AdBlue®;

extract the nozzle.

Refilling with containers

Proceed as follows:

check the expiration date;
read the advice for use on the label

before pouring the content of the bottle
into the AdBlue® tank;

if systems which cannot be screwed

in (e.g. tanks) are used for refilling, after

the indication appears on the instrument

panel display (see “Warning lights and

messages" paragraph in the “Knowing

the instrument panel” chapter), fill the
AdBlue® tank with no more than 1.11 UK

gal (5 litres);

if containers which can be screwed to

the filler are used, the reservoir is full

when the AdBlue® level in the container

stops pouring out. Do not proceed

further.

AdBlue® level display

The level of AdBlue® inside the tank can

be viewed on the Connect system display
fig. 197.
Proceed as follows:

activate the "Vehicle Information"

function pressing the appropriate widget

on the Connect system display.

press the graphic button (1) fig. 197: the

level (2) of AdBlue® will appear on the

display.
If the AdBlue® level is not in reserve, the

message "OK" will appear on the display.
If the AdBlue® level is insufficient the

message "KO" will appear on the display.

Next service in

197

12126S0681EM

Operations after refilling

Proceed as follows:

fit the cap (4) fig. 194 back on the

AdBlue® filler by turning it clockwise and

screwing it completely;

set the ignition device to ON (it is not

necessary to start the engine);

wait for the indication on the

instrument panel to switch off before

moving the car. The indication may stay

on for a few seconds to approximately

half a minute. If the engine is started

and the car is moved, the indication

will remain on for longer. This will not

compromise engine operation;

if the AdBlue® was topped up

when the tank was empty, see the

"Refuelling " paragraph in the "Technical

Specifications" chapter and wait for 2

minutes before starting the engine.
WARNING If AdBlue® is spilled out of

the filler neck, clean up well the area and

proceed to filling up again. If the liquid

crystallises, eliminate it with a sponge

and warm water.

ATTENTION

DO NOT EXCEED THE MAXIMUM

LEVEL: this could cause damage to
the reservoir. AdBlue® freezes under

12.2 °F (-11 °C). Although the system is

designed to operate below the freezing
point of the AdBlue®, it is advisable not

to fill the tank beyond the maximum
level because if the AdBlue® freezes

the system can be damaged.
Comply with the instructions provided

in this paragraph.

-------------------------------------------------------------------------------------------------------------------------------------------------------------

 STARTING AND DRIVING

178

If the AdBlue® is spilled on painted

surfaces or aluminium, immediately

clean the area with water and use

absorbent material to collect the fluid

that has been spilled on the ground.

Do not try to start the engine if the

AdBlue® was accidentally added to

the Diesel fuel tank, this can result in

serious engine damage, contact a Alfa

Romeo Dealership.

Do not add additives or other fluids

to AdBlue®, doing so could damage the

system.

The use of non-conforming

or degraded AdBlue® may lead

to indications appearing on the

instrument panel display (see "Warning

lights and messages" paragraph in

the "Knowing the instrument panel"

chapter).

Never pour AdBlue® into another

container: it could be contaminated.

In case of damage to the sewage

system of exhaust gas resulting from

the use of additives / tap water, the

introduction of diesel fuel, or at least

by not fulfilling the requirements, the

warranty expires.

If the AdBlue® runs out, see

"Warning lights and messages"

paragraph in the "Knowing the

instrument panel" chapter to continue

using the car normally.

The AdBlue® level is not updated if

the car is parked on a sloping road.

The consumption of AdBlue®

emissions additive depends on the

conditions of use of the car and is

indicated by means of the symbol and a

dedicated message on the instrument

panel display.

Fuels - identification of vehicle

compatibility. Graphic symbol for

consumer information in accordance

with EN16942

The symbols, shown below, make it

easier to recognise the correct fuel type

to use with your car.
Before refuelling, check the symbols

(where provided) inside the fuel

filler flap and compare them with the

symbols shown on the fuel pump (where

provided).

Symbols for petrol powered cars

E5

: unleaded petrol containing up to 2.7%

(m/m) oxygen and with maximum 5.0%

(V/V) ethanol compliant with the EN228

specification.

E10

: unleaded petrol containing up to

3.7% (m/m) oxygen and with maximum

10.0% (V/V) ethanol compliant with the

EN228 specification.

Symbols for diesel powered cars

B7

: diesel containing up to 7% (V/V)

of FAME (Fatty Acid Methyl Esters)

compliant with the EN590 specification.

B10

: diesel containing up to 10%

(V/V) of FAME (Fatty Acid Methyl

Esters) compliant with the EN16734

specification.

Emergency diesel version refuelling

(where provided)
Proceed as follows:

open the boot and take out the

dedicated adapter, located under the
load platform fig. 198;

open flap fig. 195, pressing on the point

shown by the arrow;

remove the closing cap;
put the cap back in position;
insert the adapter into the filler;
when you have finished refuelling,

remove the adapter, close the cap and

then close the flap;

finally put the adaptor back in the

boot.

-------------------------------------------------------------------------------------------------------------------------------------------------------------

179

198

07206S0005EM

Emergency fuel flap opening

In the event of an emergency the fuel flap

can be opened by operating from inside

the boot.
Proceed as follows:

open the boot and reach the

emergency opening cable placed on the
side of the fuel filler fig. 199;

pull the cord to unlock the fuel flap;
open the fuel flap by pressing on it (see

the previous instructions).

199

07206S0006EM

WARNING If the filler compartment is

washed with a high-pressure jet, keep it

at a distance of at least 8 in (20 cm).

WARNING

153)

Do not apply any object/cap to the end

of the filler which is not provided for the

car. The use of non-compliant objects/plugs

could cause a pressure increase inside the

tank, resulting in dangerous situations.

154)

Do not approach naked flames or lit

cigarettes to the fuel tank filler: fire risk.

Keep your face away from the fuel filler to

prevent breathing in harmful vapours.

155)

Do not use a mobile phone near the

refuelling pump: risk of fire.

156)

If the AdBlue overheats for a prolonged

period inside the tank to over 50 °C (for

example, due to direct solar irradiation),

the AdBlue may decompose and produce

ammonia vapours. Ammonia vapours have

a pungent odour when the cap of the AdBlue

tank is unscrewed, therefore be careful

not to inhale any ammonia vapours in the

tank outlet. In this concentration, however,

the ammonia vapours are not harmful or

dangerous to health.

AdBlue® (UREA) ADDITIVE FOR

DIESEL EMISSIONS

(2.2 JTD versions only)
The car is equipped with an AdBlue®

(UREA) injection system and Selective

Catalytic Reduction to meet emission

standards.
These two systems ensure compliance

with the diesel emissions requirements;

at the same time, they ensure fuel-

efficiency, handling, torque and power.

For messages and system warnings,

refer to the "Warning lights and

messages" paragraph in the "Knowing

the instrument panel" chapter.
AdBlue® (UREA) is considered a very

stable product with a long shelf life.

Stored at temperatures LOWER than 32

°C, it has a shelf life of at least one year.
For more information on the AdBlue®

(UREA) liquid type, see the “Fluids and

lubricants” paragraph in the “Technical

specifications” chapter.
The car is provided with an automatic
AdBlue® (UREA) heating system when

the engine starts allowing the system to

work correctly at temperatures lower

than -11°C.
WARNING AdBlue® (UREA) freezes at

temperatures lower than -11 °C.

-------------------------------------------------------------------------------------------------------------------------------------------------------------

 STARTING AND DRIVING

180

DRIVING TIPS

SAVING FUEL

Below are some suggestions which may

help you save fuel and thus lower the

amount of harmful emissions released

into the atmosphere.

Car maintenance

Checks and operations should be carried

out in accordance with the "Service

Schedule" (see the "Maintenance and

care" chapter).

Tyres

Check the tyre pressures at least once

every four weeks: if the pressure is too

low, consumption levels increase as

resistance to rolling is higher.

Unnecessary loads

Do not travel with an overloaded

boot. The weight of the car and its

arrangement greatly affect fuel

consumption and stability.

Electric devices

Use electrical devices only for the

amount of time needed. The heated

rear window, additional headlights,

screen wipers and heater fan require

a considerable amount of energy;

increasing the current uptake increases

fuel consumption (by up to +25% in an

urban cycle).

Climate control system

Using the climate control system will

increase consumption: use standard

ventilation when the temperature

outside permits.

Devices for aerodynamic control

The use of non-certified devices for

aerodynamic control may adversely

affect air drag and consumption levels.

DRIVING STYLE

Start

Do not warm up the engine at low or

high revs when the car is stationary;

this causes the engine to warm up

more slowly, thereby increasing fuel

consumption and emissions. It is

therefore advisable to move off

immediately, slowly, avoiding high

speeds: in this way the engine will warm

up more quickly.

Unnecessary actions

Avoid pressing the accelerator when

stationary.

Gear selection

Use a high gear when traffic and road

conditions allow it. Using a low gear

for faster acceleration will increase

fuel consumption. In the same way,

improper use of a high gear increases

consumption, emissions and engine wear.

Top speed

Fuel consumption considerably increases

as speed increases. Maintain a constant

speed, avoiding unnecessary braking and

acceleration, which cost in terms of both

fuel consumption and emissions.

Acceleration

Accelerating violently severely affects

consumption and emissions: acceleration

should be gradual and should not exceed

the maximum torque.

CONDITIONS OF USE

Cold starting

Short journeys and frequent cold starts

do not allow the engine to reach optimum

operating temperature. Consequently,

both consumption (from +15 to +30%

on the urban cycle) and emissions will

increase.

Traffic and road conditions

High fuel consumption is caused

by heavy traffic, for instance when

travelling in a queue with frequent use of

low gears or in cities with many traffic

lights. Winding mountain roads and rough

road surfaces also adversely affect

consumption.

TRANSPORTING PASSENGERS

Warnings

WARNING It is extremely dangerous to

leave children in a parked car when the

temperature outside is very high. The

-------------------------------------------------------------------------------------------------------------------------------------------------------------

181

heat inside the passenger compartment

may have serious, or even fatal,

consequences.
WARNING Never travel in the internal

load compartment. In the event of an

accident, anyone inside the boot would

be at greater risk of serious or even fatal

injury.
WARNING Ensure that all the occupants

of the car wear their seat belts correctly

and that any children are positioned

correctly on the dedicated child restraint

systems.

TRANSPORTING ANIMALS

Deployment of the airbags may be

dangerous for an animal on the front

seat. It is therefore advisable to arrange

animals on the rear seat inside dedicated

cages restrained by the car’s seat belts.
Bear in mind also that, in the event of

a sudden braking or an accident, an

inadequately restrained animal may

be projected within the passenger

compartment, risking injury to the animal

itself and the other occupants of the car.

EXHAUST GAS

Adequate maintenance of the exhaust

system represents the best protection

against leaks of carbon monoxide into

the passenger compartment.
Should an unusual noise from the

exhaust system or the presence

of exhaust gas in the passenger

compartment be identified, or if the

underbody or rear part of the car is

damaged, have the entire exhaust

system and adjoining bodywork areas

checked to identify any components

which are broken, damaged, worn or have

moved from their correct fitting position.

For these operations, contact an Alfa

Romeo Dealership.

QV VERSION

PERFORMANCE

For safe driving, it is essential,

particularly during the first days of

use, to get to know the car by driving

carefully and gradually discovering its

performance.

BRAKES

157)

WARNING Water, ice and salt spread on

the roads may deposit on the brake discs,

reducing braking efficiency the first time

the brakes are applied.
WARNING For maximum efficiency of

the braking system, a bedding-in period

of about 310 mi (500 km) is needed:

during this period it is better to avoid

sharp, repeated and prolonged braking.
The car braking system may optionally

fit four carbon-ceramic material brake

discs, one on each wheel.
In order to guarantee the maximum

braking capacity for the first use, Alfa

Romeo performs a "run-in" procedure for

discs and pads directly at the factory.
The use of carbon-ceramic material

brake discs guarantees braking features

(better deceleration/pedal load ratio,

braking distances, fading resistance)

proportional to the dynamic features

of the car in addition to considerably

decreasing the unsprung component

weight.
The materials used and the structural

features of the system could generate

anomalous noises which have absolutely

no adverse effect on correct operation

and reliability of the braking system.
Greater pressure may need to be applied

to the brake pedal the first time to keep

the same braking capacity in presence

of condensation or salt on the braking

surfaces, for example after washing or if

the car is not used for a long time.
WARNING Given the high technological

level of this system, any servicing on it

must be performed by a Dedicated Alfa

Romeo Dealership with the exclusive

skills needed for the repair operations.
WARNING In case of intensive, high-

performance use of the car, have the

condition of the carbon-ceramic material

braking system inspected at a Dedicated

Alfa Romeo Dealership, as shown on the

Service Schedule.

-------------------------------------------------------------------------------------------------------------------------------------------------------------

 STARTING AND DRIVING

182

DRIVING ON RACE TRACKS

Before driving on a track using a racing

style, it is necessary to:

Attend a race track driving course.
Check the liquid levels in the engine

compartment. For more information,

see the “Checking levels” paragraph in

the “Servicing and care” chapter of the

Owner Handbook.

Have the vehicle inspected at a

Dedicated Alfa Romeo Dealership.
Remember that the car was not designed

to be driven exclusive on the race track

and that this use increases stress and

component wear.

Overheating of the brakes

The braking system components may

overheat when driving on mountain roads

with steep gradients or during sporty use

of the car. When this happens, there may

be noise/vibrations while braking.
When you reach the destination, do not

stop the engine immediately, but leave it

idling for a few minutes to let the braking

system components cool down and to

lubricate the engine parts properly.
To make the car safe when it is parked,

apply the safety provisions of the

Highway Code before leaving the car:

engage P (Park) mode;
position the wheels at full lock;

engage the electric parking brake;
when parked on a steep slope, place

chocks or stones behind the wheels.

Preheating the carbon ceramic material

brake discs

The brake discs must be warmed up

to make them fully efficient. You are

advised to perform the following

procedure:

brake nine times from 80 mph

(130 km/h) to 20 mph (30 km/h) with

deceleration equal to 0.7 g (the

longitudinal acceleration value is shown

on the instrument panel display by

setting RACE mode and selecting the

“Performance” page) with 20 second

intervals between brake applications;

keep the car at a speed comprised

between 37 mph (60 km/h) and 60 mph

(100 km/h) and do not brake for 240

seconds to allow the brakes to cool

down;

then brake three times from 230

mph (200 km/h) to 20 mph (30 km/h)

with deceleration equal to 1.1 g (ABS

operation) with 30 second intervals

between brake applications; keep the car

at a speed comprised between 37 mph

(60 km/h) and 60 mph (100 km/h) and do

not brake for 300 seconds to allow the

brakes to cool down.

WARNING

157)

After the car has been stopped for a

long time in a very cold place (temperature

below 0 °C), for the first five brakes, the

carbon-ceramic braking system efficiency is

not optimal, so you may need slightly more

pressure on the brake pedal.

TOWING TRAILERS

(where provided)
For towing caravans or trailers the car

must be fitted with an approved tow

hook and an adequate electrical system.

Should aftermarket installation be

requested, this must be carried out by a

specialised technician.
Install any specific and/or additional

rear-view mirrors as specified by the

Highway Code.
Remember that, when towing a trailer,

steep hills are harder to climb, braking

distances increase and overtaking takes

longer depending on the overall weight of

the trailer.
Engage a low gear when driving downhill,

rather than constantly using the brake.
The weight the trailer exerts on the car

tow hook reduces the loading capacity of

the car by the same amount. To make

sure that the maximum towable weight is

not exceeded (given in the registration

document) account should be taken

-------------------------------------------------------------------------------------------------------------------------------------------------------------

183

of the fully laden trailer, including

accessories and luggage.
Do not exceed the speed limits specific

to each country you are driving in, in the

case of vehicles towing trailers. In any

case, the top speed must not exceed 60

mph (100 km/h).
Any electric brake must be powered

directly by the battery through a cable

with a cross-section of no less than

0.004 in² (2.5 mm²).
In addition to the electrical branches,

the car electrical system can only be

connected to the supply cable for an

electric brake and to the cable for

an internal light for the trailer, not

exceeding 15W. For connections use the

preset box with battery cable with cross-

section no less than 0.004 in² (2.5 mm²).
WARNING The use of auxiliary loads

other than external lights (e.g. electric

brake) must take place with engine

running.
WARNING Contact an Alfa Romeo

Dealership to install a tow hook.

-------------------------------------------------------------------------------------------------------------------------------------------------------------

Have a flat tyre or a burnt-out bulb?

At times, a problem such as these may interfere with your

driving experience.

The pages on emergencies can help you to deal with critical

situations independently and calmly.

In an emergency, we recommend that you call the phone

number found in the Warranty Booklet.

You can also use the universal, national or international

freephone number to find your nearest Alfa Romeo

Dealership.

IN AN EMERGENCY

HAZARD WARNING LIGHTS . . . . . . . . . . . . . . . . . . . . . . . . . . . . . . . . . . . . . . . . . . . . 186
SOS CALL AND ASSIST CALL . . . . . . . . . . . . . . . . . . . . . . . . . . . . . . . . . . . . . . . . . . 186
REPLACING A BULB . . . . . . . . . . . . . . . . . . . . . . . . . . . . . . . . . . . . . . . . . . . . . . . . . . . . . 189
FUSES . . . . . . . . . . . . . . . . . . . . . . . . . . . . . . . . . . . . . . . . . . . . . . . . . . . . . . . . . . . . . . . . . . . . . 194
TYRE REPAIR KIT . . . . . . . . . . . . . . . . . . . . . . . . . . . . . . . . . . . . . . . . . . . . . . . . . . . . . . . 200
RUN FLAT TYRES . . . . . . . . . . . . . . . . . . . . . . . . . . . . . . . . . . . . . . . . . . . . . . . . . . . . . . . .202
JUMP STARTING . . . . . . . . . . . . . . . . . . . . . . . . . . . . . . . . . . . . . . . . . . . . . . . . . . . . . . . . .202
FUEL CUT-OFF SYSTEM . . . . . . . . . . . . . . . . . . . . . . . . . . . . . . . . . . . . . . . . . . . . . . . 204
ENGINE OVERHEATING . . . . . . . . . . . . . . . . . . . . . . . . . . . . . . . . . . . . . . . . . . . . . . . . .205
AUTOMATIC TRANSMISSION GEAR LEVER RELEASE . . . . . . . . . . . . .205
TOWING A BROKEN-DOWN CAR . . . . . . . . . . . . . . . . . . . . . . . . . . . . . . . . . . . . . .205
TOWING THE CAR . . . . . . . . . . . . . . . . . . . . . . . . . . . . . . . . . . . . . . . . . . . . . . . . . . . . . . 206

-------------------------------------------------------------------------------------------------------------------------------------------------------------

 IN AN EMERGENCY

186

HAZARD WARNING LIGHTS

CONTROL

72)

Press hazard lights button fig. 200 to

switch the lights on/off.
When the hazard lights are on, the
warning lights

and

flash.

When you need to move away from the

car to look for help, the hazard warning

lights will continue flashing even if the

ignition device is in the STOP position.

200

08016S0001EM

WARNING The use of hazard warning

lights is governed by the highway code

of the country you are driving in: comply

with legal requirements.

Emergency braking

In the event of emergency braking, the

hazard lights are switched on and the
warning lights

and

appear on

the instrument panel, depending on the

mode selected by the “Alfa DNA™ Pro”

selector.
When the "Alfa DNA™ Pro" selector

is in position "n" or "a", the activation

threshold of the hazard warning lights is

higher; on the other hand, in position "d"

the sensitivity of the activation is lower

than that in the "n" and "a" modes.
With the "Alfa DNA™ Pro" selector in the

"RACE” position (where provided), the

hazard warning lights do not activate.
The lights switch off automatically when

emergency braking ceases. For further

details about the emergency braking, see

the "Active safety systems" paragraph in

the "Safety" chapter.

IMPORTANT

72)

A prolonged use of the hazard warning

lights may discharge the battery.

SOS CALL AND ASSIST CALL

(for versions/markets where provided)
The car is equipped with on-board

assistance functions designed to provide

support in the event of accident and/or

emergency (SOS) or malfunctions of the

vehicle (roadside assistance - ASSIST)

managed by means of Alfa Connect Box.
The SOS function is activated:

automatically in the event of a major

collision recorded by the device aboard

the vehicle;

manually, by pressing the SOS button

located on the ceiling light fig. 201 or

by means of the appropriate menu
fig. 202 on the Connect system (for

versions/markets, where provided).

201

04136S0073EM

-------------------------------------------------------------------------------------------------------------------------------------------------------------

187

SOS

°

°

202

12126S2098EM

WARNING

If the SOS emergency

service is activated, the call will be

automatically routed to a private

Call Centre. We hereby specify that,

whenever the SOS call is referred to the

text, the SOS call is to be considered

managed by private service providers.

This SOS call service is not the e-call

service.

.

The SOS service is valid for 5 years from

delivery of the vehicle; in any case, it is

advisable to consult the Connectivity

section of the official Alfa Romeo

website for updates on the terms of

service.
The ASSIST function is activated:

automatically (for versions/markets,

where provided) following malfunctions

of the braking system, fuel system,

engine, etc.

manually by selecting the appropriate

menu fig. 203 on the Connect system (for

versions/markets where provided).

203

12126S2099EM

The SOS and ASSIST functions are

active with:

ignition device is at ON;
ignition device in STOP position and

Connect system display on.
After the SOS and ASSIST functions

(for versions/markets, where provided)

have been activated automatically or

manually, pressing the corresponding

button will send the position data to the

operational centre and make a voice call

to an operator.
NOTE If the SOS or Assist functions do

not work, the fault in the system will be

indicated on the display. Go as soon as

possible to an authorised workshop to

have the function repaired.
NOTE The correct operation of the SOS

and ASSIST services will be guaranteed

only by a good network coverage.

WARNING The SOS Call and ASSIST Call

functions may not be available for the

first minute after the vehicle is started.

Privacy

: GPS location is always

active, for both SOS and Assist calls.

Deactivating it via the "Settings" menu

of the Connect system will make some

of the other services unavailable (see

the "Settings" chapter of the Connect

system for more details).
WARNING The

icon is shown at the

bottom left of the Connect system

display when the geolocation function

is active (ON). When geolocation is on,

the vehicle position is tracked to enable

the functions that require it. When

geolocation is off, the vehicle position is

only tracked by the navigation, safety,

insurance and driver assistance systems

(where provided). See the Connect

system "Settings" chapter to deactivate

the function.

MANUAL SOS CALL

In the event of need, hold the SOS

button on the front ceiling light fig. 201

pressed for 2 seconds or press the
button fig. 202 on the Connect display

(for versions/markets where provided).

-------------------------------------------------------------------------------------------------------------------------------------------------------------

 IN AN EMERGENCY

188

The SOS button located on the ceiling

light will light up after connecting to an

SOS operator and will turn off when the

connection is ended.
NOTE If the SOS call button is pressed

by mistake, it is possible to press it

again within 10 seconds to cancel the

operation or press the cancel button on

the Connect system display.
Once the connection has been

established, the following data will

be automatically transmitted to the

Operations Centre, as authorised by the

customer:

indication that the occupant has made

an SOS call;

the brand of the vehicle;
the most recent known GPS

coordinates of the vehicle.
If you are able to speak to the operator,

do so through the car audio to provide

additional information about the request

for help.
If the system is unable to establish the

voice call, or the line disconnects due to

insufficient coverage, the SOS service

will try to call the operational centre

again for 5 minutes.
If the operational centre needs to

contact the car again, the system can

receive an incoming call, which will be

accepted automatically.

WARNING

Once the service has expired,

you will not be put in contact with an

operational centre and the system

will alert you that the service is not

available

.

WARNING Any malfunctions detected by

the SOS calling system will be notified:

during the start-up phase;
when the malfunction is detected;

by displaying a respective message on

the Connect system display. Contact

an Alfa Romeo Dealership as soon as

possible.
WARNING In the event of danger

(fire, visible smoke or hazardous road

conditions or dangerous positions), do

not wait for voice contact with the SOS

service operator, but exit from the car

immediately and go to a safe place, if in a

condition to do so.
WARNING Do not place network

antennas, CB radios or aftermarket

electrical equipment to avoid

interference. Such interference could

prevent the system form making the

emergency call.
WARNING Ignoring malfunction

warnings displayed by the Connect

system for a long time could lead to

being unable to make an SOS call when

needed.
Even if the SOS call system is fully

functional, factors outside the control

of FCA could interfere with or prevent

operation of the SOS call. Such factors

can be caused by the car electrical

systems not being intact, damage to

the SOS system during the accident,

obstructed or unavailable satellite

signals, network congestion, adverse

weather conditions, buildings, interfering

structures, tunnels, etc.

ASSIST CALLS

(for versions/markets where provided)

Pressing the graphic buttons fig. 203

located on the display of the Connect

system makes a call to one or more of

the following services:

Roadside Assistance

: if case of need,

a connection will be established with the

roadside assistance authority which will

receive the vehicle type and its position

directly. Additional roadside assistance

charges may apply.

Customer Care

(for versions/markets,

where provided): Customer service to

provide support in case of problems to

the car.
NOTE The relative menus and the

Connect system status bar will change

display state depending on the actions

performed, and it will be possible to

-------------------------------------------------------------------------------------------------------------------------------------------------------------

189

monitor each stage of the assist call

(connection, duration, ending, connection

errors, etc.).
NOTE If the ASSIST call button is

pressed by mistake, the call can be ended

by pressing the cancel button on the

Connect system display.
Once the connection has been

established, the following data will be

automatically transmitted, as authorised

by the customer:

indication that the occupant has made

an ASSIST call;

the brand of the vehicle;
the most recent known GPS

coordinates of the vehicle;

the type of error that occurred on

the vehicle that automatically sent

the ASSIST request (in the case of an

automatic call - for versions/markets,

where provided).
The call will be made through the car

audio system to provide any additional

information about the assistance

request.
If the system is unable to establish the

voice call, or the line disconnects due

to insufficient coverage, the ASSIST

service will try to call the operational

centre again for certain number of times.
WARNING If you have not subscribed

to the related services or the Roadside

Assistance package has expired or is

unavailable for purchase, the ASSIST

call will not be available. For further

information visit the Alfa Romeo official

website.
WARNING If the ASSIST call system

detects a malfunction, it is indicated by a

corresponding message on the Connect

system display. Contact an Alfa Romeo

Dealership as soon as.
If an emergency call (SOS) is active and

an ASSIST call is requested, the latter

will not be delivered.

Alfa Connect Box SYSTEM BATTERY

The Alfa Connect Box system is provided

with an independent battery that allows

the operation of some connected

services even if the car battery is

disconnected.
The system will warn the user of

the need to replace this battery by

displaying a dedicated message on

the display of the Connect system (for

versions/markets where provided) and

by means of a notification via mobile app

(for versions/markets, where provided).
Go to an Alfa Romeo dealership as soon

as possible.
NOTE: Failure to replace the battery

and, consequently, failure to observe

the warnings provided by the system

could affect or entirely prevent service

operation.

NOTE Regardless of charge, the battery

must be replaced every 5 years by an

Alfa Romeo dealership.

REPLACING A BULB

158) 159) 160) 161)

73)

GENERAL INSTRUCTIONS

Before replacing a bulb check the

contacts for oxidation;

replace blown bulbs with others of the

same type and power;

after replacing a headlight bulb, always

check its alignment;

when a light is not working, check that

the corresponding fuse is intact before

changing the bulb. For the location of

fuses, refer to the paragraph "If a fuse

blows" in this chapter.
WARNING In some particular climate

conditions such as low temperature,

humidity or after washing the car, a thin

condensation layer may form on the

internal surfaces of the front and rear

headlights. This is a natural phenomenon

due to the difference in temperature

and humidity between the inside and the

outside of the transparent cover which

does not indicate a fault and does not

compromise the normal operation of

lighting devices. It will disappear during

normal use.

-------------------------------------------------------------------------------------------------------------------------------------------------------------

 IN AN EMERGENCY

190

WARNING

158)

Before replacing the bulb, wait for the

exhaust ducts to cool down: DANGER OF

SCALDING!

159)

Modifications or repairs to the electric

system that are not carried out properly

or do not take the system technical

specifications into account can cause

malfunctions leading to the risk of fire.

160)

Halogen bulbs contain pressurised

gas, in the case of breakage they may burst

causing glass fragments to be projected

outwards.

161)

Only replace the light bulbs when the

engine is off and in a position that does not

interfere with traffic and lets you safely

replace them (see the description in the

“Replacement” paragraph). Also ensure

that the engine is cold, to prevent the risk of

burns.

IMPORTANT

73)

Halogen bulbs must be handled holding

the metallic part only. Touching the

transparent part of the bulb with your

fingers may reduce the intensity of the

emitted light and even reduce the lifespan

of the bulb. In the event of accidental

contact, wipe the bulb with a cloth

moistened with alcohol and let the bulb dry.

-------------------------------------------------------------------------------------------------------------------------------------------------------------

191

Light bulbs

Type

Power

Figure reference

Main beam headlights, front side lights/daylight running

lights (DRL) (*)

H15

55/15W

D

Dipped beam headlights (*)

H7

55W

D

Front direction indicators (*)

PY24W

24W

B

Fog lights (*)

H11

55W

E

Main beam/dipped beam headlights (Xenon gas discharge)

D5S

25W

F

Main beam/dipped beam headlights (Xenon gas discharge)

D3S

35W

F

Sun visor courtesy light

1.5CP

2.1W

C

Glove compartment light

W5W

4W

A

Luggage compartment light

W5W

5W

A

Puddle lights (under door panel)

W5W

5W

A

(*) Only for basic version headlight with halogen main beam/dipped beam headlights

-------------------------------------------------------------------------------------------------------------------------------------------------------------

 IN AN EMERGENCY

192

 REPLACING AN EXTERNAL BULB

Front light cluster with main

beam/dipped beam halogen headlights

Dipped beam headlights

To change the bulb of these lights,

proceed as follows:

remove the top cover from the wheel

arch by unscrewing the fixing screws
fig. 204;

remove the cover (1) fig. 205;
remove the bulb/connector assembly

(2) from the headlight body fig. 205;

204

08026S0001EM

205

08026S0099EM

remove the bulb by sliding it off the

connector;

install the new bulb, making sure it is

correctly inserted in the connector;

then insert the bulb/connector

assembly in the housing on the headlight

body and make sure that it is locked

correctly;

remount the lid and cover, tightening

the fixing bolts.

Main beam headlights

To change the bulb of these lights,

proceed as follows:

working from inside the engine

compartment fig. 206 remove the (1)
fig. 207;

turn the bulb, bulb holder and

connector (2) anticlockwise and then

slide it off the headlight body fig. 207;

206

08026S0023EM

207

08026S0097EM

remove the bulb by sliding it off the

bulb holder;

install the new bulb, making sure it is

correctly inserted in the bulb holder;

then insert the bulb, bulb holder and

connector assembly in the housing on

the headlight body and turn it clockwise,

making sure that it is locked correctly;

remount the lid and cover, tightening

the fixing bolts.

-------------------------------------------------------------------------------------------------------------------------------------------------------------


Content      ..     9      10      11      12     ..