Acura ILX (2021 year). Manual in english - page 9
 

  Index      Manuals     Acura ILX (2021 year). Manual in english


Search            copyright infringement  


Content      ..     7      8      9      10     ..


Acura ILX (2021 year). Manual in english - page 9


142

uu

Operating the Switches Around the Steering Wheel

u

Turn Signals

Co
ntrols

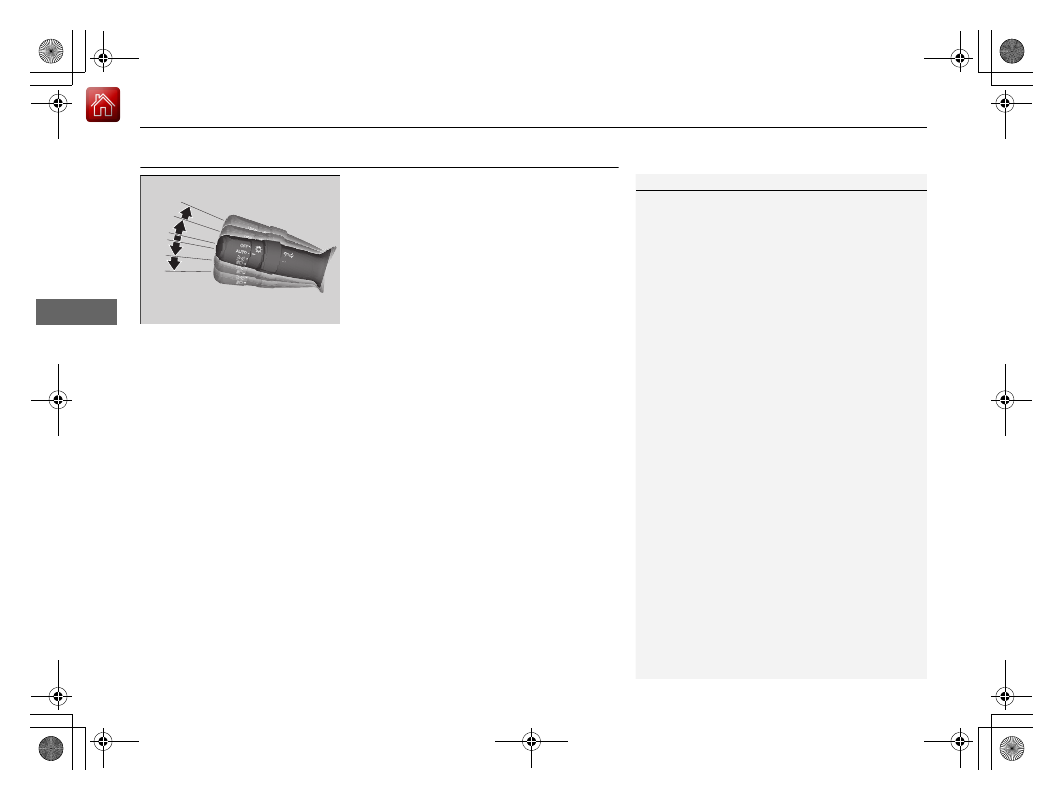
Turn Signals

The turn signals can be used when the power 
mode is in ON.

(A): Turn signal

Push the lever up or down based on the 
direction you want to turn, and the turn signal 
will blink.

(B): One-touch turn signal

When you lightly push the lever up or down 
and release it, the turn signal will blink 3 
times.

1

(A): Turn signal

The turn signal indicator on the instrument panel will 
blink when the external turn signal blinks.

2

Indicators

 P. 72

(A)

(A)

(B)

(B)

-------------------------------------------------------------------------------------------------------------------------------------------------------------

143

uu

Operating the Switches Around the Steering Wheel

u

Light Switches

Continued

Co
ntrols

Light Switches

Rotating the light switch turns the lights on 
and off, regardless of the power mode 
setting.

High beams

Push the lever forward until you hear a click.

Low beams

When in high beams, pull the lever back to 
return to low beams.

Flashing the high beams

Pull the lever back, and release it.

Lights off

Turn the lever to 

OFF

 either when:

The transmission is in 

(

P

.

The parking brake is applied.

To turn the lights on again, turn the lever to 

OFF

 to cancel the lights off mode. Even if you 

do not cancel the lights off mode, the lights 
come on automatically when:

The transmission is taken out of 

(

P

 and the 

parking brake is released.

The vehicle starts to move.

Manual Operation

1

Light Switches

If you leave the power mode in VEHICLE OFF (LOCK) 
while the lights are on, a chime sounds when the 
driver’s door is opened.

When the lights are on, the lights on indicator in the 
instrument panel will be on.

2

Lights On Indicator

 P. 78

Do not leave the lights on when the engine is off 
because it will cause the battery to discharge.

If you sense that the level of the headlights is 
abnormal, have the vehicle inspected by a dealer.

High Beams

Flashing the high beams

Low Beams

Turns on parking, side marker, 
tail, and rear license plate lights

Turns on headlights, parking, 
side marker, tail, and rear 
license plate lights

-------------------------------------------------------------------------------------------------------------------------------------------------------------

uu

Operating the Switches Around the Steering Wheel

u

Light Switches

144

Co
ntrols

Automatic lighting control can be used when 
the power mode is in ON.

When the light switch is in 

AUTO

, the 

headlights and other exterior lights will switch 
on and off automatically depending on the 
ambient brightness.

The headlights come on when you unlock a 
door in dark areas with the headlight switch in 

AUTO

.

u

Once you lock the door, the headlights 
will go off.

Automatic Operation (automatic lighting control)

1

Automatic Operation (automatic lighting control)

We recommend that you turn on the lights manually 
when driving at night, in a dense fog, or in dark areas 
such as long tunnels or parking facilities.

The light sensor is in the location shown below.
Do not cover this light sensor with anything; 
otherwise, the automatic lighting system may not 
work properly.

Light Sensor

Models with automatic 

intermittent wipers

Models without automatic 

intermittent wipers

Light Sensor

-------------------------------------------------------------------------------------------------------------------------------------------------------------

145

uu

Operating the Switches Around the Steering Wheel

u

Light Switches

Co
ntrols

The headlights automatically come on when the wipers are used several times within 
a certain number of intervals with the headlight switch in 

AUTO

.

The headlights automatically go off a few minutes later if the wipers are stopped.

The headlights, all other exterior lights, and the instrument panel lights turn off 15 
seconds after you set the power mode to VEHICLE OFF (LOCK), take the remote with 
you, and close the driver's door.

If you set the power mode to VEHICLE OFF (LOCK) with the headlight switch on, but 
do not open the door, the lights turn off after 10 minutes (3 minutes, if the switch 
is in the 

AUTO

 position).

The lights turn on again when you unlock or open the driver's door. If you unlock 
the door, but do not open it within 15 seconds, the lights go off. If you open the 
driver's door, you will hear a reminder chime alerting you that the lights are on.

Headlight Integration with Wiper

Automatic Lighting Off Feature

1

Automatic Operation (automatic lighting control)

You can adjust the auto light sensitivity as follows:

2

Customized Features

 P. 99, 315

Setting

The exterior lights come on 

when the ambient light is at

Max

High

Mid

Low

Min

U.S. models

Bright

Dark

1

Headlight Integration with Wiper

This feature activates while the headlights are off in 

AUTO

.

The instrument panel brightness does not change 
when the headlights come on.

At dark ambient light levels, the automatic lighting 
control feature turns on the headlights, regardless of 
the number of wiper sweeps.

1

Automatic Lighting Off Feature

 You can change the headlight auto off timer setting.

2

Customized Features

 P. 99, 315

-------------------------------------------------------------------------------------------------------------------------------------------------------------

146

uu

Operating the Switches Around the Steering Wheel

u

Fog Lights

*

Co
ntrols

Fog Lights

*

When the low beam headlights are on, turn 
the fog light switch on to use the fog lights.

Daytime Running Lights

The parking/daytime running lights come on when the following conditions have 
been met:

The power mode is in ON.

The headlight switch is in 

AUTO

.

The parking brake is released.

The lights remain on even if you set the parking brake.
Setting the power mode to VEHICLE OFF (LOCK) will turn off the daytime running 
lights.

The daytime running lights are off once the headlight switch is turned on, or when 
the headlight switch is in 

AUTO

 and it is getting darker outside.

Fog Light Switch

* Not available on all models

-------------------------------------------------------------------------------------------------------------------------------------------------------------

147

uu

Operating the Switches Around the Steering Wheel

u

Auto High-Beam

Continued

Co
ntrols

Auto High-Beam

The front sensor camera detects the light sources ahead of the vehicle such as the 
lights of a preceding or oncoming vehicle, or street lights. When you are driving at 
night, the system automatically switches the headlights between low beam and high 
beam depending on the situation.

When all of the following conditions have been met, the auto high-beam indicator 
comes on and the auto high-beam is activated.

The power mode is in ON.

The light switch is in 

AUTO

.

The lever is in the low beam position.

The headlights have been automatically 
activated.

It is dark outside the vehicle.

If the auto high-beam indicator does not come on even when all the conditions have 
been met, carry out the following procedure and the indicator will come on.

Pull the lever toward you for flashing the high beams then release it while driving.

1

Auto High-Beam

The auto high-beam system does not always operate 
in every situation. This system is just for assisting the 
driver. Always observe your surroundings and switch 
the headlights between high beam and low beam 
manually if necessary.

If you find the timing of beam changes inconvenient 
for driving, change the headlight beams manually.

The range and the distance at which the camera can 
recognize varies depending on conditions 
surrounding your vehicle.

Regarding the handling of the camera mounted to 
the inside of the windshield, refer to the following.

2

Front Sensor Camera

 P. 493

For the auto high-beam to work properly:

Do not place an object that reflects light on the 
dashboard.

Keep the windshield around the camera clean.

When cleaning the windshield, be careful not to 
apply the windshield cleanser to the camera lens.

Do not attach an object, sticker or film to the area 
around the camera.

Do not touch the camera lens.

If the camera receives a strong impact, or repairing of 
the area near the camera is required, consult a dealer.

How to Use the Auto High-Beam

Front Sensor Camera

Auto High-Beam 

Indicator

Light Switch

-------------------------------------------------------------------------------------------------------------------------------------------------------------

uu

Operating the Switches Around the Steering Wheel

u

Auto High-Beam

148

Co
ntrols

Automatic switching between high-beam and low-beam

When auto high-beam is active, the headlights switch between high beam and low 
beam based on the following conditions.

Manual switching between high-beam and low-beam

If you want to manually switch the headlights between high beam and low beam, 
follow either of the procedures below. Note that when you do this, the auto high-
beam indicator will turn off and the auto high-beam will be deactivated.

Using the lever:

Pull the lever toward you for flashing the high beams then release it within about 
one second while driving.

u

To reactivate the auto high-beam, pull the lever toward you for flashing the 
high beams then release it while driving. The auto high-beam indicator will 
come on.

Using the light switch:

Turn the light switch to 

.

u

To reactivate the auto high-beam, turn the light switch to 

AUTO

 when the 

lever is in the low beam position, the auto high-beam indicator will come on.

Switching to high beam:

Switching to low beam:

All of the following conditions must 
be met before the high beams turn 
on.

Your vehicle speed is 45mph (72 
km/h) or more.

There are no preceding or 
oncoming vehicle with headlights 
or taillights turned on.

There are few street lights on the 
road ahead.

One of the following conditions 
must be met before the low beams 
turn on.

Your vehicle speed is 30 mph (48 
km/h) or less.

There is a preceding or oncoming 
vehicle with headlights or 
taillights turned on.

There are many street lights on 
the road ahead.

1

How to Use the Auto High-Beam

In the following cases, the auto high-beam system 
may not switch the headlights properly or the 
switching timing may be changed. In case of the 
automatic switching operation does not fit for your 
driving habits, please switch the headlights manually.

The brightness of the lights from the preceding or 
oncoming vehicle is intense or poor.

Visibility is poor due to the weather (rain, snow, 
fog, windshield frost, etc.).

Surrounding light sources, such as street lights, 
electric billboards and traffic lights are illuminating 
the road ahead.

The brightness level of the road ahead constantly 
changes.

The road is bumpy or has many curves.

A vehicle suddenly appears in front of you, or a 
vehicle in front of you is not in the preceding or 
oncoming direction.

Your vehicle is tilted with a heavy load in the rear.

A traffic sign, mirror, or other reflective object 
ahead is reflecting strong light toward the vehicle.

The oncoming vehicle frequently disappears under 
roadside trees or behind median barriers.

The preceding or oncoming vehicle is a motorcycle, 
bicycle, mobility scooter, or other small vehicle.

The auto high-beam system keeps the headlight low 
beam when:

Windshield wipers are operating.

The camera has detected a dense fog.

-------------------------------------------------------------------------------------------------------------------------------------------------------------

149

uu

Operating the Switches Around the Steering Wheel

u

Auto High-Beam

Co
ntrols

You can turn the auto high-beam system off. If you want to turn the system off or 
on, set the power mode to ON, then carry out the following procedures while the 
vehicle is stationary.

To turn the system off:

With the light switch is in 

AUTO

, pull the lever 

toward you and hold it for at least 40 seconds. 
After the auto high-beam indicator light blinks 
twice, release the lever.

To turn the system on:

With the light switch is in 

AUTO

, pull the lever 

toward you and hold it for at least 30 seconds. 
After the auto high-beam indicator light blinks 
once, release the lever.

How to Turn Off the Auto High-Beam

1

How to Use the Auto High-Beam

If the 

Some Driver Assist Systems Cannot 

Operate: Camera Temperature Too High

 message 

appears:

Use the climate control system to cool down the 
interior and, if necessary, also use defroster mode 
with the airflow directed toward the camera.

Start driving the vehicle to lower the windshield 
temperature, which cools down the area around 
the camera.

If the 

Some Driver Assist Systems Cannot 

Operate: Clean Front Windshield

 message 

appears:

Park your vehicle in a safe place, and clean the 
windshield. If the message does not disappear after 
you have cleaned the windshield and driven for a 
while, have your vehicle checked by a dealer.

1

How to Turn Off the Auto High-Beam

If you turn the auto high-beam system off, the system 
does not operate until you turn the system on.

Park in a safe place before turning the system off or 
on.

AUTO

 Position

-------------------------------------------------------------------------------------------------------------------------------------------------------------

150

uu

Operating the Switches Around the Steering Wheel

u

Wipers and Washers

Co
ntrols

Wipers and Washers

The windshield wipers and washers can be 
used when the power mode is in ON.

MIST

The wipers run at high speed until you release 
the lever.

Wiper switch (OFF, INT

*1

/AUTO

*2

, LO, 

HI)

Move the lever up or down to change the 
wiper settings.

Adjusting wiper operation

*

Turn the adjustment ring to adjust the wiper 
operation.

Washer

Sprays while you pull the lever toward you.
When you release the lever for more than one 
second, the spray stops, the wipers sweep two 
or three more times to clear the windshield, 
then stop.

*1: Models with manual intermittent operation
*2: Models with automatic intermittent operation

Windshield Wipers/Washers

1

Wipers and Washers

NOTICE

Do not use the wipers when the windshield is dry.
The windshield will get scratched, or the rubber 
blades will get damaged.

NOTICE

Turn the washers off if no washer fluid comes out.
The pump may get damaged.

The wiper motor may stop motor operation 
temporarily to prevent an overload. Wiper operation 
will return to normal within a few minutes, once the 
circuit has returned to normal.

If the vehicle speeds up while the wipers are 
operating intermittently, the length of the wipe 
interval shortens.
When the vehicle speeds up, the wiper operation’s 
shortest delay setting ( ) and the 

LO

 setting become 

the same.

NOTICE

In cold weather, the blades may freeze to the 
windshield.
Operating the wipers in this condition may damage 
the wipers. Use the defogger to warm the 
windshield, then turn the wipers on.

Models with intermittent time adjustment ring

Intermittent Time 

Adjustment Ring

*

MIST

INT

*1

/

AUTO

*2

OFF

LO

: Low speed wipe

HI

: High speed wipe

Pull to 

use 

washer.

Lower speed, fewer sweeps

Higher speed, more sweeps

* Not available on all models

-------------------------------------------------------------------------------------------------------------------------------------------------------------

151

uu

Operating the Switches Around the Steering Wheel

u

Wipers and Washers

Co
ntrols

When you push the lever down to 

AUTO

, the 

windshield wipers sweep once, and go into 
the automatic mode.

The wipers operate intermittently, at low 
speed, or at high speed and stops in 
accordance with the amount of rainfall the 
rainfall sensor detects.

AUTO sensitivity adjustment

When the wiper function is set to 

AUTO

, you 

can adjust the sensitivity of the rainfall sensor 
(using the adjustment ring) so that wipers will 
operate in accordance with your preference.

Sensor sensitivity

Automatic Intermittent Wipers

*

1

Wipers and Washers

If the wipers stop operating due to an obstacle such 
as the build-up of snow, park the vehicle in a safe 
place.
Rotate the wiper switch to 

OFF

, and set the power 

mode to ACCESSORY or VEHICLE OFF (LOCK), then 
remove the obstacle.

1

Automatic Intermittent Wipers

*

The rainfall sensor is in the location shown below.

NOTICE

AUTO

 should always be turned 

OFF

 before the 

following situations in order to prevent severe 
damage to the wiper system:

Cleaning the windshield

Driving through a car wash

No rain present

Rainfall Sensor

Adjustment Ring

Low sensitivity

High sensitivity

* Not available on all models

-------------------------------------------------------------------------------------------------------------------------------------------------------------

152

uu

Operating the Switches Around the Steering Wheel

u

Brightness Control

Co
ntrols

Brightness Control

When the power mode is in ON, you can use 
the brightness control knob to adjust 
instrument panel brightness.

Brighten:

 Turn the knob to the right.

Dim:

 Turn the knob to the left.

You will hear a beep when the brightness 
reaches minimum or maximum. Several 
seconds after adjusting the brightness, you 
will be returned to the previous display.

Brightness level indicator

The brightness level is shown on the display 
while you are adjusting it.

1

Brightness Control

The brightness of the instrument panel will be 
reduced when the following conditions:

The power mode is in ON.

The light switch is in any position other than 

OFF


and it is dark outside.

The brightness can be set differently for when the 
exterior lights are on, and when they are off.

Control Knob

-------------------------------------------------------------------------------------------------------------------------------------------------------------

153

uu

Operating the Switches Around the Steering Wheel

u

Rear Defogger/Heated Door Mirror Button

Co
ntrols

Rear Defogger/Heated Door Mirror Button

Press the rear defogger and heated door 
mirror button to defog the rear window and 
mirrors when the power mode is in ON.

The rear defogger and heated door mirrors 
automatically switch off after 10-30 minutes 
depending on the outside temperature.
However, if the outside temperature is 32°F 
(0°C) or below, it does not automatically 
switch off.

Adjusting the Steering Wheel

The steering wheel height and distance from your body can be adjusted so that you 
can comfortably grip the steering wheel in an appropriate driving posture.

1.

Pull the steering wheel adjustment lever up.

u

The steering wheel adjustment lever is 
under the steering column.

2.

Move the steering wheel up or down, and 
in or out.

u

Make sure you can see the instrument 
panel gauges and indicators.

3.

Push the steering wheel adjustment lever 
down to lock the steering wheel in position.

u

After adjusting the position, make sure 
you have securely locked the steering 
wheel in place by trying to move it up, 
down, in, and out.

1

Rear Defogger/Heated Door Mirror Button

This system consumes a lot of power, so turn it off 
when the window has been defogged.
Also, do not use the system for a long time while the 
engine is idling. This may weaken the battery, making 
it difficult to start the engine.

When the power mode is set to ON and the outside 
temperature is below 41°F (5°C), the heated door 
mirror may automatically activate for 10 minutes.

1

Adjusting the Steering Wheel

3

WARNING

Adjusting the steering wheel position while 
driving may cause you to lose control of the 
vehicle and be seriously injured in a crash.

Adjust the steering wheel only when the 
vehicle is stopped.

To adjust

To lock

Lever

-------------------------------------------------------------------------------------------------------------------------------------------------------------

154

uu

Operating the Switches Around the Steering Wheel

u

Driving Position Memory System

*

Co
ntrols

Driving Position Memory System

*

You can store two driver’s seat (except for power lumbar) positions with the driving 
position memory system.
When you unlock and open the driver’s door with a remote transmitter, or keyless 
access system, the seat adjust automatically to one of the two preset positions.

When you enter the vehicle, the multi-information display briefly shows you which 
remote transmitter you used to unlock the vehicle.

DRIVER 1

 transmitter is linked to memory button 1.

DRIVER 2

 transmitter is linked to memory button 2.

1

Driving Position Memory System

*

Using the information screen or multi-information 
display, you can disable the automatic seat 
adjustment function.

2

Customized Features

 P. 99, 315

DRIVER 1

DRIVER 2

* Not available on all models

-------------------------------------------------------------------------------------------------------------------------------------------------------------

155

uu

Operating the Switches Around the Steering Wheel

u

Driving Position Memory System

*

Co
ntrols

1.

Set the power mode to ON. Adjust the 
driver’s seat to the desired position.

2.

Press the 

SET

 button.

u

You will hear the beep, and the memory 
button indicator light will blink.

3.

Press and hold memory button 

(

1

 or 

(

2


within five seconds of pressing the 

SET


button.

u

Once the seat positions have been 
memorized, the indicator light on the 
button you pressed stays on and you will 
hear the double-beep.

1.

Put the transmission into 

(

P

.

2.

Apply the parking brake.

3.

Press a memory button (

(

1

 or 

(

2

).

u

You will hear the beep, and the indicator 
light will blink.

The seat will automatically move to the 
memorized position. When it has finished 
moving, you will hear the beep, and the 
indicator light stays on.

Storing a Position in Memory

1

Storing a Position in Memory

After you press the 

SET

 button, the storing operation 

will be canceled when:

You do not press the memory button within five 
seconds.

You readjust the seat position before the double-
beep.

You set the power mode to any position except 
ON.

SET

 Button

Memory Button 1

Memory Button 2

Recalling the Stored Position

1

Recalling the Stored Position

The seat will stop moving if you:

Press the 

SET

 button or memory button 

(

1

 or 

(

2

.

Adjust the seat position.

Put the transmission into a position other than 

(

P

.

Memory Buttons

-------------------------------------------------------------------------------------------------------------------------------------------------------------

156

Co
ntrols

Mirrors

Interior Rearview Mirror

Adjust the angle of the rearview mirror when you are sitting in the correct driving 
position.

Flip the tab to switch the position.
The night position will help to reduce the glare 
from headlights behind you when driving 
after dark.

When you are driving after dark, the 
automatic dimming rearview mirror reduces 
the glare from headlights behind you, based 
on inputs from the mirror sensor. This feature 
is always active.

Rearview Mirror with Day and Night Positions

*

1

Mirrors

Keep the inside and outside mirrors clean and 
adjusted for best visibility.

Adjust the mirrors before you start driving.

2

Front Seats

 P. 158

Daytime 

Position

Night 

Position

Automatic Dimming Rearview Mirror

*

1

Automatic Dimming Rearview Mirror

*

The auto dimming function cancels when the 
transmission is in 

(

R

.

Sensor

* Not available on all models

-------------------------------------------------------------------------------------------------------------------------------------------------------------

157

uu

Mirrors

u

Power Door Mirrors

Co
ntrols

Power Door Mirrors

You can adjust the door mirrors when the 
power mode is in ON.

Mirror position adjustment

L/R selector switch:

 Select the left or right 

mirror. After adjusting the mirror, return the 
switch to the center position.

Mirror position adjustment switch:

 Press 

the switch left, right, up, or down to move the 
mirror.

Selector Switch

Adjustment Switch

-------------------------------------------------------------------------------------------------------------------------------------------------------------


Content      ..     7      8      9      10     ..