RAM 3500 (2022 year). Manual in english - page 1
 

  Index      Manuals     RAM 3500 (2022 year). Manual in english


Search            copyright infringement  


Content      ..      1       2         ..


RAM 3500 (2022 year). Manual in english - page 1


12  

Secure loose items to prevent weight shifts that could affect the balance of 

your vehicle. When the truck camper is loaded, drive to a scale and weigh the 

front and rear wheels separately, to determine axle loads. Individual axle loads 

should not exceed either of the Gross Axle Weight Ratings (GAWR). The total of 

the axle loads should not exceed the Gross Vehicle Weight Rating (GVWR). If 

weight ratings are exceeded, move or remove items to get the total weight 

below the ratings.

NOTE:

These ratings are also provided on the vehicle certification label located on the 

driver’s side B-pillar. See  

Ú

page 212 for more information.

For any additional instructions, please contact your conversion/camper 

manufacturer or an authorized dealer.

VEHICLE MODIFICATIONS/ALTERATIONS  

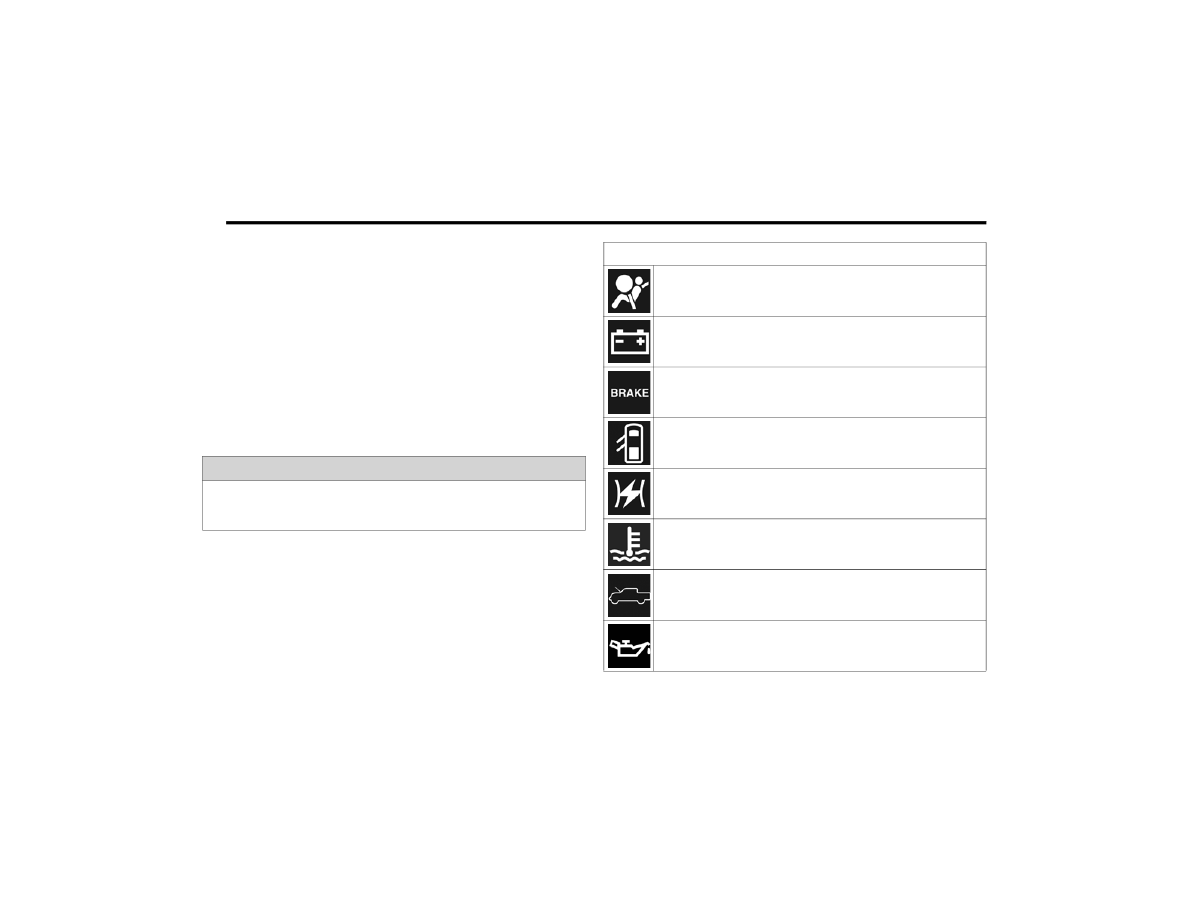
SYMBOL GLOSSARY

Some car components have colored labels with symbols indicating 

precautions to be observed when using this component. It is important to 

follow all warnings when operating your vehicle. See below for the definition of 

each symbol  

Ú

page 113.

NOTE:

Warning and Indicator lights are different based upon equipment options and 

current vehicle status. Some telltales are optional and may not appear.

WARNING!

Any modifications or alterations to this vehicle could seriously affect its 

roadworthiness and safety and may lead to a collision resulting in serious 

injury or death.

Red Warning Lights

Air Bag Warning Light


Ú

page 113

Battery Charge Warning Light


Ú

page 114

Brake Warning Light


Ú

page 113

Door Open Warning Light


Ú

page 114

Electronic Throttle Control (ETC) Warning Light


Ú

page 114

Engine Coolant Temperature Warning Light


Ú

page 114

Hood Open Warning Light


Ú

page 114

Oil Pressure Warning Light


Ú

page 115

-------------------------------------------------------------------------------------------------------------------------------------------------------------

13

Oil Temperature Warning Light


Ú

page 115

Seat Belt Reminder Warning Light


Ú

page 115

Trailer Brake Disconnected Warning Light


Ú

page 115

Transmission Temperature Warning Light


Ú

page 115

Vehicle Security Warning Light


Ú

page 115

Yellow Warning Lights

Adaptive Cruise Control (ACC) Fault Warning Light


Ú

page 115

Air Suspension Fault Warning Light


Ú

page 115

Red Warning Lights

Anti-Lock Brake System (ABS) Warning Light


Ú

page 115

Cruise Control Fault Warning Light


Ú

page 117

Engine Check/Malfunction Indicator Warning Light (MIL)


Ú

page 117

Electronic Stability Control (ESC) Active Warning Light


Ú

page 116

Electronic Stability Control (ESC) OFF Warning Light


Ú

page 116

LaneSense Warning Light


Ú

page 116

Low Washer Fluid Warning Light


Ú

page 116

Low Fuel Warning Light


Ú

page 116

Yellow Warning Lights

1

-------------------------------------------------------------------------------------------------------------------------------------------------------------

14  

Low Coolant Level Warning Light


Ú

page 116

Loose Fuel Filler Cap Warning Light


Ú

page 116

Rear Axle Locker Fault Warning Light


Ú

page 117

Service Forward Collision Warning (FCW) Light


Ú

page 117

Service LaneSense Warning Light


Ú

page 117

Service 4WD Warning Light


Ú

page 117

Sway Bar Fault Warning Light


Ú

page 118

Tire Pressure Monitoring System (TPMS) Warning Light


Ú

page 118

Yellow Warning Lights

Yellow Indicator Lights

Air Suspension Payload Protection Indicator Light


Ú

page 119

Air Suspension Alternate Trailer Height Indicator Light


Ú

page 119

Air Suspension Bed Lowering Mode Indicator Light


Ú

page 119

Air Suspension Ride Height Raising Indicator Light


Ú

page 119

Air Suspension Ride Height Lowering Indicator Light


Ú

page 119

Cargo Light


Ú

page 119

Cold Ambient Derate Mode Indicator Light


Ú

page 119

Diesel Exhaust Brake Indicator Light


Ú

page 119

-------------------------------------------------------------------------------------------------------------------------------------------------------------

15

Forward Collision Warning (FCW) Off Indicator Light


Ú

page 119

Front And Rear Axle Lock Indicator Light


Ú

page 119

4WD Lock Indicator Light


Ú

page 120

4WD Low Indicator Light


Ú

page 120

4WD High Indicator Light


Ú

page 120

Low Diesel Exhaust Fluid (DEF) Indicator Light


Ú

page 119

NEUTRAL Indicator Light


Ú

page 119

Rear Axle Lock Indicator Light


Ú

page 120

Yellow Indicator Lights

Snowplow Mode Indicator Light


Ú

page 120

Sway Bar Indicator Light


Ú

page 120

TOW/HAUL Indicator Light


Ú

page 120

Trailer Merge Assist Indicator Light


Ú

page 120

Wait To Start Light


Ú

page 120

Water In Fuel Indicator Light


Ú

page 120

Green Indicator Lights

Adaptive Cruise Control (ACC) Set With Target Light


Ú

page 120

Yellow Indicator Lights

1

-------------------------------------------------------------------------------------------------------------------------------------------------------------

16  

Adaptive Cruise Control (ACC) Set With No Target Detected 

Indicator Light


Ú

page 120

Automatic Diesel Exhaust Brake Indicator Light


Ú

page 121

Cruise Control Set Indicator Light


Ú

page 121

ECO Mode Indicator Light


Ú

page 121

Front Fog Indicator Light


Ú

page 121

Parking/Headlights On Indicator Light


Ú

page 121

LaneSense Indicator Light


Ú

page 121

Turn Signal Indicator Lights


Ú

page 121

Green Indicator Lights

White Indicator Lights

Adaptive Cruise Control (ACC) Ready Light


Ú

page 121

Cruise Control Ready Indicator Light


Ú

page 121

Hill Descent Control (HDC) Indicator Light


Ú

page 121

LaneSense Indicator Light


Ú

page 121

Blue Indicator Lights

High Beam Indicator Light


Ú

page 122

-------------------------------------------------------------------------------------------------------------------------------------------------------------

17

GETTING TO KNOW YOUR VEHICLE

KEYS 

K

EY

 F

OB

Your vehicle is equipped with a key fob which 

supports Passive Entry, Remote Keyless Entry 

(RKE), Keyless Enter ‘n Go™ (if equipped), air 

suspension remote lowering (if equipped), and 

Remote Start (if equipped). The key fob allows you 

to lock or unlock all doors, tailgate, and the 

RamBox (if equipped) as well as activate the Panic 

Alarm from distances up to approximately 66 ft 

(20 m). The key fob does not need to be pointed at 

the vehicle to activate the system. The key fob also 

contains an emergency key, which is stored in the 

rear of the key fob.

NOTE:

The key fob’s wireless signal may be blocked if 

the key fob is located next to a mobile phone, 

laptop, or other electronic device. This may 

result in poor performance.

If your vehicle is equipped with a Wireless 

Charging Pad, the key fob may not be detected 

if it is placed within 6 inches (15 cm) of the pad  

Ú

page 75.

With the ignition in the ON position and the 

vehicle moving at 2 mph (4 km/h), all RKE 

commands are disabled.

Key Fob

In case the ignition switch does not change with 

the push of a button, the key fob may have a low or 

fully depleted battery. A low key fob battery can be 

verified by referring to the instrument cluster, 

which will display directions to follow.

NOTE:

A low key fob battery condition may be indicated by 

a message in the instrument cluster display, or by 

the LED light on the key fob. If the LED key fob light 

no longer illuminates from key fob button pushes, 

then the key fob battery requires replacement  

Ú

page 447.

To Lock/Unlock The Doors And Tailgate

Push and release the unlock button on the key fob 

once to unlock the driver’s door, or, twice within 

five seconds to unlock all doors, the tailgate and 

the RamBox (if equipped). To lock all the doors and 

the tailgate, push the lock button once.
When the doors are unlocked, the turn signals will 

flash and the illuminated entry system will be 

activated. When the doors are locked, the turn 

signals will flash and the horn will chirp.

1 — LED Indicator Light
2 — Unlock
3 — Tailgate Release (If Equipped)
4 — Air Suspension Remote Lowering 

(If Equipped)
5 — Lock

6 — Remote Start
7 — PANIC
8 — Emergency Key

2

-------------------------------------------------------------------------------------------------------------------------------------------------------------

18

GETTING TO KNOW YOUR VEHICLE


All doors can be programmed to unlock on the first 

push of the unlock button. The horn chirp when the 

lock button is pushed can be programmed on/off 

within Uconnect Settings  

Ú

page 232.

Key Left Vehicle Feature

If a valid key fob is no longer detected inside the 

vehicle while the vehicle’s ignition system is in the 

ON/RUN or START position, the message “Key Left 

Vehicle” will be shown in the instrument cluster 

display along with an interior chime. An exterior 

audible and visual alert will also be activated to 

warn the driver.
The vehicle’s horn will rapidly chirp three times 

along with a single flash of the vehicle’s exterior 

lights.

NOTE:

The doors have to be open and then closed in 

order for the vehicle to check for the presence of 

a key fob; the Key Left Vehicle feature will not 

activate until all of the doors are closed.

These alerts will not be activated in situations 

where the vehicle’s engine is left running with 

the key fob inside.

Air Suspension (Remote Lowering Of The 

Vehicle) — If Equipped

For easy entry and loading, your vehicle 

can be lowered by pushing the key fob air 

suspension lowering button two times. 

When air suspension lowering is 

requested using the key fob, the vehicle will send a 

series of chirps and flashes to alert the customer 

that the operation has begun and will continue 

these alerts until it successfully lowers.
The following conditions must be met for the 

vehicle to lower remotely:

The vehicle must not already be in Entry/Exit 

ride height.

The vehicle battery must be fully charged.

All doors must be closed.

The key fob must be out of the vehicle.

Gear selector must be in PARK.

NOTE:

Ensure the vehicle is clear of all objects, pets, and 

people prior to remote lowering.
Canceling Remote Lowering
Vehicle lowering can be canceled at anytime. 

When vehicle lowering is canceled, the vehicle will 

raise to the next defined level and lock out the 

remote lowering feature for five seconds until a 

new request is made.

To cancel vehicle lowering, push the key fob air 

suspension lowering button one time during the 

lowering process. When vehicle lowering is 

canceled, the horn will chirp two times and the turn 

signal lamps will flash four times. Once raising is 

completed, the horn will chirp one time.

NOTE:

More information on air suspension is provided 

later in this manual, see  

Ú

page 157.

Replacing The Battery In The Key Fob 

The replacement battery model is one CR2032 

battery.

NOTE:

Customers are recommended to use a battery 

obtained from Mopar®. Aftermarket coin 

battery dimensions may not meet the original 

OEM coin battery dimensions.

Perchlorate Material — special handling may 

apply. See www.dtsc.ca.gov/hazardouswaste/

perchlorate for further information.

Do not touch the battery terminals that are on 

the back housing or the printed circuit board.

Do not replace the coin battery if the LED on the 

key fob above the top row buttons blinks when 

a button is pressed. The coin battery should last 

a minimum of three years with normal vehicle 

usage.

-------------------------------------------------------------------------------------------------------------------------------------------------------------

GETTING TO KNOW YOUR VEHICLE

19

1. Remove the emergency key (1) by pushing 

the emergency key release button (2) on the 

side of the key fob, and pulling the emergency 

key out with your other hand.

Emergency Key Removal

2. Hold the key fob with the button side facing 

down, and locate the small rectangular gap on 

the left side between the housing and the back 

cover of the key fob. Use a small screwdriver 

(or similar tool) to pry open the left side of the 

fob cover while applying pressure until the 

cover snaps open.

3. Next, locate the gap on the right side of the key 

fob, which is positioned further to the edge 

than the left side gap. Pry open the right side, 

and remove the back cover.

4. Remove the battery by using a suitable tool, 

such as a screwdriver, to slide the battery 

downward and back toward the key ring.

Key Fob Battery Location

NOTE:

When replacing the battery, ensure the (+) sign on 

the battery is facing upward. Avoid touching the 

new battery with your fingers. Skin oils may cause 

battery deterioration. If you touch a battery, clean 

it with rubbing alcohol.

5. Replace the battery by using your thumb to 

push down and slide the battery under the 

small lip on the top edge of the opening.

Key Fob Battery Replacement

6. To assemble the key fob case, line up the top 

edge of the back cover with the top of the fob, 

and press the edges into the interlocking 

hinges until all edges snap together with no 

large visual gaps.

7. Reinsert the emergency key until it locks into 

place.

NOTE:

The key fob battery should only be replaced by 

qualified technicians. If the battery requires 

replacement, see an authorized dealer.

1 — Emergency Key
2 — Emergency Key Release Button

2

-------------------------------------------------------------------------------------------------------------------------------------------------------------

20

GETTING TO KNOW YOUR VEHICLE


Programming And Requesting Additional 

Key Fobs 

Programming the key fob may be performed by an 

authorized dealer.

NOTE:

Once a key fob is programmed to a vehicle, it 

cannot be repurposed and reprogrammed to 

another vehicle.

Only key fobs that are programmed to the 

vehicle electronics can be used to start and 

operate the vehicle. Once a key fob is 

programmed to a vehicle, it cannot be 

programmed to any other vehicle.

Duplication of key fobs may be performed at an 

authorized dealer. This procedure consists of 

programming a blank key fob to the vehicle 

electronics. A blank key fob is one that has never 

been programmed.

NOTE:

When having the Sentry Key Immobilizer system 

serviced, bring all vehicle keys with you to an 

authorized dealer.

Keys must be ordered to the correct key cut to 

match the vehicle locks.

SENTRY KEY

The Sentry Key Immobilizer system prevents 

unauthorized vehicle operation by disabling the 

engine. The system does not need to be armed or 

activated. Operation is automatic, regardless of 

whether the vehicle is locked or unlocked.
The system uses a key fob, keyless push button 

ignition and a Radio Frequency (RF) receiver to 

prevent unauthorized vehicle operation. Therefore, 

only key fobs that are programmed to the vehicle 

can be used to start and operate the vehicle. The 

system cannot reprogram a key fob obtained from 

another vehicle.
After placing the ignition in the ON/RUN position, 

the Vehicle Security Light will turn on for three 

seconds for a bulb check. If the light remains on 

after the bulb check, it indicates that there is a 

problem with the electronics. In addition, if the light 

begins to flash after the bulb check, it indicates 

that someone attempted to start the engine with 

an invalid key fob. In the event that a valid key fob 

is used to start the engine but there is an issue 

with the vehicle electronics, the engine will start 

and shut off after two seconds.
If the Vehicle Security Light turns on during normal 

vehicle operation (vehicle running for longer than 

10 seconds), it indicates that there is a fault in the 

electronics. Should this occur, have the vehicle 

serviced as soon as possible by an authorized 

dealer.

WARNING!

The integrated key fob contains a coin cell 

battery. Do not ingest the battery; there is a 

chemical burn hazard. If the coin cell battery is 

swallowed, it can cause severe internal burns 

in just two hours and can lead to death.

If you think a battery may have been swal

-

lowed or placed inside any part of the body, 

seek immediate medical attention.

Keep new and used batteries away from chil

-

dren. If the battery compartment does not 

close securely, stop using the product and 

keep it away from children.

WARNING!

Always remove the key fobs from the vehicle 

and lock all doors when leaving the vehicle 

unattended.

Always remember to place the Keyless 

Enter ‘n Go™ Ignition in the OFF position.

CAUTION!

The Sentry Key Immobilizer system is not 

compatible with some aftermarket remote 

starting systems. Use of these systems may 

result in vehicle starting problems and loss of 

security protection.

-------------------------------------------------------------------------------------------------------------------------------------------------------------

GETTING TO KNOW YOUR VEHICLE

21

(Continued)

All of the key fobs provided with your new vehicle 

have been programmed to the vehicle electronics  

Ú

page 447.

IGNITION SWITCH  

K

EYLESS

 E

NTER

 ‘

N

 G

O

™ I

GNITION

This feature allows the driver to operate the 

ignition switch with the push of a button as long as 

the key fob is in the passenger compartment.
The START/STOP ignition button has several 

operating modes that are labeled and will 

illuminate when in position. These modes are OFF, 

ACC, ON/RUN, and START.

Keyless Push Button Ignition

The push button ignition can be placed in the 

following modes:
OFF 

The engine is stopped

Some electrical devices (e.g. power locks, 

alarm, etc.) are still available

ACC

Engine is not started

Some electrical devices are available (e.g. 

power sunroof, power windows, etc.)

RUN 

Driving position

All electrical devices are available (e.g. climate 

controls, heated seats, etc.)

START 

The engine will start (when foot is on the brake)

NOTE:

If the ignition switch does not change the mode by 

pushing the button, the key fob may have a low or 

depleted battery. In this situation, a back up 

method can be used to operate the ignition switch. 

Put the nose side (side opposite of the emergency 

key) of the key fob against the START/STOP 

ignition button and push to operate the ignition 

switch.

Back Up Starting Method

1 — OFF
2 — ACC (Accessory)
3 — ON/RUN

WARNING!

When exiting the vehicle, always remove the 

key fob from the vehicle and lock your vehicle.

Never leave children alone in a vehicle, or with 

access to an unlocked vehicle.

Allowing children to be in a vehicle unattended 

is dangerous for a number of reasons. A child 

or others could be seriously or fatally injured. 

Children should be warned not to touch the 

parking brake, brake pedal or the gear 

selector.

2

-------------------------------------------------------------------------------------------------------------------------------------------------------------

22

GETTING TO KNOW YOUR VEHICLE


(Continued)

NOTE:

The key fob may not be detected by the vehicle 

Keyless Enter ‘n Go™ system if it is located next 

to a mobile phone, laptop or other electronic 

device; these devices may block the key fob’s 

wireless signal and prevent the Keyless Enter ‘n 

Go™ system from starting the vehicle.

For more information on engine starting proce

-

dures, see  

Ú

page 124.

When opening the driver's door and the ignition 

is in the ON/RUN (engine not running) position, 

a chime will sound to remind you to place the 

ignition in the OFF position. In addition to the 

chime, the message “Ignition or Accessory ON” 

will display in the instrument cluster display.

REMOTE START — IF EQUIPPED 

(GASOLINE) 

This system uses the key fob to start the 

engine conveniently from outside the 

vehicle while still maintaining security. 

The system has a range of approximately 

300 ft (91 m).
Remote Start is used to defrost windows in cold 

weather, and to reach a comfortable climate in all 

ambient conditions before the driver enters the 

vehicle.

NOTE:

Obstructions between the vehicle and the key fob 

may reduce this range  

Ú

page 447.

H

OW

 T

O

 U

SE

 R

EMOTE

 S

TART

Push and release the Remote Start button on the 

key fob twice within five seconds. The vehicle 

doors will lock, the parking lights will flash, and the 

horn will chirp twice (if programmed). Then, the 

engine will start, and the vehicle will remain in the 

Remote Start mode for a 15 minute cycle.
Pushing the Remote Start button a third time shuts 

the engine off.
To drive the vehicle, push the unlock button, and 

place the ignition in the ON/RUN position.

NOTE:

With Remote Start, the engine will only run for 

15 minutes.

Remote Start can only be used twice.

If an engine fault is present or fuel level is low, 

the vehicle will start and then shut down in 

10 seconds.

The parking lights will turn on and remain on 

during Remote Start mode.

Do not leave the key fob in or near the vehicle, 

or in a location accessible to children, and do 

not leave the Keyless Enter ‘n Go™ Ignition in 

the ON/RUN position. A child could operate 

power windows, other controls, or move the 

vehicle.

Do not leave children or animals inside parked 

vehicles in hot weather. Interior heat buildup 

may cause serious injury or death.

CAUTION!

An unlocked vehicle is an invitation for thieves. 

Always remove key fob from the vehicle and lock 

all doors when leaving the vehicle unattended.

WARNING!

WARNING!

Do not start or run an engine in a closed 

garage or confined area. Exhaust gas contains 

Carbon Monoxide (CO) which is odorless and 

colorless. Carbon Monoxide is poisonous and 

can cause serious injury or death when 

inhaled.

Keep key fobs away from children. Operation 

of the Remote Start system, windows, door 

locks or other controls could cause serious 

injury or death.

WARNING!

-------------------------------------------------------------------------------------------------------------------------------------------------------------

GETTING TO KNOW YOUR VEHICLE

23

For security, power window and power sunroof 

operation (if equipped) are disabled when the 

vehicle is in the Remote Start mode.

The ignition must be placed in the ON/RUN posi

-

tion before the Remote Start sequence can be 

repeated for a third cycle.

If your power door locks were unlocked, Remote 

Start will automatically lock the doors.

All of the following conditions must be met before 

the engine will remote start:

Gear selector in PARK

Doors closed

Hood closed

Hazard switch off

Brake switch inactive (brake pedal not pressed)

Battery at an acceptable charge level

PANIC button not pushed

Fuel meets minimum requirement

System not disabled from previous Remote 

Start event

Vehicle Security system not active

Malfunction Indicator Light (MIL) is not illumi

-

nated

T

O

 E

XIT

 R

EMOTE

 S

TART

 M

ODE

To drive the vehicle after starting the Remote Start 

system, push and release the START/STOP ignition 

button while pressing the brake pedal prior to the 

end of the 15 minute cycle.
The Remote Start system will turn the engine off if 

the Remote Start button on the key fob is pushed 

again, or if the engine is allowed to run for the 

entire 15 minute cycle. Once the ignition is placed 

in the ON/RUN position, the climate controls will 

resume the previously set operations 

(temperature, blower control, etc.).

NOTE:

For vehicles equipped with the Keyless 

Enter ‘n Go™ — Passive Entry feature, the 

message “Remote Start Active — Push Start 

Button” will display in the instrument cluster 

display until you push the START/STOP ignition 

button.

To avoid unintentional shutdowns, the system 

will disable for two seconds after receiving a 

valid Remote Start request.

R

EMOTE

 S

TART

 F

RONT

 D

EFROST


A

CTIVATION

 — I

F

 E

QUIPPED

When Remote Start is active, and the outside 

ambient temperature is 40°F (4.5°C) or below, the 

system will automatically activate front defrost for 

15 minutes or less. The time is dependent on the 

ambient temperature. Once the timer expires, the 

system will automatically adjust the settings 

depending on ambient conditions. See “Remote 

Start Comfort Systems — If Equipped” in the next 

section for detailed operation.

WARNING!

Do not start or run an engine in a closed 

garage or confined area. Exhaust gas contains 

Carbon Monoxide (CO) which is odorless and 

colorless. Carbon Monoxide is poisonous and 

can cause serious injury or death when 

inhaled.

Keep key fobs away from children. Operation 

of the Remote Start system, windows, door 

locks or other controls could cause serious 

injury or death.

2

-------------------------------------------------------------------------------------------------------------------------------------------------------------

24

GETTING TO KNOW YOUR VEHICLE


R

EMOTE

 S

TART

 C

OMFORT

 S

YSTEMS

 — 

I

F

 E

QUIPPED

When Remote Start is activated, the front and rear 

defrost will automatically turn on in cold weather. 

The heated steering wheel and driver heated seat 

feature will turn on if programmed in the comfort 

menu screen within Uconnect Settings  

Ú

page 232. In warm weather, the driver vented 

seat feature will automatically turn on when 

Remote Start is activated, if programmed in the 

comfort menu screen. The vehicle will adjust the 

climate control settings depending on the outside 

ambient temperature.
Automatic Temperature Control (ATC) — 

If Equipped
The climate controls automatically adjust to an 

optimal temperature and mode, dependent on the 

outside ambient temperature. When the ignition is 

placed in the ON/RUN position, the climate 

controls will resume their previous settings.
Manual Temperature Control (MTC) — If Equipped

In ambient temperatures of 40°F (4.5°C) or 

below, the climate settings will default to 

maximum heat, with fresh air entering the 

cabin. If the front defrost timer expires, the 

vehicle will enter Mix Mode.

In ambient temperatures from 40°F (4.5°C) to 

78°F (26°C), the climate settings will be based 

on the last settings selected by the driver.

In ambient temperatures of 78°F (26°C) or 

above, the climate settings will default to MAX 

A/C, Bi-Level mode, with Recirculation on.

For more information on ATC, MTC, and climate 

control settings, see  

Ú

page 59.

NOTE:

These features will stay on through the duration of 

Remote Start, or until the ignition is placed in the 

ON/RUN position. The climate control settings will 

change, and exit the automatic defaults, if 

manually adjusted by the driver while the vehicle is 

in Remote Start mode. This includes turning the 

climate controls off using the OFF button.

R

EMOTE

 S

TART

 W

INDSHIELD

 W

IPER


D

E

–I

CER

 A

CTIVATION

 — I

F

 E

QUIPPED

When Remote Start is active and the outside 

ambient temperature is less than 33°F (0.6°C), 

the Windshield Wiper De-Icer will activate. Exiting 

Remote Start will resume its previous operation. If 

the Windshield Wiper De-Icer was active, the timer 

and operation will continue.

R

EMOTE

 S

TART

 A

BORT

 M

ESSAGE

The following messages will display in the 

instrument cluster display if the vehicle fails to 

remote start, or exits Remote Start prematurely:

Remote Start Cancelled — Door Open

Remote Start Cancelled — Hood Open

Remote Start Cancelled — Fuel Low

Remote Start Cancelled — Time Expired

Remote Start Disabled — Start Vehicle to Reset

The message will stay active until the ignition is 

placed in the ON/RUN position.

REMOTE START— IF EQUIPPED (DIESEL)

This system uses the key fob to start the 

engine conveniently from outside the 

vehicle while still maintaining security. 

The system has a range of approximately 

300 ft (91 m).
Remote Start is used to defrost windows in cold 

weather, and to reach a comfortable climate in all 

ambient conditions before the driver enters the 

vehicle.

-------------------------------------------------------------------------------------------------------------------------------------------------------------

GETTING TO KNOW YOUR VEHICLE

25

NOTE:

Obstructions between the vehicle and the key 

fob may reduce this range.

The Remote Start system will wait for the Wait 

To Start Indicator Light to extinguish before 

cranking the engine. This allows time for the 

engine pre-heat cycle to heat the cylinder air, 

and is normal in cold weather. For further infor

-

mation on the Wait To Start Indicator Light and 

the pre-heat cycle, see  

Ú

page 120.

H

OW

 T

O

 U

SE

 R

EMOTE

 S

TART

Push and release the Remote Start button on the 

key fob twice within five seconds. The vehicle 

doors will lock, the parking lights will flash, and the 

horn will chirp twice (if programmed). Then, the 

engine will start, and the vehicle will remain in the 

Remote Start mode for a 15 minute cycle.
Pushing the Remote Start button a third time shuts 

the engine off.
To drive the vehicle, push the unlock button, and 

place the ignition in the ON/RUN position.
All of the following conditions must be met before 

the engine will remote start:

Gear selector in PARK

Doors closed

Hood closed

Hazard switch off

Brake switch inactive (brake pedal not pressed)

Battery at an acceptable charge level

PANIC button not pushed

Fuel meets minimum requirement

Water In Fuel Indicator Light is not illuminated

Wait To Start Indicator Light is not illuminated

Malfunction Indicator Light (MIL) is not illumi

-

nated

For additional functions of the Remote Start 

system, see  

Ú

page 23

VEHICLE SECURITY SYSTEM — IF EQUIPPED 

The Vehicle Security system monitors the vehicle 

doors, hood, tailgate, and the Keyless Enter ‘n Go™ 

Ignition for unauthorized operation. While the 

Vehicle Security system is armed, interior switches 

for door locks and tailgate release are disabled. If 

something triggers the alarm, the Vehicle Security 

system will provide the following audible and 

visible signals:

The horn will pulse

The turn signals will flash

The Vehicle Security Light in the instrument 

cluster will flash

T

O

 A

RM

 T

HE

 S

YSTEM

Follow these steps to arm the Vehicle Security 

system:
1. Make sure the vehicle’s ignition is placed in 

the OFF position.

For vehicles equipped with Keyless Entry, 

make sure the vehicle’s keyless ignition 

system is OFF.

2. Perform one of the following methods to lock 

the vehicle:

Push the lock button on the interior power 

door lock switch with the driver and/or 

passenger door open.

Push the lock button on the exterior Passive 

Entry door handle with a valid key fob avail

-

able in the same exterior zone  

Ú

page 28.

Push the lock button on the key fob.

3. If any doors are open, close them.

WARNING!

Do not start or run an engine in a closed 

garage or confined area. Exhaust gas contains 

Carbon Monoxide (CO) which is odorless and 

colorless. Carbon Monoxide is poisonous and 

can cause serious injury or death when 

inhaled.

Keep key fobs away from children. Operation 

of the Remote Start system, windows, door 

locks or other controls could cause serious 

injury or death.

2

-------------------------------------------------------------------------------------------------------------------------------------------------------------

26

GETTING TO KNOW YOUR VEHICLE


(Continued)

T

O

 D

ISARM

 T

HE

 S

YSTEM

The Vehicle Security system can be disarmed using 

any of the following methods:

Push the unlock button on the key fob.

Grab the Passive Entry door handle to unlock 

the door  

Ú

page 28.

Cycle the ignition out of the OFF position to 

disarm the system.

NOTE:

The driver's door key cylinder cannot arm or 

disarm the Vehicle Security system. Use of the 

door key cylinder when the system is armed will 

sound the alarm when the door is opened.

The Vehicle Security system remains armed 

when the power tailgate (if equipped) is opened 

using the tailgate button on the key fob.

If Passive Entry (if equipped) is used to unlock 

the tailgate, the Vehicle Security system is 

disarmed and the rest of the vehicle doors will 

remain locked unless all doors are set to unlock 

on first press within Uconnect Settings.

When the Vehicle Security system is armed, the 

interior power door lock switches will not unlock 

the doors.

The Vehicle Security system is designed to protect 

your vehicle. However, you can create conditions 

where the system will give you a false alarm. If one 

of the previously described arming sequences has 

occurred, the Vehicle Security system will arm 

regardless of whether you are in the vehicle or not. 

If you remain in the vehicle and open a door, the 

alarm will sound. If this occurs, disarm the Vehicle 

Security system.
If the Vehicle Security system is armed and the 

battery becomes disconnected, the Vehicle 

Security system will remain armed when the 

battery is reconnected; the exterior lights will flash, 

and the horn will sound. If this occurs, disarm the 

Vehicle Security system.

R

EARMING

 O

F

 T

HE

 S

YSTEM

If something triggers the alarm and no action is 

taken to disarm it, the Vehicle Security system will 

turn the horn off after a 29 second cycle (with five 

seconds between cycles and up to eight cycles if 

the trigger remains active) and then rearm itself.

S

ECURITY

 S

YSTEM

 M

ANUAL

 O

VERRIDE

The Vehicle Security system will not arm if you lock 

the doors using the manual door lock.

DOORS 

M

ANUAL

 D

OOR

 L

OCKS

The power door locks can be manually locked from 

inside the vehicle by using the door lock knob. To 

lock each door, push the door lock knob on each 

door trim panel downward. To unlock the front 

doors, pull the inside door handle to the first 

detent. To unlock the rear doors, pull the door lock 

knob on the door trim panel upward. If the lock 

knob is down when the door is closed, the door will 

lock. Therefore, make sure the key fob is not inside 

the vehicle before closing the door.

NOTE:

Manually locking the vehicle will not arm the 

Vehicle Security system.

Door Lock Knob

WARNING!

Do not leave children or animals inside parked 

vehicles in hot weather. Interior heat buildup 

may cause serious injury or death.

-------------------------------------------------------------------------------------------------------------------------------------------------------------

GETTING TO KNOW YOUR VEHICLE

27

(Continued)

P

OWER

 D

OOR

 L

OCKS

 — I

F

 E

QUIPPED


The power door lock switches are located on each 

front door panel. Push the switch to lock or unlock 

the doors.

Power Door Lock Switches

The driver’s door will unlock automatically if the 

keys are detected inside the vehicle when the door 

lock button on the front door panel is used to lock 

the door. This will occur for two attempts. Upon the 

third attempt, the doors will lock even if the key is 

inside.

NOTE:

If the key fob is located next to a mobile phone, 

laptop, or other electronic device, the wireless 

signal may get blocked, and the driver’s door may 

not unlock automatically.
If the door lock switch is pushed while the ignition 

is in the ACC or ON/RUN position and the driver's 

door is open, the doors will not lock.
If a rear door is locked, it cannot be opened from 

inside the vehicle without first unlocking the door. 

The door may be unlocked manually by raising the 

lock knob.

P

OWER

 S

IDE

 S

TEPS

 — I

F

 E

QUIPPED


The Power Side Steps will extend a step for easier 

entry and exit of the vehicle.
When configured for “Auto” mode, the Power Side 

Steps will deploy when any of the doors are 

opened, or when the deploy setting is activated 

through the touchscreen. When configured for 

“Store” mode, the steps will not deploy unless the 

setting is selected manually through the Controls 

menu within the touchscreen.
If the vehicle speed exceeds 5 mph (8 km/h), or if 

the retract setting is selected within Uconnect 

Settings  

Ú

page 232, the steps will retract.

For personal security and safety in the event 

of an collision, lock the vehicle doors as you 

drive as well as when you park and leave the 

vehicle.

Before exiting a vehicle, always shift the auto

-

matic transmission into PARK, apply the 

parking brake, place the ignition in the OFF 

position, remove the key fobs from vehicle, 

and lock all doors. and lock your vehicle.

Never leave children alone in a vehicle, or with 

access to an unlocked vehicle. Leaving chil

-

dren in a vehicle unattended is dangerous for 

a number of reasons. A child or others could 

be seriously or fatally injured. Children should 

be warned not to touch the parking brake, 

brake pedal or the gear selector.

Allowing children to be in a vehicle unattended 

is dangerous for a number of reasons. A child 

or others could be seriously or fatally injured. 

Children should be warned not to touch the 

parking brake, brake pedal or the gear 

selector.

WARNING!

Do not leave the key fob in or near the vehicle, 

or in a location accessible to children, and do 

not leave the Keyless Enter ‘n Go™ Ignition in 

the ACC or ON/RUN position. A child could 

operate power windows, other controls, or 

move the vehicle.

WARNING!

2

-------------------------------------------------------------------------------------------------------------------------------------------------------------


Content      ..      1       2         ..


///////////////////////////////////////