RAM 2500 (2022 year). Manual in english - page 3
 

  Index      Manuals     RAM 2500 (2022 year). Manual in english


Search            copyright infringement  


Content      ..     1      2      3      4      ..


RAM 2500 (2022 year). Manual in english - page 3


44

GETTING TO KNOW YOUR VEHICLE


“Slide-On-Rod” Features Of Sun Visor — 

If Equipped

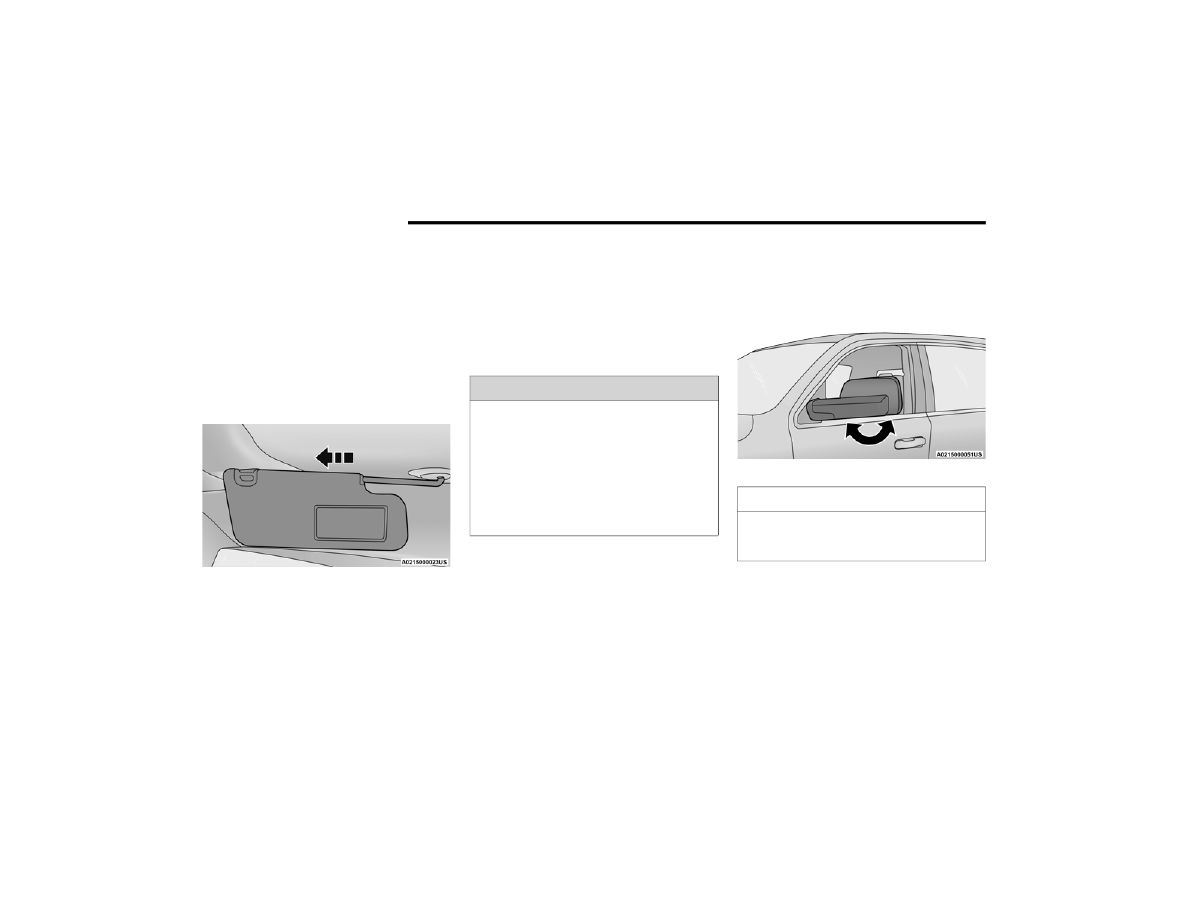
The sun visor “Slide-On-Rod” feature allows for 

additional flexibility in positioning the sun visor to 

block out the sun.
1. Fold down the sun visor.
2. Unclip the visor from the corner clip.
3. Pivot the sun visor toward the side window.
4. Extend the sun visor for additional sun 

blockage.

“Slide-On-Rod” Extender

NOTE:

The sun visor can also be extended while the sun 

visor is against the windshield for additional sun 

blockage through the front of the vehicle.

O

UTSIDE

 M

IRRORS


The outside mirror(s) can be adjusted to the center 

of the adjacent lane of traffic to achieve the 

optimal view.
NOTE:

If your vehicle is equipped with puddle lamps 

under the outside mirrors, they can be turned off 

through the Uconnect system  

Ú

page 232.

Outside Mirrors Folding Feature

All outside mirrors are designed to be able to be 

manually folded both forward and rearward to 

prevent damage.

Folding Mirror

WARNING!

Vehicles and other objects seen in the 

passenger side convex mirror will look smaller 

and farther away than they really are. Relying too 

much on your passenger side convex mirror 

could cause you to collide with another vehicle 

or other object. Use your inside mirror when 

judging the size or distance of a vehicle seen in 

the passenger side convex mirror. Some vehicles 

will not have a convex passenger side mirror.

CAUTION!

It is recommended to fold the mirrors into the 

full rearward position to resist damage when 

entering a car wash or a narrow location.

-------------------------------------------------------------------------------------------------------------------------------------------------------------

GETTING TO KNOW YOUR VEHICLE

45

P

OWER

 M

IRRORS

 — I

F

 E

QUIPPED


The controls for the power mirrors are located on 

the driver's door trim panel.

Power Mirror Controls

The power mirror controls consist of mirror select 

buttons and a four-way mirror control switch.
To adjust a mirror, push either the L (left) or R 

(right) button to select the mirror that you want to 

adjust.
Using the mirror control switch, push on any of the 

four arrows for the direction that you want the 

mirror to move.

Power Mirror Movement

P

OWER

 F

OLDING

 O

UTSIDE

 M

IRRORS


F

OR

 S

TANDARD

 A

ND

 T

RAILER

 T

OW

 — 

I

F

 E

QUIPPED

The power folding mirrors can be folded rearward 

and unfolded into the normal driving position.
The switch for the power folding mirrors is located 

between the power mirror switches L (left) and R 

(right). Push the switch once and the mirrors will 

fold in, push the switch a second time and the 

mirrors will return to the normal driving position.
If the mirror is manually folded after a powered 

cycle, a potential extra button push is required to 

get the mirrors back to the normal driving position. 

If the mirror does not fold automatically, check for 

ice or dirt buildup at the pivot area, which can 

cause excessive drag.

Power Folding Mirror Switch

Resetting The Power Folding Outside Mirrors
You may need to reset the power folding mirrors if 

the following occurs:

The mirrors are accidentally blocked while 

folding.

The mirrors are accidentally manually folded/

unfolded (by hand or by pushing the power 

folding mirror switch).

The mirrors come out of the unfolded position.

The mirrors shake and vibrate at normal driving 

speeds.

To reset the power folding mirrors: Fold and unfold 

them by pushing the button (this may require 

multiple attempts). This resets them to their 

normal driving position.

1 — Left Mirror Selection
2 — Mirror Direction Control
3 — Right Mirror Selection

2

-------------------------------------------------------------------------------------------------------------------------------------------------------------

46

GETTING TO KNOW YOUR VEHICLE


P

OWER

 C

ONVEX

 M

IRROR

 S

WITCH

 — 

I

F

 E

QUIPPED

The Power Convex Mirror Switch is located on the 

door trim panel, above the power mirror controls. 

The switch enables the movement of the convex 

portion of both the driver and passenger outside 

mirrors.

Power Convex Mirror Switch

To adjust the convex portion of the outside mirrors, 

push the Power Convex Mirror Switch. Then, select 

the mirror you want to adjust by using the L (left) or 

R (right) buttons.
To return the control to the large mirror, push the 

Power Convex Mirror Switch a second time.

Trailer Tow Power Convex Mirror

NOTE:

If the Power Convex Mirror Switch is not pushed a 

second time, the switch will automatically default 

back to the larger portion of the outside mirrors 

after a period of time.

T

RAILER

 T

OWING

 M

IRRORS

 — 

I

F

 E

QUIPPED


These mirrors are designed with an adjustable 

mirror head to provide a greater vision range when 

towing extra-wide loads. To change position 

inboard or outboard, the mirror head should be 

rotated (flipped in or out).

Trailer Towing Position

NOTE:

Fold the trailer towing mirrors prior to entering an 

automated car wash.
A small blindspot mirror is located next to the main 

mirror and can be adjusted manually.

Blindspot Mirror

-------------------------------------------------------------------------------------------------------------------------------------------------------------

GETTING TO KNOW YOUR VEHICLE

47

H

EATED

 M

IRRORS

 — I

F

 E

QUIPPED


These mirrors are heated to melt frost or 

ice. This feature will be activated 

whenever you turn on the rear window 

defroster (if equipped)  

Ú

page 59.

T

ILT

 S

IDE

 M

IRRORS

 I

N

 R

EVERSE

 — 

I

F

 E

QUIPPED

This feature provides automatic outside mirror 

positioning which will assist with the driver’s 

ground visibility. The outside mirrors will move 

slightly downward from the present position when 

the vehicle is shifted into REVERSE. The outside 

mirrors will then return to the original position 

when the vehicle is shifted out of REVERSE. If the 

vehicle is equipped with Driver Memory Settings, 

this feature will be linked to the programmable 

settings.
NOTE:

The Tilt Side Mirrors In Reverse feature can be 

turned on and off using the Uconnect system  

Ú

page 232.

UNIVERSAL GARAGE DOOR OPENER 

(HOMELINK®) — IF EQUIPPED 

HomeLink® Buttons

Use this QR code to access your 

digital experience.

HomeLink® replaces up to 

three hand-held transmitters 

that operate devices such as 

garage door openers, motor

-

ized gates, lighting, or home 

security systems. The HomeLink® unit is 

powered by your vehicle’s 12 Volt battery.

The HomeLink® buttons that are located in the 

overhead console or sunvisor designate the 

three different HomeLink® channels.

To operate HomeLink®, push and release any 

of the programmed HomeLink® buttons. These 

buttons will activate the devices they are 

programmed to with each press of the corre

-

sponding HomeLink® button.

The HomeLink® indicator light is located above 

the center button  

Ú

page 447.

B

EFORE

 Y

OU

 B

EGIN

 P

ROGRAMMING


H

OME

L

INK

®

For efficient programming and accurate 

transmission of the radio frequency signal, it is 

recommended that a new battery be placed in the 

hand-held transmitter of the device that is being 

programmed to the HomeLink® system. Make 

sure your hand-held transmitter is programmed to 

activate the device you are trying to program your 

HomeLink® button to.
Ensure that your vehicle is parked outside of the 

garage before you begin programming.
It is recommended that you erase all the channels 

of your HomeLink® before you use it for the first 

time.

2

-------------------------------------------------------------------------------------------------------------------------------------------------------------

48

GETTING TO KNOW YOUR VEHICLE


E

RASING

 A

LL

 T

HE

 H

OME

L

INK

® 

C

HANNELS

To erase the channels, follow this procedure:
1. Place the ignition switch into the ON/RUN 

position.

2. Push and hold the two outside HomeLink® 

buttons (I and III) for up to 20 seconds, or until 

the HomeLink® indicator light flashes.

NOTE:

Erasing all channels should only be performed 

when programming HomeLink® for the first time. 

Do not erase channels when programming addi

-

tional buttons.

I

DENTIFYING

 W

HETHER

 Y

OU

 H

AVE

 A 

R

OLLING

 C

ODE

 O

R

 N

ON

-R

OLLING

 C

ODE


D

EVICE

Before programming a device to one of your 

HomeLink® buttons, you must determine whether 

the device has a rolling code or non-rolling code.
Rolling Code Devices
To determine if your device has a rolling code, a 

good indicator is its manufacturing date. Typically, 

devices manufactured after 1995 have rolling 

codes. A device with a rolling code will also have a 

“LEARN” or “TRAIN” button located where the 

antenna is attached to the device. The button may 

not be immediately visible when looking at the 

device. The name and color of the button may vary 

slightly by manufacturer.
NOTE:

The “LEARN” or “TRAIN” button is not the button 

you normally use to operate the device.
Non-rolling Code Devices
Most devices manufactured before 1995 will not 

have a rolling code. These devices will also not 

have a “LEARN” or “TRAIN” button.

P

ROGRAMMING

 H

OME

L

INK

® T

O

 A 

G

ARAGE

 D

OOR

 O

PENER

To program any of the HomeLink® buttons to 

activate your garage door opener motor, follow the 

steps below:
NOTE:

All HomeLink® buttons are programmed using this 

procedure. You do not need to erase all channels 

when programming additional buttons.
1. Place the ignition switch into the ON/RUN 

position.

2. Place the garage door opener transmitter 1 to 

3 inches (3 to 8 cm) away from the 

HomeLink® button you wish to program, while 

keeping the HomeLink® indicator light in view.

3. Push and hold the HomeLink® button you 

want to program while you push and hold the 

garage door opener transmitter button you are 

trying to replicate.

4. Continue to hold both buttons and observe the 

HomeLink® indicator light. The HomeLink® 

indicator light will flash slowly and then rapidly. 

Once this happens, release both buttons.

NOTE:

Make sure the garage door opener motor is 

plugged in before moving on to the rolling code/

non-rolling code final steps.
Rolling Code Garage Door Opener Final Steps
NOTE:

You have 30 seconds in which to initiate rolling 

code final step 2, after completing rolling code 

final step 1.
1. At the garage door opener motor (in the 

garage), locate the “LEARN” or “TRAIN” 

button. This can usually be found where the 

hanging antenna wire is attached to the 

garage door opener motor. Firmly push and 

release the “LEARN” or “TRAIN” button.

2. Return to the vehicle and push the 

programmed HomeLink® button three times 

(holding the button for two seconds each 

time). If the garage door opener motor 

operates, programming is complete.

3. Push the programmed HomeLink® button to 

confirm that the garage door opener motor 

-------------------------------------------------------------------------------------------------------------------------------------------------------------

GETTING TO KNOW YOUR VEHICLE

49

operates. If the garage door opener motor 

does not operate, repeat the final steps for the 

rolling code procedure.

Non-Rolling Code Garage Door Opener Final Steps
1. Push and hold the programmed HomeLink® 

button and observe the HomeLink® indicator 

light. If the HomeLink® indicator light stays 

on constantly, programming is complete.

2. Push the programmed HomeLink® button to 

confirm that the garage door opener motor 

operates. If the garage door opener motor 

does not operate, repeat the steps from the 

beginning.

P

ROGRAMMING

 H

OME

L

INK

® T

O

 A 

M

ISCELLANEOUS

 D

EVICE

The procedure on how to program HomeLink® to a 

miscellaneous device follows the same procedure 

as programming to a garage door opener  

Ú

page 48. Be sure to determine if the device has 

a rolling code, or non-rolling code before beginning 

the programming process.
NOTE:

Canadian radio frequency laws require transmitter 

signals to time-out (or quit) after several seconds 

of transmission, which may not be long enough for 

HomeLink® to pick up the signal during 

programming. Similar to this Canadian law, some 

U.S. gate operators are designed to time-out in the 

same manner. The procedure may need to be 

performed multiple times to successfully pair the 

device to your HomeLink® buttons.

R

EPROGRAMMING

 A S

INGLE


H

OME

L

INK

® B

UTTON

To reprogram a single HomeLink® button that has 

been previously trained, without erasing all the 

channels, follow the procedure below. Be sure to 

determine whether the new device you want to 

program the HomeLink® button to has a Rolling 

Code, or Non-rolling Code.

1. Place the ignition in the ON/RUN position, 

without starting the engine.

2. Push and hold the desired HomeLink® button 

until the HomeLink® Indicator light begins to 

flash after 20 seconds. Do not release the 

button.

3. Without releasing the button, proceed with 

Step 2 in “Programming HomeLink® To A 

Garage Door Opener”  

Ú

page 48, and follow 

all remaining steps.

C

ANADIAN

/G

ATE

 O

PERATOR


P

ROGRAMMING

For programming transmitters in Canada/United 

States that require the transmitter signals to 

“time-out” after several seconds of transmission.
Canadian radio frequency laws require transmitter 

signals to time-out (or quit) after several seconds 

of transmission – which may not be long enough 

for HomeLink® to pick up the signal during 

programming. Similar to this Canadian law, some 

U.S. gate operators are designed to time-out in the 

same manner.
It may be helpful to unplug the device during the 

cycling process to prevent possible overheating of 

the garage door or gate motor.

WARNING!

Your motorized door or gate will open and 

close while you are programming the universal 

transceiver. Do not program the transceiver if 

people or pets are in the path of the door or 

gate.

Do not run your vehicle in a closed garage or 

confined area while programming the trans

-

ceiver. Exhaust gas from your vehicle contains 

Carbon Monoxide (CO) which is odorless and 

colorless. Carbon Monoxide is poisonous 

when inhaled and can cause you and others to 

be severely injured or killed.

2

-------------------------------------------------------------------------------------------------------------------------------------------------------------

50

GETTING TO KNOW YOUR VEHICLE


1. Place the ignition in the ON/RUN position.
2. Place the hand-held transmitter 1 to 3 inches 

(3 to 8 cm) away from the HomeLink® button 

you wish to program while keeping the 

HomeLink® indicator light in view.

3. Continue to press and hold the HomeLink® 

button, while you press and release (cycle) 

your hand-held transmitter every two seconds 

until HomeLink has successfully accepted the 

frequency signal. The indicator light will flash 

slowly and then rapidly when fully trained.

4. Watch for the HomeLink® indicator to change 

flash rates. When it changes, it is 

programmed. It may take up to 30 seconds or 

longer in rare cases. The garage door may 

open and close while you are programming.

5. Press and hold the programmed HomeLink® 

button and observe the indicator light.
NOTE:

If the indicator light stays on constantly, 

programming is complete and the garage 

door/device should activate when the 

HomeLink® button is pressed.

To program the two remaining HomeLink® 

buttons, repeat each step for each remaining 

button. DO NOT erase the channels.

If you unplugged the garage door opener/device 

for programming, plug it back in at this time.

Reprogramming A Single HomeLink® Button 

(Canadian/Gate Operator)
To reprogram a channel that has been previously 

trained, follow these steps:
1. Place the ignition in the ON/RUN position.
2. Press and hold the desired HomeLink® button 

until the indicator light begins to flash after 20 

seconds. Do not release the button.

3. Without releasing the button, proceed with 

“Canadian/Gate Operator Programming” step 

2 and follow all remaining steps.

S

ECURITY

It is advised to erase all channels before you sell or 

turn in your vehicle.
To do this, push and hold the two outside buttons 

for 20 seconds until the indicator flashes. Note 

that all channels will be erased. Individual 

channels cannot be erased.
The HomeLink® Universal Transceiver is disabled 

when the Vehicle Security system is active.

T

ROUBLESHOOTING

 T

IPS

If you are having trouble programming 

HomeLink®, here are some of the most common 

solutions:

Replace the battery in the Garage Door Opener 

hand-held transmitter.

Push the LEARN button on the Garage Door 

Opener to complete the training for a Rolling 

Code.

Did you unplug the device for programming and 

remember to plug it back in?

If you have any problems, or require assistance, 

please call toll-free 1-800-355-3515 or, on the 

Internet at HomeLink.com for information or 

assistance.

WARNING!

Vehicle exhaust contains carbon monoxide, a 

dangerous gas. Do not run your vehicle in the 

garage while programming the transceiver. 

Exhaust gas can cause serious injury or death.

Your motorized door or gate will open and 

close while you are programming the universal 

transceiver. Do not program the transceiver if 

people, pets or other objects are in the path of 

the door or gate. Only use this transceiver with 

a garage door opener that has a “stop and 

reverse” feature as required by Federal safety 

standards. This includes most garage door 

opener models manufactured after 1982. Do 

not use a garage door opener without these 

safety features.

-------------------------------------------------------------------------------------------------------------------------------------------------------------

GETTING TO KNOW YOUR VEHICLE

51

EXTERIOR LIGHTS  

H

EADLIGHT

 S

WITCH

The headlight switch is located on the left side of 

the instrument panel. This switch controls the 

operation of the headlights, parking lights, 

automatic headlights (if equipped), instrument 

panel light dimming, cargo light/trailer spotter 

lights (if equipped), and fog lights (if equipped).

Headlight Switch

Headlight Switch (Vehicles Sold In Canada)

NOTE:

Vehicles sold in Canada are equipped with a head

-

light switch with an AUTO and ON detent but 

without an OFF detent. Headlights will be deacti

-

vated when the headlight switch is placed in the 

parking lights position. However, the Daytime 

Running Lights (DRLs) will be activated along with 

the front and rear marker lights. The DRLs may be 

deactivated when the parking brake is engaged.
To turn on the headlights, rotate the headlight 

switch clockwise. When the headlight switch is on, 

the parking lights, taillights, license plate light and 

instrument panel lights are also turned on. To turn 

off the headlights, rotate the headlight switch back 

to the O (off) position.
NOTE:

For vehicles sold in Canada, rotate the headlight 

switch clockwise from the parking lights and 

instrument panel lights position to the first detent 

to turn on headlights, parking lights, and 

instrument panel lights. Rotate the headlight 

switch to the second detent for the AUTO position.

M

ULTIFUNCTION

 L

EVER

The multifunction lever is located on the left side of 

the steering column.

Multifunction Lever

D

AYTIME

 R

UNNING

 L

IGHTS

 (DRL

S

) — 

I

F

 E

QUIPPED


The Daytime Running Lights (DRLs) come on 

whenever the engine is running, and the low 

beams are not on. The lights will remain on until 

the ignition is placed in the OFF or ACC position, or 

the parking brake is engaged.

1 — Rotate Headlight Control
2 — Push Fog Light Switch
3 — Ambient Light Dimmer Control
4 — Instrument Panel Dimmer Control
5 — Push Cargo Light Switch

1 — Rotate Headlight Control
2 — Push Fog Light Switch
3 — Ambient Light Dimmer Control
4 — Instrument Panel Dimmer Control
5 — Push Cargo Light Switch

2

-------------------------------------------------------------------------------------------------------------------------------------------------------------

52

GETTING TO KNOW YOUR VEHICLE


NOTE:

For vehicles sold in Canada, the Daytime 

Running Lights will automatically deactivate 

when the front fog lights are turned on.

If allowed by law in the country in which the 

vehicle was purchased, the Daytime Running 

Lights can be turned on and off using the 

Uconnect system  

Ú

page 232.

On some vehicles, the Daytime Running Lights 

may deactivate, or reduce intensity, on one side 

of the vehicle (when a turn signal is activated on 

that side), or on both sides of the vehicle (when 

the hazard warning lights are activated).

H

IGH

/L

OW

 B

EAM

 S

WITCH

Push the multifunction lever toward the instrument 

panel to switch the headlights to high beams. 

Pulling the multifunction lever back will turn the 

low beams on.

A

UTOMATIC

 H

IGH

 B

EAM

 H

EADLAMP


C

ONTROL

 — I

F

 E

QUIPPED

The Automatic High Beam Headlamp Control 

system provides increased forward lighting at night 

by automating high beam control through the use 

of a camera mounted on the inside rearview mirror 

or a windshield mounted camera. These cameras 

detect vehicle specific light and automatically 

switch from high beams to low beams until the 

approaching vehicle is out of view.

NOTE:

The Automatic High Beam Headlamp Control 

can be turned on or off by selecting “ON” under 

“Auto Dim High Beams” within your Uconnect 

Settings  

Ú

page 232, as well as turning the 

headlight switch to the AUTO position.

Broken, muddy, or obstructed headlights and 

taillights of vehicles in the field of view will 

cause headlights to remain on longer (closer to 

the vehicle). Also, dirt, film, and other obstruc

-

tions on the windshield or camera lens will 

cause the system to function improperly.

If the windshield or Automatic High Beam Head

-

lamp Control mirror is replaced, the mirror must 

be re-aimed to ensure proper performance. See 

a local authorized dealer.

The Automatic High Beams will not activate until 

the vehicle is at or above 15 mph (24 km/h). To 

opt out of the Automatic High-Beam Sensitivity 

Control (default) and enter Reduced High-Beam 

Sensitivity Control (not recommended), toggle 

the multifunction lever six full on/off cycles 

within 10 seconds of ignition ON. The system 

will return to the default setting when the igni

-

tion is placed in the OFF position.

F

LASH

-T

O

-P

ASS


You can signal another vehicle with your headlights 

by lightly pulling the multifunction lever toward you. 

This will cause the high beam headlights to turn on, 

and remain on, until the lever is released.

A

UTOMATIC

 H

EADLIGHTS

 — I

F

 E

QUIPPED


This system automatically turns the headlights on 

or off according to ambient light levels. To turn the 

system on, rotate the headlight switch to the AUTO 

position.
When the system is on, the Headlight Delay feature 

is also on. This means the headlights will stay on 

for up to 90 seconds after you place the ignition 

into the OFF position. To turn the automatic 

headlights off, turn the headlight switch out of the 

AUTO position.
NOTE:

The engine must be running before the headlights 

will turn on in the Automatic Mode.

D

IRECTIONAL

 LED H

EADLAMP


S

YSTEM

 — I

F

 E

QUIPPED

This is a system consisting of LED (low/high beam) 

headlights that incorporate dynamic cornering with 

5-degree inboard/15-degree outboard swivel. The 

headlights continuously and automatically adapt 

to the driving conditions around bends or when 

cornering based on steering wheel angle.

-------------------------------------------------------------------------------------------------------------------------------------------------------------

GETTING TO KNOW YOUR VEHICLE

53

The system directs the headlights to light up the 

road in the best way, taking into account the speed 

of the vehicle and the bend or corner angle, as well 

as the speed of the vehicle while the steering 

wheel is being turned.
The adaptive lights are automatically activated 

when the vehicle is traveling above approximately 

5 mph (8 km/h).
This system can be turned on/off through the 

Uconnect Settings under “Steering Directed 

Lights”  

Ú

page 232.

P

ARKING

 L

IGHTS

 A

ND

 P

ANEL

 L

IGHTS

To turn on the parking lights and instrument panel 

lights, rotate the headlight switch clockwise. To 

turn off the parking lights, rotate the headlight 

switch back to the O (off) position.
NOTE:

For vehicles sold in Canada, the first headlight 

switch position is the parking lights and instru

-

ment panel lights position (instead of the OFF 

position).

Vehicles sold in Canada are equipped with a 

headlight switch with an AUTO and ON detent 

but without an OFF detent. Headlights will be 

deactivated when the headlight switch is placed 

in the parking lights position. However, the 

Daytime Running Lights (DRLs) will be activated 

along with the front and rear marker lights. The 

DRLs may be deactivated when the parking 

brake is engaged.

A

UTOMATIC

 H

EADLIGHTS

 W

ITH

 W

IPERS

If your vehicle is equipped with Automatic 

Headlights, it also has this 

customer-programmable feature. When your 

headlights are in the automatic mode and the 

engine is running, they will automatically turn on 

when the wiper system is on. This feature is 

programmable through the Uconnect system  

Ú

page 232.

If your vehicle is equipped with the Rain Sensing 

Wiper system  

Ú

page 58, and it is activated, the 

headlights will automatically turn on after the 

wipers complete five wipe cycles within 

approximately one minute, and they will turn off 

approximately four minutes after the wipers 

completely stop.
NOTE:

When your headlights come on during the daytime, 

the instrument panel lights will automatically dim 

to the lower nighttime intensity.

H

EADLIGHT

 D

ELAY

To assist when exiting the vehicle, the headlight 

delay feature will leave the headlights on for up to 

90 seconds. This delay is initiated when the 

ignition is placed in the OFF position while the 

headlight switch is on, and then the headlight 

switch is cycled off. Headlight delay can be 

canceled by either turning the headlight switch on 

then off, or by placing the ignition in the ON 

position.
NOTE:

This feature can be programmed through the 

Uconnect system  

Ú

page 232.

The headlight delay feature is automatically 

activated if the headlight switch is left in the 

AUTO position when the ignition is placed in the 

OFF position.

L

IGHTS

-O

N

 R

EMINDER

If the headlights, parking lights, or cargo lights are 

left on after the ignition is placed in the OFF 

position, a chime will sound and a message will 

appear in the instrument cluster display when the 

driver’s door is opened.

2

-------------------------------------------------------------------------------------------------------------------------------------------------------------

54

GETTING TO KNOW YOUR VEHICLE


F

RONT

 F

OG

 L

IGHTS

 — I

F

 E

QUIPPED


To activate the front fog lights, turn on the parking 

lights or low beam headlights and push the fog 

light switch located within the headlight switch. 

Pushing the fog light switch a second time will turn 

the front fog lights off.

Fog Light Switch

Fog Light Switch (Vehicles Sold In Canada Only)

T

URN

 S

IGNALS


Move the multifunction lever up or down to 

activate the turn signals. The arrows on each side 

of the instrument cluster flash to show proper 

operation.
NOTE:

If either light remains on and does not flash, or 

there is a very fast flash rate, check for a defective 

outside light bulb.

L

ANE

 C

HANGE

 A

SSIST

 — I

F

 E

QUIPPED

Lightly push the multifunction lever up or down, 

without moving beyond the detent, and the turn 

signal will flash three times then automatically turn 

off.

C

ARGO

 L

IGHTS

/T

RAILER

 S

POTTER


L

IGHTS

/T

RAILER

 H

ITCH

 L

IGHT

 W

ITH


B

ED

 L

IGHTS

 — I

F

 E

QUIPPED


The cargo light, bed lights, trailer spotter lights, and 

trailer hitch light are turned on by pushing the 

cargo light button located on the lower half of the 

headlight switch.

Cargo/Bed Lights Button On Headlight Switch

Cargo/Bed Lights Button On Headlight Switch

(Vehicles Sold In Canada)

-------------------------------------------------------------------------------------------------------------------------------------------------------------

GETTING TO KNOW YOUR VEHICLE

55

When the vehicle is stationary, these lights can 

also be turned on using the switch located just 

inside the pickup box, on the lower part of the bed 

light lens. A telltale will illuminate in the instrument 

cluster display when these lights are on. Pushing 

the switch a second time will turn the lights off.

Bed Light Switch (Without RamBox)

The cargo light and bed lights (if equipped) will turn 

on for approximately 30 seconds when a key fob 

unlock button is pushed, as part of the Illuminated 

Entry feature.
When these lights are activated using the button 

on the headlight switch, the cargo lights, trailer 

spotter lights, and trailer hitch light will remain 

illuminated when the vehicle transmission is in 

PARK, NEUTRAL, or REVERSE. The lights will turn 

off when the vehicle transmission is placed in 

DRIVE.

When the vehicle is placed in the REVERSE 

position, the trailer hitch light will turn on 

automatically. The trailer hitch light will turn off 

when the vehicle is placed in the DRIVE position.
NOTE:

For vehicles shipped to or sold in the states of Cali

-

fornia or Mississippi, the cargo, bed, and mirror 

spotter lights will not work while the vehicle is in 

motion. In every other state, the cargo and mirror 

spotter lights will turn off when the vehicle is in 

motion, but the bed light will remain on. In all 

states, including California and Mississippi, if a 

bed camera is deactivated, the bed lights will turn 

back on.

B

ATTERY

 S

AVER

Timers are set to both the interior and exterior 

lights to protect the life of your vehicle’s battery.
If the ignition is in the OFF position, the interior 

lights will automatically turn off when:

Any door is left ajar for 10 minutes.

The Dome Defeat button is pushed.

The cargo, bed, and spotter lights are manually 

activated by either the headlight switch or the 

truck bed switch.

NOTE:

Battery saver mode is canceled if the ignition is in 

the ON/RUN position.
If the headlights remain on while the ignition is 

placed in the OFF position, the exterior lights will 

automatically turn off after eight minutes. If the 

headlights are turned on and left on for eight 

minutes while the ignition is in the OFF position, 

the exterior lights will automatically turn off.

INTERIOR LIGHTS 

C

OURTESY

 L

IGHTS

The courtesy, dome, cargo, and bed lights are 

turned on when any door is opened. The courtesy 

and dome lights are turned on when the Dome On 

button is pushed on the overhead console. Also, if 

your vehicle is equipped with Remote Keyless 

Entry, and the unlock button is pushed on the key 

fob, the courtesy, dome, cargo, and bed lights will 

turn on.

2

-------------------------------------------------------------------------------------------------------------------------------------------------------------

56

GETTING TO KNOW YOUR VEHICLE


Courtesy/Reading Lights 

The overhead console lights can also be operated 

individually as reading lights by pushing the 

corresponding buttons.

Front Courtesy/Reading Lights

Front Courtesy/Reading Lights

NOTE:

On vehicles equipped with an LED overhead 

console, if both the Dome On and Dome Defeat 

buttons are pushed, the Illuminated Entry with 

door ajar feature will be disabled, but the dome 

lights inside the vehicle will turn on.
Three types of rear courtesy/reading lights are 

available for your vehicle:

Push button on/off

Push lens on/off

No on/off button, only courtesy light

NOTE:

The rear courtesy/reading lights will remain on 

until the switch is pushed a second time, so be 

sure they have been turned off before exiting the 

vehicle. If the interior lights are left on after the 

ignition is placed in the OFF position, they will auto

-

matically turn off after 10 minutes.

Dimmer Controls

The dimmer controls are part of the headlight 

switch and are located on the left side of the 

instrument panel.

Dimmer Controls

1 — Driver’s Reading Light On/Off Button
2 — Dome Defeat Button
3 — Dome On Button
4 — Passenger’s Reading Light On/Off Button

1 — Driver’s Reading Light On/Off Button
2 — Dome Defeat Button
3 — Passenger’s Reading Light On/Off Button
4 — Dome On Button

1 — Ambient Light Control
2 — Instrument Panel Dimmer Control

-------------------------------------------------------------------------------------------------------------------------------------------------------------

GETTING TO KNOW YOUR VEHICLE

57

Dimmer Controls (Vehicles Sold In Canada Only)

With the parking lights or headlights on, rotating 

the right dimmer control upward will increase the 

brightness of the instrument panel lights. Rotating 

the left dimmer control will adjust the interior and 

ambient light levels.
NOTE:

The ambient lights are only active when the head

-

lights or parking lights are on.

I

LLUMINATED

 E

NTRY


The courtesy lights will turn on when you use the 

key fob to unlock the doors or open any door.
This feature also turns on the approach lamps 

located beneath the outside mirrors (if equipped).
The lights will fade to off after approximately 

30 seconds, or they will immediately fade to off 

once the ignition switch is placed in the ON/RUN 

position from the OFF position.
The front courtesy overhead console and door 

courtesy lights will not turn off if the Dome On 

button on the overhead console is pushed. The 

overhead and door courtesy lights will turn off after 

10 minutes to protect the battery.
The illuminated entry system will not operate if the 

Dome Defeat button on the overhead console is 

pushed.
NOTE:

If your vehicle is equipped with Illuminated 

Approach lights under the outside mirrors, they will 

also be turned off by pushing the Dome Defeat 

button.

WINDSHIELD WIPERS AND WASHERS  

The windshield wiper/washer controls are located 

on the multifunction lever on the left side of the 

steering column. The front wipers are operated by 

rotating a switch, located on the end of the lever.

Windshield Wiper/Washer Lever

1 — Ambient Light Control
2 — Instrument Panel Dimmer Control

1 — Push End Inward (Hold For Washer Or Short 

Press For Mist)
2 — Rotate For Front Wiper Operation

2

-------------------------------------------------------------------------------------------------------------------------------------------------------------

58

GETTING TO KNOW YOUR VEHICLE


W

INDSHIELD

 W

IPER

 O

PERATION

Intermittent Wipers
The intermittent feature of this system was 

designed for use when weather conditions make a 

single wiping cycle, with a variable pause between 

cycles, desirable. For maximum delay between 

cycles, rotate the control knob upward to the first 

detent.
The delay interval decreases as you rotate the 

knob until it enters the low continual speed 

position. The delay can be regulated from a 

maximum of about 18 seconds between cycles, to 

a cycle every one second. The delay intervals will 

double in duration when the vehicle speed is 

10 mph (16 km/h) or less.
Windshield Washers
To use the windshield washer, push the washer 

knob, located on the end of the multifunction lever, 

inward and hold. Washer fluid will be sprayed and 

the wiper will operate for two to three cycles after 

the washer knob is released.
If the washer knob pushed while in the delay range, 

the wiper will operate for several seconds after the 

washer knob is released. It will then resume the 

intermittent interval previously selected. If the 

washer knob is pushed while in the off position, the 

wiper will turn on and cycle approximately three 

times after the wash knob is released.

To prevent freeze-up of your windshield washer 

system in cold weather, select a solution or mixture 

that meets or exceeds the temperature range of 

your climate. This rating information can be found 

on most washer fluid containers.

Mist
When a single wipe to clear off road mist or spray 

from a passing vehicle is needed, push the washer 

knob, located on the end of the multifunction lever, 

inward briefly and release. The wipers will cycle 

one time and automatically shut off.
NOTE:

The mist feature does not activate the washer 

pump; therefore, no washer fluid will be sprayed on 

the windshield. The wash function must be used in 

order to spray the windshield with washer fluid.
For information on wiper care and replacement, 

see  

Ú

page 384.

R

AIN

 S

ENSING

 W

IPERS

 — I

F

 E

QUIPPED


This feature senses rain or snowfall on the 

windshield and automatically activates the wipers. 

Rotate the end of the multifunction lever to one of 

five detent positions to activate this feature.
The sensitivity of the system can be adjusted with 

the multifunction lever. Wiper delay position 1 is 

the least sensitive, and wiper delay position 5 is 

the most sensitive. Position 3 should be used for 

normal rain conditions. Positions 1 and 2 can be 

used if the driver desires less wiper sensitivity. 

Positions 4 and 5 can be used if the driver desires 

more sensitivity. Place the wiper switch in the 

O (off) position when not using the system.
NOTE:

The Rain Sensing feature will not operate when 

the wiper switch is in the low or high-speed posi

-

tion.

The Rain Sensing feature may not function prop

-

erly when ice, or dried salt water is present on 

the windshield.

Use of Rain-X or products containing wax or sili

-

cone may reduce Rain Sensing performance.

The Rain Sensing feature can be turned on and 

off using the Uconnect system  

Ú

page 232.

WARNING!

Sudden loss of visibility through the windshield 

could lead to a collision. You might not see other 

vehicles or other obstacles. To avoid sudden 

icing of the windshield during freezing weather, 

warm the windshield with the defroster before 

and during windshield washer use.

-------------------------------------------------------------------------------------------------------------------------------------------------------------

GETTING TO KNOW YOUR VEHICLE

59

The Rain Sensing system has protection features 

for the wiper blades and arms, and will not operate 

under the following conditions:

Low Ambient Temperature — When the ignition 

is first placed in the ON position, the Rain 

Sensing system will not operate until the wiper 

switch is moved, vehicle speed is greater than 

0 mph (0 km/h), or the outside temperature is 

greater than 32°F (0°C).

Transmission In NEUTRAL Position — When the 

ignition is ON, and the transmission is in the 

NEUTRAL position, the Rain Sensing system will 

not operate until the wiper switch is moved, 

vehicle speed is greater than 5 mph (8 km/h), 

or the gear selector is moved out of the 

NEUTRAL position.

Remote Start Mode Inhibit — On vehicles 

equipped with the Remote Start system, Rain 

Sensing wipers are not operational when the 

vehicle is in the Remote Start mode. Once the 

operator is in the vehicle and has placed the 

ignition switch in the RUN position, Rain Sensing 

wiper operation can resume, if it has been 

selected, and no other inhibit conditions 

(mentioned previously) exist.

CLIMATE CONTROLS 

The Climate Control system allows you to regulate 

the temperature, air flow, and direction of air 

circulating throughout the vehicle. The controls are 

located on the touchscreen (if equipped), on the 

sides of the touchscreen, or on the instrument 

panel below the radio.

A

UTOMATIC

 C

LIMATE

 C

ONTROL


D

ESCRIPTIONS

 A

ND

 F

UNCTIONS

Uconnect 5 or 5 NAV With 8.4–inch Display Automatic 

Temperature Controls

Uconnect 5 NAV With 12–inch Display Automatic 

Temperature Controls

NOTE:

Icons and descriptions can vary based upon 

vehicle equipment.

MAX A/C Button

Press and release the MAX A/C button on 

the touchscreen to change the current 

setting to the coldest output of air. The 

MAX A/C indicator illuminates when MAX 

A/C is on. Pressing the button again will cause the 

MAX A/C operation to exit. Pressing other settings 

will also cause MAX A/C to exit.
NOTE:

The MAX A/C sets the control for maximum 

cooling performance.

The MAX A/C button is only available on the 

touchscreen.

2

-------------------------------------------------------------------------------------------------------------------------------------------------------------


Content      ..     1      2      3      4      ..