RAM 3500 Chassis Cab (2021 year). Manual in english - page 16
 

  Index      Manuals     RAM 3500 Chassis Cab (2021 year). Manual in english


Search            copyright infringement  


Content      ..     14      15      16      17     ..


RAM 3500 Chassis Cab (2021 year). Manual in english - page 16


250

MULTIMEDIA


No Subscription
Radios equipped with a Satellite receiver 

require a subscription to the SiriusXM® Service. 

When the Radio does not have the necessary 

subscription, the Radio is able to receive the 

Preview channel only.
Acquiring SiriusXM® Subscription
To activate the SiriusXM® Satellite Radio 

subscription, US residents visit siriusxm.com/

getallaccess or call: 1-800-643-2112
Canadian residents visit https://

www.siriusxm.ca/ or call: 1-888-539-7474.

NOTE:

You will need to provide the SiriusXM® ID (RID) 

located at the bottom of the Channel 0 screen.

The Satellite Mode is activated by a press of the 

SXM button on the touchscreen.

When in Satellite Mode:

The SXM button on the touchscreen is high

-

lighted.

The SiriusXM® Presets are displayed at the 

top of the screen.

The SiriusXM® Channel Number is displayed 

in the center.

The Program Information is displayed at the 

bottom of the Channel Number.

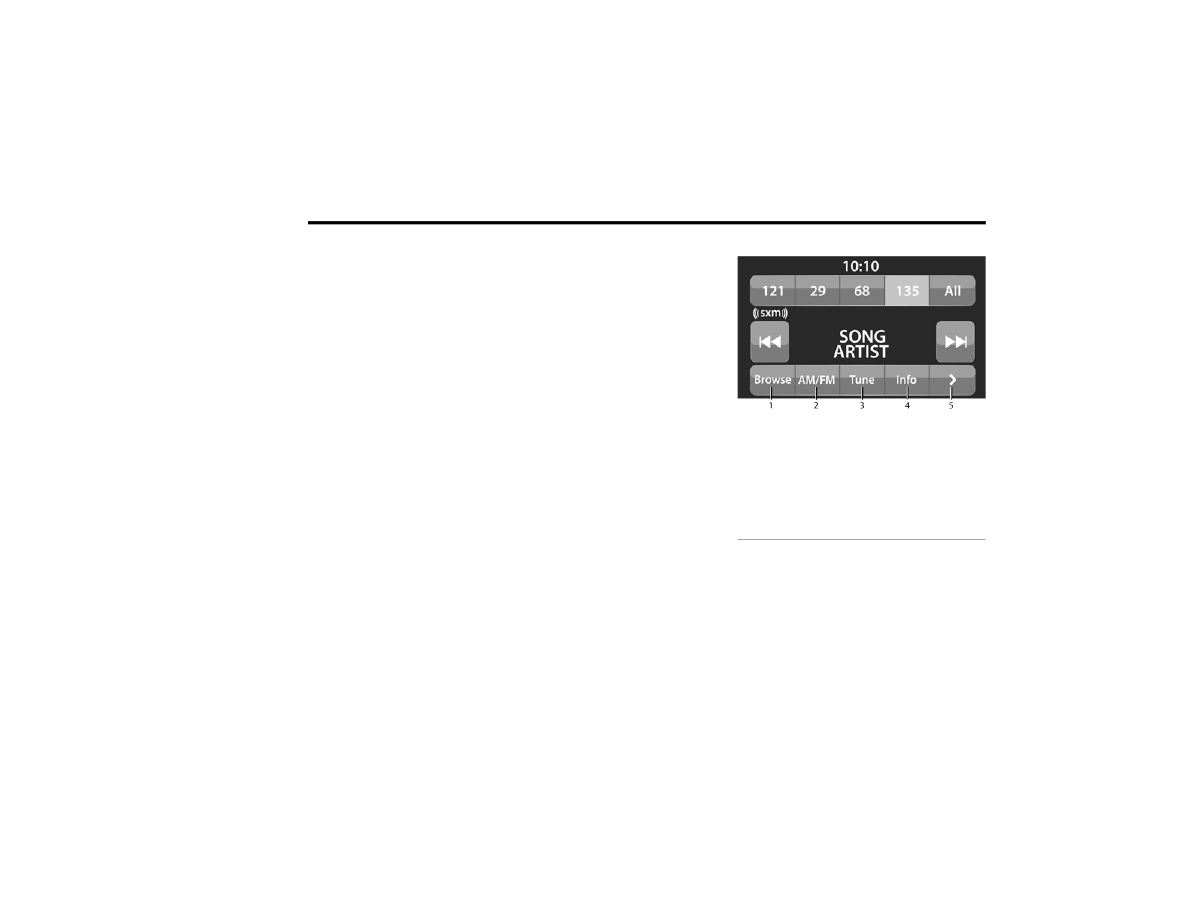
The SiriusXM® function buttons are 

displayed below the Program Information.

Tuning is done by operating the Tune Knob or by 

Direct Tune, similar to other Radio Bands.
In addition to the tuning operation functions 

common to all radio modes, the replay, Traffic/

Weather button, and Favorite button functions 

are available in SiriusXM® Mode.

Uconnect 3 With 5-inch Display SiriusXM® Satellite 

Radio

1 — Browse
2 — Radio Bands
3 — Direct Tune
4 — Info Button
5 — Next Button

-------------------------------------------------------------------------------------------------------------------------------------------------------------

MULTIMEDIA

251

Replay 

The replay function provides a means to store and replay up to 22 minutes of music audio and 48 minutes of talk radio. Once the channel is switched, 

content in replay memory is lost.
Press the Replay button on the touchscreen. The play/pause, rewind/forward and live buttons will display at the top of the screen, along with the replay time.
You can exit by pressing the Replay button on the touchscreen any time during the Replay Mode.

Play/Pause

Press the Pause/Play button on the touchscreen to pause 

the playing of live or rewound content at any time. Play can 

be resumed by pressing the Pause/Play button again on 

the touchscreen.

Rewind

Press the Rewind button on the touchscreen to rewind the 

content in steps of five seconds. Pressing the Rewind 

button on the touchscreen for more than two seconds 

rewinds the content. The radio begins playing the content 

at the point at which the press is released.

Forward

Each press of the Forward button on the touchscreen 

forwards the content in steps of five seconds. Forwarding 

of the content can only be done when the content is 

previously rewound, and therefore, cannot be done for live 

content. A continuous press of the Forward button on the 

touchscreen also forwards the content. The radio begins 

playing the content at the point at which the press is 

release.

Live

Live

Press the Live button on the touchscreen to resume the 

playing of live content.

5

-------------------------------------------------------------------------------------------------------------------------------------------------------------

252

MULTIMEDIA


Favorites 

Press the Favorites button on the touchscreen to 

activate the favorites menu, which will time out 

within 20 seconds in absence of user interaction.
You can exit the Favorites Menu by a press of 

the X button.
The favorites feature enables you to set a favorite 

artist or song that is currently playing. The radio then 

uses this information to alert you when either the 

favorite artist or song is being played at any time by 

any of the SiriusXM® Channels.
The maximum number of favorites that can be 

stored in the Radio is 50.
Favorite Artist: While the song is playing, to set 

a favorite artist, press the Favorites button on 

the touchscreen and then the Favorite Artist 

button on the touchscreen.
Favorite Song: While the song is playing, to set 

a favorite song, press the Favorites button on 

the touchscreen and then the Favorite Song 

button on the touchscreen.

Browse In SXM 

Press the Browse button on the touchscreen to 

edit Presets, Favorites, Game Zone, and Jump 

settings, along with providing the SiriusXM® 

Channel List.

This Screen contains many submenus. You can 

exit submenus to return to a parent menu by 

pressing the Back arrow.
All
Press the All button on the Browse Screen. 

When pressing the All button, the following 

categories become available:

Channel List Press the Channel List to display 

all the SiriusXM® Channel Numbers. You can 

scroll the Channel List by pressing the Up and 

Down arrows, located on the right side of the 

screen. Scrolling can also be done by oper

-

ating the Tune/Scroll knob.

Genre List Press the Genre button on the 

touchscreen to display a list of Genres. You 

can select any desired Genre by pressing the 

Genre List. The radio tunes to a channel with 

the content in the selected Genre.

Favorites
Press the Favorites button on the Browse 

screen.
The Favorites menu provides a means to edit the 

Favorites list and to configure the Alert Settings, 

along with providing a list of Channels currently 

airing any of the items in the Favorites list.

You can scroll the Favorites list by pressing the 

Up and Down arrows located at the right side

of the screen. Scrolling can also be done by 

operating the Tune/Scroll knob as well.
Remove Favorites
Press the Remove Favorites tab at the top of 

the screen. Press the Delete All button on the 

touchscreen to delete all of the Favorites or press the 

Trash Can icon next to the Favorite to be deleted.
Alert Settings
Press the Alert Settings tab at the top of the 

Favorites screen. The Alert Settings menu allows 

you to choose from a visual alert or audible and 

visual alert when one of your favorites is airing on 

any of the SiriusXM® channels.
Game Zone
Press the Game Zone button, located at the left 

of the Browse screen. This feature provides 

you with the ability to select teams, edit the 

selection, and set alerts.
On-Air
Press the On-Air tab at the top of the screen.

The On-Air list provides a list of Channels 

currently airing any of the items in the 

Selections list, and pressing any of the items

in the list tunes the radio to that channel.

-------------------------------------------------------------------------------------------------------------------------------------------------------------

MULTIMEDIA

253

Add/Delete — If Equipped
Press the Add/Delete button on the touchscreen to 

activate the League Scroll list. Press the chosen 

league and a scroll list of all teams within the league 

will appear, then you can select a team by pressing 

the corresponding box. A check mark appears for all 

teams that are chosen.
Remove Selection/Trash Can Icon
Press the Remove Selection tab at the top of

the screen. Press the Delete All button on the 

touchscreen to delete all of the selections or press 

the Trash Can icon next to the selection to be 

deleted.
Alert Settings
Press the Alert Setting tab at the top of the 

screen. The Alert Settings menu allows you to 

choose from “Alert me to on-air games upon 

start” or “Alert upon score update” or both when 

one or more of your selections is airing on any 

of the SiriusXM® channels.
Tune Start
Tune Start begins playing the current song from 

the beginning when you tune to a music channel 

using one of the 12 presets. This feature occurs 

the first time the preset is selected during that 

current song.

Setting Presets    

Uconnect 3 With 5-inch Display Radio Presets

The Presets are available for all Radio Modes, 

and are activated by pressing any of the Preset 

buttons, located at the top of the screen.
When you are on a station that you wish to save 

as a preset, press and hold the numbered 

button on the touchscreen for more than 

two seconds.
The Radio stores up to 12 presets in each of the 

Radio Modes.
For the Uconnect 3 With 5-inch Display
A set of four presets will appear on the screen. 

Press the All button to view all saved presets.

To remove a saved preset, a new preset must 

be saved over the old one.

Audio Settings 

Press the Audio button within the settings main 

menu to activate the Audio Settings screen.

Uconnect 3 With 5-inch Display

1 — Balance/Fade
2 — Equalizer
3 — Speed Adjusted Volume
4 — Surround Sound
5 — Loudness
6 — AUX Volume Offset
7 — Radio Off With Door — If Equipped

5

-------------------------------------------------------------------------------------------------------------------------------------------------------------

254

MULTIMEDIA


Audio Setting

Description

Balance/Fade

Press the Balance/Fade button on the touchscreen to balance audio 

between the front speakers or fade the audio between the rear and front 

speakers. Press the Front, Rear, Left or Right buttons or press and drag 

the red Speaker icon to adjust the Balance/Fade.

Equalizer

Press the + or – buttons or press and drag the level bar to increase or 

decrease each of the equalizer bands. The level value, which spans 

between plus or minus nine, is displayed at the top of each of the bands.

Speed Adjusted Volume

The Speed Adjusted Volume is adjusted by selecting from “Off”, “1”, “2”, 

and “3”. This alters the automatic adjustment of the audio volume with 

variation to vehicle speed. Volume increases automatically as speed 

increases to compensate for normal road noise.

Surround Sound — If Equipped

When Surround Sound is on, you can hear audio coming from every 

direction as in a movie theatre or home theatre system.

Loudness — If Equipped

When Loudness is on, the sound quality at lower volumes improves.

AUX Volume Offset

The AUX Volume Offset is adjusted by pressing + and – buttons. This 

alters the AUX input audio volume. The level value, which spans between 

plus or minus three, is displayed above the adjustment bar.

Auto Play — If Equipped

The Auto Play feature begins playing music as soon as a USB Media 

device is connected to one of the vehicle’s Media USB ports, when it is 

turned on. Press “Off” to turn the setting off.

Radio Off With Door — If Equipped

The Radio Off With Door feature, when activated, keeps the radio on until 

the driver or passenger door is opened or when the Radio Off Delay 

selected time has expired.

-------------------------------------------------------------------------------------------------------------------------------------------------------------

MULTIMEDIA

255

M

EDIA

 M

ODE


Operating Media Mode 

Uconnect 3 With 5-inch Display Operating Media Mode

Media Mode is entered by pushing the MEDIA 

button located on the faceplate.

Audio Source Selection

Once in Media Mode, press the Source or 

Source Select button on the touchscreen and 

the desired mode button on the touchscreen. 

USB, AUX, and Bluetooth® are the Media 

sources available. When available, you can 

select the Browse button on the touchscreen to 

be given these options:

Now Playing

Artists

Albums

Genres

Songs

Playlists

Folders

For the Uconnect 3 With 5-inch Display, Media 

Mode is entered by pushing the Media button 

located on the faceplate.

Types of Media Modes 

USB Mode

Overview
USB Mode is entered by either inserting a USB 

device into the USB Port, or by pushing the 

MEDIA button on the faceplate and then 

selecting the USB button.
On the Uconnect 3 With 5-inch Display, if you 

insert a USB device with the ignition ON, the unit 

will switch to USB Mode and begin to play. 

The display will show the track number and 

index time in minutes and seconds. Play will 

begin at the start of track 1.

Bluetooth® Mode

Overview
Bluetooth® Streaming Audio or Bluetooth® 

Mode is entered by pairing a Bluetooth® 

device, containing music, to the Uconnect 

system.
Before proceeding, the Bluetooth® device 

must be paired to the Uconnect Phone to 

communicate with the Uconnect system.

1 — Seek Down 
2 — Seek Up 
3 — Browse
4 — Source
5 — Pause/Play
6 — Info
7 — More Options

5

-------------------------------------------------------------------------------------------------------------------------------------------------------------

256

MULTIMEDIA

On the Uconnect 3 With 5-inch Display, push the 

MEDIA button located on the faceplate. Once in 

Media Mode, press the Source button on the 

touchscreen and select the Bluetooth® button  

Ú

page 258.

To access Bluetooth® Mode, press the 

Bluetooth® button on the left side of the 

touchscreen or under the Source Select/Select 

Source button (if equipped).

AUX Mode

Overview
Auxiliary Mode (AUX) is entered by inserting an 

AUX device using a cable with a 3.5 mm audio 

jack into the AUX port or pushing the MEDIA 

button on the faceplate and then selecting the 

Source button and then the AUX button.
To insert an Auxiliary device, gently insert the 

Auxiliary device cable into the AUX Port. If you 

insert an Auxiliary device with the ignition and 

the radio on, the unit will switch to AUX Mode 

and begin to play.

Controlling The Auxiliary Device
The control of the Auxiliary device (e.g., 

selecting playlists, play, fast forward, etc.) 

cannot be provided by the radio; use the device 

controls instead. Adjust the volume with the 

Volume button, Volume/Mute rotary knob, or 

the On/Off rotary knob, or with the volume of 

the attached device.

NOTE:

The radio unit is acting as the amplifier for audio 

output from the Auxiliary device. Therefore, if 

the volume control on the Auxiliary device is set 

too low, there will be insufficient audio signal for 

the radio unit to play the music on the device.

Seek Up


  /Seek Down


In USB Mode, press the Seek Up button on the 

touchscreen for the next selection on the USB 

device. Press and release the Seek Down 

button on the touchscreen to return to the 

beginning of the current selection, or to return 

to the beginning of the previous selection if the 

USB device is within the first three seconds of 

the current selection.
In Bluetooth® Mode, press and release the 

Seek Up button on the touchscreen for the next 

selection on the Bluetooth® device. Press and 

release the Seek Down button on the 

touchscreen to return to the beginning of the 

current selection, or return to the beginning of 

the previous selection if the Bluetooth® device 

is within the first second of the current 

selection.
Browse
In USB Mode, press the Browse button on the 

touchscreen to display the browse window.

In USB Mode, the left side of the browse window 

displays a list of ways you can browse through 

the contents of the USB device. If supported by 

the device, you can browse by Folder, Artist, 

Playlist, Album, Song, etc. Press the desired 

button on the touchscreen on the left side of the 

screen. The center of the browse window shows 

items and its sub-functions, which can be 

scrolled through by pressing the Up and Down 

buttons to the right. The Tune/Scroll knob can 

also be used to scroll.
On the Uconnect 3 With 5-inch Display, rotate the 

Browse button on the touchscreen to scroll 

through and select a desired track on the device. 

Press the Exit button on the touchscreen if you 

wish to cancel the Browse function.

-------------------------------------------------------------------------------------------------------------------------------------------------------------

MULTIMEDIA

257

Media Mode
In USB Mode, press the Media button on the 

touchscreen to select the desired audio 

source: USB.
In Bluetooth® Mode, press the Media button on 

the touchscreen to select the desired audio 

source: Bluetooth®.
In AUX Mode, press the Media button on

the touchscreen to select the desired audio 

source: AUX.
Repeat
In USB Mode, press the Repeat button on the 

touchscreen to toggle the repeat functionality. 

The Repeat button on the touchscreen is 

highlighted when active. The Radio will continue 

to play the current track, repeatedly, as long as 

the repeat is active. Press the Repeat button 

again to enter Repeat All. The radio will continue 

to play all the current tracks, repeatedly, as long 

as the repeat function is active. To cancel 

Repeat, press the Repeat button a third time.

Shuffle
In USB Mode, press the Shuffle button on the 

touchscreen to play the selections on the USB 

device in random order to provide an interesting 

change of pace. Press the Shuffle button on the 

touchscreen a second time to turn this feature off.
Audio
Audio settings can be accessed by pressing the 

Audio button  

Ú

page 247.

Info
In both Disc and USB Modes, press the Info 

button on the touchscreen to display the 

current track information. Press the Info or X 

button on the touchscreen a second time to 

cancel this feature.
Tracks
In both Disc and USB Modes, press the Tracks 

button on the touchscreen to display a pop-up 

with the Song List. The song currently playing is 

indicated by an arrow and lines above and 

below the song title. When in the Tracks List 

screen you can rotate the Tune/Scroll knob to 

highlight a track (indicated by the line above 

and below the track name) and then push the 

Enter/Browse knob to start playing that track.

In Bluetooth® Mode, if the Bluetooth® device 

supports this feature, press the Tracks button 

on the touchscreen to display a pop-up with 

the Song List. The currently playing song is 

indicated by a red arrow and lines above and 

below the song title.
Pressing the Tracks button on the touchscreen 

while the pop-up is displayed will close the pop-up.

Media Voice Commands

Uconnect offers connections via USB, 

Bluetooth®, and auxiliary (AUX) ports. Voice 

operation is only available for connected USB 

and AUX devices.

Push the VR button   located on the steering 

wheel. After the beep, say one of the following 

commands and follow the prompts to switch 

your media source or choose an artist.

“Change source to Bluetooth®”

“Change source to AUX”

“Change source to USB”

“Play artist Beethoven”; “Play album 

Greatest Hits”; “Play song Moonlight 

Sonata”; “Play genre Classical”

5

-------------------------------------------------------------------------------------------------------------------------------------------------------------

258

MULTIMEDIA


Did You Know: Press the Browse button on the 

touchscreen to see all of the music on your USB 

device. Your Voice Command must match 

exactly how the artist, album, song, and genre 

information is displayed.

P

HONE

 M

ODE


Overview

Uconnect Phone is a voice-activated, 

hands-free, in-vehicle communications system. 

It allows you to dial a phone number with your 

mobile phone.
The feature supports the following:
Voice Activated Features 

Hands-Free dialing via Voice (“Call John 

Smith Mobile” or “Dial 248-555-1212”).

Hands-Free text-to-speech listening of your 

incoming SMS messages.

Hands-Free Text Message Replying: Forward 

one of 18 predefined SMS messages to 

incoming calls/text messages.

Redialing last dialed numbers (“Redial”).

Calling Back the last incoming call number 

(“Call Back”).

Viewing call logs on screen (“Show Incoming 

Calls,” “Show Outgoing Calls,” “Show Missed 

Calls,” or “Show Recent Calls”).

Searching Contacts phone number (“Search 

for John Smith Mobile”).

Screen Activated Features 

Dialing via Keypad using touchscreen.

Viewing and Calling contacts from Phone

-

books displayed on the touchscreen.

Setting Favorite Contact phone numbers so 

they are easily accessible on the Main Phone 

screen.

Viewing and Calling contacts from Recent 

Call logs.

Reviewing your recent Incoming SMS 

Messages.

Pairing up to 10 phones/audio devices for 

easy access to connect to them quickly.

NOTE:

Your phone must be capable of SMS messaging 

via Bluetooth® for messaging features to work 

properly.

Your mobile phone’s audio is transmitted 

through your vehicle’s audio system; the system 

will automatically mute your radio when using 

the Uconnect Phone.
For Uconnect customer support:

US visit UconnectPhone.com or call 

877-855-8400

Canada visit UconnectPhone.com or call 

800-465-2001 (English) or (French) call 

800-387-9983

Uconnect Phone allows you to transfer calls 

between the system and your mobile phone as 

you enter or exit your vehicle and enables you to 

mute the system's microphone for private 

conversation.

WARNING!

ALWAYS drive safely with your hands on the 

steering wheel. You have full responsibility 

and assume all risks related to the use of the 

Uconnect features and applications in this 

vehicle. Only use Uconnect when it is safe 

to do so. Failure to do so may result in an 

accident involving serious injury or death.

-------------------------------------------------------------------------------------------------------------------------------------------------------------

MULTIMEDIA

259

The Phone feature is driven through your 

Bluetooth® “Hands-Free Profile” mobile phone. 

Uconnect features Bluetooth® technology — the 

global standard that enables different electronic 

devices to connect to each other without wires or 

a docking station. Ensure you phone is turned on 

with Bluetooth® active and has been paired to 

the Uconnect system. Up to 10 mobile phones or 

audio devices are allowed to be linked to the 

system. Only one linked (or paired) mobile phone 

and one audio device can be used with the 

system at a time.
Phone Button

The Phone button   on your steering wheel is 

used to get into the Phone Mode and make 

calls, show recent, incoming or outgoing calls, 

view phonebook, etc. When you press the 

button you will hear a BEEP. The BEEP is your 

signal to give a command.
Voice Command Button

The Voice Command button   on your steering 

wheel is only used for “barge in” and when you are 

already in a call or want to make another call.
The button on your steering wheel is also

used to access the Voice Commands for the 

Uconnect Voice Command features if your 

vehicle is equipped.

Phone Operation

Operation

Voice commands can be used to operate the 

Uconnect Phone and to navigate its menu 

structure. Voice commands are required after 

most Uconnect Phone prompts. There are two 

general methods for how Voice Command 

works:

1. Say compound commands like “Call John 

Smith mobile”.

2. Say the individual commands and allow the 

system to guide you to complete the task.

You will be prompted for a specific command 

and then guided through the available options.

Prior to giving a voice command, one must 

wait for the beep, which follows the “Listen” 

prompt or another prompt.

For certain operations, compound 

commands can be used. For example, 

instead of saying “Call” and then “John 

Smith” and then “mobile”, the following 

compound command can be said: “Call John 

Smith mobile.”

For each feature explanation in this section, only 

the compound command form of the voice 

command is given. You can also break the 

commands into parts and say each part of 

the command when you are asked for it. 

For example, you can use the compound 

command form voice command “Search for 

John Smith,” or you can break the compound 

command form into two voice commands: 

“Search Contacts” and when asked, “John 

Smith.” Please remember, the Uconnect Phone 

works best when you talk in a normal conversa

-

tional tone, as if speaking to someone sitting a 

few feet/meters away from you.

Natural Speech

Your Uconnect Phone Voice system uses a 

Natural Language Voice Recognition (VR) 

engine.
Natural speech allows the user to speak 

commands in phrases or complete sentences. 

The system filters out certain non-word 

utterances and sounds such as “ah” and “eh.” 

The system handles fill-in words such as “I would 

like to”.

5

-------------------------------------------------------------------------------------------------------------------------------------------------------------

260

MULTIMEDIA


The system handles multiple inputs in the same 

phrase or sentence such as “make a phone call” 

and “to Kelly Smith”. For multiple inputs in the 

same phrase or sentence, the system identifies 

the topic or context and provides the associated 

follow-up prompt such as “Who do you want to 

call?” in the case where a phone call was 

requested but the specific name was not 

recognized.
The system utilizes continuous dialog. When the 

system requires more information from the 

user, it will ask a question to which the user can 

respond without pushing the Voice Command 

button on the steering wheel.

Help Command

If you need assistance at any prompt, or if you 

want to know your options at any prompt, say 

“Help” following the beep.
To activate the Uconnect Phone from idle, 

simply push the Phone button (if active) on your 

steering wheel and say a command or say 

“Help”. All Phone sessions begin with a push

of the VR button or the Phone button.

Cancel Command

At any prompt, after the beep, you can say 

“Cancel” and you will be returned to the main 

menu.
You can also push the VR button or Phone 

button on your steering wheel when the system 

is listening for a command and be returned to 

the main or previous menu.

Pair (Link) Uconnect Phone To A Mobile Phone

 Use this QR code to access your 

digital experience.

To begin using your Uconnect Phone, you must 

pair your compatible Bluetooth®-enabled 

mobile phone. Mobile phone pairing is the 

process of establishing a wireless connection 

between a cellular phone and the Uconnect 

system.
To complete the pairing process, you will need 

to reference your mobile phone’s manual. 

Please visit UconnectPhone.com for complete 

mobile phone compatibility information.

Uconnect 3 With 5-inch Display

NOTE:

You must have Bluetooth® enabled on your 

phone to complete this procedure.

The vehicle must be in PARK or at a standstill.

Follow the steps below to pair your phone:

1. Place the ignition in the ACC or ON/RUN 

position.

2. Press the Phone button.

-------------------------------------------------------------------------------------------------------------------------------------------------------------

MULTIMEDIA

261

NOTE:

If there are no phones currently connected 

with the system, a pop-up will appear asking 

if you would like to pair a mobile phone.

This pop-up only appears when the user 

enters Phone Mode and no other device(s) 

have previously been paired. If the system 

has a phone previously paired, even if no 

phone is currently connected with the 

system, this pop-up will not appear.

3. Select “Yes” to begin the pairing process.

4. Search for available devices on your 

Bluetooth®-enabled mobile phone.

Press the Settings button on your mobile 

phone.

Select “Bluetooth®” and ensure it is 

enabled. Once enabled, the mobile 

phone will begin to search for Bluetooth® 

connections.

NOTE:

During the pairing procedure, you may receive a 

pop-up on your touchscreen asking you to make 

sure the PIN on the touchscreen matches the 

PIN from the pop-up on your mobile phone.

5. If “No” is selected, and you still would like to 

pair a mobile phone, press the Pairing or 

Settings button from the Uconnect Phone 

main screen.

Press the Paired Phones button.

Search for available devices on your 

Bluetooth®-enabled mobile phone (see 

below). When prompted on the phone, 

select “Uconnect” and accept the 

connection request.

6. Uconnect Phone will display an in-progress 

screen while the system is connecting.

7. When your mobile phone finds the 

Uconnect system, select “Uconnect.”

8. When prompted on the mobile phone, 

accept the connection request from 

Uconnect.

9. When the pairing process has successfully 

completed, the system will prompt you to 

choose whether or not this is your favorite 

phone. Selecting “Yes” will make this phone 

the highest priority. This phone will take 

precedence over other paired phones within 

range and will connect to the Uconnect 

system automatically when entering the 

vehicle. Only one mobile phone and/or one 

Bluetooth® audio device can be connected 

to the Uconnect system at a time. If “No” is 

selected, simply select “Uconnect” from the 

mobile phone/audio device Bluetooth® 

screen, and the Uconnect system will 

reconnect to the Bluetooth® device.

NOTE:

For phones which are not made a favorite, the 

phone priority is determined by the order in 

which it was paired. The most recent phone 

paired will have the higher priority.

NOTE:

During the pairing procedure, you may receive a 

pop-up on your mobile phone for the Uconnect 

system to access your “messages” and 

“contacts”. Selecting “Ok” or “Allow” will sync 

your contacts with the Uconnect system.

You can also use the following VR command to 

bring up the Paired Phone screen from any 

screen on the radio: 

“Show Paired Phones”

5

-------------------------------------------------------------------------------------------------------------------------------------------------------------

262

MULTIMEDIA


NOTE:

Software updates on your phone or the 

Uconnect system may interfere with the

Bluetooth® connection. If this happens, simply 

repeat the pairing process. However, first make 

sure to delete the device from the list of phones 

on your Uconnect system. Next, be sure to 

remove Uconnect from the list of devices in your 

phone’s Bluetooth® settings.

Connecting To A Particular Mobile Phone Or 

Audio Device After Pairing

Uconnect Phone will automatically connect to 

the highest priority paired phone and/or Audio 

Device within range. If you need to choose a 

particular phone or audio device follow these 

steps: 

1. Press the Settings button on the 

touchscreen.

2. Press the Paired Phones/Audio Sources 

buttons.

3. Press to select the particular phone or the 

particular audio device. A pop-up menu will 

appear; press “Connect Phone”.

4. Press the X to exit out of the Settings 

screen.

Disconnecting or Deleting A Phone Or Audio 

Device 

Uconnect 3 With 5-inch Display

1. Press the Uconnect Phone Pairing or 

Settings button.

2. Press the Paired Phones/Audio Sources 

buttons.

3. Press the Settings button located to the 

right of the device name for a different 

phone or audio device than the currently 

connected device or press the preferred 

Connected Phone from the list.

4. The option’s pop-up will be displayed.

5. Press the Disconnect Device or the Delete 

Device button on the touchscreen.

6. Press the X to exit out of the Settings 

screen.

Making A Phone Or Audio Device A Favorite

1. On the Paired Phone/Audio sources 

screen, press the Settings button located 

to the right of the device name for a 

different phone or audio device than the 

currently connected device or press the 

preferred “Connected Phone” from the list.

2. The option’s pop-up will be displayed.

3. Press the Make Favorite button on the 

touchscreen; you will see the chosen device 

move to the top of the list.

4. Press the X to exit out of the Settings 

screen.

1 — Disconnect Device Or Disconnect Phone
2 — Make Favorite
3 — Delete Device/Phone

-------------------------------------------------------------------------------------------------------------------------------------------------------------

MULTIMEDIA

263

Phonebook Download (Automatic Phonebook 

Transfer From Mobile Phone) — If Equipped

If supported by your phone, Uconnect Phone 

has the ability to download contact names and 

number entries from the mobile phone’s 

phonebook. Specific Bluetooth® Phones with 

Phonebook Access Profile may support this 

feature. Your mobile phone may receive a 

pop-up asking for permission for the Uconnect 

system to access your messages and contacts. 

Selecting “Ok” or “Allow” will sync your contacts 

with the Uconnect system.
See the Uconnect website, UconnectPhone.com

for supported phones.

To call a name from a downloaded mobile 

phonebook, follow the procedure in the 

“Voice Command” in this section.

Automatic download and update of a phone

-

book, if supported, begins as soon as the 

Bluetooth® wireless phone connection is 

made to the Uconnect Phone, for example, 

after you start the vehicle.

A maximum of 5,000 contact names with 

four numbers per contact will be downloaded 

and updated every time a phone is 

connected to the Uconnect Phone.

Depending on the maximum number of entries 

downloaded, there may be a short delay 

before the latest downloaded names can be 

used. Until then, if available, the previously 

downloaded phonebook is available for use.

Only the phonebook of the currently 

connected mobile phone is accessible.

This downloaded phonebook cannot be 

edited or deleted on the Uconnect Phone. 

These can only be edited on the mobile 

phone. The changes are transferred and 

updated to Uconnect Phone on the next 

phone connection.

Managing Your Favorites — If Equipped

There are two ways you can add an entry to your 

favorites:

1. After loading the mobile phonebook, press 

the Favorites button on the touchscreen, 

and then press one of the +Add Favorite 

Contact buttons that appears on the list.

2. After loading the mobile phonebook, select 

“Contacts” from the Phone main screen, 

and then select the appropriate number. 

Press the Down Arrow button next to the 

selected number to display the option’s 

pop-up. In the pop-up, select “Add to 

Favorites”.

NOTE:

If the Favorites list is full, you will be asked to 

remove an existing favorite.

To Remove A Favorite — If Equipped

1. To remove a Favorite, select “Favorites” 

from the Phone main screen.

2. Next, select the Down Arrow icon next to the 

contact you want to remove from your 

favorites. This will bring up the options for 

that Favorite contact.

3. Deselect the Star icon to delete the 

Favorite.

5

-------------------------------------------------------------------------------------------------------------------------------------------------------------

264

MULTIMEDIA


Phone Call Features

The following features can be accessed through 

the Uconnect Phone if the feature(s) are 

available and supported by Bluetooth® on your 

mobile service plan. For example, if your mobile 

service plan provides three-way calling, this 

feature can be accessed through the Uconnect 

Phone. Check with your mobile service provider 

for the features that you have.
Listed below are the phone options with 

Uconnect:

Redial

Dial by pressing in the number

Voice Commands (Dial by Saying a Name, 

Call by Saying a Phonebook Name, Redial or 

Call Back)

Favorites

Mobile Phonebook

Recent Call Log

SMS Message Viewer

Call Controls

The touchscreen allows you to control the 

following call features:

Uconnect 3 With 5-inch Display

Other phone call features include:

End Call

Hold/Unhold/Resume

Swap two active calls

Key Pad Number Entry

1. Press the Phone button.

2. Press the Dial/Keypad button on the 

touchscreen.

3. The Touch-Tone screen will be displayed.

4. Use the numbered buttons on the 

touchscreens to enter the number and 

press “Dial/Call”.

Recent Calls — If Equipped

You may browse a list of the most recent of each 

of the following call types: 

All Calls

Incoming Calls or Calls Received

Outgoing Calls or Calls Made

Missed Calls

These can be accessed by pressing the Recent 

Calls button on the phone main screen.
You can also push the VR button on your steering 

wheel and perform the above operation. 

For example, say “Show my incoming calls”.

1 — Answer
2 — Mute/Unmute
3 — Ignore
4 — Transfer

-------------------------------------------------------------------------------------------------------------------------------------------------------------

MULTIMEDIA

265

Answer Or Ignore An Incoming Call — No Call 

Currently In Progress

When you receive a call on your mobile phone, 

the Uconnect Phone will interrupt the vehicle 

audio system. Push the Phone button on the 

steering wheel, press the Answer button on the 

touchscreen.

Uconnect 3 With 5-inch Display

Answer Or Ignore An Incoming Call — Call 

Currently In Progress

If a call is currently in progress and you have 

another incoming call, you will hear the same 

network tones for call waiting that you normally 

hear when using your mobile phone. Push the 

Phone button on the steering wheel, press the 

Answer button on the touchscreen, or press the 

Caller ID box to place the current call on hold 

and answer the incoming call.

NOTE:

Phones that are compatible with the Uconnect 

system in the market today do not support 

rejecting an incoming call when another call is 

in progress. Therefore, the user can only answer 

an incoming call or ignore it.

Do Not Disturb 

With Do Not Disturb, you can disable 

notifications from incoming calls and texts, 

allowing you to keep your eyes on the road and 

hands on the wheel. For your convenience, 

there is a counter display to keep track of your 

missed calls and text messages while Do Not 

Disturb is active.

Do Not Disturb can automatically reply with a 

text message, a call, or both when declining an 

incoming call and send it to voicemail.
Automatic reply messages can be:

“I am driving right now, I will get back to you 

shortly”.

Create a custom auto reply message up to 

160 characters.

NOTE:

Only the first 25 characters can be seen on the 

touchscreen while typing a custom message.

While in Do Not Disturb, Conference Call can be 

selected so you can still place a second call 

without being interrupted by incoming calls.

NOTE:

Reply with text message is not compatible 

with iPhones®.

Auto reply with text message is only available 

on phones that support Bluetooth® Message 

Access Profile (MAP).

1 — Answer Button
2 — Caller ID Box

5

-------------------------------------------------------------------------------------------------------------------------------------------------------------


Content      ..     14      15      16      17     ..