Acura RL (2011 year). Manual - part 25


  Index      Acura     Acura RL (2011 year) - manual in english


Search            copyright infringement  


Content      ..     23      24      25      26     ..


Acura RL (2011 year). Manual - part 25


CONTINUED

Park with the driver’s side closest
to the service station pump.

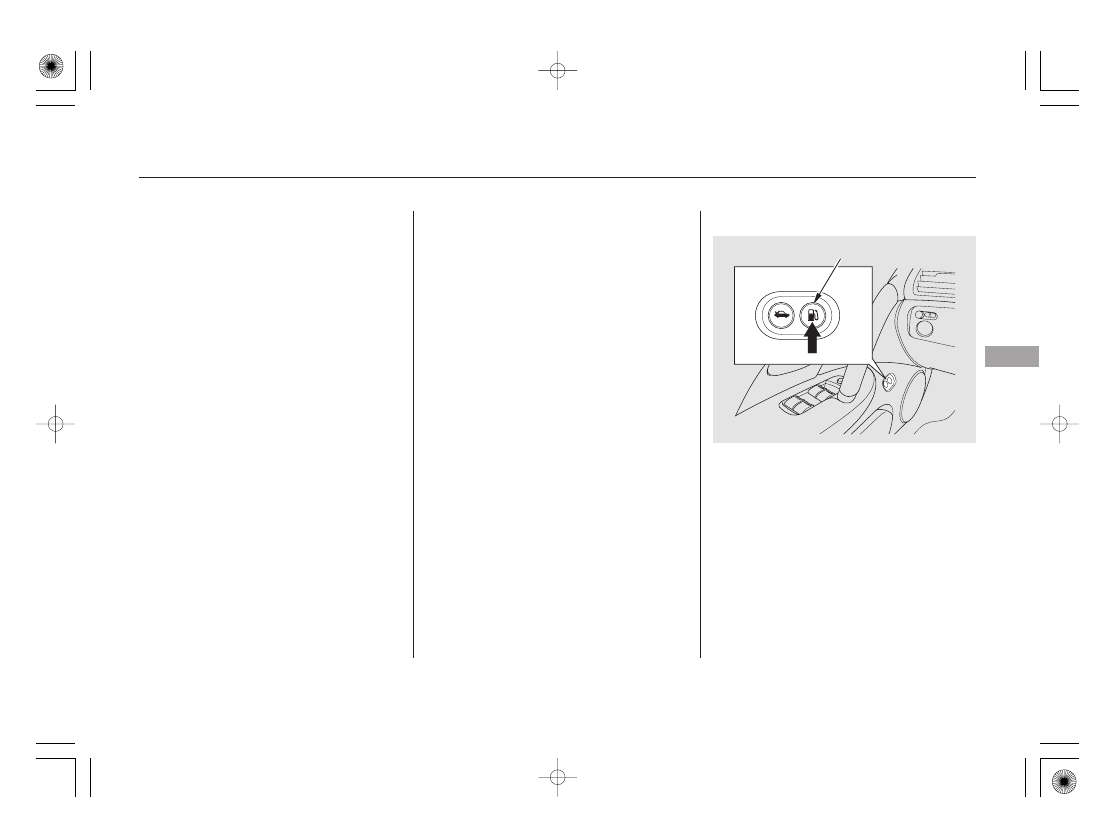
Open the fuel fill door by pressing
the button in the driver’s door (to
open the fuel fill door manually,
see page

).

Because the level of detergency and
additives in gasoline vary in the
market, Honda endorses the use of
‘‘TOP TIER Detergent Gasoline’’
where available to help maintain the
performance and reliability of your
vehicle. TOP TIER Detergent
Gasoline meets a new gasoline
standard jointly established by
leading automotive manufacturers to
meet the needs of today’s advanced
engines. Qualifying gasoline retailers
will, in most cases, identify their
gasoline as having met ‘‘TOP TIER
Detergent Gasoline’’ standards at the
retail location. This fuel is
guaranteed to contain the proper
level of detergent additives and be
free of metallic additives. The proper
level of detergent additives, and
absence of harmful metallic additives
in gasoline, help avoid build-up of
deposits in your engine and emission
control system.

For further important fuel-related
information for your vehicle, or on
information on gasoline that does not
contain MMT, visit My Acura at

. In Canada, visit

for additional

information on gasoline. For more
information on top tier gasoline, visit

.

1.

2.

511

owners.acura.com
www.acura.ca

www.toptiergas.com

Service Station Procedures

Ref ueling

B

e

fo

re

D

riv

ing

383

FUEL FILL DOOR RELEASE BUTTON

10/08/04 19:49:24 31SJA660_388

-------------------------------------------------------------------------------------------------------------------------------------------------------------

Screw the fuel fill cap back on
until it clicks at least once. If you
do not properly tighten the cap,
you will see a ‘‘TIGHTEN FUEL
CAP’’ message on the multi-
information display, and the
malfunction indicator lamp may
also come on (see page

).

Push the fuel fill door closed until
it latches.

If the fuel nozzle keeps clicking off
even though the tank is not full,
there may be a problem with your
vehicle’s fuel vapor recovery
system. The system helps keep
fuel vapor from going into the
atmosphere. Try filling at another
pump. If this does not fix the
problem, consult your dealer.

Remove the fuel fill cap slowly.
You may hear a hissing sound as
pressure inside the tank equalizes.
Place the cap in the holder on the
fuel fill door.

Stop filling the tank after the fuel
nozzle automatically clicks off. Do
not try to ‘‘top off’’ the tank. This
leaves some room in the fuel tank
for the fuel to expand with
temperature changes.

3.

4.

5.

6.

509

Service Station Procedures

384

TETHER

FUEL FILL CAP

Gasoline is highly flammable
and explosive. You can be
burned or seriously injured
when handling fuel.

Stop the engine, and keep
heat, sparks, and flames
away.
Handle fuel only outdoors.
Wipe up spills immediately.

10/08/04 19:49:34 31SJA660_389

-------------------------------------------------------------------------------------------------------------------------------------------------------------

Park the vehicle, and set the
parking brake. Pull the hood
release lever located under the
lower left corner of the dashboard.
The hood will pop up slightly.

Your vehicle’s on board diagnostic
system will detect a loose or missing
fuel fill cap as an evaporative system
leak. The first time a leak is detected
a ‘‘TIGHTEN FUEL CAP’’ message
appears on the multi-information
display. Turn the engine off, and
confirm the fuel fill cap is installed. If
it is, loosen it, then retighten it until
it clicks at least once. The message
should go off after several days of
normal driving once you tighten or

replace the fuel fill cap. To scroll to
another message, press the INFO
button. The ‘‘TIGHTEN FUEL CAP’’
message will appear each time you
restart the engine until the system
turns the message off.

If the system still detects a leak in
the vehicle’s evaporative emissions
system, the malfunction indicator
lamp (MIL) comes on. If the fuel fill
cap was not already tightened, turn
the engine off, and check or
retighten the fuel fill cap until it
clicks at least once. The MIL should
go off after several days of normal
driving once the cap is tightened or
replaced. If the MIL does not go off,
have your vehicle inspected by a
dealer. For more information, see
page

.

1.

509

CONTINUED

Opening and Closing the Hood

Tighten Fuel Cap Message

Service Station Procedures

B

e

fo

re

D

riv

ing

385

HOOD RELEASE LEVER

10/08/04 19:49:43 31SJA660_390

-------------------------------------------------------------------------------------------------------------------------------------------------------------

If the hood latch handle moves
stiffly, or if you can open the hood
without lifting the handle, the
mechanism should be cleaned and
lubricated.

Reach between the hood and the
front bumper with your finger.
Slide the latch handle up.

To close the hood, lower the hood to
about a foot (30 cm) above the
fender, then firmly press down on
the front edge of the hood. Make
sure it is securely latched.

Lift the hood up most of the way.
The hydraulic supports will lift it
up the rest of the way and hold it
up.

2.

3.

Service Station Procedures

386

LATCH

10/09/08 21:18:42 31SJA660_391

-------------------------------------------------------------------------------------------------------------------------------------------------------------

Remove the dipstick again, and
check the level. It should be
between the upper and lower
marks.

If it is near or below the lower
mark, see

on

page

.

Wait a few minutes after turning the
engine off before you check the oil.

Remove the dipstick (orange loop).

Wipe the dipstick with a clean
cloth or paper towel.

Insert the dipstick all the way back
into its hole.

Look at the coolant level in the
radiator reserve tank. Make sure it is
between the MAX and MIN lines. If
it is below the MIN line, see

on page

for

information on adding the proper
coolant.

Refer to

on page

for information

about checking other items on your
vehicle.

4.

1.

2.

3.

458

461

452

Engine Coolant Check

Adding Engine Oil

Oil Check

Adding

Engine Coolant

Owner’s Maintenance

Checks

Service Station Procedures

B

e

fo

re

D

riv

ing

387

MAX
MIN

LOWER MARK

UPPER MARK

RESERVE TANK

DIPSTICK

10/09/08 21:18:52 31SJA660_392

-------------------------------------------------------------------------------------------------------------------------------------------------------------

Fuel economy is not a fixed number.
It varies based on driving conditions,
driving habits, and vehicle condition.
Therefore, it is not possible for one
set of estimates to predict fuel
economy precisely for all drivers in
all environments.

Represents urban

driving in light traffic. A range of
miles per gallon achieved is also
provided.

The EPA fuel economy estimates
shown in the example to the right
are a useful tool for comparison
when buying a vehicle. EPA
estimates include:

Represents a combination of city and
highway driving. The scale
represents the range of combined
fuel economy for other vehicles in
the class.

Represents a

mixture of rural and interstate
driving, in a warmed-up vehicle,
typical of longer trips in free-flowing
traffic. A range of miles per gallon

achieved is also provided.

Provides an estimated annual fuel
cost, based on 15,000 miles (20,000
km) per year multiplied by the cost

per gallon (based on EPA fuel cost
data) divided by the combined fuel
economy.

For more information on fuel
economy ratings and factors that
affect fuel economy, visit

(Canada: Visit

)

www.

fueleconomy.gov

www.

vehicles.gc.ca

Fuel Economy

Actual Mileage and EPA Fuel
Economy Estimates Comparison.

City MPG

Combined Fuel Economy

Highway MPG

Estimated Annual Fuel Cost

388

Combined Fuel
Economy

(Sample U.S. EPA label shown)

Estimated Annual
Fuel Cost

City MPG

Highway MPG

10/08/04 19:50:17 31SJA660_393

-------------------------------------------------------------------------------------------------------------------------------------------------------------

The following factors can lower your
vehicle’s fuel economy:

Idling

results in 0 miles per gallon (0 kms
per liter).

Aerodynamic drag has a big effect
on fuel economy at speeds above
45 mph (75 km/h). Reduce your
speed and you reduce the drag.
Trailers, car top carriers, roof
racks and bike racks are also big
contributors to increased drag.

Rapid

acceleration, abrupt cornering,
and hard braking increase fuel
consumption.

In

particular, a build-up of snow or
mud on your vehicle’s underside
adds weight and rolling resistance.
Frequent cleaning helps your fuel
economy.

It puts a heavier

load on the engine, increasing fuel
consumption.

An underinflated tire increases

‘‘rolling resistance,’’ which reduces
fuel economy.

A properly maintained vehicle
maximizes fuel economy. Poor
maintenance can significantly reduce
fuel economy. Always maintain your
vehicle according to the maintenance
messages displayed on the multi-
information display (see

on page

).

For example:

Improperly inflated tires

Driving with a heavy load or the
air conditioner running

Cold engine operation (engines
are more efficient when warmed
up)

Excessive idling, accelerating and
braking in stop-and-go traffic

Aggressive driving (hard
acceleration and braking)

452

CONTINUED

Fuel Economy

Fuel Economy Factors

Avoid excessive idling

Observe the speed limit

Drive moderately

Keep your vehicle clean

Avoid carrying excess weight in
your vehicle

Maintain proper tire inf lation

Use the recommended viscosity
motor oil, displaying the API
Certif ication Seal (see page

).

Owner’s

Maintenance Checks

Improving Fuel Economy

458

Drive Ef f iciently

Vehicle Maintenance

B

e

fo

re

D

riv

ing

389

10/08/04 19:50:35 31SJA660_394

-------------------------------------------------------------------------------------------------------------------------------------------------------------

Fill the fuel tank until the nozzle automatically clicks off.
Reset trip counter to zero.
Record the total gallons (liters) needed to refill.
Follow one of the simple calculations above.

Direct calculation is the
recommended source of information
about your actual fuel economy.
Using frequency of fill-ups or taking
fuel gauge readings are NOT
accurate measures of fuel economy.
Fuel economy may improve over the
first several thousand miles
(kilometers).

The A/C

puts an extra load on the engine
which makes it use more fuel. Use
the fresh-air ventilation when
possible.

Combine several short trips into
one. A warmed-up engine is more
fuel efficient than a cold one.

1)
2)
3)
4)

Fuel Economy

Checking Your Fuel Economy

Measuring Techniques

Calculating Fuel Economy

Minimize the use of the air
conditioning system

Plan and combine trips

390

Miles

driven

Gallons

of fuel

Miles per

Gallon

100

Kilometers

L per

100 km

Liter

10/08/04 19:50:47 31SJA660_395

-------------------------------------------------------------------------------------------------------------------------------------------------------------

Before installing any accessory:

Make sure the accessory does not
obscure any lights, or interfere
with proper vehicle operation or
performance.

Modifying your vehicle, or installing
some non-Acura accessories, can
make your vehicle unsafe. Before
you make any modifications or add
any accessories, be sure to read the
following information.

Your dealer has Acura accessories
that allow you to personalize your
vehicle. These accessories have
been designed and approved for your
vehicle, and are covered by warranty.

Be sure electronic accessories do
not overload electrical circuits
(see page

) or interfere with

the proper operation of your
vehicle.

Do not install accessories on the
side pillars or across the rear
windows. Accessories installed in
these areas may interfere with
proper operation of the side
curtain airbags.

When properly installed, cellular
phones, alarms, two-way radios, and
low-powered audio systems should
not interfere with your vehicle’s
computer controlled systems, such
as your airbags, anti-lock brakes, and
tire pressure monitoring system.

Although non-Acura accessories may
fit on your vehicle, they may not
meet factory specifications, and
could adversely affect your vehicle’s
handling, stability, and reliability.

Before installing any electronic
accessory, have the installer
contact your dealer for assistance.
If possible, have your dealer
inspect the final installation.

512

Accessories

Accessories and Modifications

B

e

fo

re

D

riv

ing

391

Improper accessories or
modifications can affect your
vehicle’s handling, stability, and
performance, and cause a
crash in which you can be hurt
or killed.

Follow all instructions in this
owner’s manual regarding
accessories and modifications.

10/08/04 19:50:59 31SJA660_396

-------------------------------------------------------------------------------------------------------------------------------------------------------------

Raising your vehicle with a non-
Acura suspension kit can affect
the handling, stability, and
reliability.

Lowering the vehicle with a non-
Acura suspension kit that
significantly reduces ground
clearance can allow the
undercarriage to hit speed bumps
or other raised objects, which
could cause the airbags to deploy.

Removing parts from your vehicle,
or replacing components with non-
Acura components could seriously
affect your vehicle’s handling,
stability, and reliability.

Some examples are:

Non-Acura wheels, because they
are a universal design, can cause
excessive stress on suspension
components and will not be
compatible with the tire pressure
monitoring system (TPMS).

Larger or smaller wheels and tires
can interfere with the operation of
your vehicle’s anti-lock brakes and
other systems.

Modifying your steering wheel or
any other part of your vehicle’s
safety features can make the
systems ineffective.

If you plan to modify your vehicle,
consult your dealer.

Modif ying Your Vehicle

Accessories and Modifications

392

10/08/04 19:51:09 31SJA660_397

-------------------------------------------------------------------------------------------------------------------------------------------------------------

Your vehicle has several convenient
storage areas:

Glove box
Front door and seat-back pockets
Console compartment

In addition, the trunk pass-through
allows you to carry longer items.

However, carrying too much cargo,
or improperly storing it, can affect
your vehicle’s handling, stability,
stopping distance, and tires, and
make it unsafe. Before carrying any
type of cargo, be sure to read the
following pages.

Trunk

Center pocket

Carrying Cargo

B

e

fo

re

D

riv

ing

393

TRUNK

SEAT-BACK POCKETS

GLOVE BOX

CONSOLE COMPARTMENT

FRONT DOOR POCKET

CENTER POCKET

10/08/04 19:51:20 31SJA660_398

-------------------------------------------------------------------------------------------------------------------------------------------------------------

×

The resulting figure equals the
available amount of cargo and
luggage load capacity. For
example, if the ‘‘XXX’’ amount
equals 1,400 lbs. and there will be
five 150 lb. passengers in your
vehicle, the amount of available
cargo and luggage load capacity is
650 lbs.
(1,400

750 (5

150) = 650 lbs.)

Determine the combined weight
of luggage and cargo being loaded
on the vehicle. That weight may
not safely exceed the available
cargo and luggage load capacity
calculated in Step 4.

If your vehicle will be towing a
trailer, load from your trailer will
be transferred to your vehicle.
Consult this manual to determine
how this reduces the available
cargo and luggage load capacity of
your vehicle.

Subtract the combined weight of
the driver and passengers from
XXX kg or XXX lbs.

Locate the statement ‘‘The
combined weight of occupants and
cargo should never exceed XXX
kg or XXX lbs.’’ on your vehicle’s
placard.

Steps for Determining Correct Load
Limit

The maximum load for your vehicle
is 850 lbs (385 kg).

See Tire And Loading Information
label attached to the driver’s
doorjamb.

Label Example

This figure includes the total weight
of all occupants, cargo, and
accessories, and the tongue load if
you are towing a trailer.

Determine the combined weight
of the driver and passengers that
will be riding in your vehicle.

(1)

(2)

(3)

(6)

(5)

(4)

Carrying Cargo

Load Limits

394

Overloading or improper
loading can affect handling and
stability and cause a crash in
which you can be hurt or killed.

Follow all load limits and other
loading guidelines in this
manual.

10/08/04 19:51:35 31SJA660_399

-------------------------------------------------------------------------------------------------------------------------------------------------------------

In addition, the total weight of the
vehicle, all occupants, accessories,
cargo, and trailer tongue load must
not exceed the Gross Vehicle
Weight Rating (GVWR) or the Gross
Axle Weight Rating (GAWR). Both
are on a label on the driver’s
doorjamb.

Example 2

Example 1

Example 3

Carrying Cargo

B

e

fo

re

D

riv

ing

395

Passenger Weight
150 lbs x 4 = 600 lbs
(68 kg x 4 = 272 kg)

Passenger Weight
150 lbs x 5 = 750 lbs
(68 kg x 5 = 340 kg)

Max Load 850 lbs

(385 kg)

Max Load 850 lbs

(385 kg)

Passenger Weight
150 lbs x 2 = 300 lbs
(68 kg x 2 = 136 kg)

Cargo Weight
550 lbs
(249 kg)

Cargo Weight
250 lbs
(113 kg)

Cargo Weight
100 lbs
(45 kg)

Max Load 850 lbs

(385 kg)

10/08/04 19:51:41 31SJA660_400

-------------------------------------------------------------------------------------------------------------------------------------------------------------

Store or secure all items that could
be thrown around and hurt
someone during a crash.

Do not put any items on top of the
rear shelf. They can block your
view and be thrown around the
vehicle during a crash.

Be sure items placed on the floor
behind the front seats cannot roll
underneath and interfere with the
proper operation of the seats, the
sensors under the seats, or the
driver’s ability to operate the
pedals.

Distribute cargo evenly on the
floor of the trunk, placing the
heaviest items on the bottom and
as far forward as possible.

If you carry large items that
prevent you from closing the trunk
lid, exhaust gas can enter the
passenger area. To avoid the
possibility of

, follow the instructions

on page

.

If you carry any items on a roof
rack, be sure the total weight of
the rack and the items does not
exceed 121 lbs (55 kg).

If you use an accessory roof rack,
the roof rack weight limit may be
lower. Refer to the information
that came with your roof rack.

Keep the glove box closed while
driving. If it is open, a passenger
could injure their knees during a
crash or sudden stop.

Keep all cargo below the bottom
of the windows. If it is higher, it
could interfere with the proper
operation of the side curtain
airbags.

56

Carrying Items in the Passenger
Compartment

Carrying Cargo in the Trunk or on
a Roof Rack

carbon monoxide

poisoning

Carrying Cargo

396

10/08/04 19:51:52 31SJA660_401

-------------------------------------------------------------------------------------------------------------------------------------------------------------

The cargo floor hooks can also be
used to tie down and secure items on
the floor.

There are hooks on the floor and
both sides of the trunk. They can be
used to install the cargo net for
securing items. The side cargo
hooks are designed to hold light
items (maximum load: 6 lbs or 3 kgs
for each hook). Heavy objects may
damage the side hooks.

If you carry any items extending
through the trunk pass-through,
tie down or secure all items that
could be thrown around the
vehicle and hurt someone during a
crash or sudden stop.

Carrying Cargo

Cargo Hooks

B

e

fo

re

D

riv

ing

397

SIDE CARGO HOOKS

CARGO FLOOR HOOKS

10/08/04 19:52:00 31SJA660_402

-------------------------------------------------------------------------------------------------------------------------------------------------------------

398

10/08/04 19:52:03 31SJA660_403

-------------------------------------------------------------------------------------------------------------------------------------------------------------


Content      ..     23      24      25      26     ..