Acura RL (1996-2004 year). Manual - part 616


  Index      Acura     Acura RL 1996-2004 year - service repair manual


Search            


Content   ..  614  615  616  617   ..


Acura RL (1996-2004 year). Manual - part 616


Safety Indicator

Indicator Input Test

1. Remove the gauge assembly (see page 

23-85

).

2. Disconnect the connectors from the gauge assembly.
3. Inspect the connector and socket terminals to be sure they are all making good contact.

• If the terminals are bent, loose or corroded, repair them as necessary, and recheck the system.
• If the terminals look OK, make the following input tests at the connector.

If any test indicates a problem, find and correct the cause, then recheck the system.
If all the input test prove OK, the gauge printed circuit panel must be faulty; replace it.

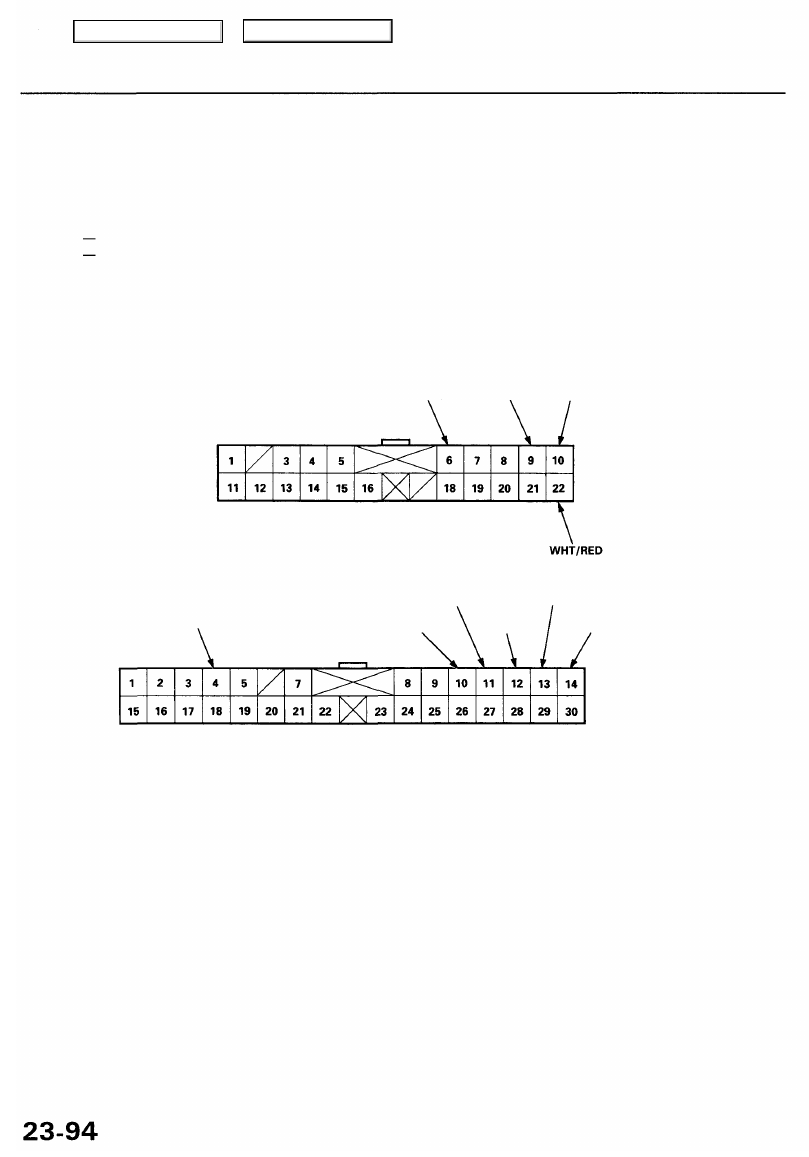
22P CONNECTOR "A" (C508)

30P CONNECTOR "B" (C509)

WHT/GRN

Wire side of
female terminals

GRN/BLU

GRN/RED

GRN/YEL

GRN/ORN

GRN/BLK

Wire side of
female terminals

WHT/YEL BLK BLK

Main Menu

Table of Contents

Cavity Wire Test condition Test: Desired result Possible cause if result is not obtained

Main Menu

Table of Contents

Safety Indicator System

Brake Light Failure Sensor Test

'96 - 98 models:

1. First make sure the brake lights come on when the

brake pedal is pressed.

• If all the brake lights come on, go to step 2.
• If one of the brake lights does not come on, check

whether the bulb is blown. If the bulb is OK, go to
step 2.

• If none of the brake lights come on, check the

brake light circuit. 

2. Open the trunk lid.

3. Pull back the left trunk side panel to uncover the

brake light failure sensor (see 

section 20

).

4. Make sure the light in the safety

indicator does not come on and stay on when the
No. 1 terminal of the 8P connector is grounded and

the ignition switch is turned from OFF to ON (II).

• If the light does not go off, check

for:

an open in the WHT/GRN wire between the
safety indicator and left taillight.
a faulty safety indicator circuit in the gauge
assembly.

• If the light goes off, go to step 5.

5. Make sure the light in the safety indi-

cator comes on and goes off when the No. 7 terminal
of the 8P connector is grounded, the brake pedal is
depressed, and the ignition switch is turned from OFF

to ON (II).

• If the light does not go off, replace

the brake light failure sensor.

• If the light goes off, check for:

poor ground (G701).
an open in the BLK wire.

Main Menu

Table of Contents

'99 - 01 models:

1. First make sure the brake lights come on when the

brake pedal is pressed.
• If all the brake lights come on, go to step 2.
• If one of the brake lights does not come on, check

whether the bulb is blown. If the bulb is OK, go to
step 2.

• If none of the brake lights come on, check the

brake light circuit. 

2. Open the trunk lid, and remove the rear trunk side

trim (se

section 20

).

4. Make sure the light in the safety indi-

cator comes on and goes off when the No. 2 terminal
of the left or right 6P connector is grounded, the brake
pedal is pressed, and the ignition switch is turned
from OFF to ON (II).

• If the light does not go off, replace

the left or right brake light failure sensor.

• If the light goes off, check for:

a poor ground (G701)
an open in the BLK wire.

Wire side of
female terminals

GRN/WHT

BLK

3. Make sure the light in the safety indi-

cator does not come on and stay on when the left
and right 6P connectors are disconnected and the
ignition switch is turned from OFF to engine running.

If the light in the safety indicator

comes on and stays on, check for:

short to ground on the WHT/GRN wire between
the safety indicator and the No. 4 terminal of the

left or right brake light failure sensor,

a faulty safety indicator circuit (printed circuit

board) in the gauge assembly.

• If the light does not come on, go

to step 4.

Main Menu

Table of Contents


Content   ..  614  615  616  617   ..